- An error has occurred, which probably means the feed is down. Try again later.
Archive for the ‘Azure’ Category
Creating a Lab on Windows Azure – Continue
- Create a server on Azure in the Virtual Network
If you have worked on Hyper-V or any other Virtual server environment, this process is pretty simple for you. Here we will create our Virtual Machines. First machine would be our Domain Controller also known as DC. This server manage DNS, AD Users, etc. and normally the 1st and most important server in a company.
- Login to your Azure Subscription Portal site https://manage.windowsazure.com
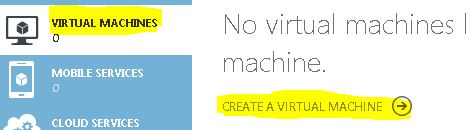
- Select “Virtual Machines” from left menu and select “Create a Virtual Machine”
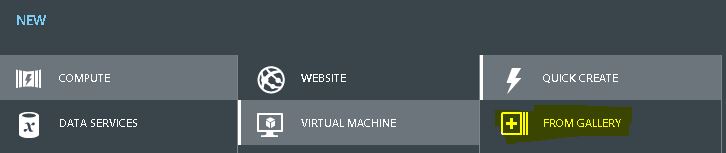
- Under “Virtual Machine” select “From Gallery”
- On the Choose an Image screen select “Windows server 2012 R2” and select Next
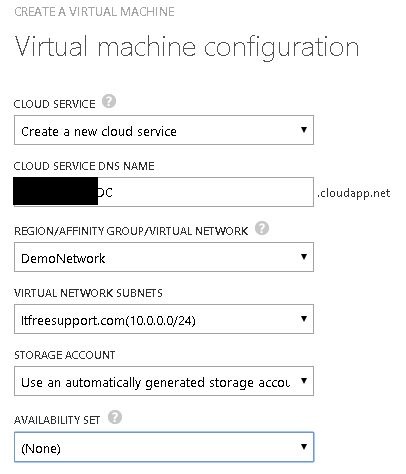
- Type a unique name for the Virtual Machine. Select a username and password which you will never forget.(Selected a Low configuration because I won’t be using it much)

- Now we have the most important step in the process. Select the DEMONETWORK you created in Region/Affinity Group/Virtual Network. Make sure our Virtual network name is selected in Virtual Network Subnet. Click on Next.
- Now Select Finish.
- Once the Machine is created, you will get a Connect button at bottom of screen.
Creating a Lab on Windows Azure – Continue
- Create a Virtual Network in Azure.
Now let’s create a Virtual Network in Azure like we do in our Hyper-V servers. We need this Virtual network so that all the new and old Machine are in same IP range and can communicate with each other. You don’t need to be a Networking expert to do so. Just follow steps mentioned below.
- Login to your Azure Subscription Portal site https://manage.windowsazure.com
- Select “Network” from left hand menu > Select “New” on left bottom corner
- Now in the Menu select “Custom Create”
- Now type the network name and select the data center for that network(note all computers should be in the same datacenter)
![]()
- For now we will keep this DNS server empty (We should have our Domain controller DNS IP here. Our DC is not yet created so we keep it blank). Click on Next
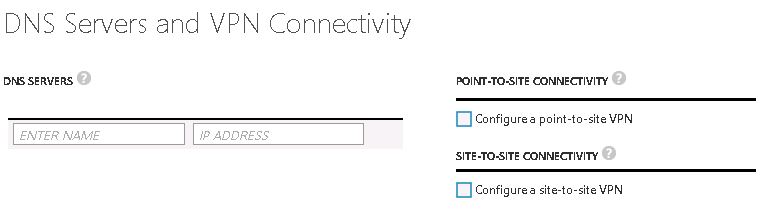
- On “Virtual Network Address Spaces”, provide name of your network and Subnet count (I won’t have more than 256 machines so selected same). Click on “Add Subnet”. Click on Finish
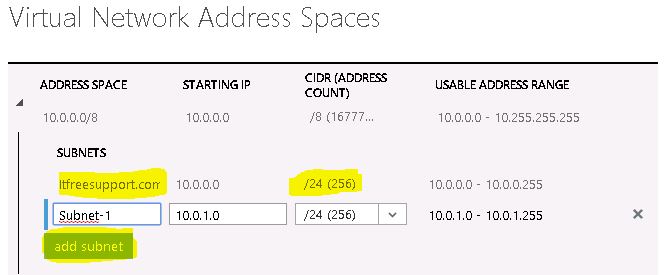
Here we have our Virtual Network created. Note this Network will then be used while creating our Virtual Machine. The very first machine we will create is our Domain controller. Once the domain controller is created we will update it in DNS server records used above.
Creating a Lab on Windows Azure
Recently when I got access to Azure I wanted to create my lab on Azure which took me days to figure out the process. It is similar to what we do on our Hyper V machines but a bit complex in nature because we are working on cloud
We follow the same process on our local machine to create a Lab environment but normally we are short of resources like Disk Space, RAM, CPU which is the taken care by Azure. Biggest dis-advantage for our local system environment is when you buy these resources, you don’t use it all the time which we have already paid for. In Azure we pay only when you use it.
Today we will understand how we can create our own Lab environment on Windows Azure. The whole process is lengthy to explain so I have divided it in 8 different parts listed below. Hope you will enjoy learning it.
- Connect to your Azure Subscription using PowerShell.
- Create a Virtual Network in Azure
- Create a server on Azure in the Virtual Network
- Create a new domain
- Update Domain setting on Virtual Network and bind it to Private IP on DC
- When creating a new server it should be part of this domain
- Install SQL, SharePoint. labs as part of this domain
- Troubleshoot common issue during this process
- Connect to your Azure Subscription using PowerShell
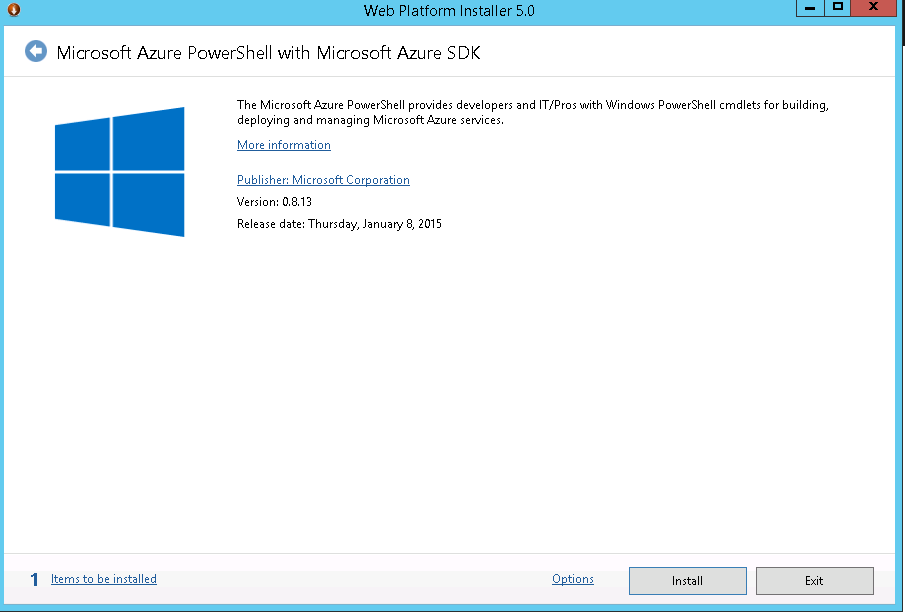
You cannot create your lab with just Azure User Interface. It’s said that “Well planned is half done”. So let’s plan and prepare our self with Azure PowerShell. Go to below link and download Microsoft Web Platform installer.
- You can use it download and install Azure PowerShell

- Once the PowerShell is downloaded and installed, we will get below message
- Now we will download the Azure Setting file to connect to our Azure subscription. In the Azure PowerShell, type below command.
Get-AzurePublishSettingsFile
![]()
- Once you login to your Azure website, you will get a file named “Visual Studio Premium with MSDN-date-credentials.publishsettings”.
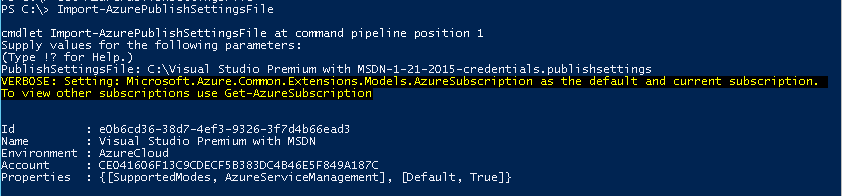
Note: File name may change based on your subscription. Save it to a secure location. This file contains secure credentials and additional information about subscriptions that you can use in your Azure environment.
- Now Import the Azure Settings file to PowerShell. Run “Import-AzurePublishSettingsFile” and then type path of the file we just downloaded as shown in below image.
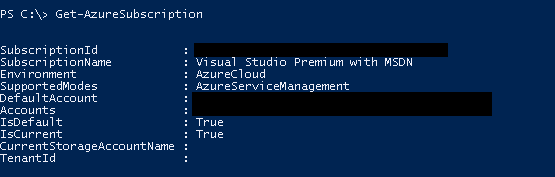
- To check Subscription details run below command
Get-AzureSubscription
Microsoft Azure SQL VM not able to access
Issue :
When you logon to some server using Domain account, you cannot access the pre-installed software like SQL server.
Solution:
When the VM is created, it is created account you specify using Azure VM creation screen and then added to domain. So by default other account don’t have access to the application installed during VM creation. You have to 1st Logon to the server using Azure VM account give appropriate permission to domain account and then use it.
Create a Active Directory Forest on a Windows Azure VM
- Create a new domain
Now let’s configure this server to be a Domain Controller. As discussed earlier Domain controller manage DNS, AD Users, etc. and are normally the 1st and most important server in a company.
- Login to your Azure Subscription Portal site https://manage.windowsazure.com
- Select Virtual Machine from left Menu
- Select the Virtual Machine we just created and click on Connect at bottom
- Now RDP to the Virtual Machine we created and click on Server Manager

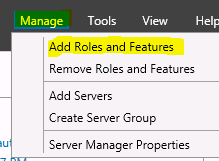
- Select Manager > Add Roles and Features
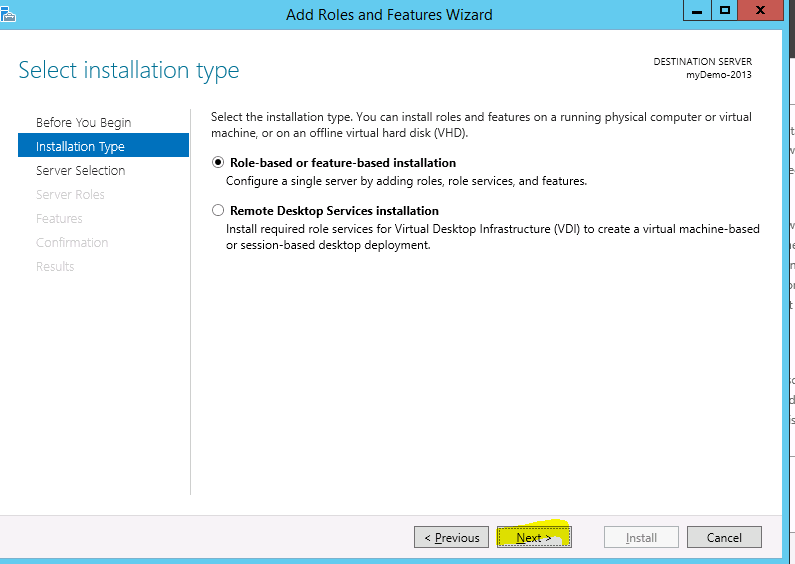
- Select “Next” on Installation Type screen
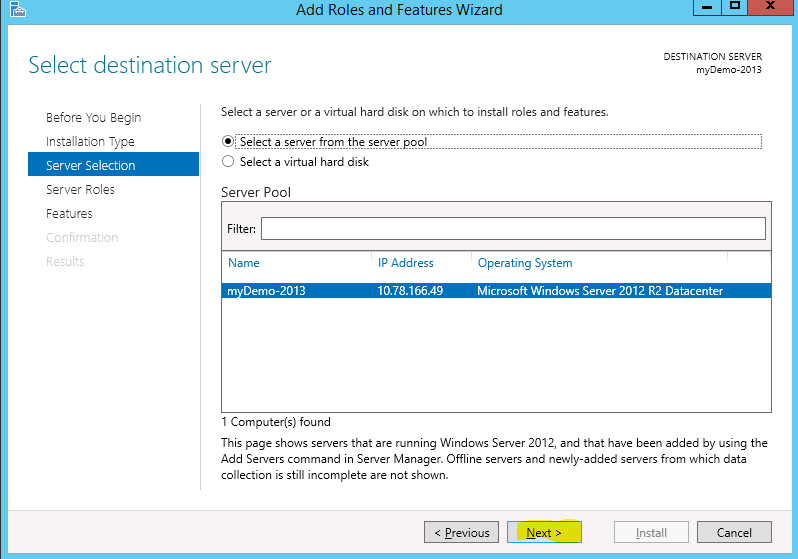
- Select “Next” on Destination Server screen
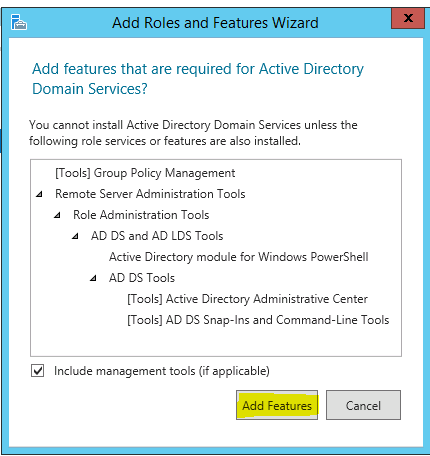
- Check Box “Active Directory Domain servers”
![]()
- Click on “Add Feature” on pop-up screen
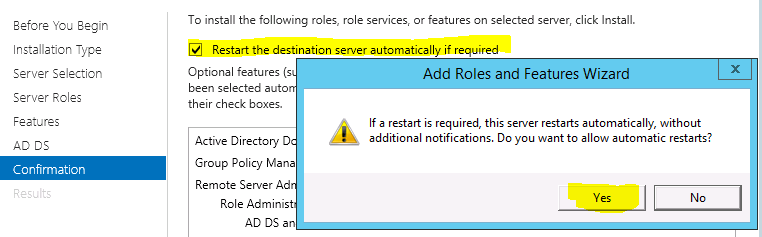
- Select the check box “Restart the destination server if required” > Click OK
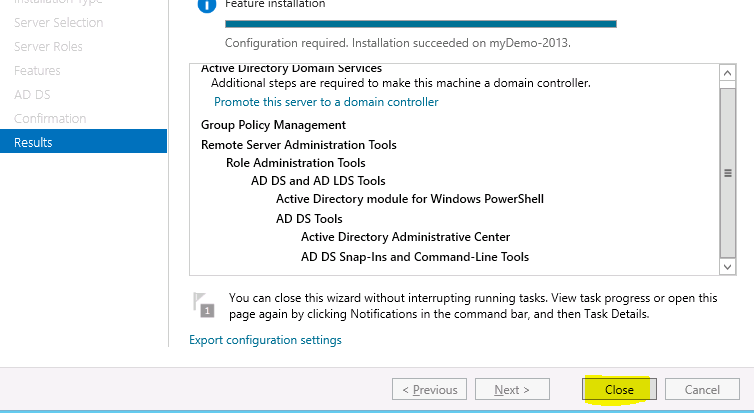
- Once it is installed, Click on Close
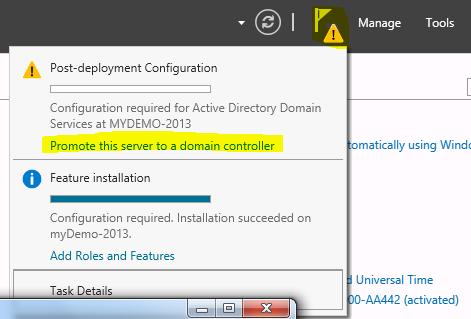
- Open the Server Manager again, Click on Flag at top and select “Promote this server to a Domain Controller”
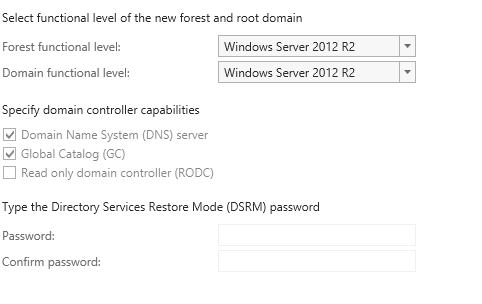
- Select “Add a New forest”, type domain name
- Type the DSRM password and click “Next” (Note: this is required when you try to recover your active directory)
- Now you will have to select your domain name. For example. Demo.com
- The NetBIOS Name screen will remove .com and you will see only demo.
- Select the Default location of installation and click “Next”
- Click on “Install”
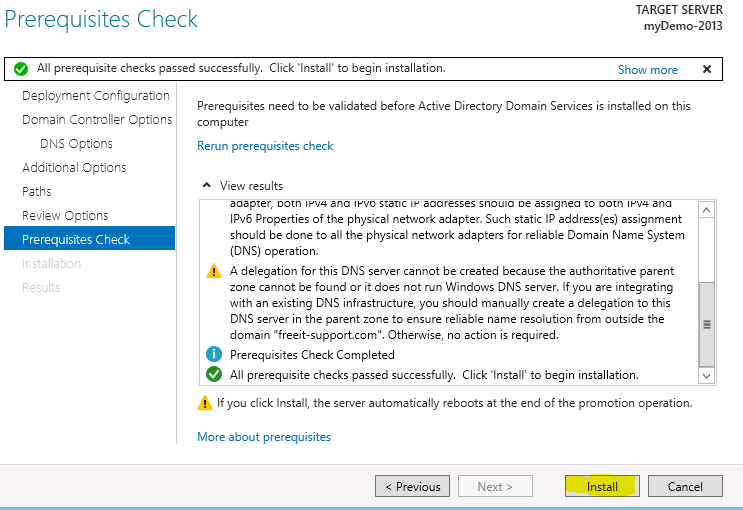
- Once the Computer is restarted, your Domain Controller would be ready.
Note: From now on when you logon to server you need use your domain name along with username we just created to authenticate to server. Example: demo\user1
Azure Powershell Error No current subscription has been designated. Use Select-AzureSubscription – Current to set the current subscription
Hello Everyone, Today i was doing some testing and configuration on my Windows Azure server and got a weird error message as shown below:
Test-AzureStaticVNetIP : No current subscription has been designated. Use Select-AzureSubscription –
Current <subscriptionName> to set the current subscription.
At line:1 char:1
+ Test-AzureStaticVNetIP –VNetName test –IPAddress 11.0.0.1
+ ~~~~~~~~~~~~~~~~~~~~~~~~~~~~~~~~~~~~~~~~~~~~~~~~~~~~~~~~~~~~~~~~~~~
+ CategoryInfo : NotSpecified: (:) [Test-AzureStaticVNetIP], ApplicationException
+ FullyQualifiedErrorId :
System.ApplicationException,Microsoft.WindowsAzure.Commands.ServiceManagement.IaaS.TestA
zureStaticVNetIPCommand
Did some research and found that we need to connect to Azure subscription and then run these command. To do so we need to download and install Azure Powershell. Copy paste below url on your browser and install the Web Platform Installer. This will give you option to download Azure Powershell.
http://go.microsoft.com/fwlink/p/?linkid=320376&clcid=0x409
Once the Powershell is downloaded and installed, we will
Now we will download the Azure Setting file to connect to the azure server. In the Azure Powershell, type below command.
Get-AzurePublishSettingsFile
![]()
Once you login to your Azure website, you will get a file named “Visual Studio Premium with MSDN-date-credentials.publishsettings”. Save it to a secure location. This file contains secure credentials and additional information about subscriptions that you can use in your development environment.
Now Import the Azure Settings file to Powershell. Run “Import-AzurePublisingSettingsFile” and then type path of the file we just downloaded as shown in below image
To check Subscription details run below command
Get-AzureSubscription
Now the command completed successfully.
Connect to your Azure Subscription using Powershell
Today we will understand we can connect to our Azure Subscription using Powershell and run some basic command on it.
To connect to Azure subscription we need to download and install Azure Powershell. Copy paste below url on your browser and install the Web Platform Installer. This will give you option to download Azure Powershell.
http://go.microsoft.com/fwlink/p/?linkid=320376&clcid=0x409
Once the Powershell is downloaded and installed, we will
Now we will download the Azure Setting file to connect to the azure server. In the Azure Powershell, type below command.
Get-AzurePublishSettingsFile
![]()
Once you login to your Azure website, you will get a file named “Visual Studio Premium with MSDN-date-credentials.publishsettings”. Save it to a secure location. This file contains secure credentials and additional information about subscriptions that you can use in your development environment.
Now Import the Azure Settings file to Powershell. Run “Import-AzurePublisingSettingsFile” and then type path of the file we just downloaded as shown in below image
To check Subsctiption details run below command
Get-AzureSubscription