- An error has occurred, which probably means the feed is down. Try again later.
Download and Install Cumulative Update February 2015 for SharePoint 2013
Microsoft has released another SharePoint 2013 Cumulative Update in February 2015. Let me help you know how we can install February 2015 on SharePoint 2013 server.
Its per-requisites is either SharePoint 2013 SP1 or SharePoint 2013 March PU.
Now the most important part is how to install SharePoint server February 2014 Cumulative Update.
Previous releases of the SharePoint Server 2013 cumulative update included both the executable and the .CAB file in the same self-extracting executable download. Because of the file size, the SharePoint Server 2013 package has been divided into several separate downloads. One contains the executable file, while the others contain the CAB file. All are necessary and must be placed in the same folder to successfully install the update. All are available by clicking the same Hotfix Download Available link in the KB article for the release.
Here is link for all the updates:
Sharepoint Foundation 2013 has only 1 setup file ubersts2013-kb2920801-fullfile-x64-glb.exe
Download SharePoint Foundation 2013 February 2015 CU
Now here the twist starts, SharePoint 2013 update has 3 setup files ubersrv_1.cab, ubersrv_2.cab, ubersrv2013-kb2920804-fullfile-x64-glb.exe. You can download this from:
Download SharePoint Server 2013 February 2015 CU
Project Server 2013 update has 3 setup files ubersrvprj_1.cab, ubersrvprj_2.cab, ubersrvprj2013-kb2920796-fullfile-x64-glb.exe. You can download this from below
Download Project Server 2013 February 2015 CU
Office Web App server 2013 has only 1 setup filewacserver2013-kb2956101-fullfile-x64-glb.exe.
Download Office Web App 2013 February 2015 CU
The KB articles for September CU are available at the following locations:
- KB 2920801 – SharePoint Foundation 2013 February 2015 CU
- KB 2920804 – SharePoint Server 2013 February 2015 CU
- KB 2920796 – SharePoint Server 2013 with Project Server February 2015 CU
- KB 2956101 – Office Web App Server 2013 February 2015 CU
Once the updated the downloaded you need to extract all the updates in 1 folder as shown below:
- Now when you run the main setup file exe file, you will be able to extract and install the update.Do not try to extract cab file it will be extracted by exe.
- Once you install these updates, you need to reboot the server
- Now system needs to be restarted.
- Follow the same steps on all SharePoint servers in farm.
- SharePoint PSconfig wizard on all servers.
- Finally it is installed
Note : SharePoint Server 2013 update contains the SharePoint Foundation update.Where as SharePoint Server 2013 with Project Server update contains Project Server update, SharePoint Server update and SharePoint Foundation update.
For more information:
http://blogs.technet.com/b/stefan_gossner/archive/2015/02/10/february-2015-cu-for-sharepoint-2013-has-been-released.aspx
Cumulative Update February 2015 for SharePoint 2010
Microsoft has released SharePoint 2010 Cumulative Update in February 2015.
Its per-requisites is Sharepoint 2010 SP2. Rather I would recommend you to install September 2014 CU before installing February 2015 CU.
Note: This CU does contains all SharePoint 2010 fixes released after Service pack 2.
All are available by clicking the same Hotfix Download Available link in the KB article for the release.
Here is link for all the updates:
For SharePoint Foundation 2010 you need setup wssloc2010-kb2910904-fullfile-x64-glb.exe
Download SharePoint Foundation 2010 February 2015 CU
For SharePoint server 2010 you need setup ubersrv2010-kb2899558-fullfile-x64-glb.exe
Download SharePoint Server 2010 February 2015 CU
For Project server 2010 you need setup ubersrvprj2010-kb2899557-fullfile-x64-glb.exe
Download Project Server 2010 February 2015 CU
The KB articles for December CU are available at the following locations:
- SharePoint Foundation 2010: KB 2910904
- SharePoint Server 2010: KB 2899558
- Project Server 2010: KB 2899557
Once the updated are downloaded, you need run the main setup file ubersrv.exe file, you will be able to extract and install the update.
Once updates are installed, run SharePoint Products and configuration wizard to seal the update on the server.
Follow the same steps on all SharePoint servers in farm. Now run SharePoint PSconfig wizard on all servers.
For more information:
Congratulations to speakers of Ignite 2015
Hi All,
Lets congratulate all the speakers who made their space in Ignite 2015 hosted by Microsoft at Chicago
http://ignite.microsoft.com/speakers
Below are few highlight speaker I know about.
Amit Bansal : Amit Bansal is a Microsoft Regional Director in India. With his 14 years IT experience he is a SQL expert and a key to SQL maestro. He has been a Speaker in lot of session/conference like TechED, etc conducted by Microsoft.
Manas Biswas : Manas Biswas is working in Microsoft India office at SharePoint Escalation services team. I 1st met in in Wipro when I was working for SharePoint support. Manas has been a speaker in lot of events like SharePoint conference, Office 365 summit, etc.
Vivek Sharma : Vivek is a Director of Microsoft Office 365 team at Redmond. I met Vivek in the recent MVP summit in Redmond where he shared lot of insight on Office 365. Vivek has been a speaker in lot of Office 365 conference around the world.
Hope to see you all at Microsoft Ignite and once again congratulation to all the speakers.
Release date of SharePoint Beta 2016
Hi All,
Just a head-up on SharePoint 2016 release details. This dates are not yet confirmed but good for initial guidance.
SharePoint Beta 5th June 2015
Some Highlights for the SharePoint 2016:
The next version of SharePoint is not the last version of SharePoint server that Microsoft will SHIP. So thats a very good news for the SharePoint On-premises community.
You can still use Infopath Forms 2013 with SharePoint 2016. Forms for SharePoint library seems dropped from the list.
More integration features with Office 2016.
Delve and yammer still does not have much of clarity on integration with SharePoint 2016.
Lot more site and list templates to use from.
Hybrid mode of SharePoint is also given some extra consideration.
Improved Business Intelligence features.
Hope this head-up is helpful for you.
Creating a Lab on Windows Azure – Install SQL, SharePoint. etc. labs as part of this domain
- Install SQL, SharePoint. etc. labs as part of this domain
Once we are confirmed using script we are able to add new Virtual Machine to domain, we can use the ready to use SharePoint, SQL, etc. VM’s as part of our Lab environment. Let’s see an example of SharePoint server.
- Login to your Azure Subscription Portal site https://manage.windowsazure.com
- Select “Virtual Machines” from left menu and select “Create a Virtual Machine”
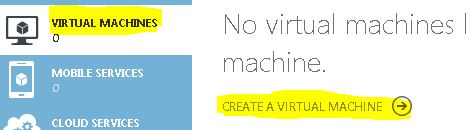
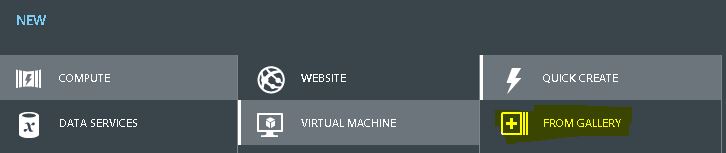
- Under “Virtual Machine” select “From Gallery”
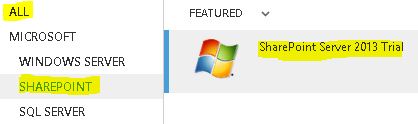
- On the Choose an Image screen select SharePoint server 2013 Trial. This trial works for 180 days.
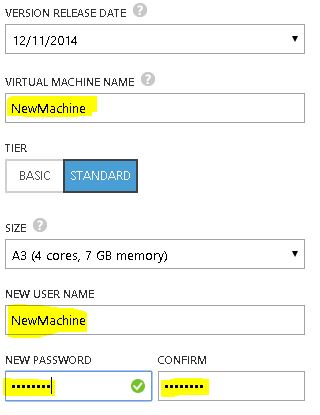
- Type the Machines necessary details like Hardware configuration, Machine name, username and password
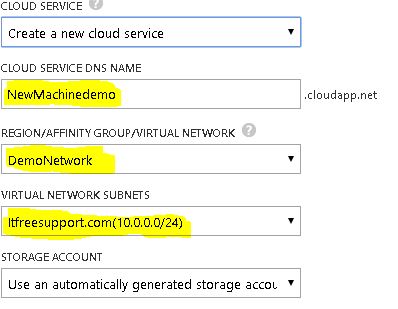
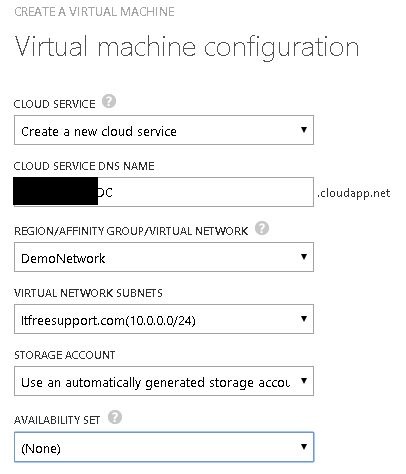
- Now we have an important step in the process. Select the DEMONETWORK you created in Region/Affinity Group/Virtual Network. Make sure our Virtual network name is selected in Virtual Network Subnet. Click on Next
- Now comes the most important step, we need to select Custom Script on this page and select the Join.ps1 script we just created. Click Finish

- Now you can see that even SharePoint server is ready within few minutes
- Advantage here is that you have a single credential stored on Active directory using which you manage all the Virtual Machine and work on your lab.
- Below you can see that I have created SQL server, SharePoint server and started using them in just couple of minutes.
Creating a Lab on Windows Azure – When creating a new server it should be part of this domain
We are nearly done with our Domain related activities. Now we need to make sure that all the Virtual Machines we create are part of same Active Directory. This will help us to manage the server and users in domain. In number of Demos we need a domain (AD), so we have met the most important pre-requisites.
- You need to copy below script into a notepad and save it as join.PS1
///// SCRIPT START HERE ////
$domainName = “type domain name here e.g. demo.com. It should be in quotes”
$username = “type domain\username e.g. demo\user1. It should be in quotes”
$password = “type password of above user e.g. 213@jjj. It should be in quotes”
$securePass = ConvertTo-SecureString $password -AsPlainText -Force
$cred = New-Object System.Management.Automation.PSCredential($username, $securePass)
Add-Computer -DomainName $domainName -Credential $cred -Restart –Force
////// SCRIPT END HERE ////
- Login to your Azure Subscription Portal site https://manage.windowsazure.com
- Select “Virtual Machines” from left menu and select “Create a Virtual Machine”
- Under “Virtual Machine” select “From Gallery”
- On the Choose an Image screen select “Windows server 2012 R2” and select Next
- Type the Machines necessary details like Hardware configuration, Machine name, username and password

- Now we have an important step in the process. Select the DEMONETWORK you created in Region/Affinity Group/Virtual Network. Make sure our Virtual network name is selected in Virtual Network Subnet. Click on Next
- Now comes the most important step, we need to select Custom Script on this page and select the Join.ps1 script we just created. Click Finish
- You will observer that your machine will reboot during the initialization process.
- Now when the machine is created, Open Server Manager and you will observe it is already part of Demo domain. On the domain controller in “Active Directory users and computers” you should be able to see the newly added
Note: In some rare scenario, the new computer may not get added to the domain. In that case, please run above PowerShell command line by line and the computer would be added to domain.
Creating a Lab on Windows Azure – Continue
- Update Domain setting on Virtual Network and bind it to Private IP on DC
So far we have created a Virtual Network and a Domain controller in that Virtual network. I hope this process was simple enough for you to follow. It is very important that Domain Controller and DNS have a static IP address so that all other machines know whom to contact to authenticate and resolve computer name. Now we need to make sure that our domain controller has a static IP address and then assign it to DNS on Virtual Network. To do so we will follow below steps:
- Login to your Azure Subscription Portal site https://manage.windowsazure.com
- Select Virtual Machine from left Menu
- Select the Virtual Machine we just created and click on Connect at bottom
- Now RDP to the Virtual Machine we created as a Domain Controller
- Open Windows PowerShell and run command “IPConfig”. Make a note of IP address
- Click on Start and Open DNS manager. Expand Computer name > Forward Lookup Zone > Demo.com > Make sure Ipconfig and DNS has same IP address.
![]()
- Make sure you are connected to Azure PowerShell account by following steps we discussed in section “Connect to your Azure Subscription using PowerShell”
- Run command “Get-AzureVM”. You should be able to see your Azure Virtual Machine name, make a note of same
![]()
- Run below command in Azure PowerShell
Get-AzureVM -ServiceName “Service name from Get-AzureVM command” -Name “name from Get-AzureVM command”| Set-AzureStaticVNetIP -IPAddress “10.0.0.4” | Update-AzureVM
- Now the system will get restarted and a Static IP will be assigned to same. We need to update the same IP in the Virtual Network we created in Azure.
- Login to your Azure Subscription Portal site https://manage.windowsazure.com
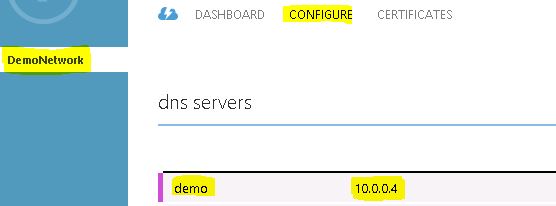
- Select “Network” from left pane > Select the “Demo Network” we created > Click “Configure” on top.
- Update the IP Address of Domain Controller and Domain name. E.g. demo 10.0.0.4. Click on Save at bottom to save these changes
Creating a Lab on Windows Azure – Continue
- Create a server on Azure in the Virtual Network
If you have worked on Hyper-V or any other Virtual server environment, this process is pretty simple for you. Here we will create our Virtual Machines. First machine would be our Domain Controller also known as DC. This server manage DNS, AD Users, etc. and normally the 1st and most important server in a company.
- Login to your Azure Subscription Portal site https://manage.windowsazure.com
- Select “Virtual Machines” from left menu and select “Create a Virtual Machine”
- Under “Virtual Machine” select “From Gallery”
- On the Choose an Image screen select “Windows server 2012 R2” and select Next
- Type a unique name for the Virtual Machine. Select a username and password which you will never forget.(Selected a Low configuration because I won’t be using it much)
- Now we have the most important step in the process. Select the DEMONETWORK you created in Region/Affinity Group/Virtual Network. Make sure our Virtual network name is selected in Virtual Network Subnet. Click on Next.
- Now Select Finish.
- Once the Machine is created, you will get a Connect button at bottom of screen.
Creating a Lab on Windows Azure – Continue
- Create a Virtual Network in Azure.
Now let’s create a Virtual Network in Azure like we do in our Hyper-V servers. We need this Virtual network so that all the new and old Machine are in same IP range and can communicate with each other. You don’t need to be a Networking expert to do so. Just follow steps mentioned below.
- Login to your Azure Subscription Portal site https://manage.windowsazure.com
- Select “Network” from left hand menu > Select “New” on left bottom corner
- Now in the Menu select “Custom Create”
- Now type the network name and select the data center for that network(note all computers should be in the same datacenter)
![]()
- For now we will keep this DNS server empty (We should have our Domain controller DNS IP here. Our DC is not yet created so we keep it blank). Click on Next
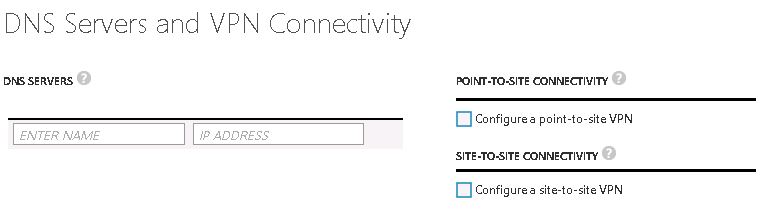
- On “Virtual Network Address Spaces”, provide name of your network and Subnet count (I won’t have more than 256 machines so selected same). Click on “Add Subnet”. Click on Finish
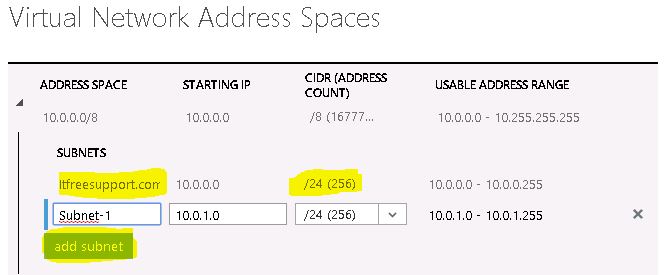
Here we have our Virtual Network created. Note this Network will then be used while creating our Virtual Machine. The very first machine we will create is our Domain controller. Once the domain controller is created we will update it in DNS server records used above.
Creating a Lab on Windows Azure
Recently when I got access to Azure I wanted to create my lab on Azure which took me days to figure out the process. It is similar to what we do on our Hyper V machines but a bit complex in nature because we are working on cloud
We follow the same process on our local machine to create a Lab environment but normally we are short of resources like Disk Space, RAM, CPU which is the taken care by Azure. Biggest dis-advantage for our local system environment is when you buy these resources, you don’t use it all the time which we have already paid for. In Azure we pay only when you use it.
Today we will understand how we can create our own Lab environment on Windows Azure. The whole process is lengthy to explain so I have divided it in 8 different parts listed below. Hope you will enjoy learning it.
- Connect to your Azure Subscription using PowerShell.
- Create a Virtual Network in Azure
- Create a server on Azure in the Virtual Network
- Create a new domain
- Update Domain setting on Virtual Network and bind it to Private IP on DC
- When creating a new server it should be part of this domain
- Install SQL, SharePoint. labs as part of this domain
- Troubleshoot common issue during this process
- Connect to your Azure Subscription using PowerShell
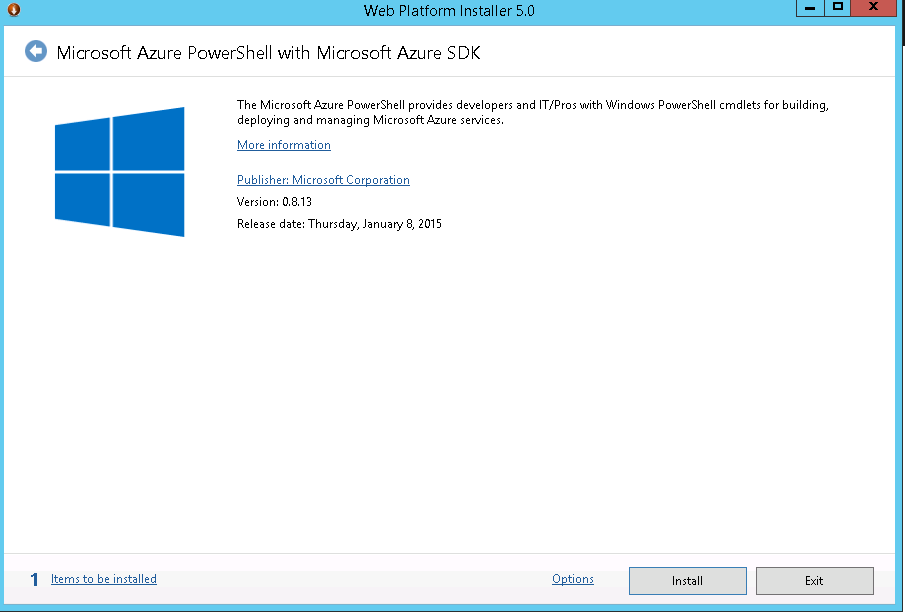
You cannot create your lab with just Azure User Interface. It’s said that “Well planned is half done”. So let’s plan and prepare our self with Azure PowerShell. Go to below link and download Microsoft Web Platform installer.
- You can use it download and install Azure PowerShell

- Once the PowerShell is downloaded and installed, we will get below message
- Now we will download the Azure Setting file to connect to our Azure subscription. In the Azure PowerShell, type below command.
Get-AzurePublishSettingsFile
![]()
- Once you login to your Azure website, you will get a file named “Visual Studio Premium with MSDN-date-credentials.publishsettings”.
Note: File name may change based on your subscription. Save it to a secure location. This file contains secure credentials and additional information about subscriptions that you can use in your Azure environment.
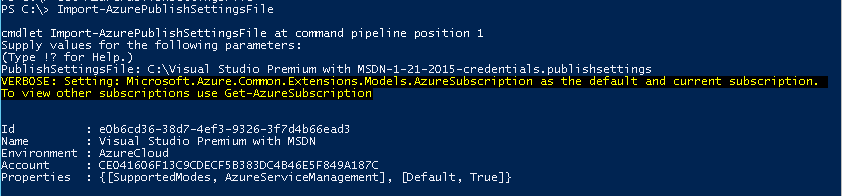
- Now Import the Azure Settings file to PowerShell. Run “Import-AzurePublishSettingsFile” and then type path of the file we just downloaded as shown in below image.
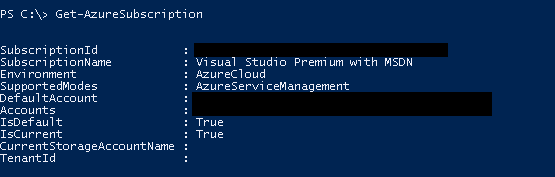
- To check Subscription details run below command
Get-AzureSubscription