Posts Tagged ‘2013’
SharePoint site down “An application error occurred on the server” web.config error
Hi All,
Recently I got below error message which you might have seen. This is a very common and generic error message which can confuse you a lot. You may face this issue in all versions of SharePoint like SharePoint 2007, 2010, 2013 or SharePoint 2016. First let us look at the error message
#################### Error Start #############
Runtime Error Description: An application error occurred on the server. The current custom error settings for this application prevent the details of the application error from being viewed remotely (for security reasons). It could, however, be viewed by browsers running on the local server machine.
Details: To enable the details of this specific error message to be view able on remote machines, please create a <customErrors> tag within a “web.config” configuration file located in the root directory of the current web application. This <customErrors> tag should then have its “mode” attribute set to “Off”.
<!– Web.Config Configuration File –>
<configuration>
<system.web>
<customErrors mode=”Off”/>
</system.web>
</configuration>
Notes: The current error page you are seeing can be replaced by a custom error page by modifying the “defaultRedirect” attribute of the application’s <customErrors> configuration tag to point to a custom error page URL.
<!– Web.Config Configuration File –>
<configuration>
<system.web>
<customErrors mode=”RemoteOnly” defaultRedirect=”mycustompage.htm”/>
</system.web>
</configuration>
#################### Error End #############
We can see that error message says something about web.config file. Here is what we need to do.
1. Open IIS management console
2. Start > RUN > Inetmgr > Expand server
3. Expand the site you are getting this error on > right click > explore
Here you should be able to see a web.config file. If this web.config was recently modified by someone, please check with your team if anyone has recently modified this file, tried to deployed a farm\web application solution or run psconfig wizard on any of the SharePoint server in farm.
Note: If you have multiple SharePoint server, try the same on all the servers
In most cases, it is a web.config change done by someone from within the team which cause this issue.
If no one has done any changes:
1. Make a copy of this web.config file and open the original file. Search for “callstack” and set the value to True, again search for customerrors set it to OFF.
2. Rename the recent web.config to web.config.old with today’s date and revert the most recent web.config(date and time) file to web.config
3. Install Examdiff tool on a computer and copy the most recent web.config file and new web.config to identify the changes.
These steps will help you identify the actual cause of this error.
Myth Buster for SharePoint SQL RBS
Hi All,
In this article I would try to share my experience about SharePoint on SQL RBS. This article may help you decide if you should use SQL RBS with SharePoint or any other product.
This is my personal opinion about SQL RBS with SharePoint. I would suggest you to cross check below furnished details before taking final decision. Microsoft keeps enhancing its product so some of these may be fixed\resolved\changed.
Let’s first discuss what is SQL RBS? Normally when you upload a document, image, video, audio, etc on your SQL server it is stored in MDF (Master database file) of your SQL content database. As per my past experience when you upload anything to a content management system, you would revisit only 20 % of data uploaded, rest 80 % of data is never visited but used for record only purpose. IT pro’s suggest that you should keep your SQL content database on RAID 10 hard disk or SAN which is pretty expensive.
To resolve this issue Microsoft came out with SQL RBS which allows you to store your Files\BLOB outside (File system) of SQL database. This means you can use a Raid 0 drive to store BLOB files (image, video, document, etc). RBS is intended to lower storage costs by allowing you to store large read-intensive BLOBs on less expensive drives.
1st Myth of SQL RBS: Additional Storage for Content database.
This is the biggest myth about SQL RBS. Microsoft Suggest that your content database should be below 200 GB. Now days when we have a USB stick with 100 GB, a Content management server restricted to 200 GB is not a good deal. To overcome this issue few IT admin plan to use SQL RBS because RBS stores files outside of SQL server hence decrease the size of content database.
Reality: RBS does not increase the storage limits of content databases. All limitations still apply to RBS-enabled content databases. If you are using Remote BLOB Storage (RBS), the total volume of remote BLOB storage and metadata in the content database must not exceed the 200GB limit.
2nd Myth of SQL RBS: Files stored on FILESYSTEM through RBS cannot be accessed directly.
IT Pros and lot of other articles says that we cannot open the file directly from BLOB FILESYSTEM. We have to go through SQL database in order to read these files.
Reality: I was able to access FILESYSTEM where the BLOB files were stored and was able to open my txt, bmp, jpg, etc files. SharePoint is known for its Item level Security. So far SharePoint security was never compromised and access is only available on need to know basis. If any users who has access to FILESYSTEM can open any file stored in SharePoint without having access on SharePoint is a security issue. Also encryption is not supported on BLOBs, even if Transparent Data Encryption is enabled.
3rd Myth of SQL RBS: Better performance I hear a lot of IT PRO who comment that they would get better performance if FILES\BLOBS are stores outside of SQL Server.
Reality: I would accept this when we are using SharePoint to store Hugh amount of data files (70-80 % of BLOB). When I asked these IT Pros how much data is stored on dbo.docs, dbo.AllDocStreams, dbo.DocStreams, dbo.AllDocVersions, dbo.alldocs, etc table, they are not aware of same or they don’t bother. When you offload 70-80 % of data from your MDF file and store it FILESYSTEM you may feel better performance. If our content database stores BLOB files not more then 30-35 % then it would not make sense to go with RBS. Let me explain you why I say that, when you configure RBS you create number of additional tables on your content database. This means when we upload BLOB to SharePoint it will execute additional query to store data. Here SQL will first import image files, and then it may split the file based on size of file and then store it to FILESYSTEM. Again this process is reversed when we try to open or query the BLOB file. This will increase disk IO, RAM and processing power. Now if consumption of my resources is increased, how can I expect better performance? RBS does not support using data compression but data is compressed when uploaded to SQL MDF file. Microsoft says “Although using RBS with files larger than 1 MB can improve I/O and processor performance, using RBS with files smaller than 256 KB might decrease overall performance. Storing the BLOBs inline in the content database is more efficient with smaller files”
4th Myth of SQL RBS: Ease in management
A lot of IT Pro’s also comment that it is easy to manage smaller SQL databases, Better Technology, Ease in configuration, etc.
Reality: Why you want to take an additional Load of configuration anything extra on SQL. If any feature is available does not mean you should use it. Implementation of these features depends on its pros\cons and specific requirement of the feature. Also when you backup the database, it will backup all the files from FILESYSTEM along with SQL MDF\LDF files. Sizes of these databases backup does not decreases but it increase because RBS does not perform any compression. If you plan High availability through Mirroring or Log shipping, you need to follow additional steps to configure the same.
That’s it from my side. Feel free to comment or connect with me if you feel any of the above information is incorrect.
Reference:
https://technet.microsoft.com/en-us/library/cc262787.aspx
https://technet.microsoft.com/en-us/library/ff628583.aspx
Configure Office Web App 2013 Farm with SharePoint 2013 Farm
Hi Friends,
Today we will discuss on how to configure Multi Server Office Web Apps farm with a SharePoint farm. Also the specialty of this OWA configuration is that it can work inside and outside of firewall. Normally OWA farms are setup HTTP inside the firewall network(Internal network) and HTTPS outside the network(External world) but using this configuration we will configure HTTPS for both inside and outside network. This will not only decrease additional overhead and configuration but also is recommended by Microsoft to use HTTPS for production environment.
We need to meet below pre-requisites before we proceed further:
1. SharePoint farm configured and ready to use
2. Two or more Office Web Apps servers with setup files
3. One certificate for Office Web App
4. If you are using Windows server 2012 R2 then you would need to install latest update for Office Web Apps
5. FQDN name for your Office web app farm e.g.(owa.domain.com) and its DNS entry with Round Robin(You can also configure Windows NLB or a Load Balancer entry for same)
Installation of Office Web App is very simple, You just need to download the installable and execute it on all OWA servers.
Install Office Web apps on all Office Web Apps servers. If you are using Office Web App on Windows Server 2012 R2, you should install latest update for Office Web Apps. You would need an Office Web app certificate imported to IIS
Now Let’s configure Office Web App, Open Windows PowerShell and execute below command
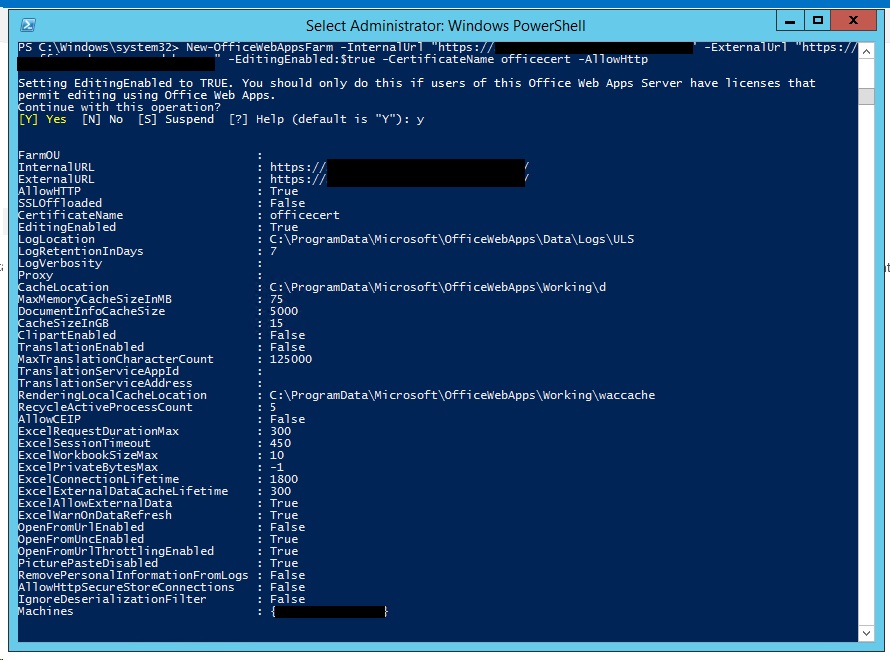
Once the Office Web App farm is configured, open IIS and make sure SSL binding for site HTTP80 has proper certificate attached.
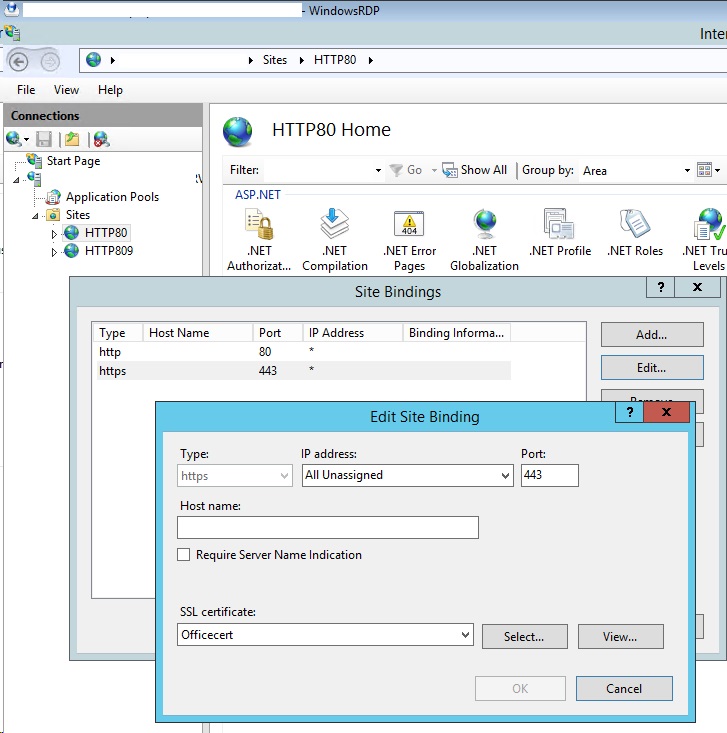
From IIS binding select the certificate and export the .cer file.
You need to import it to central admin manage trust.
To Attach this Office web app farm to SharePoint farm, you need to create a WOPI connection. Open SharePoint PowerShell on SharePoint server and execute below command:
New-SPWOPIBinding -ServerName “officewebapp.domain.com”
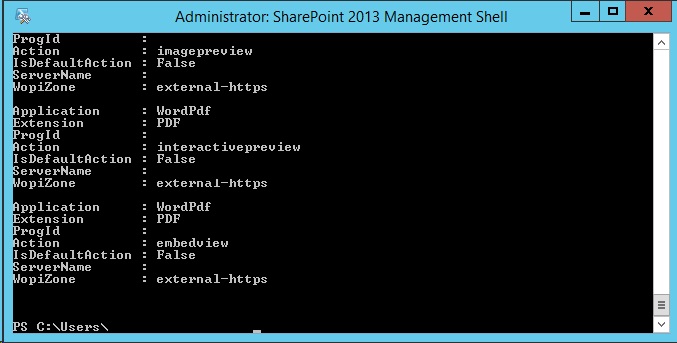
Set Wopi zone
![]()
Now if you want to add other Office Web App Server to OWA farm, you need to execute below command on existing OWA server
new-officewebappsmachine -machinetojoin “owa2server.domain.com”
![]()
Hope this will help you
Configure Workflow Manager 1.0 with SharePoint Server 2013/2016/2019
Hi Friends,
Today we will discuss on how to configure Multi Server Workflow farm with SharePoint farm. Just of your information, you need to access Workflow farm only from WFE and Application servers. This means just like your database server, even workflow servers are not exposed to end users.
We need to meet below pre-requisites before we proceed further:
A. SharePoint farm configured and ready to use
B. Two or more Workflow servers with setup files
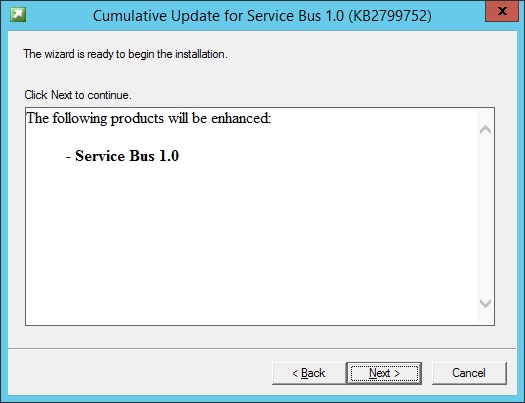
C. If you are using Windows server 2012 R2 then you would need update KB2799752(Service bus hotfix) and KB2799754(Workflow manager hotfix)
D. FQDN name for your workflow farm e.g.(Workflow.domain.com) and its DNS entry with Round Robin(You can also configure Windows NLB or a Load Balancer entry for same)
- Let’s get started with installation of Workflow Manager 1.0 on Workflow servers. We need installable as shown below
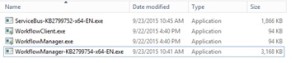
-
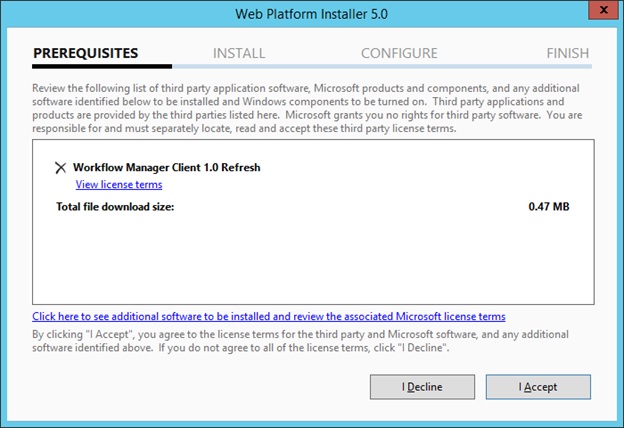
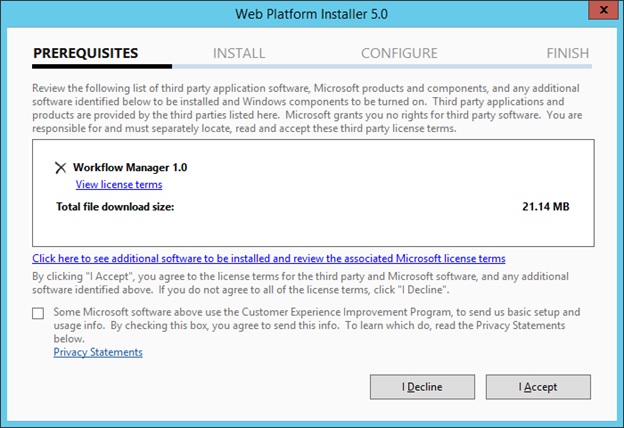
When you will try to install the workflow.exe file you will be asked to download and install WebPlatformInstaller.exe. Now all the updates and most components are installed through WebPlatforminstaller.

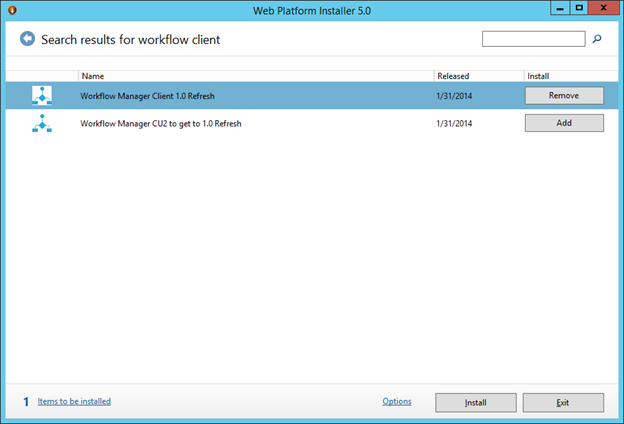
- Once the WebPlatforminstaller is installed, you need to search for Workflow manager and Workflow manager client and install the same.


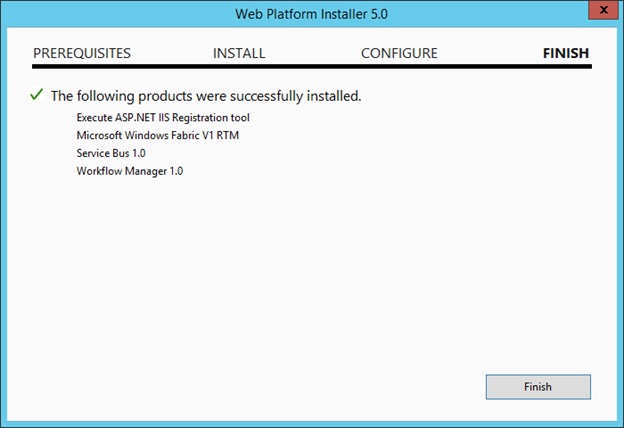
- Once Workflow Manager and client is installed, I would suggest you to install the updates as well.


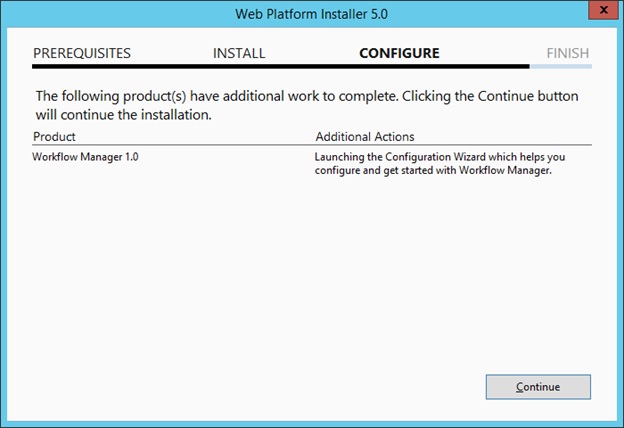
- Now let’s configure Workflow Server farm. This is very important so please follow steps carefully.
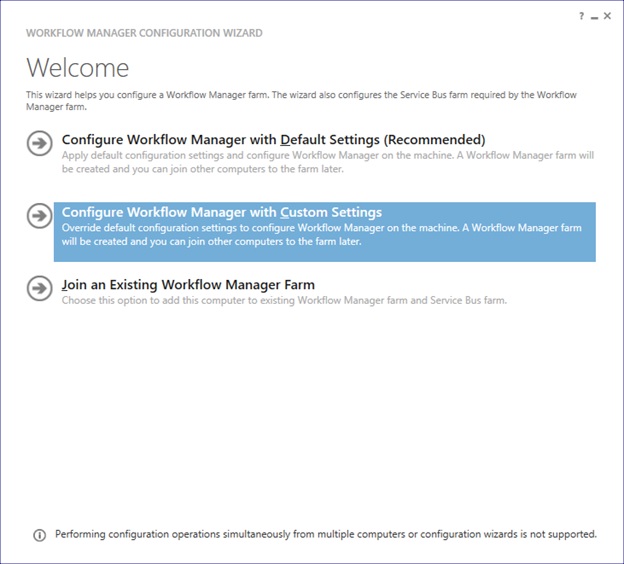
- Lets execute the Workflow Manager Configuration Wizard
- Select “Configure Workflow Manager with Custom Settings”
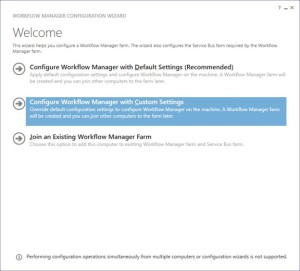
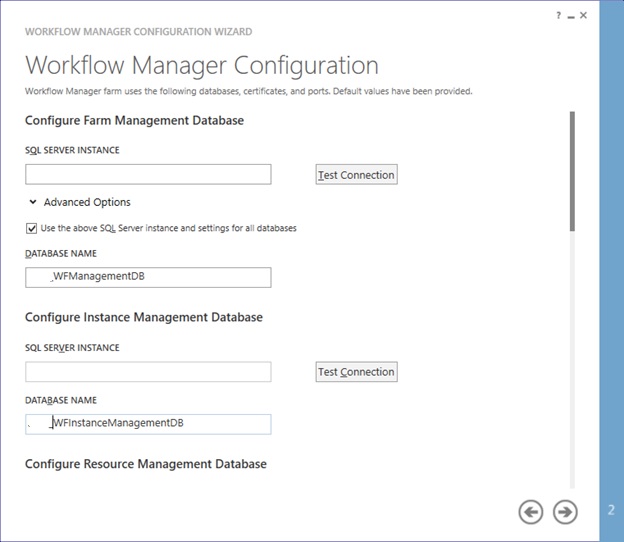
-
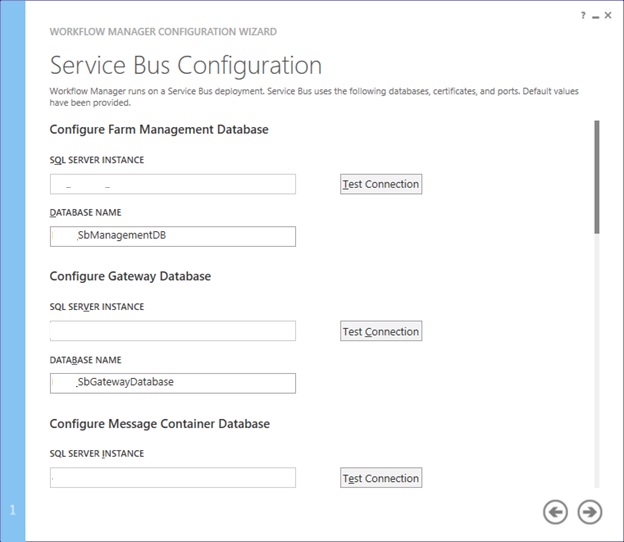
Now provide the SQL server instance name, Authentication, Certificate and SQL Workflow database names
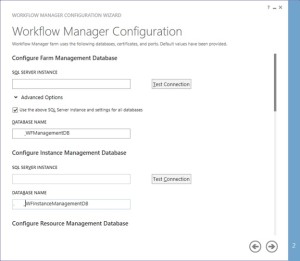
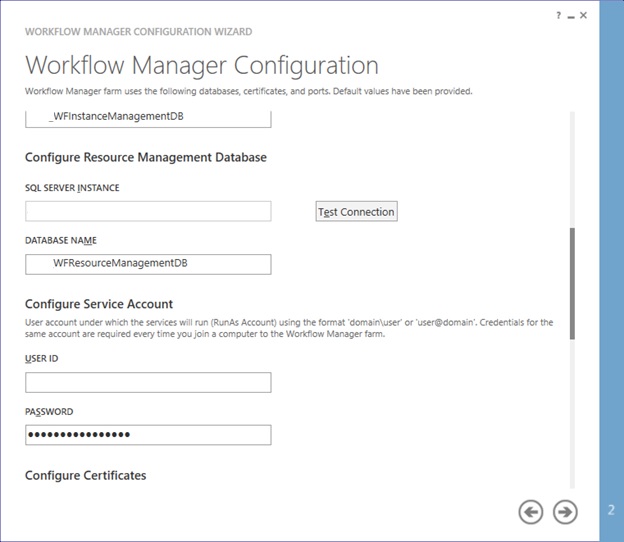
-
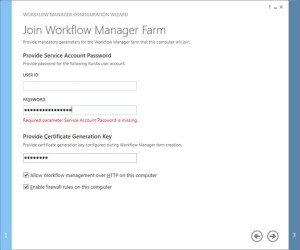
You need to provide the Workflow service account credentials which will be used to connect to SQL server and for workflow IIS Application pool.
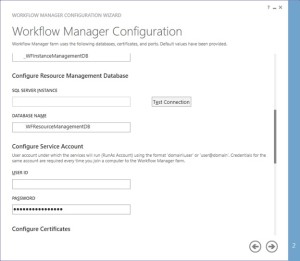
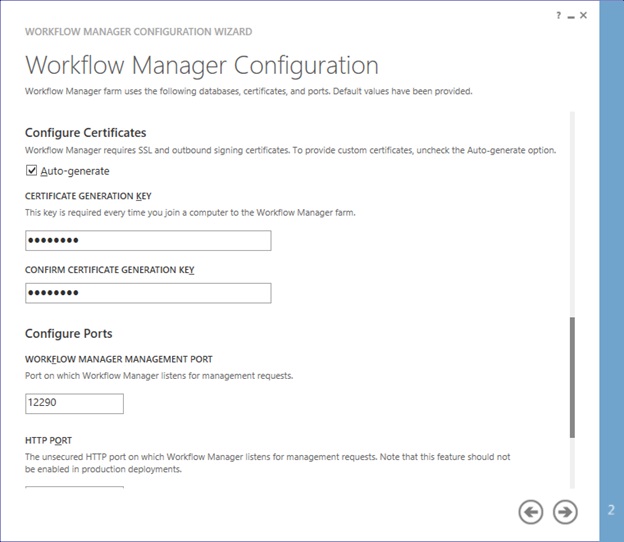
-
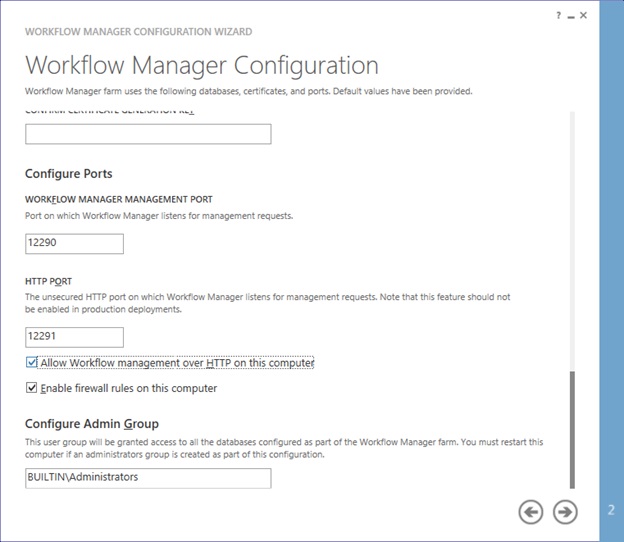
You would need to provide a Certificate Generation Key. It is just like Passphrase for your SharePoint farm
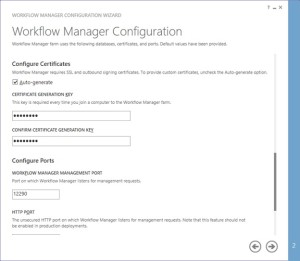
-
Make sure you select “Allow workflow management over http on this computer”
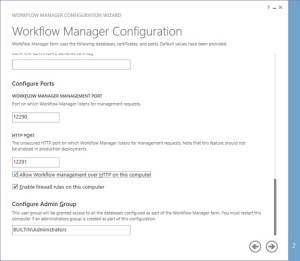
-
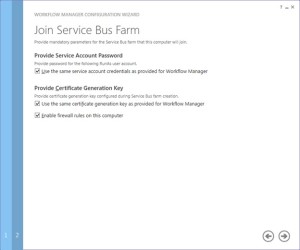
Along with Workflow Management, you need to configure Service Bus required by Workflow manager
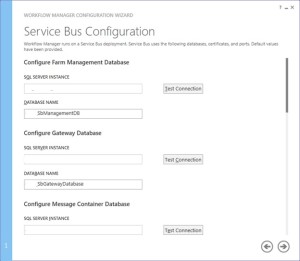
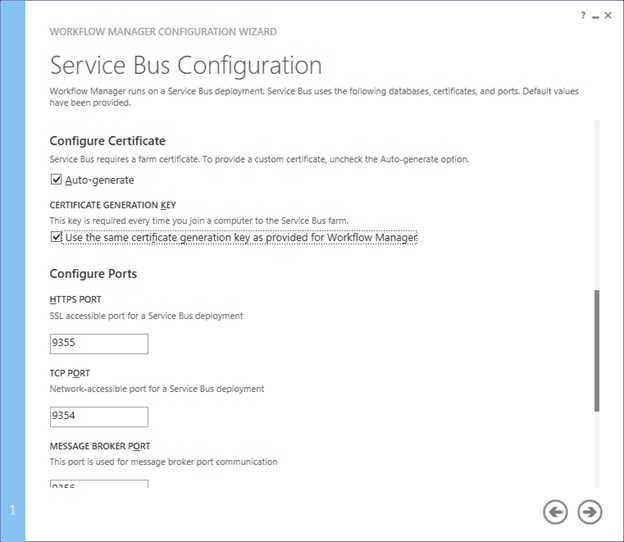
-
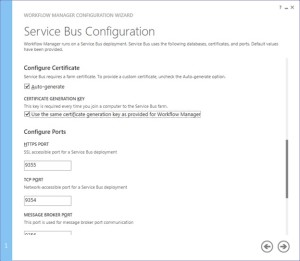
Make sure you select “use the same certificate generation key as provided for workflow manager”

- Once the Workflow Farm is created, you need to join other Workflow server to the farm. To do so execute the same Workflow configuration wizard and select “Join an Existing Workflow Manager Farm”
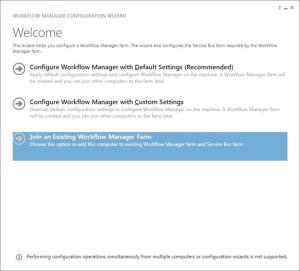
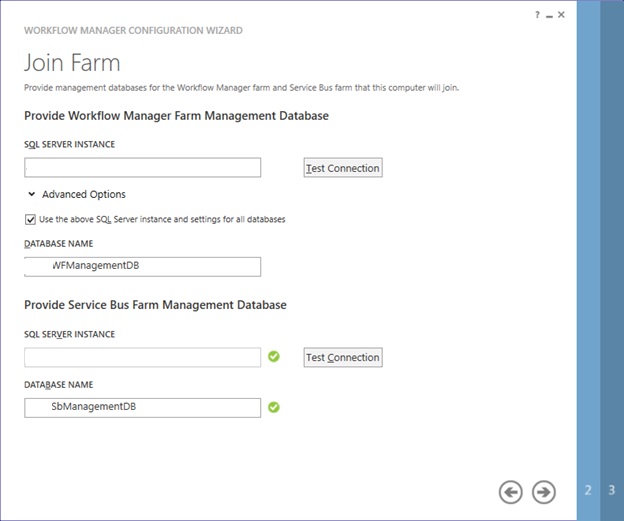
-
Provide the existing Workflow Farm SQL server instance name, Workflow database name and Service Bus farm database name

-
Provide the workflow service account and Certificate generation key used while creating workflow farm.
-
Select “use the same service account credentials as provided for Workflow Manager”, then select next
-
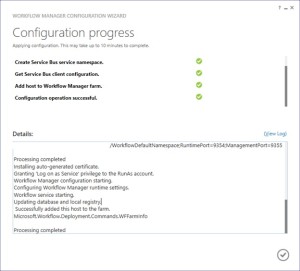
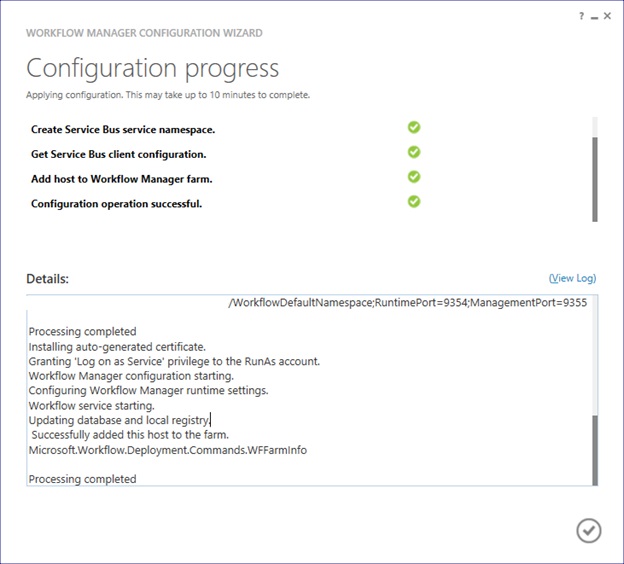
Once farm other server is joined to workflow farm you will see below
-
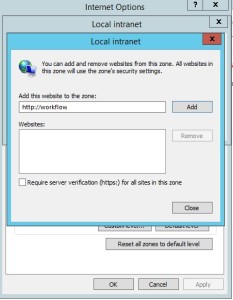
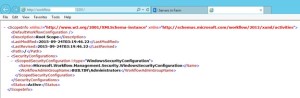
Once workflow is configured, you need to attach Workflow Farm to SharePoint farm. Make sure you have DNS entry(Workflow.domain.com) for your Workflow farm. If not DNS, you should at least have Host entry for same. Try to browse http://workflow.domain.com:12291 on WFE and Application server, you might see Authentication error.

-
Add the URL to Local Intranet and set the Local Intranet zone to “Automatically login with current username and password”


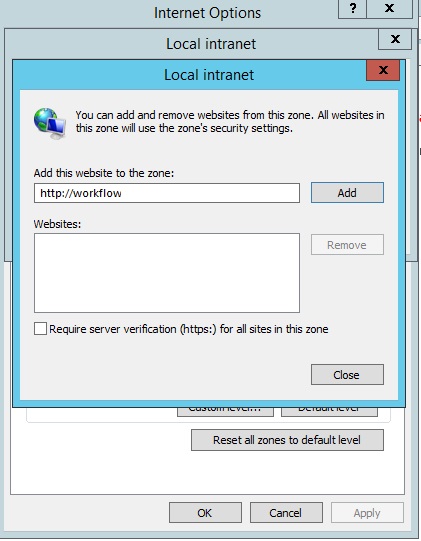
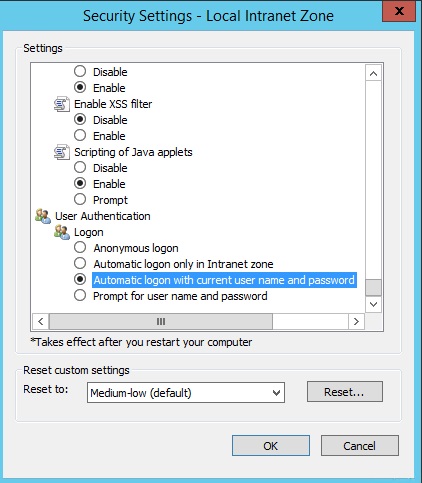
-
Now you should be able to browse the workflow farm details, this shows you can connect to workflow farm and it is working fine.
-
Now execute below command in SharePoint Powershell
Register-SPWorkflowService -SPSite “http://sharepointsite” -workflowHostUri “http://workflow.domain.com:12291/” -AllowOauthHttp -ScopeName SharePoint –force

-
Now you need to activate the workflow feature on site
Enable-SPFeature -Identity WorkflowServiceStore –Url http://sharepointsite -
In Central Admin > Manage Service Application > Workflow Service Application Proxy
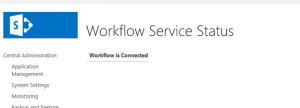
-
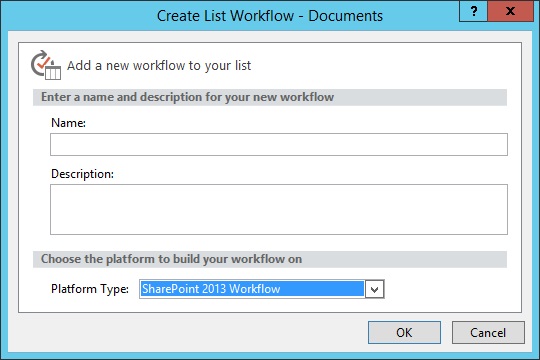
Open site in SharePoint designer – Select workflow from left pane – select new workflow

Note:
A. Workflow farm can co-locate on SharePoint servers
B. As per Microsoft articles, for high availability you need to have at least 3 Workflow Server in farm. You cannot have 2 workflow servers in a farm. It has to be 1 or 3.


SharePoint : Redirect to different home page for authenticated users
Hi All,
Today I got a requirement where authenticated users should be redirected to a different page, here is how I achieved it.
Editing the exiting SharePoint Landing page, then add a new content editor Web Part on the page. Now edit the content editor webpart and click on Web part properties on top. Now select “Embed code” under Insert for content editor webpart, add below script in :
<meta http-equiv=”refresh” content=”5;url=http://sharepoint/SitePages/Home.aspx”>
Try to check if your site is redirect to the new site.
If the redirection is working fine then we will restrict this script only for authenticated users. We need to edit the page again and select Edit webpart. Under Advance setting Set Target Audience as “NT Authenticated users”
Hope this helps you.
What is a Site Collection in SharePoint?
There are lot of confusions between Site Collection, sites and web application so though I will try to put some light on same. A very high level overview of a Site Collection is that Site collection share common features like Content types, Templates, Site columns, permissions, Web Parts etc. In other words a site collection groups together websites, and (perhaps most importantly) the security data for these websites. A site Collection stores references to a bunch of information critical to any web site. This information includes, but is not limited to:
–Web Parts
–Users which have access to the website
–Themes
–Sandbox Solutions
–MasterPages
–List Templates
Site Collection facilitates better administration of our internet\intranet websites. Let me explain using an example. We have a company’s intranet site and that intranet site (http://intranet) has multiple departments based sub sites like Finance, Sales, Support, etc. If I need to check something related to Finance, I can simply go to http://intranet/finance and try to find my relevant information in through Shared Document library, Blogging and much more. I would have access to all commonly used information\documents through a single intranet URL.
To the Site Collection all the websites within it are in a flat hierarchy which developers can see using spsite.allwebs or using dbo.allwebs table in content database.
Normally each web application has at least 1 Site Collection but it can have many however every web application has only 1 Top Level Site collection. General setting like Recycle bin and Quotas are organized at site collection level. Most important is each site collection can only use a single content database though multiple site collections can us the same content database.
Sites and subsites in a web application are actual place where content is stored. A site can be a top-level site or a sub site of the top level site. Not to confuse you but even a Sub sites can have other sub sites and so on. It is a free like structure. A site can inherit its parent’s permissions or define its own.
Microsoft recommended limiting the number of site collections in a content database to 5,000. However, up to 10,000 site collections in a database are supported. Microsoft decided this parameter after analyzing speed of upgrade, SharePoint performance, etc. The larger the number of site collections in a database, the slower the upgrade with respect to both database upgrade and site collection upgrades.
Exceeding the 5,000 site collection limit puts you at risk of longer downtimes during upgrades. If you plan to exceed 5,000 site collections, Microsoft recommend that you have a clear upgrade strategy to address outage length and operations impact, and obtain additional hardware to speed up the software updates and upgrades that affect databases.
The maximum recommended number of site collections per SharePoint farm is 500,000 Personal Sites plus 250,000 for all other site templates.
You can create a very large total number of web sites by nesting subsites. For example, in a shallow hierarchy with 100 sites, each with 1,000 subsites, you would have a total of 100,000 web sites. Or a deep hierarchy with 100 sites, each with 10 subsite levels would also contain a total of 100,000 web sites.
Note: Deleting or creating a site or subsite can significantly affect a site’s availability. Access to the site and subsites will be limited while the site is being deleted. Attempting to create many subsites at the same time may also fail.
Microsoft recommends a limiting of 200 GB for each site collections. This 200 gb includes RBS blob files on SQL server.
How we create a site collection?
Open Central Admin > Application management > Create Site Collection > Select the URL and fill in other details > Click OK.
You can also use below Powershell command:
New-SPSite -URL https://itfreesupport.com -OwnerAlias inder@itfreesupport.com -template “STS#0”
How to create a subsite?
Browse your site collection > Select setting button on right top corner > select “site contents” > select new subsite > Provide the URL and fill in other details > click OK.
You can also use below Powershell command:
New-SPWeb http://itfreesupport/subweb1 -Template “STS#0”
Note: Site collection can only be create from Central admin or SharePoint server where as subsite can be created from any machine using site collection URL
Hope this was helpful
What are types of SharePoint installation? what is difference between Farm and standalone?
A very common answer to 1st question is, we have Standalone and Farm installation but when it comes to SharePoint 2010 and SharePoint 2013 I say we have Standalone and complete installation. Why I said “complete” is because when we install Complete edition of SharePoint 2010\2013 we get option to create farm where as in SharePoint 2007, you get option to select Farm or Standalone while we are installing SharePoint. So the trick here is people mention “complete” instead of “Farm” for better understanding.
At first glance, standalone installations seems best for development purposes. The benefits appear to be:
1. Standalone will automatically install SQL Express for you(No SQL server installation needed)
2. Standalone will install using local accounts(no domain controller needed)
In my view a SharePoint standalone setup should be sufficient for development unless you are developing against SharePoint Enterprise only features.(I assume SharePoint foundation or Standard). SharePoint developer save a TON of hassle by having Visual Studio and SharePoint installed on the same OS (e.g. F5 to compile, run and debug all in one go) rather than using separate servers (VM or otherwise) and performing the incantations required to get remote debugging working.
Lots of sites say you need to setup your Development environment with Windows server 2008 but that’s not necessary as Windows 7 (x64 with SharePoint 2010 and SharePoint 2013) or even Windows Vista(with SharePoint 2010) can be used as Development environment.
But I would like to add that a stand-alone environment is sufficient for a development environment, however I would recommend to mimic a stand-alone by choosing a farm installation. You can install a higher version of SQL server(e.g. SQL server 2014 with advance features or SQL server developer edition) for better advantage. Not everyone know what SQL server. No everyone know but regardless of how many physical CPUs you have on your SQL server and how many cores per physical CPU, each SQL Express instance will be limited to a single CPU core. A similar cap is applied to amount of RAM which can be used by SQL server Express edition.
Standalone installation have their own disadvantage like limitations of 4 GB SQL database. connection to SQL from a remove machine, need to separately install Management studio, etc. Moreover if any of your project needs to test a multi-server setup, you cannot mimic the same on a Standalone installation.
On the other hand a farm\complete installation allows you to add other servers and SQL a different SQL server so as to keep you running out of resources. You can install SQL server on a different machine with good resources and allow all your team member to connect to single SQL server for development purpose. SQL server can also be a Active Directory server as it consumes very less resources.
Couple of more differences between SharePoint Farm and SharePoint standalone are:
1. Using separate account to connect to SQL server\SharePoint server
2. Using other accounts to manage a lot of services such as: Excel service, Performance Point, setup reverse proxy, setup load balancing.
3. Allow multiple SharePoint servers join into this farm to improve availability.
4. Multiple SharePoint servers can host Central Administration, Search Index, Search query, Web Application, etc for better performance.
Hope this was helpful
What is a Web Application in SharePoint?
Web Applications are one of the very important and bit what confusing topic in SharePoint. Let me try to simplify the same. If you have worked on IIS, we create IIS site which are the actual URL of IIS site. You specify hostheader and port number while creating a IIS site. We then use the same URL with port number to browse our IIS site(e.g. https://itfreesupport.com:8081 or http://computername:80). We create a Web Application from SharePoint central admin which creates sites in IIS so we can say that SharePoint Web Applications are IIS sites but managed and created from SharePoint Central Admin.
Each Web Application created in SharePoint central admin is associated with a IIS site. We cannot have multiple web Application for one IIS site but we can create upto 5 IIS sites for one Web application(using Extend Web Application feature). This means we can browse same content from different URL’s using different IIS sites\web.config files.
Microsoft support upto 20 Web Application in a SharePoint farm but we can create more then 20 Web applications.
Every Web Application will have minimum 1 content database but there is not hard core limit of databases a Web Application can have. Microsoft supports upto 500 content databases in a SharePoint farm so technically you can have upto 500 content databases for single web application.
On your SharePoint server under services on server, if you have “Microsoft SharePoint Foundation web Application” service running\started, it states this server a WFE(Web front end) server. End users will access your SharePoint sites and services through these WFE servers.
Another very important feature of Web Application is authentication method for SharePoint site. We set authentication method\type(Claims authentication, NTLM authentication, Anonymous authentication, etc) at Web Application level. As discussed already you can have 5 IIS site(extended web application) for a single web application which means you can have 5 different types of authentication for same web application.
We can create Web Application using Powershell, command prompt(cmd) or through SharePoint Central Admin.
To create a new Web Application through powershell using powershell command:
$ap = New-SPAuthenticationProvider
New-SPWebApplication -Name “Itfreesupport” -Port 80 -HostHeader “itfreesupport.com” -URL “https://itfreesupport.com” -ApplicationPool “AppPool” -ApplicationPoolAccount (Get-SPManagedAccount “domain\user”) -AuthenticationProvider $ap
To create a new Web Application through stsadm command follow below:
stsadm -o extendvs -url https://itfreesupport.com -ownerlogin domain\user -owneremail “user@itfreesupport.com”
To create a new Web Application through central admin follow below:
Open SharePoint Central Admin > Select “Application management” > Select “Manage Web Application” > Select “New” on top ribbon > Complete the details e.g. port number, host header url, etc and click OK
Hope this was helpful
Connect to On Premises SharePoint 2013 site using Powershell on your local computer
Hi Friends,
Recently I had a word with Ryan Yates on our yammer group and found a interesting Powershell script. Ryan created a powershell script named “Client-side SharePoint PowerShell”is avaiable on Codeplex https://sharepointpowershell.codeplex.com. We can use this script to connect to on-premises SharePoint site using Powershell and execute queries on same. I found it pretty intreseting so I tried same. Below are couple of requirement to use this powershell script.
- Windows powershell 3.0
- Copy 15 folder from any sharepoint server(path C:\Program Files\Common Files\microsoft shared\Web Server Extensions) to local client machine at same location.
- Client user have atleast read permission on target URL.
- Client system should be part of same domain.
If above requirement are met, lets get connect to remote SharePoint server. We need to download “Client-side SharePoint PowerShell” from codeplex site and extract it to a folder(e.g. c:\inder). Then Open Windows Powershell(Run as Admin) and browse(cd C:\Inder\sharepointpowershell-42493) to Powershell folder as shown below:
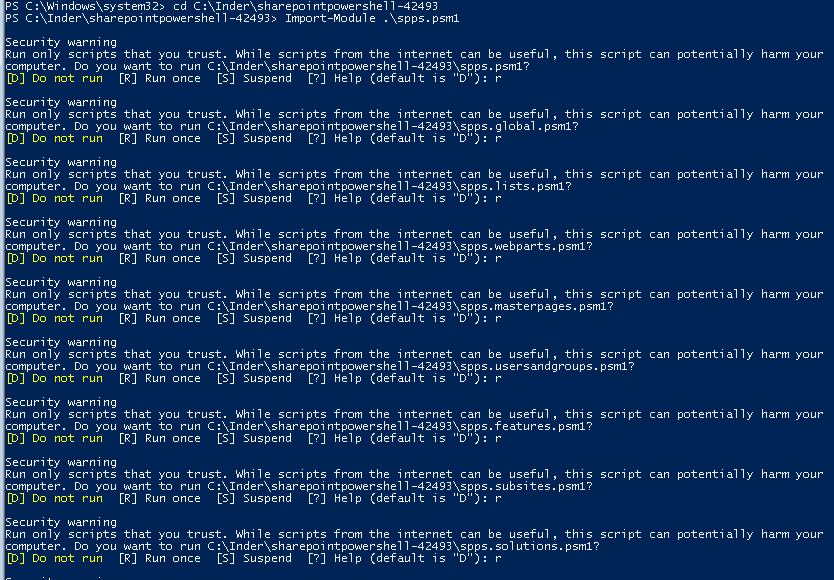
- Now we We need to load “Client-side SharePoint PowerShell” module using “Import-Module .\spps.psm1” command

Note: You might have to select “R” multiple times to load all the scripts -
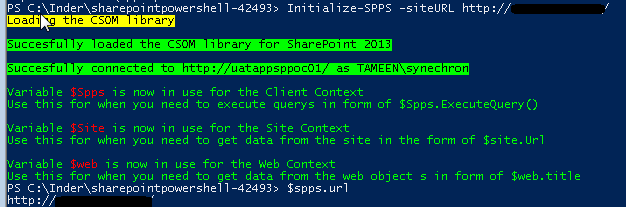
Finally we need to connect to SharePoint site using command “Initialize-SPPS -siteURL http://siteurl”
-
If we dont see any error message, it means our SharePoint is now conenct and ready to use.
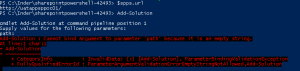
Below are arguments you can use in this powershell

Upload Sandboxed WSP to the site
Add-Solution -path “$exampledir\Solutions\solution.wsp”
Activate the WSP
Install-Solution -solutionName “AESBTwitterWebpart.wsp”
Create a subsite
Add-Subsite -title “Subsite” -webTemplate “STS#0” -description “Description…” -url “subsite” -language 1033 -useSamePermissionsAsParentSite $true
Go to the subsite
Open-Subsite -relativeUrl “/subsite”
Enable the publishing feature
Enable-Feature -featureId “94c94ca6-b32f-4da9-a9e3-1f3d343d7ecb” -force $false -featureDefinitionScope “Web”
Create document library on the subsite
Add-DocumentLibrary -listTitle “Testdoclib”
Copy testfiles to this document library
Copy-Folder “$exampledir\Subsite\Testdoclib” “Testdoclib” $false
Go back to the root site
Open-Rootsite
copy contents of local folders to SharePoint
$stylelibdir = “$exampledir\Style Library”
$styleliburl = “/Style Library”
Set master page
$masterFile = “seattle_custom.master”
Set-CustomMasterPage $masterFile
Create news list
$newsListName = “News”
$newsItemsCSV = “$exampledir\News\items.csv”
Add news web part to the page
Add-Webpart “/Pages/default.aspx” “Header” 0 $webpartXml
Create SharePoint Groups
Add-Group -name “Example Group”
#roleTypes are Guest, Reader, Contributor, WebDesigner, Administrator, Editor
Web
Set-WebPermissions -groupname “Example Group” -roleType “Reader”
Pages lib
Set-ListPermissions -groupname “Example Group” -listname “Pages” -roleType “Reader”
News list
Set-ListPermissions -groupname “Example Group” -listname “News” -roleType “Reader”
Hope this will help you all and help you save time.
Note: If you get error while loading the SharePoint site, make sure you have properly copied 15 hive folder and you are running Windows powershell as admin
You can also check below article written by Ryan Yates himself:
http://www.kilasuit.org/Blog/Post/6/Getting-up-and-Running-with-SPPS-for-PowerShell-and-SharePoint-Usage
PSconfig wizard fails after you install any update on SharePoint server
Hi Friends,
Recently I faced issue while updating SharePoint 2010 sp1 on servers. Installation of SharePoint 2013 SP1 didn’t caused any issue but when I try to run PSconfig wizard to update SharePoint databases, site features, etc, it stopped with below errors.
Environment : SharePoint 2010 standalone environment
ULS Logs:
UpdatedConcurrencyException: The object SPAdministrationWebApplication was updated by another user. Determine if these changes will conflict, resolve any differences, and reapply the second change. This error may also indicate a programming error caused by obtaining two copies of the same object in a single thread. Previous update information: User: Machinname\username Process:PSCONFIG (2624) Machine:machinename Time:April 22, 2015 10:54:48.0000 Current update information: User: machinename\username Process:PSCONFIG (2624) Machine:machinename Time:April 22, 2015 10:54:48.2154
Exception: System.NullReferenceException: Object reference not set to an instance of an object.
at Microsoft.SharePoint.Upgrade.SPContentDatabaseIntegrity.CheckAppOrphans()
at Microsoft.SharePoint.Upgrade.SPContentDatabaseIntegrity.Check(SPContentDatabaseIntegrityCheckOptions options)
at Microsoft.SharePoint.Upgrade.SPContentDatabaseSequence.ContentDatabaseDataIntegrityCheck()
at Microsoft.SharePoint.Upgrade.SPContentDatabaseSequence.PreUpgrade()
Upgrade.log:
This upgrade session has been stopped. Possible causes include the process being terminated abruptly or the OS has rebooted. Please restart the upgrade again.
PSCDiagnostics logs:
An exception of type Microsoft.SharePoint.Upgrade.SPUpgradeException was thrown. Additional exception information: Upgrade completed with errors. Review the upgrade log file located in C:\Program Files\Common Files\Microsoft Shared\Web Server Extensions\14\LOGS\Upgrade-20150422-104856-16.log. The number of errors and warnings is listed at the end of the upgrade log file.
Microsoft.SharePoint.Upgrade.SPUpgradeException: Upgrade completed with errors. Review the upgrade log file located in C:\Program Files\Common Files\Microsoft Shared\Web Server Extensions\14\LOGS\Upgrade-20150422-104856-16.log. The number of errors and warnings is listed at the end of the upgrade log file.
at Microsoft.SharePoint.Upgrade.SPUpgradeSession.CheckPoint()
at Microsoft.SharePoint.Upgrade.SPUpgradeSession.LogEnd()
at Microsoft.SharePoint.PostSetupConfiguration.UpgradeTask.Run()
at Microsoft.SharePoint.PostSetupConfiguration.TaskThread.ExecuteTask()
Troubleshooting steps tried:
To resolve the issue I tried to run below command, but it did not help:
PSCONFIG -cmd upgrade -inplace b2b -wait -force
Confirmed that there was no password change in SharePoint farm, No issues related to content databases. Checked permission for the farm account on SQL server and SharePoint server.
User Account Control (UAC) was enabled on server to disabled it so disabled it. Tried to reboot SharePoint machine and disabled Firewall.
Resolution:
After some research I found that configuration database was locked which caused this issue. To resolve the issue I executed below command in powershell:
stsadm -o setproperty -pn “command-line-upgrade-running” -pv No
Then tired to refresh sharePoint by running below command:
IISreset
net stop sptimerv4
net start sptimerv4
Now when I try to run PSconfig wizard from PowerShell, it completed without any issue:
PSCONFIG -cmd upgrade -inplace b2b -wait -force
Hope this will help you in case you face any similar issue.