Archive for March, 2015
Creating a Lab on Windows Azure – When creating a new server it should be part of this domain
We are nearly done with our Domain related activities. Now we need to make sure that all the Virtual Machines we create are part of same Active Directory. This will help us to manage the server and users in domain. In number of Demos we need a domain (AD), so we have met the most important pre-requisites.
- You need to copy below script into a notepad and save it as join.PS1
///// SCRIPT START HERE ////
$domainName = “type domain name here e.g. demo.com. It should be in quotes”
$username = “type domain\username e.g. demo\user1. It should be in quotes”
$password = “type password of above user e.g. 213@jjj. It should be in quotes”
$securePass = ConvertTo-SecureString $password -AsPlainText -Force
$cred = New-Object System.Management.Automation.PSCredential($username, $securePass)
Add-Computer -DomainName $domainName -Credential $cred -Restart –Force
////// SCRIPT END HERE ////
- Login to your Azure Subscription Portal site https://manage.windowsazure.com
- Select “Virtual Machines” from left menu and select “Create a Virtual Machine”
- Under “Virtual Machine” select “From Gallery”
- On the Choose an Image screen select “Windows server 2012 R2” and select Next
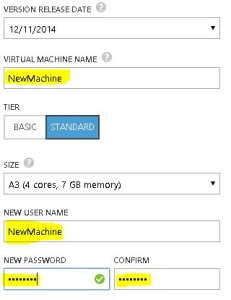
- Type the Machines necessary details like Hardware configuration, Machine name, username and password
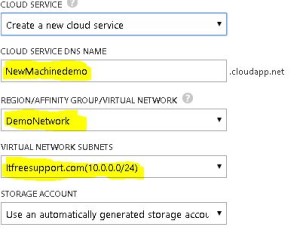
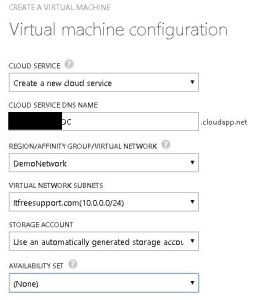
- Now we have an important step in the process. Select the DEMONETWORK you created in Region/Affinity Group/Virtual Network. Make sure our Virtual network name is selected in Virtual Network Subnet. Click on Next
- Now comes the most important step, we need to select Custom Script on this page and select the Join.ps1 script we just created. Click Finish
- You will observer that your machine will reboot during the initialization process.
- Now when the machine is created, Open Server Manager and you will observe it is already part of Demo domain. On the domain controller in “Active Directory users and computers” you should be able to see the newly added
Note: In some rare scenario, the new computer may not get added to the domain. In that case, please run above PowerShell command line by line and the computer would be added to domain.
Creating a Lab on Windows Azure – Continue
- Update Domain setting on Virtual Network and bind it to Private IP on DC
So far we have created a Virtual Network and a Domain controller in that Virtual network. I hope this process was simple enough for you to follow. It is very important that Domain Controller and DNS have a static IP address so that all other machines know whom to contact to authenticate and resolve computer name. Now we need to make sure that our domain controller has a static IP address and then assign it to DNS on Virtual Network. To do so we will follow below steps:
- Login to your Azure Subscription Portal site https://manage.windowsazure.com
- Select Virtual Machine from left Menu
- Select the Virtual Machine we just created and click on Connect at bottom
- Now RDP to the Virtual Machine we created as a Domain Controller
- Open Windows PowerShell and run command “IPConfig”. Make a note of IP address
- Click on Start and Open DNS manager. Expand Computer name > Forward Lookup Zone > Demo.com > Make sure Ipconfig and DNS has same IP address.
- Make sure you are connected to Azure PowerShell account by following steps we discussed in section “Connect to your Azure Subscription using PowerShell”
- Run command “Get-AzureVM”. You should be able to see your Azure Virtual Machine name, make a note of same
- Run below command in Azure PowerShell
Get-AzureVM -ServiceName “Service name from Get-AzureVM command” -Name “name from Get-AzureVM command”| Set-AzureStaticVNetIP -IPAddress “10.0.0.4” | Update-AzureVM
- Now the system will get restarted and a Static IP will be assigned to same. We need to update the same IP in the Virtual Network we created in Azure.
- Login to your Azure Subscription Portal site https://manage.windowsazure.com
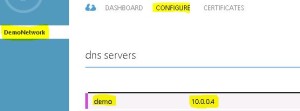
- Select “Network” from left pane > Select the “Demo Network” we created > Click “Configure” on top.
- Update the IP Address of Domain Controller and Domain name. E.g. demo 10.0.0.4. Click on Save at bottom to save these changes
Creating a Lab on Windows Azure – Continue
- Create a server on Azure in the Virtual Network
If you have worked on Hyper-V or any other Virtual server environment, this process is pretty simple for you. Here we will create our Virtual Machines. First machine would be our Domain Controller also known as DC. This server manage DNS, AD Users, etc. and normally the 1st and most important server in a company.
- Login to your Azure Subscription Portal site https://manage.windowsazure.com
- Select “Virtual Machines” from left menu and select “Create a Virtual Machine”
- Under “Virtual Machine” select “From Gallery”
- On the Choose an Image screen select “Windows server 2012 R2” and select Next
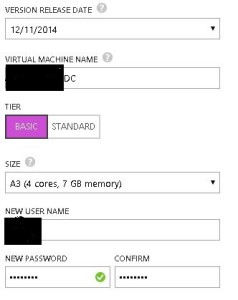
- Type a unique name for the Virtual Machine. Select a username and password which you will never forget.(Selected a Low configuration because I won’t be using it much)
- Now we have the most important step in the process. Select the DEMONETWORK you created in Region/Affinity Group/Virtual Network. Make sure our Virtual network name is selected in Virtual Network Subnet. Click on Next.
- Now Select Finish.
- Once the Machine is created, you will get a Connect button at bottom of screen.
Creating a Lab on Windows Azure – Continue
- Create a Virtual Network in Azure.
Now let’s create a Virtual Network in Azure like we do in our Hyper-V servers. We need this Virtual network so that all the new and old Machine are in same IP range and can communicate with each other. You don’t need to be a Networking expert to do so. Just follow steps mentioned below.
- Login to your Azure Subscription Portal site https://manage.windowsazure.com
- Select “Network” from left hand menu > Select “New” on left bottom corner
- Now in the Menu select “Custom Create”
- Now type the network name and select the data center for that network(note all computers should be in the same datacenter)
- For now we will keep this DNS server empty (We should have our Domain controller DNS IP here. Our DC is not yet created so we keep it blank). Click on Next
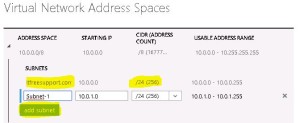
- On “Virtual Network Address Spaces”, provide name of your network and Subnet count (I won’t have more than 256 machines so selected same). Click on “Add Subnet”. Click on Finish
Here we have our Virtual Network created. Note this Network will then be used while creating our Virtual Machine. The very first machine we will create is our Domain controller. Once the domain controller is created we will update it in DNS server records used above.
Creating a Lab on Windows Azure
Recently when I got access to Azure I wanted to create my lab on Azure which took me days to figure out the process. It is similar to what we do on our Hyper V machines but a bit complex in nature because we are working on cloud
We follow the same process on our local machine to create a Lab environment but normally we are short of resources like Disk Space, RAM, CPU which is the taken care by Azure. Biggest dis-advantage for our local system environment is when you buy these resources, you don’t use it all the time which we have already paid for. In Azure we pay only when you use it.
Today we will understand how we can create our own Lab environment on Windows Azure. The whole process is lengthy to explain so I have divided it in 8 different parts listed below. Hope you will enjoy learning it.
- Connect to your Azure Subscription using PowerShell.
- Create a Virtual Network in Azure
- Create a server on Azure in the Virtual Network
- Create a new domain
- Update Domain setting on Virtual Network and bind it to Private IP on DC
- When creating a new server it should be part of this domain
- Install SQL, SharePoint. labs as part of this domain
- Troubleshoot common issue during this process
- Connect to your Azure Subscription using PowerShell
You cannot create your lab with just Azure User Interface. It’s said that “Well planned is half done”. So let’s plan and prepare our self with Azure PowerShell. Go to below link and download Microsoft Web Platform installer.
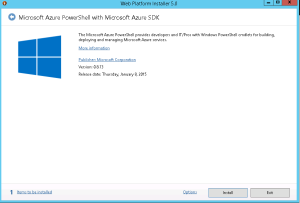
- You can use it download and install Azure PowerShell
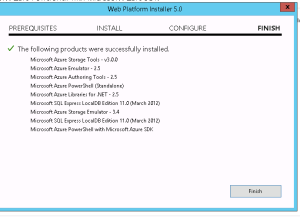
- Once the PowerShell is downloaded and installed, we will get below message
- Now we will download the Azure Setting file to connect to our Azure subscription. In the Azure PowerShell, type below command.
Get-AzurePublishSettingsFile
- Once you login to your Azure website, you will get a file named “Visual Studio Premium with MSDN-date-credentials.publishsettings”.
Note: File name may change based on your subscription. Save it to a secure location. This file contains secure credentials and additional information about subscriptions that you can use in your Azure environment.
- Now Import the Azure Settings file to PowerShell. Run “Import-AzurePublishSettingsFile” and then type path of the file we just downloaded as shown in below image.
- To check Subscription details run below command
Get-AzureSubscription
Steps to configure RBS on multiple content database in SharePoint 2013 with SQL server 2012 or 2014
Hi Friends,
Today we will try to understand how to configure RBS(Remote Blob Service) on single or multiple content databases in SharePoint 2013 with SQL server 2012 or 2014. Steps are nearly same with both SQL server but make sure you use the correct msi file. For SQL serve 2012 size of msi file would be 5120 kb which can be downloaded from here . For SQL serve 2014 size of msi file would be 4380 kb which can be downloaded from SQL server 2014 feature pack here
Once you have downloaded the file save it on empty folder on c: or d: drive
- Once database is created from SharePoint server, execute below command on SQL server
EXEC sp_configure filestream_access_level, 2
RECONFIGURE
- Then we need to select the content database from top and execute below command(password can be changed)
if not exists (select * from sys.symmetric_keys where name = N’##MS_DatabaseMasterKey##’)create master key encryption by password = N’Admin Key Password !2#4′
- Now you need to execute below command on content database(wss_content5 database name needs to be changed)
if not exists (select groupname from sysfilegroups where groupname=N’RBSFilestreamProvider’)alter database [WSS_Content5] add filegroup RBSFilestreamProvider contains filestream
- Now we will add the physical path of RBS datafiles to content database. You can change the database name and filepath
alter database [WSS_Content5] add file (name = RBSFilestreamFile, filename = ‘C:\Blobstore5’) to filegroup RBSFilestreamProvider
- Now you need to run below command on Windows Powershell (run as admin). Go to folder which has the rbs.msi file we downloaded.(Make note of FilestreamProvider name. Change SQL servaer and content databasename)
msiexec /qn /lvx* rbs_install_log_db5.txt /i RBS.msi TRUSTSERVERCERTIFICATE=true FILEGROUP=PRIMARY DBNAME=”WSS_Content5″ DBINSTANCE=”SQLservername” FILESTREAMFILEGROUP=RBSFilestreamProvider FILESTREAMSTORENAME=FilestreamProvider
If you see the rbs_install_log_db5.txt file to be less then 1000 kb, e.g. 482 kb, it means it didn’t work. If this has worked fine you will see above 1000 kb e.g. 1218 kb.
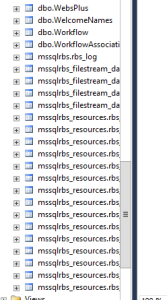
You can also validate that rbs related tables are added to database as shown below.
Note: if you face issues while running command, try to reboot both SQL and SharePoint server. I know this is not a solution but a workaround to the known issue you might get. You can also try SQL service restart and iisreset on sharepoint server. You may also check eventviewer log to find symptoms of the issue.
6. On SharePoint server run below command on windows powershell:
msiexec /qn /lvx* rbs_install_log.txt /x RBS.msi DBNAME=”WSS_Content5″ DBINSTANCE=”SQLservername” ADDLOCAL=”Client,Docs,Maintainer,ServerScript,FilestreamClient,FilestreamServer”
Note: if you face issues while running command, try to reboot both SQL and SharePoint server. I know this is not a solution but a workaround to the known issue you might get. You can also try SQL service restart and iisreset on sharepoint server. You may also check eventviewer log to find symptoms of the issue.
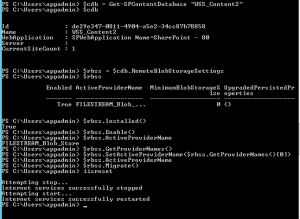
- Now run below command 1 by 1 in SharePoint powershell and update the active providername and enable the RBS on content DB.
$cdb = Get-SPContentDatabase –WebApplication http://testspimgweb01
$rbss = $cdb.RemoteBlobStorageSettings
$rbss.Installed()
$rbss.Enable()
$rbss.SetActiveProviderName($rbss.GetProviderNames()[0])
To migrate existing content (Make sure you run this even if you don’t have any existing data.)
$rbss.Migrate()
Note: Also every database in web application needs RBS to be enabled or above command will fail.
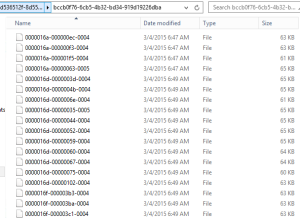
- Now if you create site collection and upload a file, you will observe it is moved to this folder you created with SQL command in step 4.
Note: You need to run these command for every content database you want enable RBS on.
Troubleshooting: When you run these command, you might face permission issues. To resolve these issue make sure you have full access on C:\Program Files\Common Files\microsoft shared and registry. When you run these command, you may not find the error in the log file so run the rbs.msi file and make sure you find all the permission issue in GUI. Many a time when you assign permission on root folder on drive or key in registry, it will not be inherit to subfolder. Make sure you go to the folder shown in error and assign owner permission.
Hope this was helpful.
Unable to create site collection in SharePoint configured with SQL server RBS 2014
Hi Friends,
Recently I wanted to configure RBS on SQL server 2014. According to me I did configure everything fine but then I was unable to create a Site collection in that database. I get below error message.
Sorry, something went wrong
The URL ‘_cts/Document Set/docsethomepage.aspx’ is invalid. It may refer to a nonexistent file or folder, or refer to a valid file or folder that is not in the current Web.
Technical Details
Troubleshoot issues with Microsoft SharePoint Foundation.
Correlation ID: af6aef9c-01ea-20f9-005a-d8bb2b2da40d
Date and Time: 3/4/2015 3:14:36 AM
In ULS logs I see below error:
Document Management Server Document Sets Unexpected DocumentSet FeatureActivating: throws exception: The URL ‘_cts/Document Set/docsethomepage.aspx’ is invalid. It may refer to a nonexistent file or folder, or refer to a valid file or folder that is not in the current Web…. Stacktrace: at Microsoft.SharePoint.SPGlobal.HandleComException(COMException comEx) at Microsoft.SharePoint.Library.SPRequest.PutFile(String bstrUrl, String bstrWebRelativeUrl, Object punkFile, Int64 cbFile, Object punkSPFileMgr, Object punkFFM, Int64 PutFileOpt, String bstrCreatedBy, String bstrModifiedBy, Int32 iCreatedByID, Int32 iModifiedByID, Object varTimeCreated, Object varTimeLastModified, Object varProperties, String bstrCheckinComment, String bstrLockIdMatch, String bstEtagToMatch, Int32 lockType, String lockId, Int32 minutes, Int32 fRefreshLock, Int32 … 2068ef9c-91d4-20f9-005a-da81ca62d058
Document Management Server Document Sets Unexpected …bValidateReqFields, Guid gNewDocId, SPFileSaveParams sfsp, SPFileInfo& pFileProps, UInt32& pdwVirusCheckStatus, String& pVirusCheckMessage, String& pEtagReturn, Byte& piLevel, Int32& pbIgnoredReqProps) at Microsoft.SharePoint.SPFileCollection.AddStreamOrBytesInternal(String urlOfFile, Stream file, Int64 fileSizeToSave, SPFileStreamManager spmgr, PutFileOpt fileOpt, String createdBy, String modifiedBy, Int32 createdByID, Int32 modifiedByID, DateTime timeCreated, DateTime timeLastModified, Object varProperties, String checkInComment, Stream formatMetadata, String lockIdMatch, String etagToMatch, SPLockType lockType, String lockId, TimeSpan lockTimeout, Boolean validateRequiredFields, SPVirusCheckStatus& virusCheckStatus, String& virusCheckMessage, String& etagNew, Boolean& ignoredRequire… 2068ef9c-91d4-20f9-005a-da81ca62d058
Document Management Server Document Sets Unexpected …dProps) at Microsoft.SharePoint.SPFileCollection.Add(String urlOfFile, Byte[] file, Boolean overwrite, String checkInComment, Boolean checkRequiredFields) at Microsoft.SharePoint.SPFileCollection.Add(String urlOfFile, Byte[] file, Boolean overwrite) at Microsoft.Office.DocumentManagement.Internal.DocumentSetFeatureReceiver.FeatureActivated(SPFeatureReceiverProperties properties). 2068ef9c-91d4-20f9-005a-da81ca62d058
I did a lot of search trying to find the issue but couldn’t find anything. Lucky I found a article which says database might be read only. I then create a new database without RBS enabled and it was working fine.
Then I enabled RBS on same database and got the same error. So I confirmed that it was RBS configuration issue.
I then followed below steps one by one and confirmed that it was issue with ActiveProviderName
$cdb = Get-SPContentDatabase “contentdbname”
$rbss = $cdb.RemoteBlobStorageSettings
$rbss
I then run below command on same content database which resolved my issue.
$cdb = Get-SPContentDatabase “contentdbname”
$rbss = $cdb.RemoteBlobStorageSettings
$rbss.Installed()
$rbss.Enable()
$rbss.GetProviderNames()
$rbss.SetActiveProviderName(RBSFilestreamProvider)
$rbss.Migrate()
Hope this will help you.
Happy Learning friends. 🙂


