Office 365 Admin interview questions – SharePoint Admin center
Also explained in youtube video : https://youtu.be/M4t86vwHx8U
If you’re preparing for a SharePoint Administrator interview, it’s essential to be well-versed in the platform’s intricacies. Here are some common interview questions related to SharePoint administration:
- What is SharePoint Online, and how is it related to Microsoft Cloud Service Office 365?
- Answer: SharePoint Online is part of Office 365, Microsoft’s cloud service suite. It provides features like document management, collaboration, and content sharing. Unlike the on-premises version, SharePoint Online is hosted and maintained by Microsoft. It doesn’t allow server-side code, but it offers all the core SharePoint features.
- What are the differences between SharePoint Online and SharePoint On-Premise?
- Answer: Key differences include:
- Hosting: SharePoint Online is hosted by Microsoft, while on-premises SharePoint is maintained by your organization.
- Maintenance: Microsoft handles patches and updates for SharePoint Online, whereas your IT team manages on-premises maintenance.
- Server-Side Code: SharePoint Online doesn’t allow server-side code, but on-premises allows it.
- Client-Side Development: SharePoint Add-ins (formerly Apps) are used for customizations in SharePoint Online.
- Answer: Key differences include:
- What are SharePoint Add-ins, and how do they differ from SharePoint Apps?
- Answer: SharePoint Add-ins (formerly known as Apps) are self-contained pieces of functionality that extend SharePoint’s capabilities. They solve specific business problems. While the terms are often used interchangeably, SharePoint Add-ins can be hosted externally, whereas SharePoint Apps are hosted within SharePoint itself.
- What responsibilities does a SharePoint administrator have?
- Answer: SharePoint administrators manage storage, access permissions, backups, security, and user support. They ensure smooth operation, troubleshoot issues, and implement solutions.
- How would you design and implement a SharePoint solution for an organization?
- Answer: I’d start by understanding business requirements, then design site structures, permissions, and workflows. I’d choose appropriate lists, libraries, and web parts, considering scalability and security.
- What strategies do you use to ensure secure data access for users on SharePoint?
- Answer: I manage permissions, use groups, and apply access controls. Regular audits help identify and address security gaps.
- How do you stay informed about SharePoint developments?
- Answer: I follow official Microsoft resources, blogs, and community forums. Attending conferences and networking with other professionals also keeps me updated.
- Can you share an example of a complex SharePoint issue you resolved?
- Answer: Describe a specific problem you encountered, the steps you took to diagnose it, and how you ultimately resolved it.
SharePoint Advanced Management: Unlocking Powerful Capabilities
Also explained in youtube video : https://youtu.be/oOxUA-KvzqA
Introduction
SharePoint Advanced Management is a Microsoft 365 add-on that equips organizations with a suite of features to enhance their SharePoint and OneDrive experience. Whether you’re a SharePoint administrator or a site owner, these advanced capabilities empower you to manage, govern, and secure your content effectively.
Key Features
1. Advanced Access Policies for Secure Content Collaboration
- Restrict SharePoint Site Access: You can limit access to SharePoint sites based on membership in Microsoft 365 groups (for group-connected sites) or security groups (for non-group connected sites). Users outside these specified groups won’t have access, even if they previously had permissions or shared links.
- OneDrive Content Access Restrictions: Control access to shared content in a user’s OneDrive by defining a security group. Only members of the group can access the content.
- OneDrive Service Access Limitation: Fine-tune OneDrive access by allowing only specific users (members of a security group) to utilize it.
2. Data Access Governance Reports
- Identify potentially overshared or sensitive content within SharePoint sites using data access governance reports. These reports help you assess and apply appropriate security and compliance policies.
3. Conditional Access Policies
- With Microsoft Entra authentication context, enforce stringent access conditions for SharePoint sites. Authentication contexts can be directly applied or connected to sensitivity labels.
4. Secure SharePoint Document Libraries
- When SharePoint is enabled for sensitivity labels, configure a default label for document libraries. New files uploaded or existing files edited in the library will automatically inherit this label.
5. Advanced Sites Content Lifecycle Management
- Block Download Policy: Prevent file downloads from SharePoint sites or OneDrive without relying on Microsoft Entra Conditional Access policies.
Licensing and Cost
SharePoint Advanced Management is available as a per-user license. Commercial customers can acquire it for $3 per user per month.
Hide, Change or Add a Button in SharePoint Online List or document library Toolbar
Also explained in youtube video : https://youtu.be/FtVHP28oWVI
If you’ve ever needed to conceal a button in your SharePoint Online list or document library, you’re in the right place. Whether it’s the “New” or button or any other, you can achieve this using list view formatting with just a few lines of JSON code.
Here’s how you can hide a button from the SharePoint Online list view:
- Navigate to the List or Document Library:
- Open the SharePoint list or document library where you want to hide the button.
- Access View Formatting:
- Click on the View dropdown menu.
- Choose “Format current view” from the options.
- Advanced Mode:
- In the formatting pane, click on “Advanced Mode” to access the JSON editor.
- Hide the New Button:
- Paste the following JSON snippet to hide the “New” button from the toolbar:
- {
- “commandBarProps” : {
- “commands”: [
- {
- “key”: “new”,
- “hide”: true
- },
- {
- “key”: “editInGridView”,
- “text”: “Quick edit”,
- “iconName”: “EditTable”,
- “primary”: true
- },
- {
- “key”: “share”,
- “iconName”: “”,
- “title”: “Share this List”
- }
- ]
- }
- }
- This will effectively hide the “New” button.
- Customization Options:
- Remember that the command bar customization method isn’t limited to hiding buttons. You can also:
- Rename button text.
- Replace icons.
- Change the order of buttons.
- Remember that the command bar customization method isn’t limited to hiding buttons. You can also:
Toolbar Key
‘new’
‘newFolder’
‘newWordDocument’
‘newExcelWorkbook’
‘newPowerPointPresentation’
‘newOneNoteNotebook’
‘newFormsForExcel’
‘newVisioDrawing’
‘upload’
‘uploadFile’
‘uploadFolder’
‘open’
‘share’
‘copyLink’
‘download’
‘rename’
‘copyTo’
‘moveTo’
‘delete’
‘edit’
‘comment’
‘editNewMenu’
‘powerBI’
‘powerBIVisualizeList’
‘automate’
‘automateCreateRule’
‘automateManageRules’
‘powerAutomate’
‘powerAutomateCreateFlow’
‘powerAutomateSeeFlows’
‘powerAutomateConfigureFlows’
‘aiBuilderCreate’
‘aiBuilderGoto’
‘aiBuilder’
‘alertMe’
‘newLink’
‘integrate’
‘manageAlert’
‘powerApps’
‘powerAppsCreateApp’
‘powerAppsSeeAllApps’
‘powerAppsCustomizeForms’
‘viewDocumentUnderstandingModels’
‘versionHistory’
‘openInImmersiveReader’
‘classifyAndExtract’
‘checkOut’
‘checkIn’
‘undoCheckOut’
‘properties’
‘pinItem’
‘exportExcel’
‘exportCSV’
‘export’
‘editInGridView’
‘exitGridView’
‘sync’
‘uploadTemplate’
‘addTemplate’
‘openInOfficeOnline’
‘openInOfficeClient’
‘addShortcut’
‘pinToQuickAccess’
‘unpinFromQuickAccess’
What is Microsoft Office 365?
Microsoft 365 (formerly known as Office 365) is a comprehensive cloud-powered productivity platform that offers a suite of powerful tools and services for individuals, businesses, and enterprises.
Also explained in my Youtube video :
Overview
- Microsoft 365 is a subscription-based service that provides access to a range of applications and services.
- It includes familiar productivity apps like Word, Excel, PowerPoint, and Outlook.
- Unlike the traditional standalone Office software, Microsoft 365 is continuously updated with new features and improvements.
Core Components
- Microsoft Teams: A collaboration hub for chat, video conferencing, file sharing, and project management.
- OneDrive: Cloud storage with 1 TB of space per user.
- SharePoint: A platform for creating and managing intranet sites and team collaboration spaces.
- Exchange Online: Cloud-based email and calendar service.
- Power Platform: Tools for creating custom apps, automating workflows, and analyzing data.
Benefits
- Anywhere Access: Install Microsoft 365 apps on PCs, Macs, tablets, and phones.
- Collaboration: Real-time collaboration on documents with colleagues.
- Security: Built-in security features and compliance tools.
- Productivity: Streamlined workflows and integration across apps.
Plans and Pricing
- Microsoft 365 offers different plans for home users, businesses, and enterprises.
- Choose the plan that best suits your needs based on the number of users and features required.
- Microsoft 365 is more than just software; it’s a complete productivity ecosystem.
- Whether you’re an individual, a small business, or a large enterprise, Microsoft 365 can enhance your productivity and collaboration.
Advantages over its competitors
- Comprehensive Suite:
- Microsoft 365 provides a complete suite of productivity tools, including Word, Excel, PowerPoint, Outlook, and more.
- Competitors often lack the breadth of applications that Microsoft 365 offers.
- Integration and Ecosystem:
- Microsoft 365 seamlessly integrates with other Microsoft products and services, such as OneDrive, Teams, and SharePoint.
- This ecosystem enhances collaboration, communication, and data sharing within organizations.
- Cloud-Based Collaboration:
- Microsoft 365 is cloud-based, allowing users to access their files and applications from anywhere.
- Real-time collaboration in documents through Microsoft Teams and OneDrive is a significant advantage.
- Regular Updates:
- Microsoft continuously updates its applications, adding new features and security enhancements.
- Competitors may not offer the same level of consistent updates.
- Industry Standard:
- Microsoft Office has been an industry standard for decades, making it familiar to users worldwide.
- Compatibility with existing files and workflows is crucial, and Microsoft 365 excels in this area.
- Enterprise-Grade Security:
- Microsoft invests heavily in security features, including data encryption, threat detection, and compliance tools.
- Competitors may not offer the same robust security infrastructure.
- Business Intelligence and Analytics:
- Microsoft 365 includes tools like Power BI for data visualization and analysis.
- Competitors may lack similar business intelligence capabilities.
- Customization and Extensibility:
- Microsoft 365 allows customization through Power Platform (Power Apps, Power Automate, and Power Virtual Agents).
- Organizations can build custom solutions tailored to their needs.
- Hybrid Deployment Options:
- Microsoft 365 supports hybrid deployments, allowing organizations to combine cloud and on-premises solutions.
- Competitors may not offer the same flexibility.
- Massive Cloud Storage:
- Microsoft 365 provides 2TB of cloud storage per user through OneDrive.
- Competitors may have limitations on storage capacity.
Disable Sync for a specific all libraries on SharePoint Site
Also explained in my youtube video : https://youtu.be/W9OtxYnWgOE
1. Disable Sync at the Library Level:
– If you generally allow synchronization in your environment but want to restrict specific libraries from being synchronized, follow these steps:
1. Navigate to the library where you want to disable sync.
2. Click the Gear Icon(Settings) > Library Settings.
3. Under Advanced Settings, scroll down to Offline Client Availability.
4. Select No (default is Yes).
5. Click OK at the bottom.
– As a result, the library will lack a Sync Button, preventing users from syncing files from that specific library.
2. Disable Sync at the Site Level:
– To go one step further and disable sync for an entire SharePoint site, follow these steps:
1. On the site, click Settings > Site Settings.
2. Under Search, click Search and offline availability.
3. In the Offline Client Availability section, select No.
4. To allow people to sync files again, set the Offline Client Availability option back to Yes.
Now SYNC button will be disabled on all the libraries on SharePoint.
How to Access OneDrive on Ubuntu
1. Install OneDrive Client for Linux
While there isn’t an official OneDrive app for Linux, you can use the OneDrive Client for Linux, which is compatible with all major Linux distributions. This client provides features like state caching, real-time file monitoring, and syncing. Here’s how to install it:
- Open a terminal on your Ubuntu machine.
- Add the OpenSuSE Build Service Repository key:
wget -qO - https://download.opensuse.org/repositories/home:/npreining:/debian-ubuntu-onedrive/xUbuntu_22.04/Release.key | gpg --dearmor | sudo tee /usr/share/keyrings/obs-onedrive.gpg > /dev/null - Install the OneDrive Client:
sudo sh -c "echo 'deb [signed-by=/usr/share/keyrings/obs-onedrive.gpg] https://download.opensuse.org/repositories/home:/npreining:/debian-ubuntu-onedrive/xUbuntu_22.04/ /' > /etc/apt/sources.list.d/onedrive.list" sudo apt update sudo apt install onedrive
2. Authorize OneDrive
- Run the OneDrive client:
onedrive - Copy the link provided in the output.
- Paste the link into your browser and authorize the OneDrive application using your account.
- Click “Yes” to grant the necessary access.
3. Sync Your Files
Once authorized, the OneDrive Client for Linux will sync your files and folders between your Ubuntu device and your OneDrive account. You’ll have seamless access to your data right from your Linux file manager. Use below command to sync the folder if needed
onedrive destination-directory [FILEPATH] –synchronize
To see the Sync status use below command
onedrive display-sync-status
SharePoint Online list connector versions 2.0 and 1.0 in Power BI Dashboard
Also explained in my Youtube video : https://youtu.be/neEBhfzFRJo
Common Features in Both Versions:
1. Date Hierarchy:
- Both versions support date hierarchies when working with date columns from SharePoint lists.
- You can create hierarchies such as Year > Quarter > Month > Day for better time-based analysis.
- This feature simplifies date-based filtering and drill-down capabilities.
2. Auto Sum:
- Auto Sum is available in both versions.
- When you add numeric columns (e.g., sales, revenue) to your visuals, Power BI automatically provides a sum aggregation.
- You can customize the aggregation method (e.g., average, maximum, minimum) as needed.
Additional Features in Version 2.0:
1. Enhanced Performance:
- As mentioned earlier, the 2.0 connector offers improved performance for column expansions and joins.
- This efficiency translates to faster data retrieval and transformation.
2. Maximum Join Operations:
- The 2.0 version has a maximum of 12 join operations per query due to API constraints.
- This ensures optimal performance while handling complex data relationships.
3. Specifically for SharePoint Online:
- Version 2.0 is tailored exclusively for SharePoint Online lists.
- It aligns with the modern SharePoint ecosystem.
4. Not Backward Compatible:
- Remember that the 2.0 connector is not backward compatible with the 1.0 version.
- When migrating or updating data connections, consider compatibility.
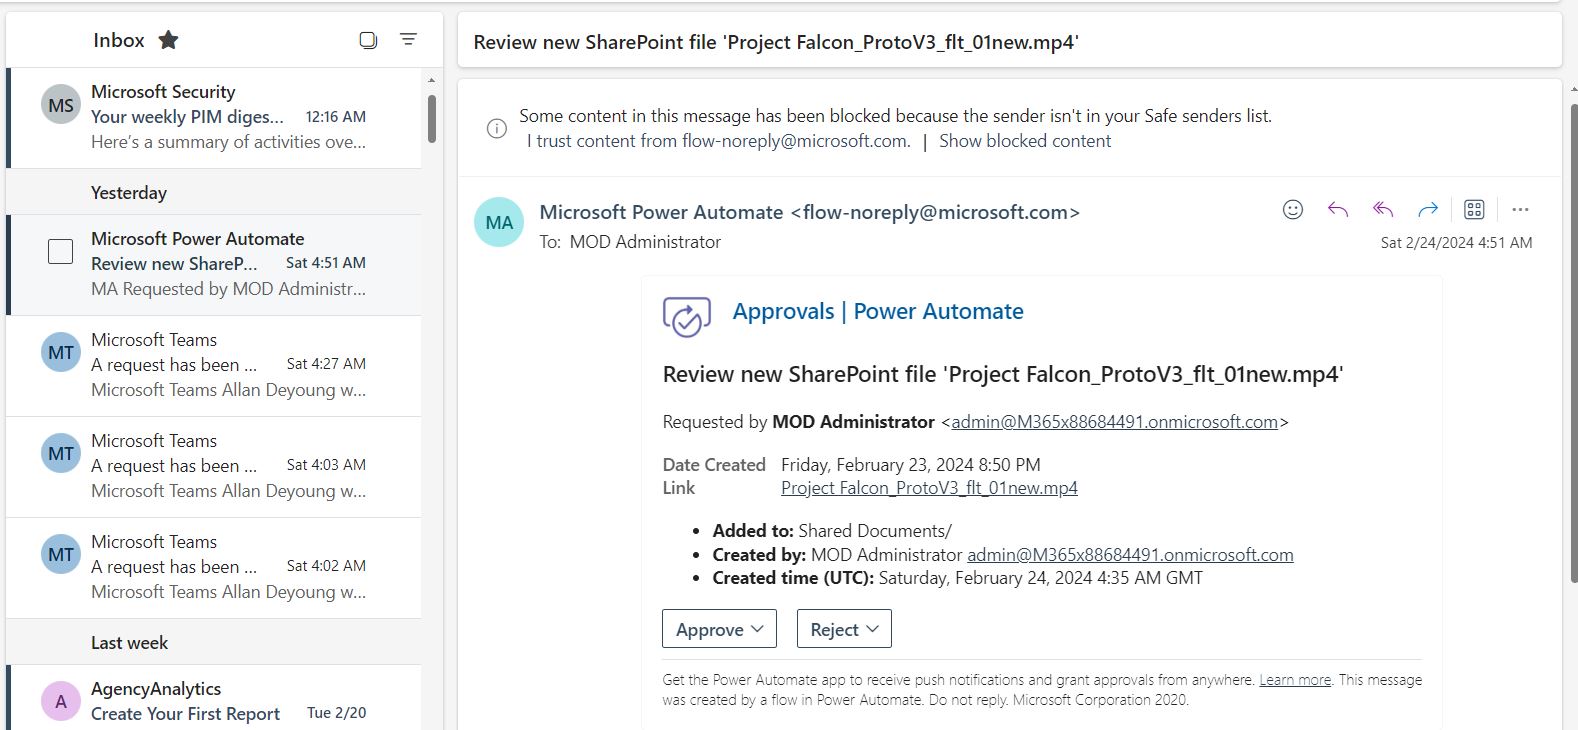
Start an approval when a file is added to SharePoint
Also explained in Youtube Video: https://www.youtube.com/watch?v=wlLohZEZ4E4
Workflow: Start an Approval When a File Is Added to SharePoint
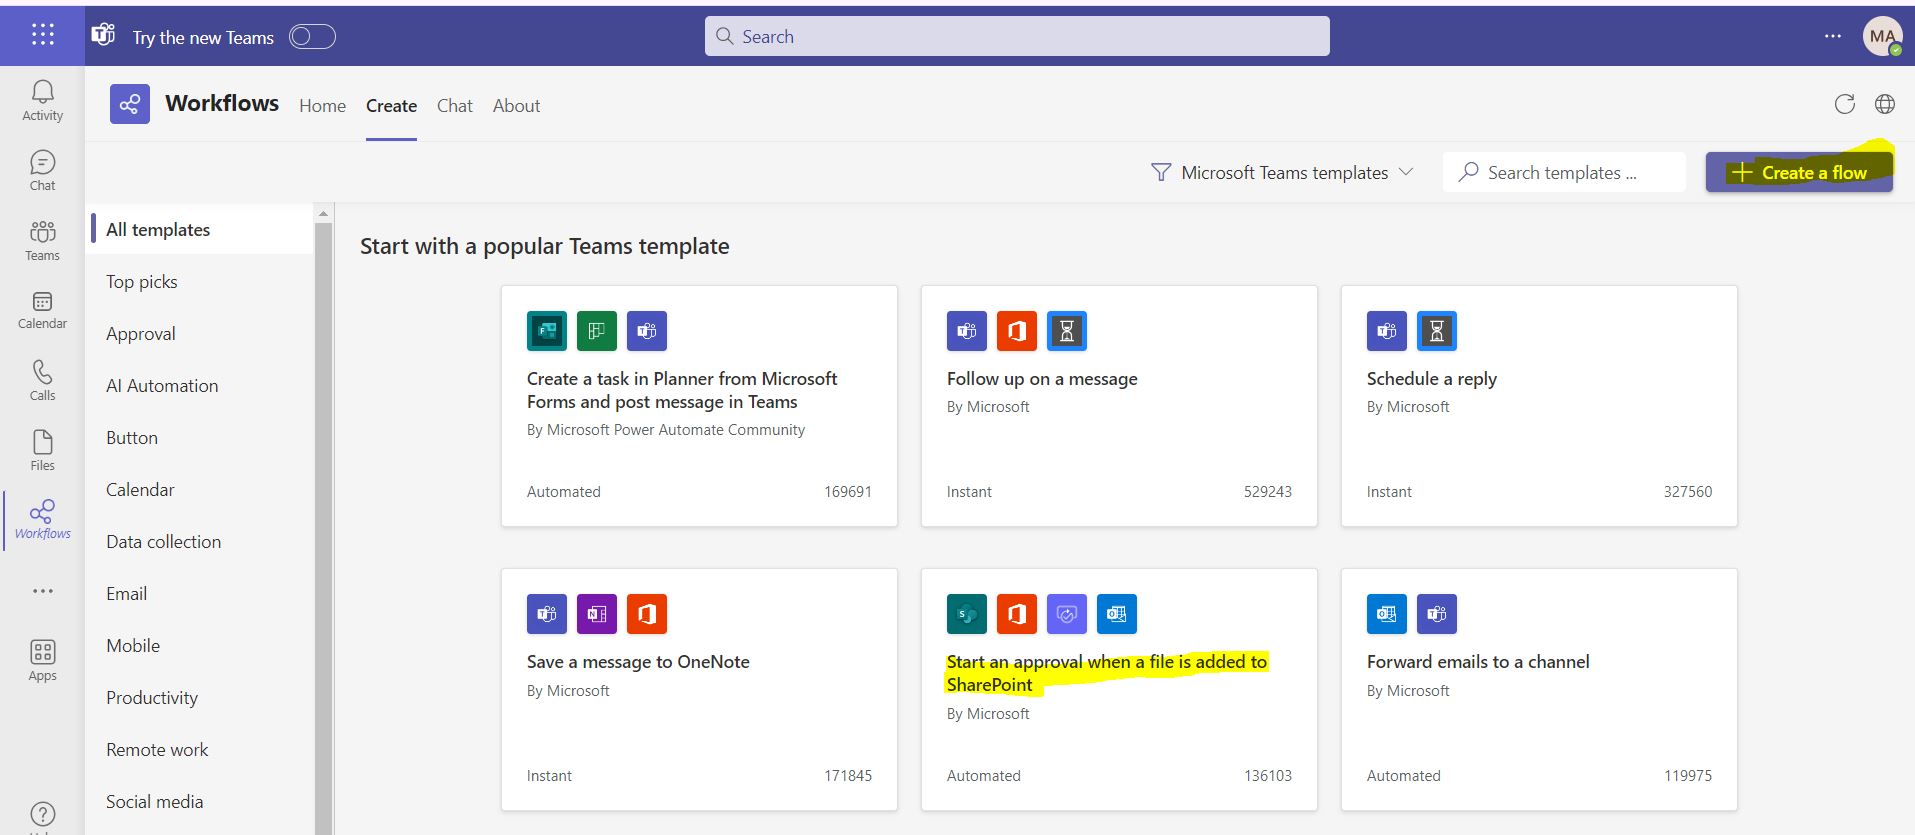
1. Create a Flow in Power Automate or Use the workflow template in Microsoft Teams
1.a Power Automate:
- Navigate to your SharePoint library where you want to implement this workflow.
- Select the file you want to send for approval.
- Click on the “Show actions” button (usually represented by three dots).
- Hover over “Automate” and select “Request sign-off.”
- 1.b Teams Workflow:
- Navigate to the Teams channel.
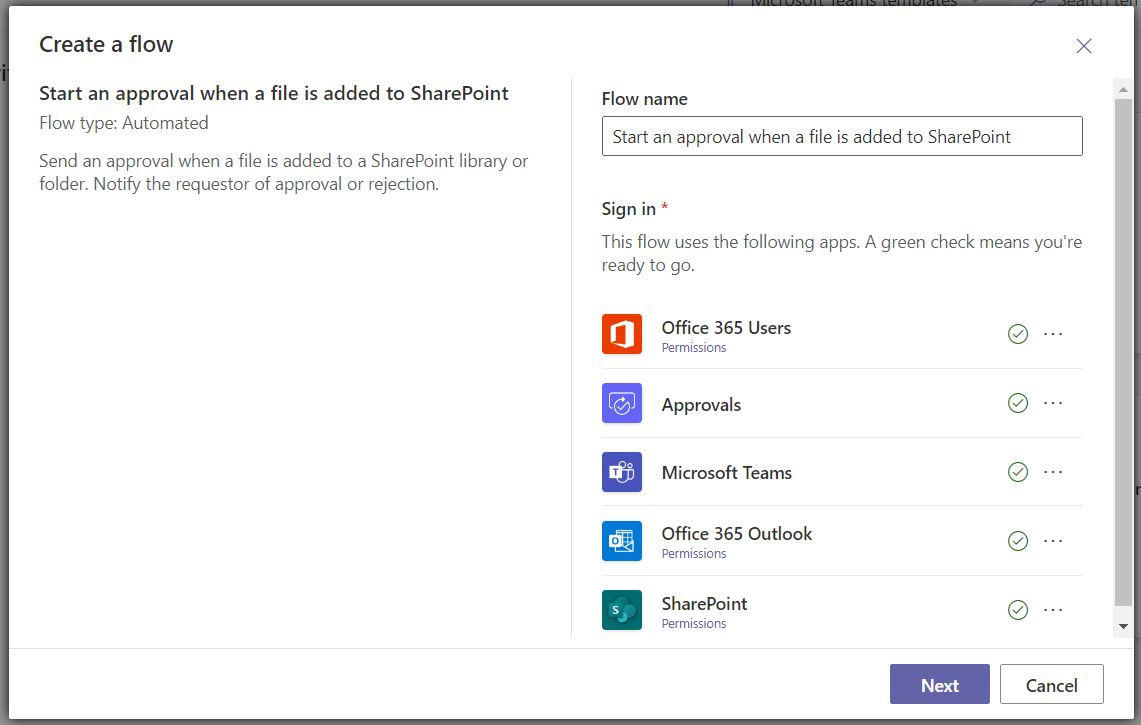
- Select “Create a Flow” then select ‘Start an approval when a file is added to SharePoint”the file you want to send for approval.”
- Give a name to the flow and make sure all authentication is done to all the required resources and then select Next
- Set up your flow with URL, list/library to monitor and users who should get email for approval.
Note : You can select multiple approvers for the library. - Select Create flow

2. Configure the Approval Flow
- In the approval configuration screen, you’ll need to:
- Specify the approvers (individuals or groups who will review the file).
- Enter a message or instructions related to the approval request.
- Click “Run flow” to initiate the approval process.
3. Approval Process
- Once the file is added to the SharePoint library, the workflow will trigger.
- The specified approvers will receive an approval request notification.
- Approvers can review the file and either approve or reject it.
- The requestor (the person who added the file) will be notified of the approval or rejection decision.
4. Additional Considerations
- You can customize the approval email template to include relevant details about the file.
- If the file is rejected, you can set up additional actions (such as notifying the requestor or updating the file status).
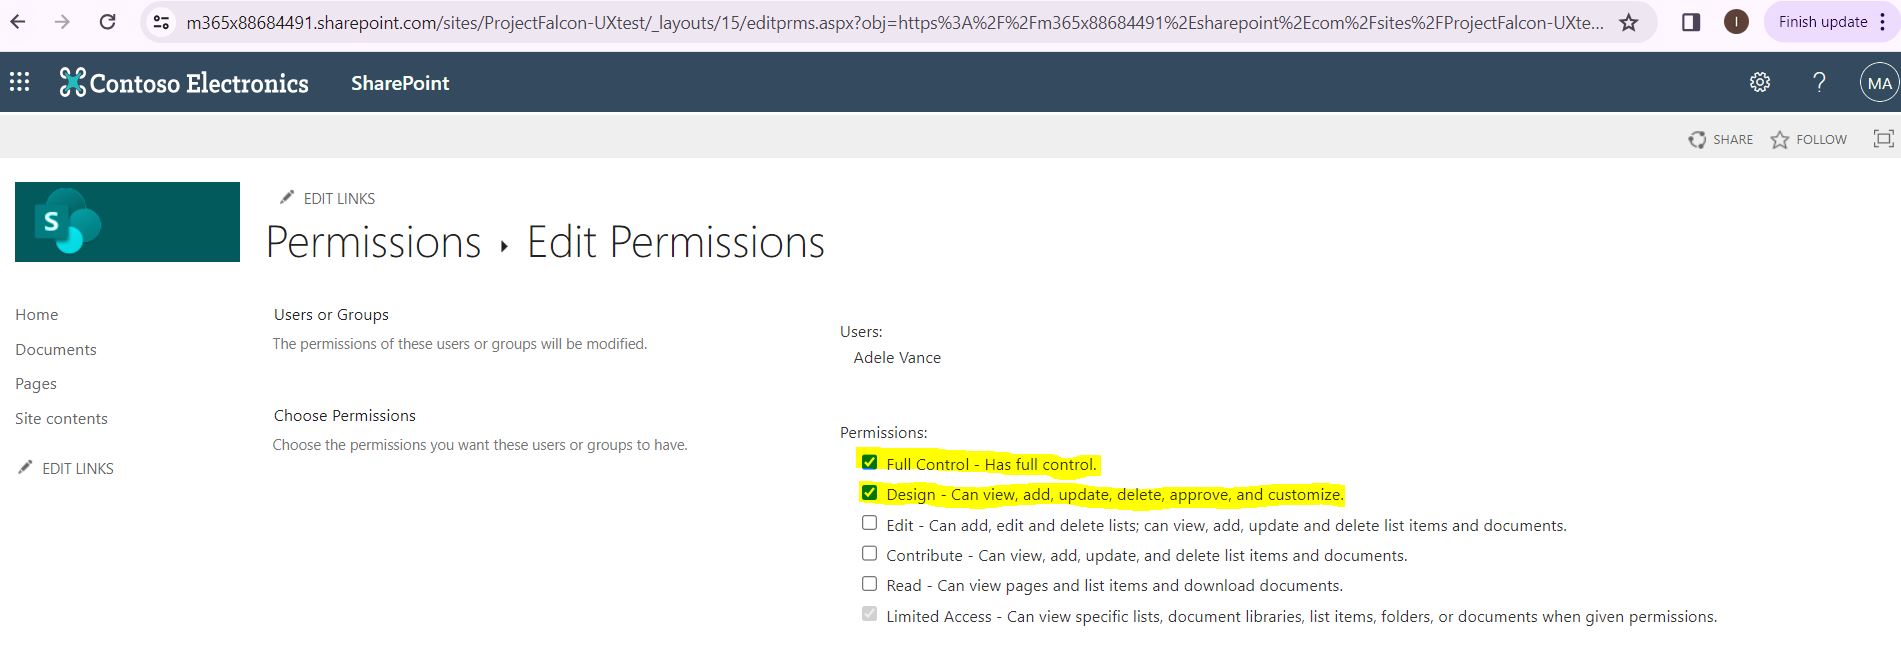
- The Approver set in the flow should have Approver/Design or Owner permission on the list/document library.
What is digital twin? – Part 1
What is digital twin?
Virtual representation of real world item or process.
Digital twin platform enables us to actually collect this data, process it, provide insights and then enable us to take some actions based on the data. More specifically take proactive measures instead of reactive measures. General its used for items but we can also use it for processes. I will explain on how we can use digital twin for processes.
What are types of Twin?
- Digital Model/Simulator: Here we manually feed data into a existing model to see its results. If we have seen the movie ‘Day After Tomorrow’, the scientist inputs data from various locations in the existing model and can predict what the world would go through in next few days.
- Digital Shadow: Here real world devices/sensors send IOT data to virtual platform. Lets assume we have a physical car and a wheels in your car has a sensor wheel which is sending data to the a cloud based digital twin wheel (Virtual representation of car). This will help understand when your car tires needs to be replaced or repaired. A real life example is Michelin Fleet Solutions.
- Digital Twin: Here we have 2 way data sync from sensor to the digital twin and may receive some action based on input provided. Example here is where we have a multistory warehouse which has sensor on all most critical components, water supply, electricity circuit, elevators, co2 level, AC etc. Based on feedback of the sensors, temperature(Cold storage) in one section of the warehouse is different and other section(Meeting room).
Typical Digital Twin functions
- Visualize current state of item or process
- Trigger alerts under certain conditions
- Review historic data
- Simulate scenarios
Few Benefits:
- Helps save money incase we go live/production with a major defects or avoid downtime at all.
- Learn from past scenarios.
- Help increase safer work environment.
- Increase Quality / efficiency / life of the products/organization.
How are digital twin used in real world?
As I have already shared, Michelin Fleet Solutions now sells kilometers instead of tyres to make profit and sensor in wheel of car is sending data to the a cloud based digital twin wheel (Virtual representation of car).This will help understand when your car tires needs to be replaced or repaired. Also they provide feedback to customer on which routes to take and what time to travel to avoid reduce lifespan of the wheels.
Another example is where a supermarket monitors all the customers as to which section they visit most, which is most visible section for adds, how many people buy what kind of items from check out counters, etc. This helps them to place new products / high margin products in that area with high footprint and also plan a longer exit path so because physiologically, the more time a person spends in the store, the more he would purchase.
Origins of digital twin
John Vickers who was Principal technologies invented the word digital twin back in 2010.
Michael Grieves then worked with Vickers to create digital twin of few real life items. It got boost after IOT growth accelerated.
One of the best example is Digital Twin Victoria(Australia)
Permission or URL issue when you use Azure Digital Twin explorer for the 1st time
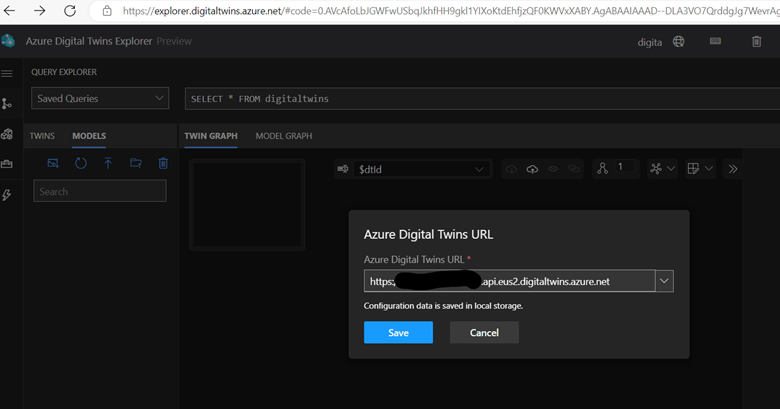
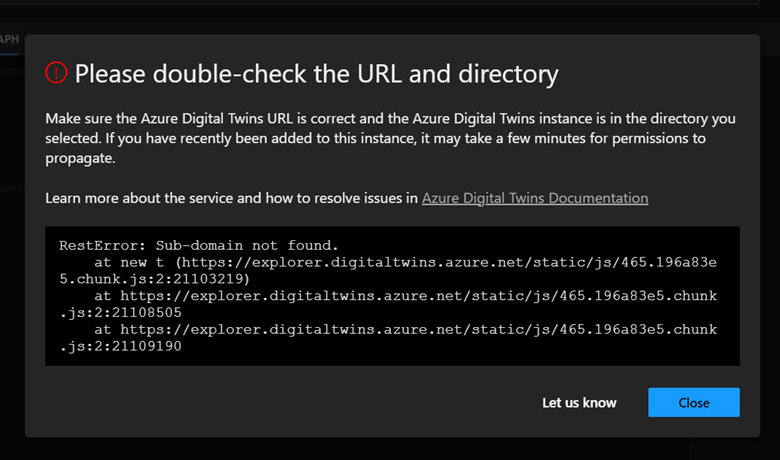
Error : ‘Double check URL and directory’ or ‘you don’t have permission on the Digital twin URL’
RestError: Sub-domain not found.
at new t (https://explorer.digitaltwins.azure.net/static/js/465.196a83e5.chunk.js:2:21103219)
at https://explorer.digitaltwins.azure.net/static/js/465.196a83e5.chunk.js:2:21108505
at https://explorer.digitaltwins.azure.net/static/js/465.196a83e5.chunk.js:2:21109190
To resolved these errors follow below steps
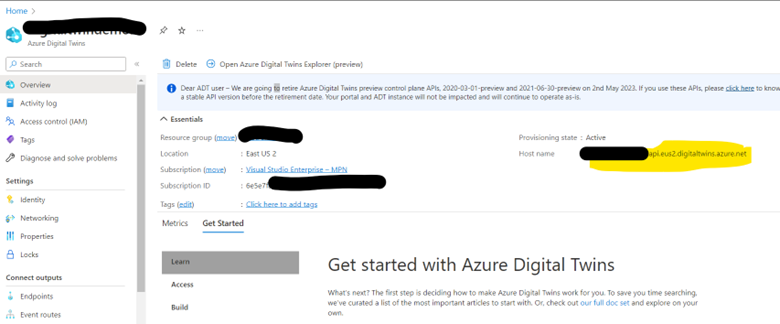
- In the Azure portal, navigate to the Digital Twins resource
- Make sure you use the URL given on your Digital Twin Overview screen in front of Hostname as shown above, make sure you start with https://
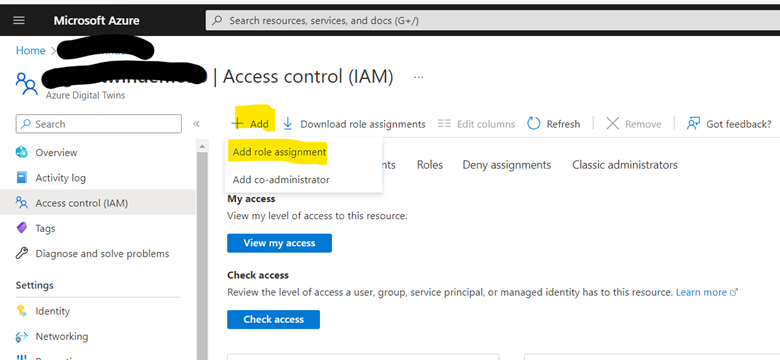
- Also give appropriate permission to yourself by clicking on the Access Control (IAM) menu
- Select Add role assignment
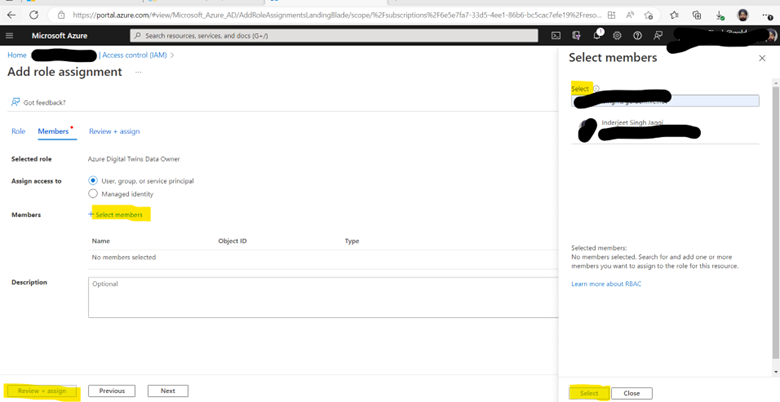
- Select Azure Digital Twins Data Owner in the Role dropdown listbox
- For the Assign access to setting, select User, group, or service principal
- Now, select the user that you are using in the Azure portal right now and that you’ll use on your local machine to authenticate with the sample application
- Click Save to assign the Role