Creating a Lab on Windows Azure – Continue
- Update Domain setting on Virtual Network and bind it to Private IP on DC
So far we have created a Virtual Network and a Domain controller in that Virtual network. I hope this process was simple enough for you to follow. It is very important that Domain Controller and DNS have a static IP address so that all other machines know whom to contact to authenticate and resolve computer name. Now we need to make sure that our domain controller has a static IP address and then assign it to DNS on Virtual Network. To do so we will follow below steps:
- Login to your Azure Subscription Portal site https://manage.windowsazure.com
- Select Virtual Machine from left Menu
- Select the Virtual Machine we just created and click on Connect at bottom
- Now RDP to the Virtual Machine we created as a Domain Controller
- Open Windows PowerShell and run command “IPConfig”. Make a note of IP address
- Click on Start and Open DNS manager. Expand Computer name > Forward Lookup Zone > Demo.com > Make sure Ipconfig and DNS has same IP address.
- Make sure you are connected to Azure PowerShell account by following steps we discussed in section “Connect to your Azure Subscription using PowerShell”
- Run command “Get-AzureVM”. You should be able to see your Azure Virtual Machine name, make a note of same
- Run below command in Azure PowerShell
Get-AzureVM -ServiceName “Service name from Get-AzureVM command” -Name “name from Get-AzureVM command”| Set-AzureStaticVNetIP -IPAddress “10.0.0.4” | Update-AzureVM
- Now the system will get restarted and a Static IP will be assigned to same. We need to update the same IP in the Virtual Network we created in Azure.
- Login to your Azure Subscription Portal site https://manage.windowsazure.com
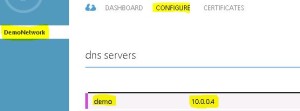
- Select “Network” from left pane > Select the “Demo Network” we created > Click “Configure” on top.
- Update the IP Address of Domain Controller and Domain name. E.g. demo 10.0.0.4. Click on Save at bottom to save these changes

