Archive for February, 2024
How to Access OneDrive on Ubuntu
1. Install OneDrive Client for Linux
While there isn’t an official OneDrive app for Linux, you can use the OneDrive Client for Linux, which is compatible with all major Linux distributions. This client provides features like state caching, real-time file monitoring, and syncing. Here’s how to install it:
- Open a terminal on your Ubuntu machine.
- Add the OpenSuSE Build Service Repository key:
wget -qO - https://download.opensuse.org/repositories/home:/npreining:/debian-ubuntu-onedrive/xUbuntu_22.04/Release.key | gpg --dearmor | sudo tee /usr/share/keyrings/obs-onedrive.gpg > /dev/null - Install the OneDrive Client:
sudo sh -c "echo 'deb [signed-by=/usr/share/keyrings/obs-onedrive.gpg] https://download.opensuse.org/repositories/home:/npreining:/debian-ubuntu-onedrive/xUbuntu_22.04/ /' > /etc/apt/sources.list.d/onedrive.list" sudo apt update sudo apt install onedrive
2. Authorize OneDrive
- Run the OneDrive client:
onedrive - Copy the link provided in the output.
- Paste the link into your browser and authorize the OneDrive application using your account.
- Click “Yes” to grant the necessary access.
3. Sync Your Files
Once authorized, the OneDrive Client for Linux will sync your files and folders between your Ubuntu device and your OneDrive account. You’ll have seamless access to your data right from your Linux file manager. Use below command to sync the folder if needed
onedrive destination-directory [FILEPATH] –synchronize
To see the Sync status use below command
onedrive display-sync-status
SharePoint Online list connector versions 2.0 and 1.0 in Power BI Dashboard
Also explained in my Youtube video : https://youtu.be/neEBhfzFRJo
Common Features in Both Versions:
1. Date Hierarchy:
- Both versions support date hierarchies when working with date columns from SharePoint lists.
- You can create hierarchies such as Year > Quarter > Month > Day for better time-based analysis.
- This feature simplifies date-based filtering and drill-down capabilities.
2. Auto Sum:
- Auto Sum is available in both versions.
- When you add numeric columns (e.g., sales, revenue) to your visuals, Power BI automatically provides a sum aggregation.
- You can customize the aggregation method (e.g., average, maximum, minimum) as needed.
Additional Features in Version 2.0:
1. Enhanced Performance:
- As mentioned earlier, the 2.0 connector offers improved performance for column expansions and joins.
- This efficiency translates to faster data retrieval and transformation.
2. Maximum Join Operations:
- The 2.0 version has a maximum of 12 join operations per query due to API constraints.
- This ensures optimal performance while handling complex data relationships.
3. Specifically for SharePoint Online:
- Version 2.0 is tailored exclusively for SharePoint Online lists.
- It aligns with the modern SharePoint ecosystem.
4. Not Backward Compatible:
- Remember that the 2.0 connector is not backward compatible with the 1.0 version.
- When migrating or updating data connections, consider compatibility.
Start an approval when a file is added to SharePoint
Also explained in Youtube Video: https://www.youtube.com/watch?v=wlLohZEZ4E4
Workflow: Start an Approval When a File Is Added to SharePoint
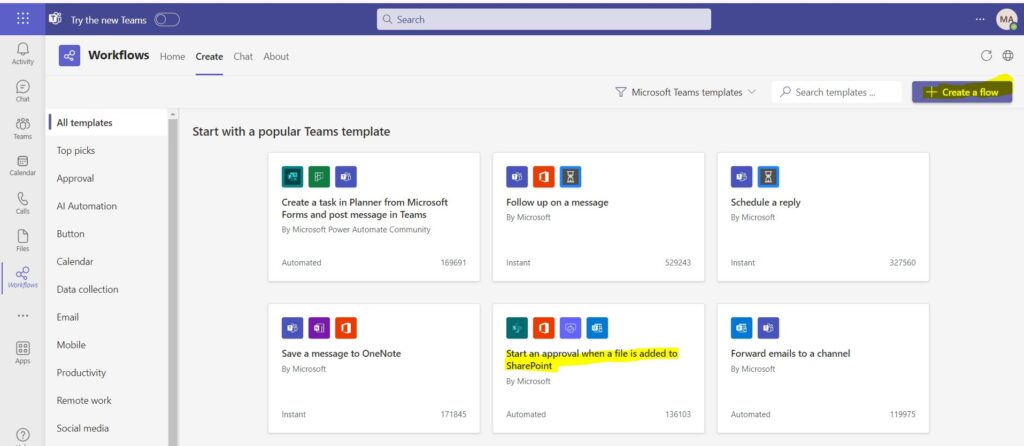
1. Create a Flow in Power Automate or Use the workflow template in Microsoft Teams
1.a Power Automate:
- Navigate to your SharePoint library where you want to implement this workflow.
- Select the file you want to send for approval.
- Click on the “Show actions” button (usually represented by three dots).
- Hover over “Automate” and select “Request sign-off.”
- 1.b Teams Workflow:
- Navigate to the Teams channel.
- Select “Create a Flow” then select ‘Start an approval when a file is added to SharePoint”the file you want to send for approval.”
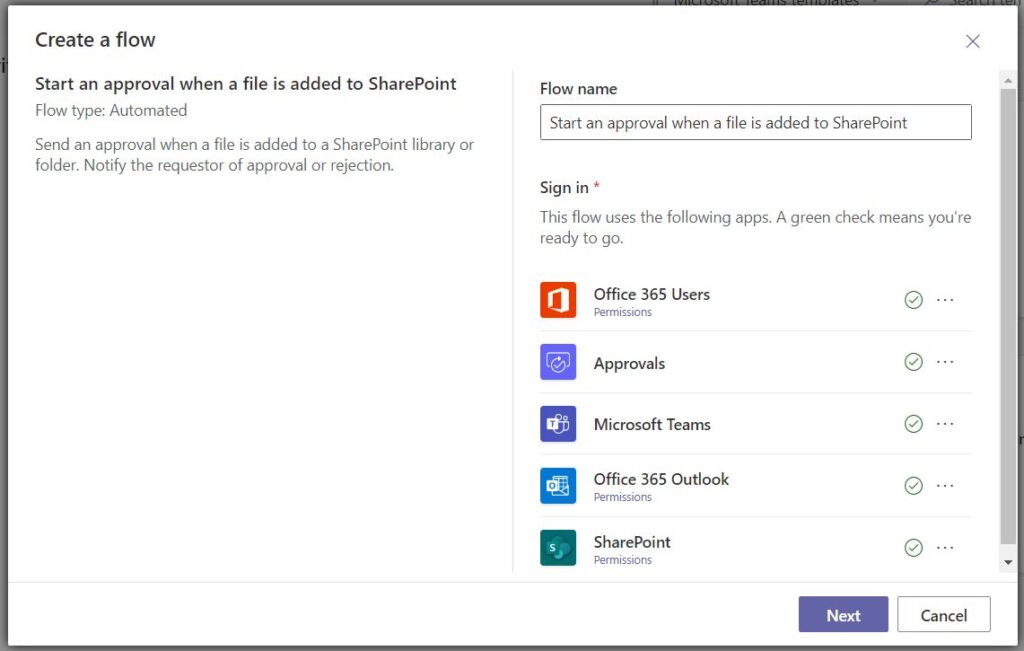
- Give a name to the flow and make sure all authentication is done to all the required resources and then select Next
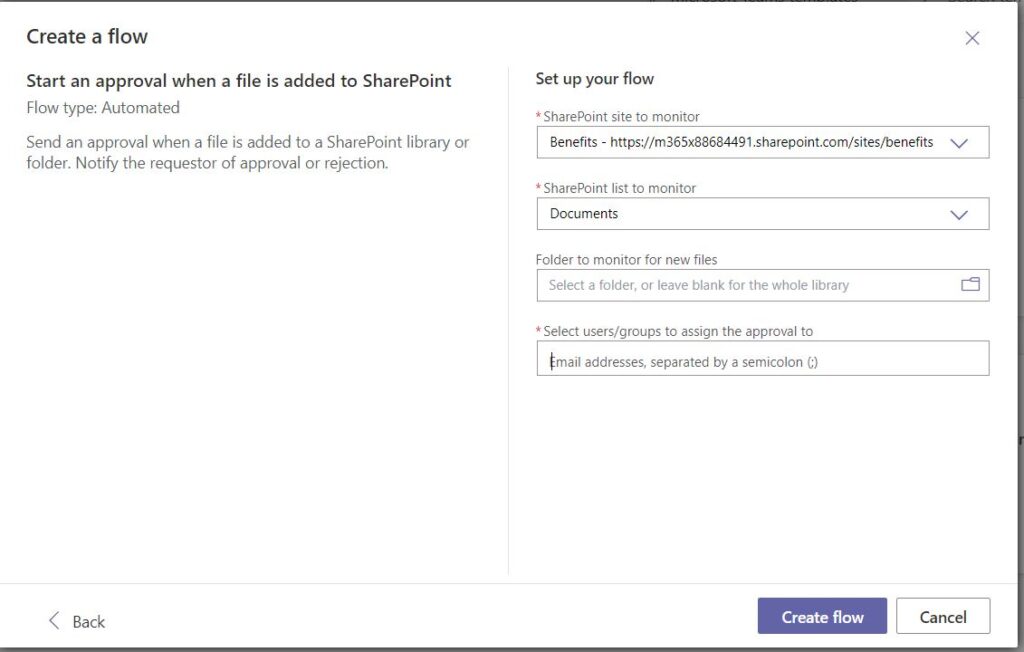
- Set up your flow with URL, list/library to monitor and users who should get email for approval.
Note : You can select multiple approvers for the library. - Select Create flow
2. Configure the Approval Flow
- In the approval configuration screen, you’ll need to:
- Specify the approvers (individuals or groups who will review the file).
- Enter a message or instructions related to the approval request.
- Click “Run flow” to initiate the approval process.
3. Approval Process
- Once the file is added to the SharePoint library, the workflow will trigger.
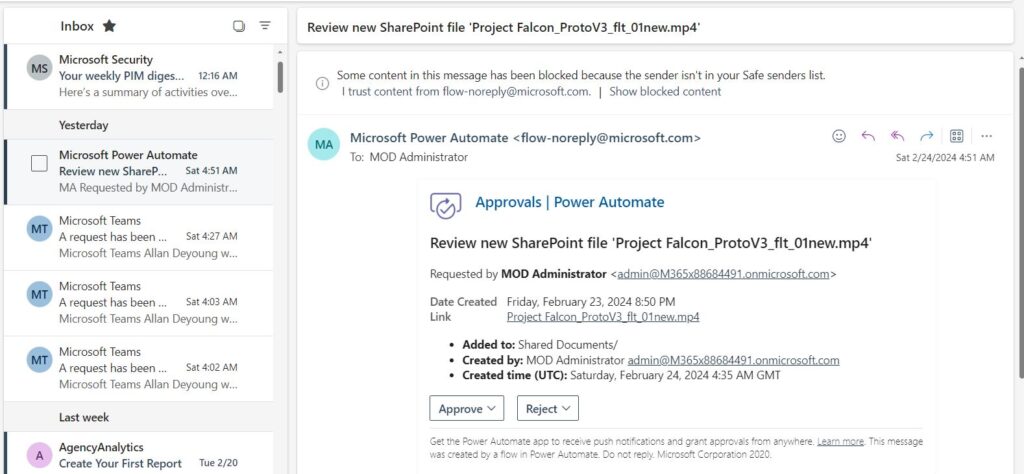
- The specified approvers will receive an approval request notification.
- Approvers can review the file and either approve or reject it.
- The requestor (the person who added the file) will be notified of the approval or rejection decision.
4. Additional Considerations
- You can customize the approval email template to include relevant details about the file.
- If the file is rejected, you can set up additional actions (such as notifying the requestor or updating the file status).
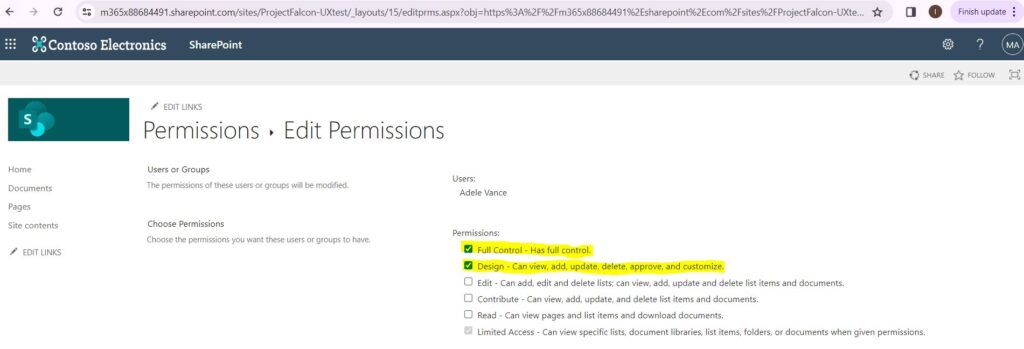
- The Approver set in the flow should have Approver/Design or Owner permission on the list/document library.
What is digital twin? – Part 1
What is digital twin?
Virtual representation of real world item or process.
Digital twin platform enables us to actually collect this data, process it, provide insights and then enable us to take some actions based on the data. More specifically take proactive measures instead of reactive measures. General its used for items but we can also use it for processes. I will explain on how we can use digital twin for processes.
What are types of Twin?
- Digital Model/Simulator: Here we manually feed data into a existing model to see its results. If we have seen the movie ‘Day After Tomorrow’, the scientist inputs data from various locations in the existing model and can predict what the world would go through in next few days.
- Digital Shadow: Here real world devices/sensors send IOT data to virtual platform. Lets assume we have a physical car and a wheels in your car has a sensor wheel which is sending data to the a cloud based digital twin wheel (Virtual representation of car). This will help understand when your car tires needs to be replaced or repaired. A real life example is Michelin Fleet Solutions.
- Digital Twin: Here we have 2 way data sync from sensor to the digital twin and may receive some action based on input provided. Example here is where we have a multistory warehouse which has sensor on all most critical components, water supply, electricity circuit, elevators, co2 level, AC etc. Based on feedback of the sensors, temperature(Cold storage) in one section of the warehouse is different and other section(Meeting room).
Typical Digital Twin functions
- Visualize current state of item or process
- Trigger alerts under certain conditions
- Review historic data
- Simulate scenarios
Few Benefits:
- Helps save money incase we go live/production with a major defects or avoid downtime at all.
- Learn from past scenarios.
- Help increase safer work environment.
- Increase Quality / efficiency / life of the products/organization.
How are digital twin used in real world?
As I have already shared, Michelin Fleet Solutions now sells kilometers instead of tyres to make profit and sensor in wheel of car is sending data to the a cloud based digital twin wheel (Virtual representation of car).This will help understand when your car tires needs to be replaced or repaired. Also they provide feedback to customer on which routes to take and what time to travel to avoid reduce lifespan of the wheels.
Another example is where a supermarket monitors all the customers as to which section they visit most, which is most visible section for adds, how many people buy what kind of items from check out counters, etc. This helps them to place new products / high margin products in that area with high footprint and also plan a longer exit path so because physiologically, the more time a person spends in the store, the more he would purchase.
Origins of digital twin
John Vickers who was Principal technologies invented the word digital twin back in 2010.
Michael Grieves then worked with Vickers to create digital twin of few real life items. It got boost after IOT growth accelerated.
One of the best example is Digital Twin Victoria(Australia)
Permission or URL issue when you use Azure Digital Twin explorer for the 1st time
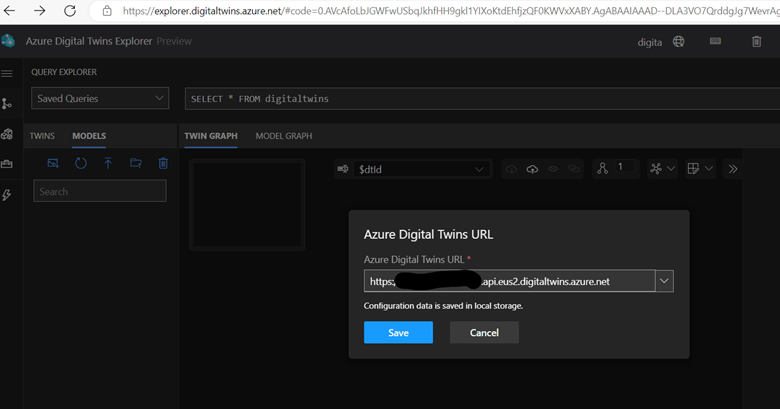
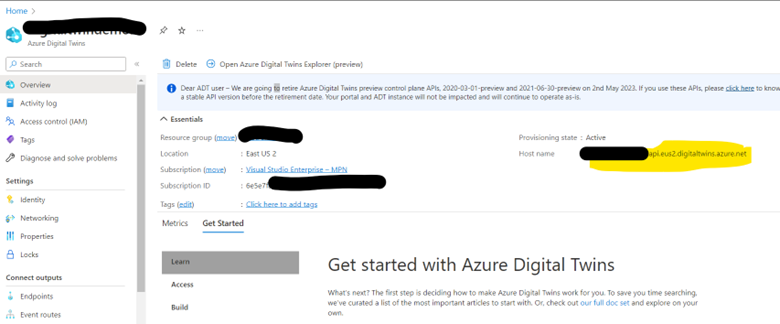
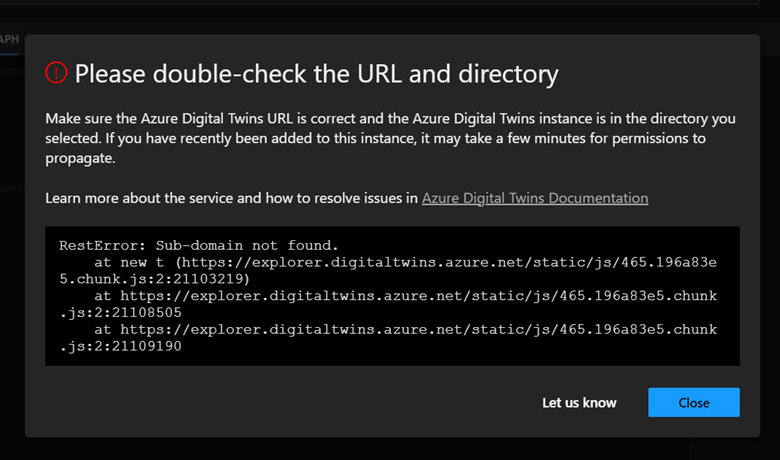
Error : ‘Double check URL and directory’ or ‘you don’t have permission on the Digital twin URL’
RestError: Sub-domain not found.
at new t (https://explorer.digitaltwins.azure.net/static/js/465.196a83e5.chunk.js:2:21103219)
at https://explorer.digitaltwins.azure.net/static/js/465.196a83e5.chunk.js:2:21108505
at https://explorer.digitaltwins.azure.net/static/js/465.196a83e5.chunk.js:2:21109190
To resolved these errors follow below steps
- In the Azure portal, navigate to the Digital Twins resource
- Make sure you use the URL given on your Digital Twin Overview screen in front of Hostname as shown above, make sure you start with https://
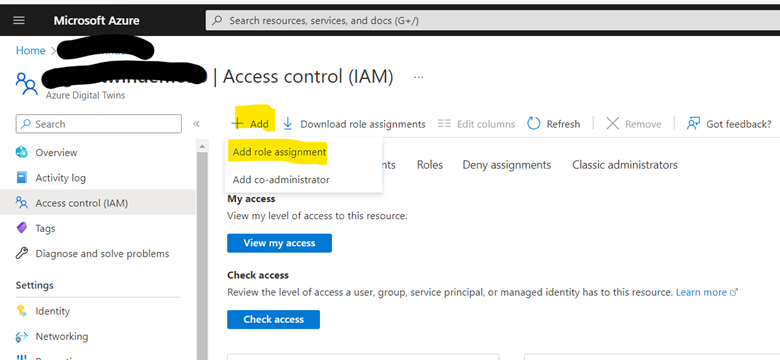
- Also give appropriate permission to yourself by clicking on the Access Control (IAM) menu
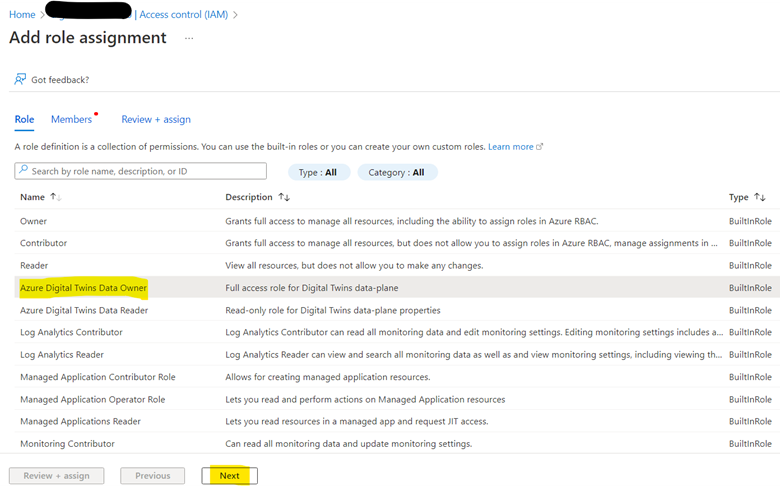
- Select Add role assignment
- Select Azure Digital Twins Data Owner in the Role dropdown listbox
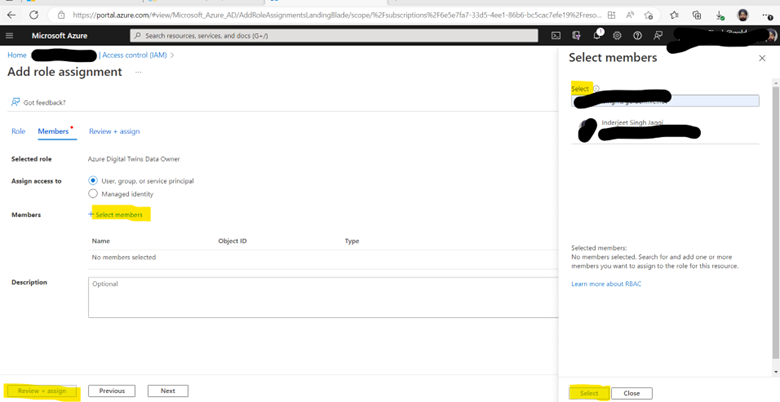
- For the Assign access to setting, select User, group, or service principal
- Now, select the user that you are using in the Azure portal right now and that you’ll use on your local machine to authenticate with the sample application
- Click Save to assign the Role
Quick overview of Azure Data Explorer
A big data analytics platform called Azure Data Explorer makes it simple to quickly evaluate large amounts of data. You may get a complete end-to-end solution for data ingestion, query, visualization, and administration with the Azure Data Explorer toolset.
Azure Data Explorer makes it simple to extract critical insights, identify patterns and trends, and develop forecasting models by analyzing structured, semi-structured, and unstructured data over time series. Azure Data Explorer is helpful for log analytics, time series analytics, IoT, and general-purpose exploratory analytics. It is completely managed, scalable, secure, resilient, and enterprise ready.
Terabytes of data may be ingested by Azure Data Explorer in minutes in batch or streaming mode, and petabytes of data can be searched with millisecond response times. Data can be ingested in a variety of structures and formats. It may enter from a number of channels and sources.
The Kusto Query Language (KQL), an open-source language created by the team, is used by Azure Data Explorer. The language is straightforward to comprehend and learn, and it is quite effective. Both basic operators and sophisticated analyses are available. Microsoft makes extensive use of it (Azure Monitor – Log Analytics and Application Insights, Microsoft Sentinel, and Microsoft 365 Defender). KQL is designed with quick, varied big data exploration in mind. queries any other tabular expressions, including views, functions, and tables. This can involve clusters or even tables from various databases.
Each table’s data is kept as data shards, commonly referred to as “extents.” Based on the ingestion time, all data is automatically indexed and partitioned. There are no main foreign key requirements or other restrictions, like as uniqueness, unlike a relational database. As a result, you may store a wide variety of data and quickly query it thanks to the way it is kept.
Azure Data Explorer
ADX Dashboards is a newly released feature from Microsoft which provide the ability to create various types of data visualizations in one place and in an easy-to-digest form. Dashboards can be shared broadly and allow multiple stakeholders to view dynamic, real time, fresh data while easily interacting with it to gain desired insights. With ADX Dashboards, you can build a dashboard, share it with others, and empower them to continue their data exploration journey. You can say, this is a cheap alternative to PowerBI.
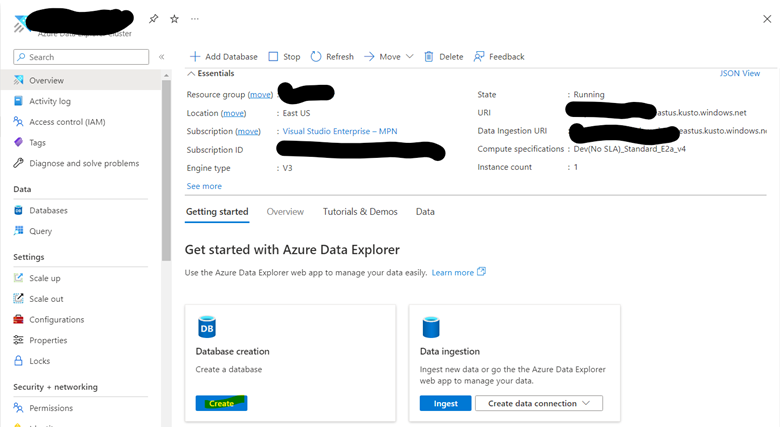
- Create Azure data explorer cluster
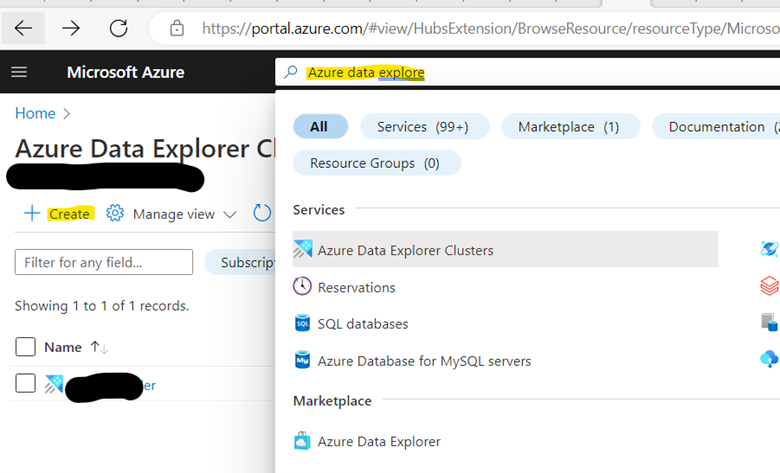
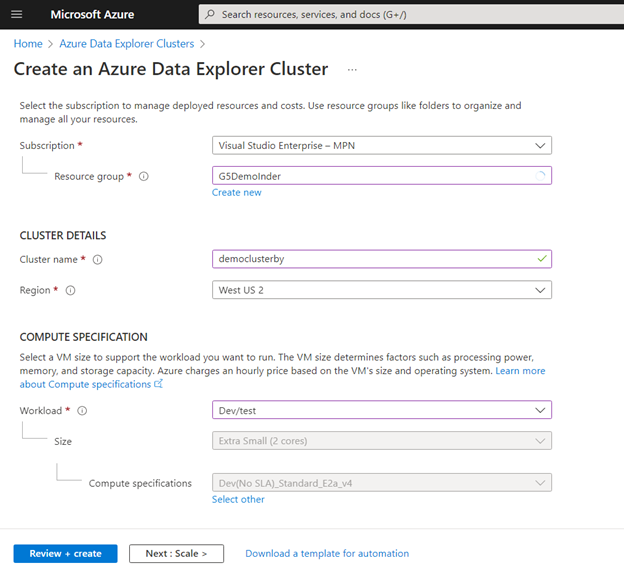
*Create a new resource group if required.
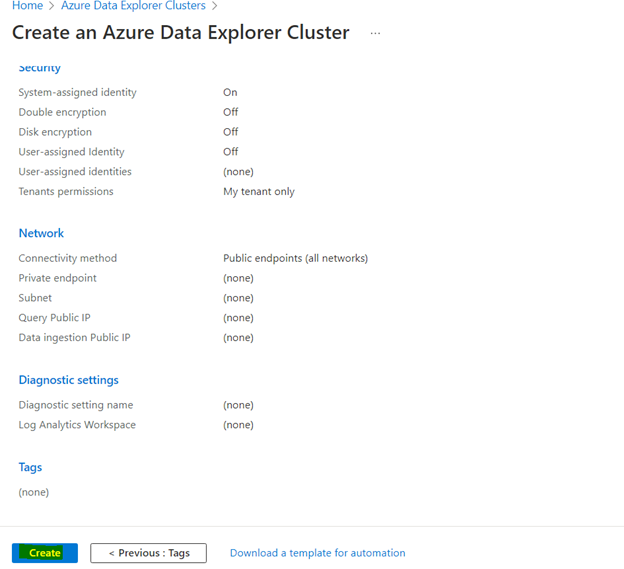
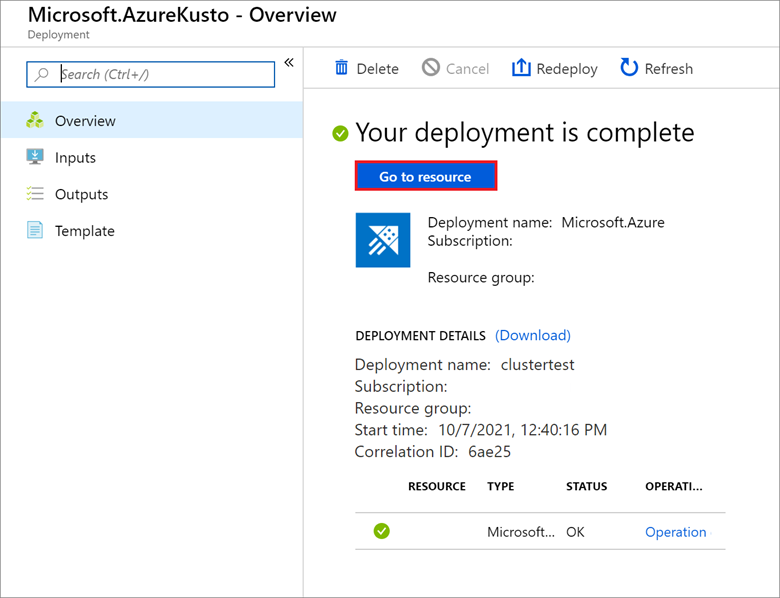
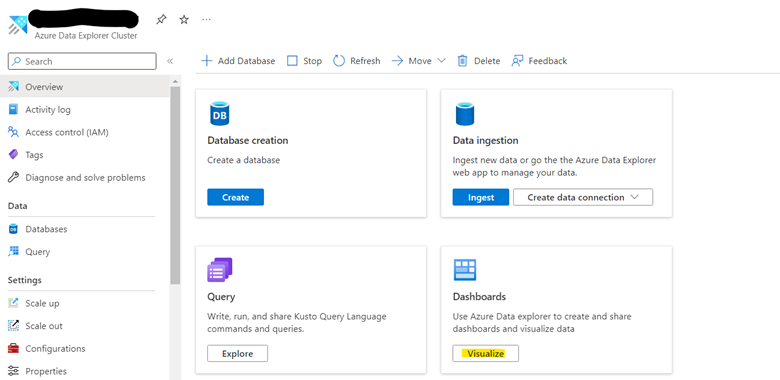
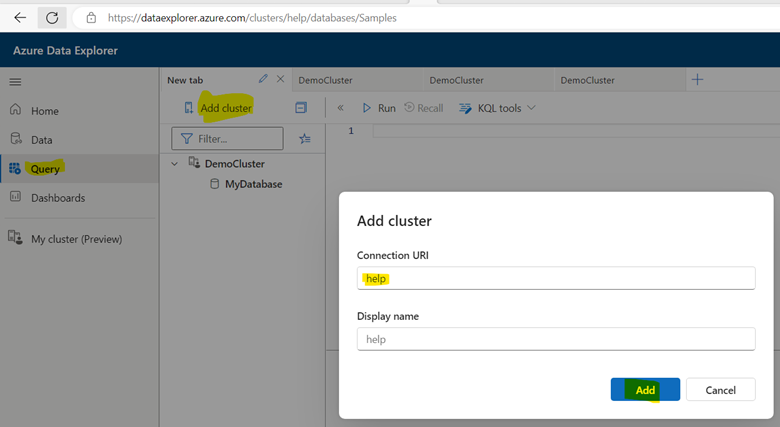
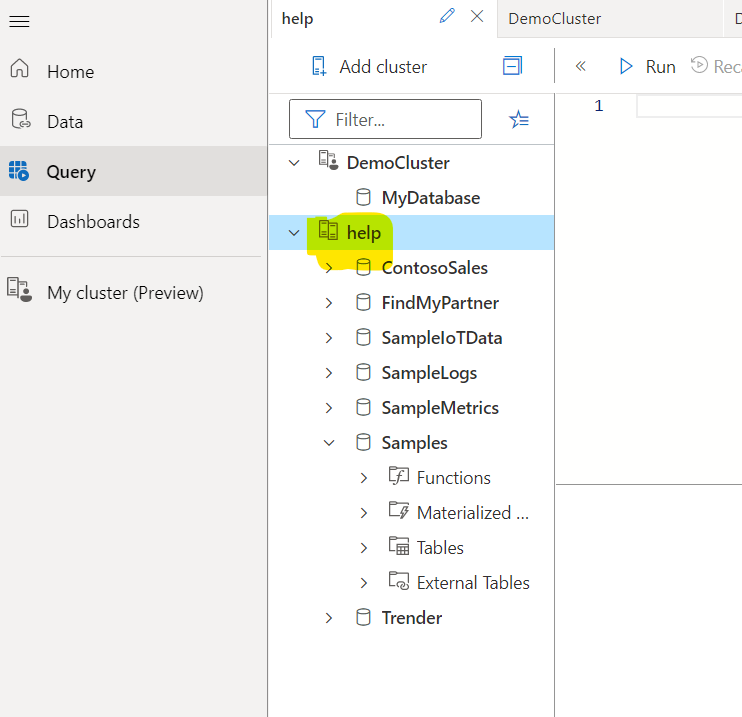
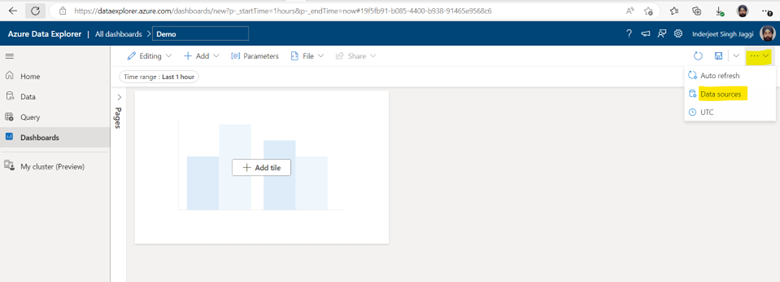
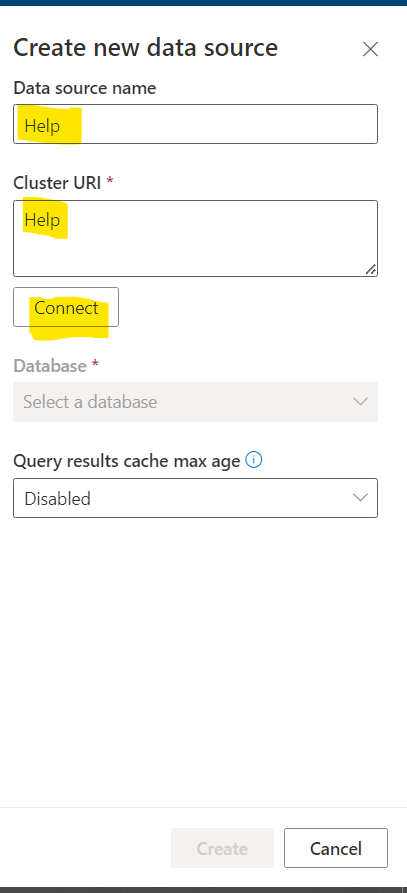
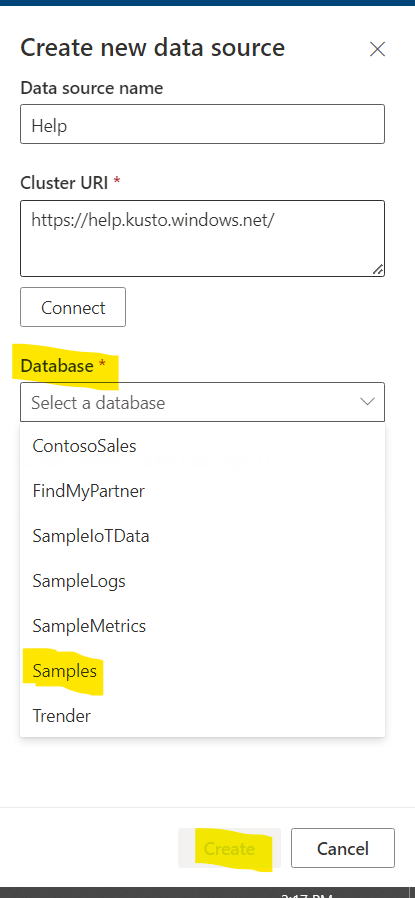
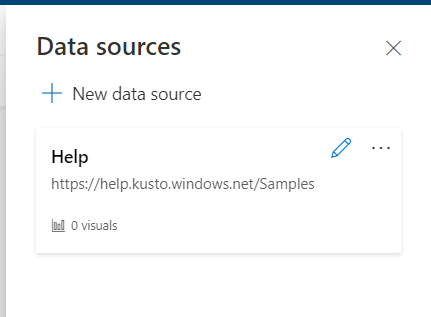
2. Add Help database to Visualization Dashboard
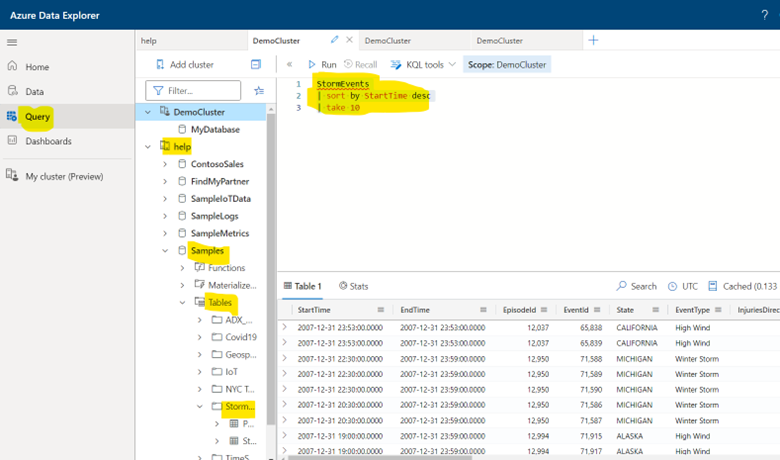
StormEvents
| sort by StartTime desc
| take 10
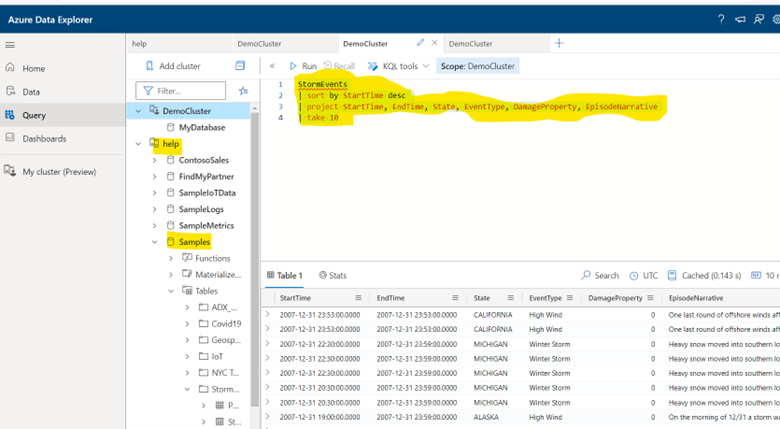
StormEvents
| sort by StartTime desc
| project StartTime, EndTime, State, EventType, DamageProperty, EpisodeNarrative
| take 10
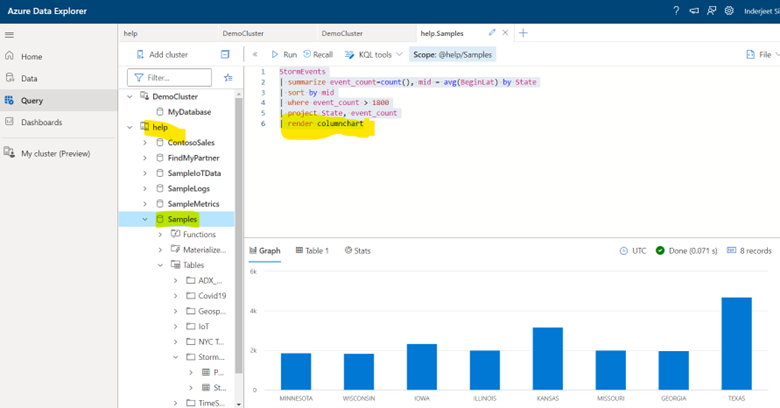
StormEvents
| summarize event_count=count(), mid = avg(BeginLat) by State
| sort by mid
| where event_count > 1800
| project State, event_count
| render columnchart
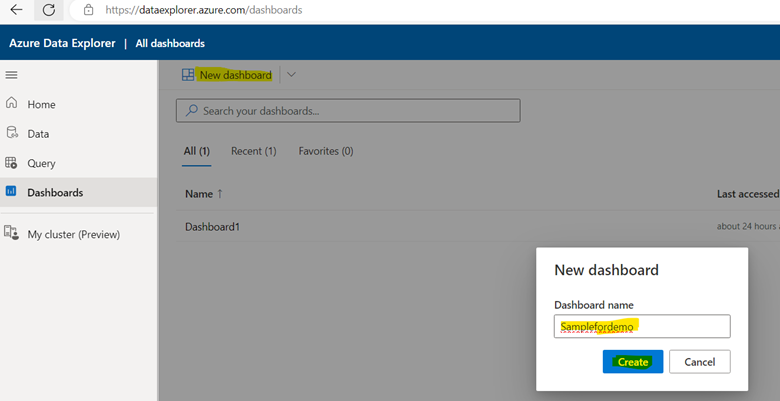
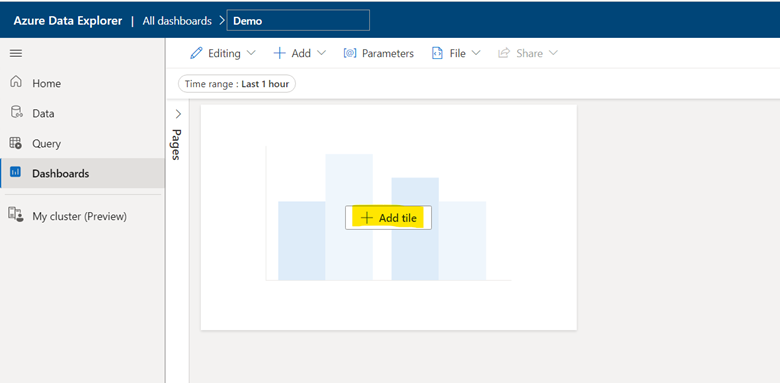
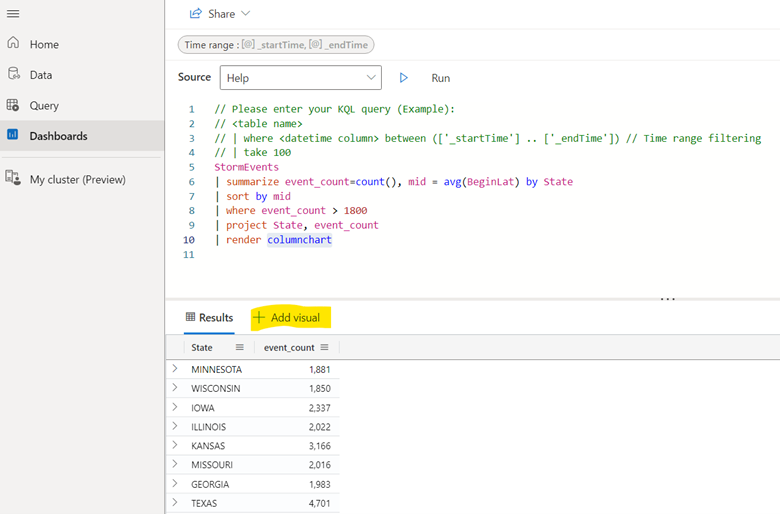
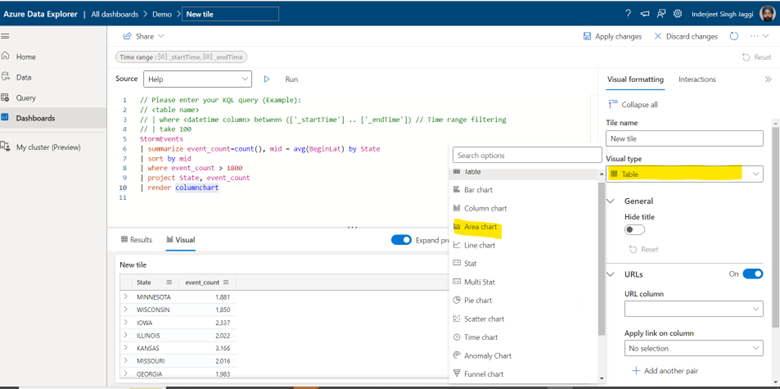
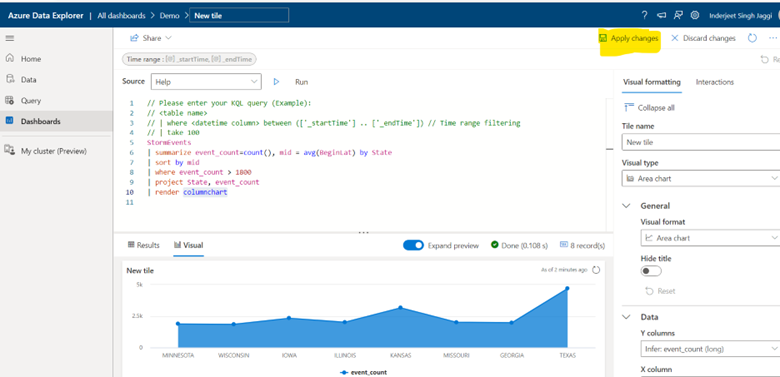
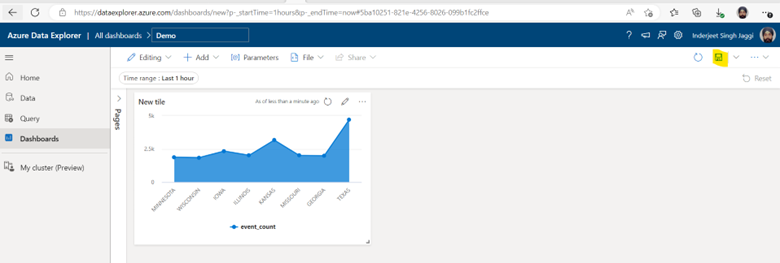
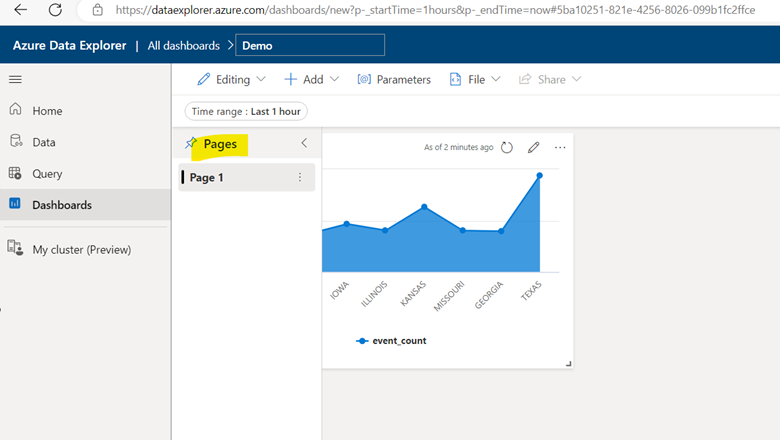
3. Finally we are ready to create Visualization Dashboard

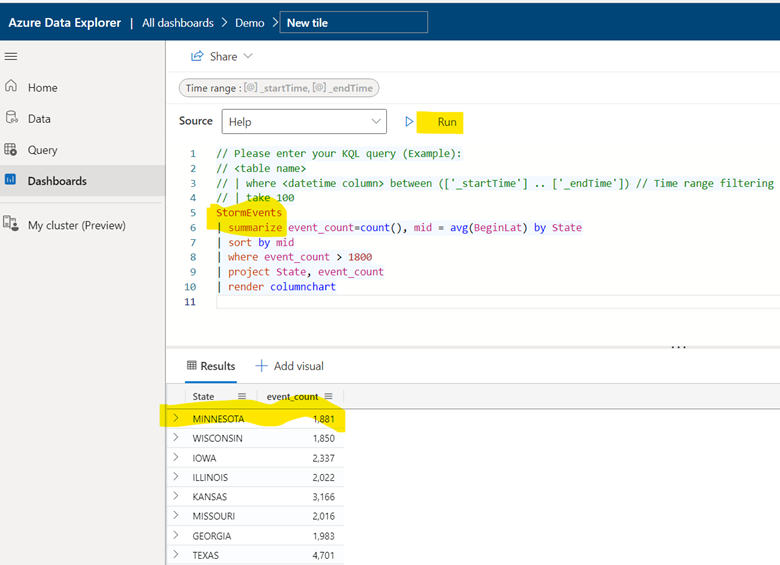
StormEvents
| summarize event_count=count(), mid = avg(BeginLat) by State
| sort by mid
| where event_count > 1800
| project State, event_count
| render columnchart
Onboard External GCCHigh or commercial User to commercial AD tenant
- Add users as External User in Azure AD. If You are adding a GCC or GCChigh user, you need to follow step 11 before you start step 1.


11. For GCCHigh, below tenant level setting is additionally needed before you follow step 1


- Once added, click on ‘Inherited from default’

- Select ‘Customize Settings’ for B2B collaboration > ‘Allow access’ under external users and group. Set ‘Allow access’ under Applications

- Select ‘Customize Settings’ for B2B Direct Connect > ‘Allow access’ under external users and group. Set ‘Allow access’ under Applications

- Under Microsoft cloud settings select ‘Microsoft Azure Government’

- Now from GCCHigh, go to Access Poratl.azure.com, search Azure Active Directory > ‘External Identities’ from left navigation > Add the GCCHigh tenant ID and then select Add at bottom.


- For GCCHigh we should leave ‘Inherited from default’

- Under Microsoft cloud settings select ‘Microsoft Azure Commercial’

OneDrive App for Teams vs. Files in Old Teams
- Purpose and Usage:
- OneDrive App for Teams:
- Designed for individual workspace and personal file storage.
- Ideal for files used by a single user.
- Great for business documents, drafts, and personal reference.
- Files in Old Teams:
- Used for collaborative work within channels and teams.
- Shared files accessible to multiple team members.
- Suitable for ongoing projects and long-term collaborations.
- OneDrive App for Teams:
- Access and Integration:
- OneDrive App for Teams:
- Seamlessly integrates with Teams.
- Provides easy access to all Microsoft 365 content.
- Replaces the existing Files menu item.
- Files in Old Teams:
- Accessed directly within Teams.
- Linked to SharePoint libraries behind Teams and channels.
- OneDrive App for Teams:
- File Ownership:
- OneDrive App for Teams:
- Files are owned by individual users.
- Account holder’s departure doesn’t impact shared links.
- Files in Old Teams:
- Files are owned by the team or channel.
- Shared links may be removed if the account holder leaves.
- OneDrive App for Teams:
- Collaboration:
- OneDrive App for Teams:
- Limited sharing—best for personal use.
- Collaboration features are minimal.
- Files in Old Teams:
- Robust collaboration tools.
- Multiple users can work on shared files simultaneously.
- OneDrive App for Teams:
- Future Enhancements:
- The OneDrive app enhancements will roll out to classic Teams in early 2024, with the Files app name unchanged.
Workflow in Microsoft Teams
The Workflow feature enhances collaboration and productivity within Teams by streamlining processes and automating repetitive tasks. Here are some key aspects:
- Approvals and Reviews:
- Teams now allows you to create approval workflows directly within channels or chats.
- You can request approvals for documents, proposals, or any other content.
- Approvers receive notifications and can review and respond without leaving Teams.
- Power Automate Integration:
- Teams integrates seamlessly with Power Automate, Microsoft’s workflow automation platform.
- You can create custom flows to automate actions based on triggers within Teams.
- For example, automatically post a message in a channel when a new file is uploaded to a SharePoint folder.
- Templates and Custom Workflows:
- Teams provides pre-built templates for common workflows.
- Customize these templates or create your own workflows tailored to your team’s needs.
- Examples include employee onboarding, expense approvals, and project management.
- Task Management:
- Use the Tasks by Planner and To Do app to manage tasks within Teams.
- Assign tasks, set due dates, and track progress—all without leaving the collaboration environment.
- Notifications and Reminders:
- Workflow notifications keep team members informed.
- Set reminders for upcoming deadlines, meetings, or important events.
- Integration with Apps and Bots:
- Leverage third-party apps and bots to enhance workflows.
- For instance, integrate with Trello, Jira, or other tools your team uses.
