Archive for April, 2015
Caching in MVC 5 Asp.net
Hello Everyone,
In this blog I want to share advantages of caching in MVC. Its a very important to know how caching is used in MVC websites.
By using Caching, we can store content at client’s browser and/or server. We can easily access these data and content when required.Caching data or content provides following advantages:
- Minimize Request To Hosting Server
- Minimize Request To Database Server
- Reduce Network Traffic
- Save Time and resources
- Above advantages helps in improving the performance of MVC Website.
There are two types of method for caching available in MVC.
- Page Output Caching
- Application Caching
In this blog we will discuss on Page Output Caching.We can achieve this by
adding OutputCache attribute to either an individual controller action or an
entire controller class.
OutputCache Filter Parameter :
| Parameter | Type | Description |
|---|---|---|
| CacheProfile | string | It is the name of the output cache profile which is defined with in tag of Web.config. |
Example: Creating Cache profile in cache.
<caching>
<outputCacheSettings>
<outputCacheProfiles>
<add name=”Test1″ duration=”30″ varyByParam=”none”/>
</outputCacheProfiles>
</outputCacheSettings>
</caching>
And this cache profile is used in the action method as shown below.
[OutputCache(CacheProfile = “Test1”)]
public ActionResult Index()
{
return View();
}
| Parameter | Type | Description |
|---|---|---|
| Duration | int | It specify the duration in sec to cache the content. |
Example : The output of the Index() action is cached for 30 seconds.
using System.Web.Mvc;
namespace MvcApplication1.Controllers
{
public class HomeController : Controller
{
[OutputCache(Duration=30, VaryByParam=”none”)]
public ActionResult Index()
{
return View();
}
}
}
Note: If you will not defined the duration, it will cached it for
by default cache duration 60 sec.
| Parameter | Type | Description |
|---|---|---|
| Location | OutputCacheLocation | It specify the location of the output to be cached. Location property can be any one of the following values:
|
Example: Cache stored at client browser.
using System.Web.Mvc;
using System.Web.UI;
namespace MvcApplication1.Controllers
{
public class UserController : Controller
{
[OutputCache(Duration=3600, VaryByParam=”none”, Location=OutputCacheLocation.Client)]
public ActionResult Index()
{
return View();
}
}
}
| Parameter | Type | Description |
|---|---|---|
| VaryByParam | string | This property enables us to create different cached versions of the very same content when a form parameter or query string parameter varies. If not specified, the default value is none. VaryByParam=”none” specifies that caching doesn’t depend on anything. |
| VaryByCustom | string | This is used for custom output cache requirements |
| VaryByHeader | string | This specify list of HTTP header names that are used tovary the cache content. |
Example:
public class TestController : Controller
{
[OutputCache(Duration = 30, VaryByParam = “none”)]
public ActionResult Index()
{
return View();
}
[OutputCache(Duration = 30, VaryByParam = “id”)]
public ActionResult Index1()
{
return View();
}
}
| Parameter | Type | Description |
|---|---|---|
| NoStore | bool | It enable/disable where to use HTTP Cache-Control. This is used only to protect very sensitive data. |
| SqlDependency | string | It specify the database and table name pairs on which the cache content depends on. The cached data will expire automatically when the data changes in the database. |
For more information visit here
I hope this will help you.Your valuable feedback and comments are important for me.
Connect to On Premises SharePoint 2013 site using Powershell on your local computer
Hi Friends,
Recently I had a word with Ryan Yates on our yammer group and found a interesting Powershell script. Ryan created a powershell script named “Client-side SharePoint PowerShell”is avaiable on Codeplex https://sharepointpowershell.codeplex.com. We can use this script to connect to on-premises SharePoint site using Powershell and execute queries on same. I found it pretty intreseting so I tried same. Below are couple of requirement to use this powershell script.
- Windows powershell 3.0
- Copy 15 folder from any sharepoint server(path C:\Program Files\Common Files\microsoft shared\Web Server Extensions) to local client machine at same location.
- Client user have atleast read permission on target URL.
- Client system should be part of same domain.
If above requirement are met, lets get connect to remote SharePoint server. We need to download “Client-side SharePoint PowerShell” from codeplex site and extract it to a folder(e.g. c:\inder). Then Open Windows Powershell(Run as Admin) and browse(cd C:\Inder\sharepointpowershell-42493) to Powershell folder as shown below:
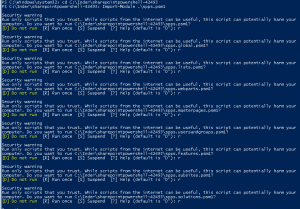
- Now we We need to load “Client-side SharePoint PowerShell” module using “Import-Module .\spps.psm1” command

Note: You might have to select “R” multiple times to load all the scripts -
Finally we need to connect to SharePoint site using command “Initialize-SPPS -siteURL http://siteurl”

-
If we dont see any error message, it means our SharePoint is now conenct and ready to use.
Below are arguments you can use in this powershell
Upload Sandboxed WSP to the site
Add-Solution -path “$exampledir\Solutions\solution.wsp”
Activate the WSP
Install-Solution -solutionName “AESBTwitterWebpart.wsp”
Create a subsite
Add-Subsite -title “Subsite” -webTemplate “STS#0” -description “Description…” -url “subsite” -language 1033 -useSamePermissionsAsParentSite $true
Go to the subsite
Open-Subsite -relativeUrl “/subsite”
Enable the publishing feature
Enable-Feature -featureId “94c94ca6-b32f-4da9-a9e3-1f3d343d7ecb” -force $false -featureDefinitionScope “Web”
Create document library on the subsite
Add-DocumentLibrary -listTitle “Testdoclib”
Copy testfiles to this document library
Copy-Folder “$exampledir\Subsite\Testdoclib” “Testdoclib” $false
Go back to the root site
Open-Rootsite
copy contents of local folders to SharePoint
$stylelibdir = “$exampledir\Style Library”
$styleliburl = “/Style Library”
Set master page
$masterFile = “seattle_custom.master”
Set-CustomMasterPage $masterFile
Create news list
$newsListName = “News”
$newsItemsCSV = “$exampledir\News\items.csv”
Add news web part to the page
Add-Webpart “/Pages/default.aspx” “Header” 0 $webpartXml
Create SharePoint Groups
Add-Group -name “Example Group”
#roleTypes are Guest, Reader, Contributor, WebDesigner, Administrator, Editor
Web
Set-WebPermissions -groupname “Example Group” -roleType “Reader”
Pages lib
Set-ListPermissions -groupname “Example Group” -listname “Pages” -roleType “Reader”
News list
Set-ListPermissions -groupname “Example Group” -listname “News” -roleType “Reader”
Hope this will help you all and help you save time.
Note: If you get error while loading the SharePoint site, make sure you have properly copied 15 hive folder and you are running Windows powershell as admin
You can also check below article written by Ryan Yates himself:
http://www.kilasuit.org/Blog/Post/6/Getting-up-and-Running-with-SPPS-for-PowerShell-and-SharePoint-Usage
Installing Bacula (Enterprise Backup System) With Webmin
Hello Everyone,
Today we are installing the “Bacula”, Bacula is the Enterprise Backup solution & more IMP it’s free.
“Bacula is an open source, enterprise level computer backup system for heterogeneous networks. It is designed to automate backup tasks that had often required intervention from a systems administrator or computer operator.
Bacula supports Linux, UNIX, Windows, and Mac OS X backup clients, and a range of professional backup devices including tape libraries. Administrators and operators can configure the system via a command line console, GUI or web interface; its back-end is a catalog of information stored by MySQL, PostgreSQL, or SQLite.”
–Source WIKI
Currently i am taking backup of more than 1.5TB data on my auto-loader
Let’s start Bacula installation
Installing bacula & mysql all together
yum install bacula-director-mysql bacula-console bacula-client bacula-storage-mysql mysql-server mysql-devel –y
[root@Bacula ~]# yum install bacula-director-mysql bacula-console bacula-client bacula-storage-mysql mysql-server mysql-devel -y
Loaded plugins: fastestmirror
Setting up Install Process
base | 3.7 kB 00:00
base/primary_db | 4.6 MB 00:29
extras | 3.4 kB 00:00
extras/primary_db | 30 kB 00:00
updates | 3.4 kB 00:00
updates/primary_db | 2.8 MB 00:13
Resolving Dependencies
–> Running transaction check
—> Package bacula-client.x86_64 0:5.0.0-12.el6 will be installed
–> Processing Dependency: bacula-common = 5.0.0-12.el6 for package: bacula-client-5.0.0-12.el6.x86_64
—> Package bacula-console.x86_64 0:5.0.0-12.el6 will be installed
—> Package bacula-director-mysql.x86_64 0:5.0.0-12.el6 will be installed
–> Processing Dependency: bacula-director-common = 5.0.0-12.el6 for package: bacula-director-mysql-5.0.0-12.el6.x 86_64
—> Package bacula-storage-mysql.x86_64 0:5.0.0-12.el6 will be installed
–> Processing Dependency: bacula-storage-common = 5.0.0-12.el6 for package: bacula-storage-mysql-5.0.0-12.el6.x86 _64
—> Package mysql-devel.x86_64 0:5.1.73-3.el6_5 will be installed
–> Processing Dependency: mysql = 5.1.73-3.el6_5 for package: mysql-devel-5.1.73-3.el6_5.x86_64
–> Processing Dependency: openssl-devel for package: mysql-devel-5.1.73-3.el6_5.x86_64
—> Package mysql-server.x86_64 0:5.1.73-3.el6_5 will be installed
–> Processing Dependency: perl-DBI for package: mysql-server-5.1.73-3.el6_5.x86_64
–> Processing Dependency: perl-DBD-MySQL for package: mysql-server-5.1.73-3.el6_5.x86_64
–> Processing Dependency: perl(vars) for package: mysql-server-5.1.73-3.el6_5.x86_64
–> Processing Dependency: perl(strict) for package: mysql-server-5.1.73-3.el6_5.x86_64
–> Processing Dependency: perl(Sys::Hostname) for package: mysql-server-5.1.73-3.el6_5.x86_64
–> Processing Dependency: perl(POSIX) for package: mysql-server-5.1.73-3.el6_5.x86_64
–> Processing Dependency: perl(Getopt::Long) for package: mysql-server-5.1.73-3.el6_5.x86_64
–> Processing Dependency: perl(File::Temp) for package: mysql-server-5.1.73-3.el6_5.x86_64
–> Processing Dependency: perl(File::Path) for package: mysql-server-5.1.73-3.el6_5.x86_64
–> Processing Dependency: perl(File::Copy) for package: mysql-server-5.1.73-3.el6_5.x86_64
–> Processing Dependency: perl(File::Basename) for package: mysql-server-5.1.73-3.el6_5.x86_64
–> Processing Dependency: perl(Data::Dumper) for package: mysql-server-5.1.73-3.el6_5.x86_64
–> Processing Dependency: perl(DBI) for package: mysql-server-5.1.73-3.el6_5.x86_64
–> Processing Dependency: /usr/bin/perl for package: mysql-server-5.1.73-3.el6_5.x86_64
–> Running transaction check
—> Package bacula-common.x86_64 0:5.0.0-12.el6 will be installed
—> Package bacula-director-common.x86_64 0:5.0.0-12.el6 will be installed
–> Processing Dependency: perl(Logwatch) for package: bacula-director-common-5.0.0-12.el6.x86_64
–> Processing Dependency: logwatch for package: bacula-director-common-5.0.0-12.el6.x86_64
—> Package bacula-storage-common.x86_64 0:5.0.0-12.el6 will be installed
—> Package mysql.x86_64 0:5.1.73-3.el6_5 will be installed
—> Package openssl-devel.x86_64 0:1.0.1e-30.el6.8 will be installed
–> Processing Dependency: openssl = 1.0.1e-30.el6.8 for package: openssl-devel-1.0.1e-30.el6.8.x86_64
–> Processing Dependency: zlib-devel for package: openssl-devel-1.0.1e-30.el6.8.x86_64
–> Processing Dependency: krb5-devel for package: openssl-devel-1.0.1e-30.el6.8.x86_64
—> Package perl.x86_64 4:5.10.1-136.el6_6.1 will be installed
–> Processing Dependency: perl-libs = 4:5.10.1-136.el6_6.1 for package: 4:perl-5.10.1-136.el6_6.1.x86_64
–> Processing Dependency: perl-libs for package: 4:perl-5.10.1-136.el6_6.1.x86_64
–> Processing Dependency: perl(version) for package: 4:perl-5.10.1-136.el6_6.1.x86_64
–> Processing Dependency: perl(Pod::Simple) for package: 4:perl-5.10.1-136.el6_6.1.x86_64
–> Processing Dependency: perl(Module::Pluggable) for package: 4:perl-5.10.1-136.el6_6.1.x86_64
–> Processing Dependency: libperl.so()(64bit) for package: 4:perl-5.10.1-136.el6_6.1.x86_64
—> Package perl-DBD-MySQL.x86_64 0:4.013-3.el6 will be installed
—> Package perl-DBI.x86_64 0:1.609-4.el6 will be installed
–> Running transaction check
—> Package krb5-devel.x86_64 0:1.10.3-37.el6_6 will be installed
–> Processing Dependency: krb5-libs = 1.10.3-37.el6_6 for package: krb5-devel-1.10.3-37.el6_6.x86_64
–> Processing Dependency: libselinux-devel for package: krb5-devel-1.10.3-37.el6_6.x86_64
–> Processing Dependency: libcom_err-devel for package: krb5-devel-1.10.3-37.el6_6.x86_64
–> Processing Dependency: keyutils-libs-devel for package: krb5-devel-1.10.3-37.el6_6.x86_64
—> Package logwatch.noarch 0:7.3.6-52.el6 will be installed
–> Processing Dependency: perl(Date::Manip) for package: logwatch-7.3.6-52.el6.noarch
–> Processing Dependency: mailx for package: logwatch-7.3.6-52.el6.noarch
—> Package openssl.x86_64 0:1.0.1e-30.el6 will be updated
—> Package openssl.x86_64 0:1.0.1e-30.el6.8 will be an update
—> Package perl-Module-Pluggable.x86_64 1:3.90-136.el6_6.1 will be installed
—> Package perl-Pod-Simple.x86_64 1:3.13-136.el6_6.1 will be installed
–> Processing Dependency: perl(Pod::Escapes) >= 1.04 for package: 1:perl-Pod-Simple-3.13-136.el6_6.1.x86_64
—> Package perl-libs.x86_64 4:5.10.1-136.el6_6.1 will be installed
—> Package perl-version.x86_64 3:0.77-136.el6_6.1 will be installed
—> Package zlib-devel.x86_64 0:1.2.3-29.el6 will be installed
–> Running transaction check
—> Package keyutils-libs-devel.x86_64 0:1.4-5.el6 will be installed
—> Package krb5-libs.x86_64 0:1.10.3-33.el6 will be updated
—> Package krb5-libs.x86_64 0:1.10.3-37.el6_6 will be an update
—> Package libcom_err-devel.x86_64 0:1.41.12-21.el6 will be installed
—> Package libselinux-devel.x86_64 0:2.0.94-5.8.el6 will be installed
–> Processing Dependency: libsepol-devel >= 2.0.32-1 for package: libselinux-devel-2.0.94-5.8.el6.x86_64
–> Processing Dependency: pkgconfig(libsepol) for package: libselinux-devel-2.0.94-5.8.el6.x86_64
—> Package mailx.x86_64 0:12.4-8.el6_6 will be installed
—> Package perl-Date-Manip.noarch 0:6.24-1.el6 will be installed
–> Processing Dependency: perl(YAML::Syck) for package: perl-Date-Manip-6.24-1.el6.noarch
—> Package perl-Pod-Escapes.x86_64 1:1.04-136.el6_6.1 will be installed
–> Running transaction check
—> Package libsepol-devel.x86_64 0:2.0.41-4.el6 will be installed
—> Package perl-YAML-Syck.x86_64 0:1.07-4.el6 will be installed
–> Finished Dependency Resolution
Dependencies Resolved
==================================================================================================================
Package Arch Version Repository Size
==================================================================================================================
Installing:
bacula-client x86_64 5.0.0-12.el6 base 176 k
bacula-console x86_64 5.0.0-12.el6 base 110 k
bacula-director-mysql x86_64 5.0.0-12.el6 base 416 k
bacula-storage-mysql x86_64 5.0.0-12.el6 base 356 k
mysql-devel x86_64 5.1.73-3.el6_5 base 129 k
mysql-server x86_64 5.1.73-3.el6_5 base 8.6 M
Installing for dependencies:
bacula-common x86_64 5.0.0-12.el6 base 360 k
bacula-director-common x86_64 5.0.0-12.el6 base 136 k
bacula-storage-common x86_64 5.0.0-12.el6 base 496 k
keyutils-libs-devel x86_64 1.4-5.el6 base 29 k
krb5-devel x86_64 1.10.3-37.el6_6 updates 499 k
libcom_err-devel x86_64 1.41.12-21.el6 base 32 k
libselinux-devel x86_64 2.0.94-5.8.el6 base 137 k
libsepol-devel x86_64 2.0.41-4.el6 base 64 k
logwatch noarch 7.3.6-52.el6 base 302 k
mailx x86_64 12.4-8.el6_6 updates 235 k
mysql x86_64 5.1.73-3.el6_5 base 894 k
openssl-devel x86_64 1.0.1e-30.el6.8 updates 1.2 M
perl x86_64 4:5.10.1-136.el6_6.1 updates 10 M
perl-DBD-MySQL x86_64 4.013-3.el6 base 134 k
perl-DBI x86_64 1.609-4.el6 base 705 k
perl-Date-Manip noarch 6.24-1.el6 base 1.4 M
perl-Module-Pluggable x86_64 1:3.90-136.el6_6.1 updates 40 k
perl-Pod-Escapes x86_64 1:1.04-136.el6_6.1 updates 32 k
perl-Pod-Simple x86_64 1:3.13-136.el6_6.1 updates 212 k
perl-YAML-Syck x86_64 1.07-4.el6 base 75 k
perl-libs x86_64 4:5.10.1-136.el6_6.1 updates 578 k
perl-version x86_64 3:0.77-136.el6_6.1 updates 51 k
zlib-devel x86_64 1.2.3-29.el6 base 44 k
Updating for dependencies:
krb5-libs x86_64 1.10.3-37.el6_6 updates 766 k
openssl x86_64 1.0.1e-30.el6.8 updates 1.5 M
Transaction Summary
==================================================================================================================
Install 29 Package(s)
Upgrade 2 Package(s)
Total download size: 30 M
Downloading Packages:
(1/31): bacula-client-5.0.0-12.el6.x86_64.rpm | 176 kB 00:01
(2/31): bacula-common-5.0.0-12.el6.x86_64.rpm | 360 kB 00:03
(3/31): bacula-console-5.0.0-12.el6.x86_64.rpm | 110 kB 00:00
(4/31): bacula-director-common-5.0.0-12.el6.x86_64.rpm | 136 kB 00:00
(5/31): bacula-director-mysql-5.0.0-12.el6.x86_64.rpm | 416 kB 00:03
(6/31): bacula-storage-common-5.0.0-12.el6.x86_64.rpm | 496 kB 00:02
(7/31): bacula-storage-mysql-5.0.0-12.el6.x86_64.rpm | 356 kB 00:02
(8/31): keyutils-libs-devel-1.4-5.el6.x86_64.rpm | 29 kB 00:00
(9/31): krb5-devel-1.10.3-37.el6_6.x86_64.rpm | 499 kB 00:02
(10/31): krb5-libs-1.10.3-37.el6_6.x86_64.rpm | 766 kB 00:04
(11/31): libcom_err-devel-1.41.12-21.el6.x86_64.rpm | 32 kB 00:00
(12/31): libselinux-devel-2.0.94-5.8.el6.x86_64.rpm | 137 kB 00:00
(13/31): libsepol-devel-2.0.41-4.el6.x86_64.rpm | 64 kB 00:00
(14/31): logwatch-7.3.6-52.el6.noarch.rpm | 302 kB 00:01
(15/31): mailx-12.4-8.el6_6.x86_64.rpm | 235 kB 00:01
(16/31): mysql-5.1.73-3.el6_5.x86_64.rpm | 894 kB 00:04
(17/31): mysql-devel-5.1.73-3.el6_5.x86_64.rpm | 129 kB 00:00
(18/31): mysql-server-5.1.73-3.el6_5.x86_64.rpm | 8.6 MB 00:50
(19/31): openssl-1.0.1e-30.el6.8.x86_64.rpm | 1.5 MB 00:01
(20/31): openssl-devel-1.0.1e-30.el6.8.x86_64.rpm | 1.2 MB 00:02
(21/31): perl-5.10.1-136.el6_6.1.x86_64.rpm | 10 MB 00:19
(22/31): perl-DBD-MySQL-4.013-3.el6.x86_64.rpm | 134 kB 00:00
(23/31): perl-DBI-1.609-4.el6.x86_64.rpm | 705 kB 00:01
(24/31): perl-Date-Manip-6.24-1.el6.noarch.rpm | 1.4 MB 00:02
(25/31): perl-Module-Pluggable-3.90-136.el6_6.1.x86_64.rpm | 40 kB 00:00
(26/31): perl-Pod-Escapes-1.04-136.el6_6.1.x86_64.rpm | 32 kB 00:00
(27/31): perl-Pod-Simple-3.13-136.el6_6.1.x86_64.rpm | 212 kB 00:01
(28/31): perl-YAML-Syck-1.07-4.el6.x86_64.rpm | 75 kB 00:00
(29/31): perl-libs-5.10.1-136.el6_6.1.x86_64.rpm | 578 kB 00:02
(30/31): perl-version-0.77-136.el6_6.1.x86_64.rpm | 51 kB 00:00
(31/31): zlib-devel-1.2.3-29.el6.x86_64.rpm | 44 kB 00:00
——————————————————————————————————————
Total 245 kB/s | 30 MB 02:03
warning: rpmts_HdrFromFdno: Header V3 RSA/SHA1 Signature, key ID c105b9de: NOKEY
Retrieving key from file:///etc/pki/rpm-gpg/RPM-GPG-KEY-CentOS-6
Importing GPG key 0xC105B9DE:
Userid : CentOS-6 Key (CentOS 6 Official Signing Key) <centos-6-key@centos.org>
Package: centos-release-6-6.el6.centos.12.2.x86_64 (@anaconda-CentOS-201410241409.x86_64/6.6)
From : /etc/pki/rpm-gpg/RPM-GPG-KEY-CentOS-6
Running rpm_check_debug
Running Transaction Test
Transaction Test Succeeded
Running Transaction
Updating : krb5-libs-1.10.3-37.el6_6.x86_64 1/33
Updating : openssl-1.0.1e-30.el6.8.x86_64 2/33
Installing : bacula-common-5.0.0-12.el6.x86_64 3/33
Installing : bacula-storage-mysql-5.0.0-12.el6.x86_64 4/33
Installing : bacula-storage-common-5.0.0-12.el6.x86_64 5/33
Installing : mailx-12.4-8.el6_6.x86_64 6/33
Installing : 1:perl-Pod-Escapes-1.04-136.el6_6.1.x86_64 7/33
Installing : 3:perl-version-0.77-136.el6_6.1.x86_64 8/33
Installing : 4:perl-libs-5.10.1-136.el6_6.1.x86_64 9/33
Installing : 1:perl-Module-Pluggable-3.90-136.el6_6.1.x86_64 10/33
Installing : 1:perl-Pod-Simple-3.13-136.el6_6.1.x86_64 11/33
Installing : 4:perl-5.10.1-136.el6_6.1.x86_64 12/33
Installing : mysql-5.1.73-3.el6_5.x86_64 13/33
Installing : perl-DBI-1.609-4.el6.x86_64 14/33
Installing : perl-DBD-MySQL-4.013-3.el6.x86_64 15/33
Installing : perl-YAML-Syck-1.07-4.el6.x86_64 16/33
Installing : perl-Date-Manip-6.24-1.el6.noarch 17/33
Installing : logwatch-7.3.6-52.el6.noarch 18/33
Installing : bacula-director-mysql-5.0.0-12.el6.x86_64 19/33
Installing : bacula-director-common-5.0.0-12.el6.x86_64 20/33
Installing : libsepol-devel-2.0.41-4.el6.x86_64 21/33
Installing : libselinux-devel-2.0.94-5.8.el6.x86_64 22/33
Installing : libcom_err-devel-1.41.12-21.el6.x86_64 23/33
Installing : keyutils-libs-devel-1.4-5.el6.x86_64 24/33
Installing : krb5-devel-1.10.3-37.el6_6.x86_64 25/33
Installing : zlib-devel-1.2.3-29.el6.x86_64 26/33
Installing : openssl-devel-1.0.1e-30.el6.8.x86_64 27/33
Installing : mysql-devel-5.1.73-3.el6_5.x86_64 28/33
Installing : mysql-server-5.1.73-3.el6_5.x86_64 29/33
Installing : bacula-client-5.0.0-12.el6.x86_64 30/33
Installing : bacula-console-5.0.0-12.el6.x86_64 31/33
Cleanup : openssl-1.0.1e-30.el6.x86_64 32/33
Cleanup : krb5-libs-1.10.3-33.el6.x86_64 33/33
Verifying : perl-Date-Manip-6.24-1.el6.noarch 1/33
Verifying : bacula-client-5.0.0-12.el6.x86_64 2/33
Verifying : mysql-5.1.73-3.el6_5.x86_64 3/33
Verifying : openssl-devel-1.0.1e-30.el6.8.x86_64 4/33
Verifying : perl-DBI-1.609-4.el6.x86_64 5/33
Verifying : 1:perl-Pod-Escapes-1.04-136.el6_6.1.x86_64 6/33
Verifying : mysql-devel-5.1.73-3.el6_5.x86_64 7/33
Verifying : 3:perl-version-0.77-136.el6_6.1.x86_64 8/33
Verifying : bacula-console-5.0.0-12.el6.x86_64 9/33
Verifying : mysql-server-5.1.73-3.el6_5.x86_64 10/33
Verifying : bacula-director-mysql-5.0.0-12.el6.x86_64 11/33
Verifying : perl-DBD-MySQL-4.013-3.el6.x86_64 12/33
Verifying : bacula-common-5.0.0-12.el6.x86_64 13/33
Verifying : 4:perl-libs-5.10.1-136.el6_6.1.x86_64 14/33
Verifying : zlib-devel-1.2.3-29.el6.x86_64 15/33
Verifying : 1:perl-Module-Pluggable-3.90-136.el6_6.1.x86_64 16/33
Verifying : bacula-storage-mysql-5.0.0-12.el6.x86_64 17/33
Verifying : krb5-devel-1.10.3-37.el6_6.x86_64 18/33
Verifying : openssl-1.0.1e-30.el6.8.x86_64 19/33
Verifying : krb5-libs-1.10.3-37.el6_6.x86_64 20/33
Verifying : keyutils-libs-devel-1.4-5.el6.x86_64 21/33
Verifying : 4:perl-5.10.1-136.el6_6.1.x86_64 22/33
Verifying : libcom_err-devel-1.41.12-21.el6.x86_64 23/33
Verifying : mailx-12.4-8.el6_6.x86_64 24/33
Verifying : bacula-director-common-5.0.0-12.el6.x86_64 25/33
Verifying : libsepol-devel-2.0.41-4.el6.x86_64 26/33
Verifying : bacula-storage-common-5.0.0-12.el6.x86_64 27/33
Verifying : 1:perl-Pod-Simple-3.13-136.el6_6.1.x86_64 28/33
Verifying : logwatch-7.3.6-52.el6.noarch 29/33
Verifying : libselinux-devel-2.0.94-5.8.el6.x86_64 30/33
Verifying : perl-YAML-Syck-1.07-4.el6.x86_64 31/33
Verifying : openssl-1.0.1e-30.el6.x86_64 32/33
Verifying : krb5-libs-1.10.3-33.el6.x86_64 33/33
Installed:
bacula-client.x86_64 0:5.0.0-12.el6 bacula-console.x86_64 0:5.0.0-12.el6
bacula-director-mysql.x86_64 0:5.0.0-12.el6 bacula-storage-mysql.x86_64 0:5.0.0-12.el6
mysql-devel.x86_64 0:5.1.73-3.el6_5 mysql-server.x86_64 0:5.1.73-3.el6_5
Dependency Installed:
bacula-common.x86_64 0:5.0.0-12.el6 bacula-director-common.x86_64 0:5.0.0-12.el6
bacula-storage-common.x86_64 0:5.0.0-12.el6 keyutils-libs-devel.x86_64 0:1.4-5.el6
krb5-devel.x86_64 0:1.10.3-37.el6_6 libcom_err-devel.x86_64 0:1.41.12-21.el6
libselinux-devel.x86_64 0:2.0.94-5.8.el6 libsepol-devel.x86_64 0:2.0.41-4.el6
logwatch.noarch 0:7.3.6-52.el6 mailx.x86_64 0:12.4-8.el6_6
mysql.x86_64 0:5.1.73-3.el6_5 openssl-devel.x86_64 0:1.0.1e-30.el6.8
perl.x86_64 4:5.10.1-136.el6_6.1 perl-DBD-MySQL.x86_64 0:4.013-3.el6
perl-DBI.x86_64 0:1.609-4.el6 perl-Date-Manip.noarch 0:6.24-1.el6
perl-Module-Pluggable.x86_64 1:3.90-136.el6_6.1 perl-Pod-Escapes.x86_64 1:1.04-136.el6_6.1
perl-Pod-Simple.x86_64 1:3.13-136.el6_6.1 perl-YAML-Syck.x86_64 0:1.07-4.el6
perl-libs.x86_64 4:5.10.1-136.el6_6.1 perl-version.x86_64 3:0.77-136.el6_6.1
zlib-devel.x86_64 0:1.2.3-29.el6
Dependency Updated:
krb5-libs.x86_64 0:1.10.3-37.el6_6 openssl.x86_64 0:1.0.1e-30.el6.8
Complete!
Start mysql Service
service mysqld start
chkconfig mysqld on
assign password to mysql ( root123)
mysqladmin -u root password root123
Creating necessary databases for Bacula
/usr/libexec/bacula/grant_mysql_privileges -u root -p
[root@Bacula ~]# /usr/libexec/bacula/grant_mysql_privileges -u root -p
Enter password:
Host User Password Select_priv Insert_priv Update_priv Delete_priv Create_priv Drop_priv Reload_priv Shutdown_priv Process_priv File_priv Grant_priv References_priv Index_priv Alter_priv Show_db_priv Super_priv Create_tmp_table_priv Lock_tables_priv Execute_priv Repl_slave_priv Repl_client_priv Create_view_priv Show_view_priv Create_routine_priv Alter_routine_priv Create_user_priv Event_priv Trigger_priv ssl_type ssl_cipher x509_issuer x509_subjectmax_questions max_updates max_connections max_user_connections
localhost root *FAAFFE644E901CFAFAEC7562415E5FAEC243B8B2 Y Y Y Y Y Y Y Y Y Y Y Y Y Y Y Y YY Y Y Y Y Y Y Y Y Y Y 0 0 0 0
bacula.local root Y Y Y Y Y Y Y Y Y Y Y Y Y Y Y Y Y Y Y Y Y YY Y Y Y Y Y 0 0 0 0
127.0.0.1 root Y Y Y Y Y Y Y Y Y Y Y Y Y Y Y Y Y Y Y Y Y YY Y Y Y Y Y 0 0 0 0
localhost N N N N N N N N N N N N N N N N N N N N N NN N N N N N 0 0 0 0
- local N N N N N N N N N N N N N N N N N N N N N NN N N N N N 0 0 0 0
- localhost bacula N N N N N N N N N N N N N N N N N N N N N NN N N N N N 0 0 0 0
- % bacula N N N N N N N N N N N N N N N N N N N N N N NN N N N N 0 0 0 0
Privileges for user bacula granted on database bacula.
/usr/libexec/bacula/create_mysql_database -u root –p
[root@Bacula ~]# /usr/libexec/bacula/create_mysql_database -u root -p
Enter password:
Creation of bacula database succeeded.
/usr/libexec/bacula/make_mysql_tables -u root –p
[root@Bacula ~]# /usr/libexec/bacula/make_mysql_tables -u root -p
Enter password:
Creation of Bacula MySQL tables succeeded.
/usr/libexec/bacula/grant_bacula_privileges -u root –p
[root@Bacula ~]# /usr/libexec/bacula/grant_bacula_privileges -u root -p
Granting MySQL privileges
Enter password:
Host User Password Select_priv Insert_priv Update_priv Delete_priv Create_priv Drop_priv Reload_priv Shutdown_priv Process_priv File_priv Grant_priv References_priv Index_priv Alter_priv Show_db_priv Super_priv Create_tmp_table_priv Lock_tables_priv Execute_priv Repl_slave_priv Repl_client_priv Create_view_priv Show_view_priv Create_routine_priv Alter_routine_priv Create_user_priv Event_priv Trigger_priv ssl_type ssl_cipher x509_issuer x509_subjectmax_questions max_updates max_connections max_user_connections
localhost root *FAAFFE644E901CFAFAEC7562415E5FAEC243B8B2 Y Y Y Y Y Y Y Y Y Y Y Y Y Y Y Y YY Y Y Y Y Y Y Y Y Y Y 0 0 0 0
bacula.local root Y Y Y Y Y Y Y Y Y Y Y Y Y Y Y Y Y Y Y Y Y YY Y Y Y Y Y 0 0 0 0
127.0.0.1 root Y Y Y Y Y Y Y Y Y Y Y Y Y Y Y Y Y Y Y Y Y YY Y Y Y Y Y 0 0 0 0
localhost N N N N N N N N N N N N N N N N N N N N N NN N N N N N 0 0 0 0
bacula.local N N N N N N N N N N N N N N N N N N N N N NN N N N N N 0 0 0 0
localhost bacula N N N N N N N N N N N N N N N N N N N N N NN N N N N N 0 0 0 0
% bacula N N N N N N N N N N N N N N N N N N N N N N NN N N N N 0 0 0 0
Privileges for user bacula granted on database bacula.
set bacula user password on MySQL.
mysql -u root –p
[root@Bacula ~]# mysql -u root -p
Enter password:
Welcome to the MySQL monitor. Commands end with ; or \g.
Your MySQL connection id is 30
Server version: 5.1.73 Source distribution
Copyright (c) 2000, 2013, Oracle and/or its affiliates. All rights reserved.
Oracle is a registered trademark of Oracle Corporation and/or its
affiliates. Other names may be trademarks of their respective
owners.
Type ‘help;’ or ‘\h’ for help. Type ‘\c’ to clear the current input statement.
Type below command
mysql> UPDATE mysql.user SET password=PASSWORD(“root123”) WHERE user=’bacula’;
Query OK, 2 rows affected (0.00 sec)
Rows matched: 2 Changed: 2 Warnings: 0
mysql> FLUSH PRIVILEGES;
Query OK, 0 rows affected (0.00 sec)
Update all Bacula configuration files with new password and addresses
Edit file /etc/bacula/bacula-dir.conf,
[root@Bacula ~]# vi /etc/bacula/bacula-dir.conf
[…]
Director { # define myself
Name = bacula-dir
DIRport = 9101 # where we listen for UA connections
QueryFile = “/usr/libexec/bacula/query.sql”
WorkingDirectory = “/var/spool/bacula”
PidDirectory = “/var/run”
Maximum Concurrent Jobs = 1
Password = “root123” # Console password
Messages = Daemon
[…]
# Client (File Services) to backup
Client {
Name = bacula-fd
Address = 192.168.0.50
FDPort = 9102
Catalog = MyCatalog
Password = “root123” # password for FileDaemon
File Retention = 30 days # 30 days
Job Retention = 6 months # six months
AutoPrune = yes # Prune expired Jobs/Files
}
# Definition of file storage device
Storage {
Name = File
# Do not use “localhost” here
Address = 192.168.0.50 # N.B. Use a fully qualified name here
SDPort = 9103
Password = “root123”
Device = FileStorage
Media Type = File
}
[…]
# Generic catalog service
Catalog {
Name = MyCatalog
# Uncomment the following line if you want the dbi driver
# dbdriver = “dbi:sqlite3”; dbaddress = 127.0.0.1; dbport =
dbname = “bacula”; dbuser = “bacula”; dbpassword = “root123”
}
[…]
Console {
Name = bacula-mon
Password = “root123”
CommandACL = status, .status
}
Edit file /etc/bacula/bconsole.conf,
[root@Bacula ~]# vi /etc/bacula/bconsole.conf
#
# Bacula User Agent (or Console) Configuration File
#
Director {
Name = bacula-dir
DIRport = 9101
address = localhost
Password = “root123”
}
Update Storage
Edit file /etc/bacula/bacula-sd.conf,
Director {
Name = bacula-dir
Password = “root123”
}
Delete following lines
# Restricted Director, used by tray-monitor to get the
# status of the storage daemon
#
Director {
Name = bacula-mon
Password = “@@MON_SD_PASSWORD@@”
Monitor = yes
}
Add the backup folder
Device {
Name = FileStorage
Media Type = File
Archive Device = /tmp/mybackup
LabelMedia = yes; # lets Bacula label unlabeled media
Random Access = Yes;
AutomaticMount = yes; # when device opened, read it
RemovableMedia = no;
AlwaysOpen = no;
}
Now create mybackup folder in /tmp
[root@Bacula tmp]# mkdir mybackup
[root@Bacula tmp]# chown root.bacula mybackup/
[root@Bacula tmp]# ll
total 4
drwxr-xr-x. 2 root bacula 4096 Apr 22 14:19 mybackup
-rw——-. 1 root root 0 Apr 22 11:55 yum.log
Next restart all bacula daemons and make them to start automatically on every reboot
[root@Bacula tmp]# service bacula-dir start
Starting bacula-dir: [ OK ]
[root@Bacula tmp]# service bacula-fd start
Starting bacula-fd: [ OK ]
[root@Bacula tmp]# service bacula-sd start
Starting bacula-sd: [ OK ]
[root@Bacula tmp]# chkconfig bacula-dir on
[root@Bacula tmp]# chkconfig bacula-fd on
[root@Bacula tmp]# chkconfig bacula-sd on
[root@Bacula tmp]#
Now there is one more thing we have to open bacula’s require ports in iptables
[root@Bacula ~]# vi /etc/sysconfig/iptables
-A INPUT -m state –state NEW -m tcp -p tcp –dport 22 -j ACCEPT
-A INPUT -m state –state NEW -m tcp -p tcp –dport 9101 -j ACCEPT
-A INPUT -m state –state NEW -m tcp -p tcp –dport 9102 -j ACCEPT
-A INPUT -m state –state NEW -m tcp -p tcp –dport 9103 -j ACCEPT
-A INPUT -m state –state NEW -m tcp -p tcp –dport 10000 -j ACCEPT
We have opened the 10000 port because we are going to install “webmin” to mamage bacula using GUI
Bacula has been successfully installed
Now we are rebooting the server & checking it’s working fine or not
Type “bconsole “ if you will get ”*” then your configuration is correct
[root@Bacula ~]# bconsole
Connecting to Director 192.168.0.50:9101
1000 OK: bacula-dir Version: 5.0.0 (26 January 2010)
Enter a period to cancel a command.
*
Type exit to console
Now installing webmin to manage bacula
# wget http://sourceforge.net/projects/webadmin/files/webmin/1.660/webmin-1.660-1.noarch.rpm
# rpm -Uvh webmin-1.660-1.noarch.rpm
# service webmin start
# chkconfig webmin on
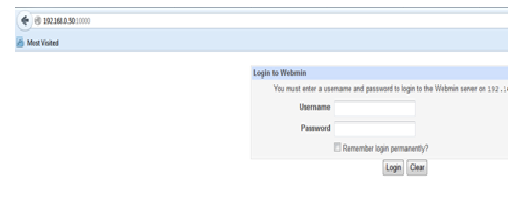
Access webmin “//http://server-ip-address:10000″ or “http://domain-name:10000/”.
Click on system –> Bacula backup system–> module configuration–>Next
Select database type “MYSQL” & enter your password
Now here your Bacula web-console
It’s Done….
–Sachin.
PSconfig wizard fails after you install any update on SharePoint server
Hi Friends,
Recently I faced issue while updating SharePoint 2010 sp1 on servers. Installation of SharePoint 2013 SP1 didn’t caused any issue but when I try to run PSconfig wizard to update SharePoint databases, site features, etc, it stopped with below errors.
Environment : SharePoint 2010 standalone environment
ULS Logs:
UpdatedConcurrencyException: The object SPAdministrationWebApplication was updated by another user. Determine if these changes will conflict, resolve any differences, and reapply the second change. This error may also indicate a programming error caused by obtaining two copies of the same object in a single thread. Previous update information: User: Machinname\username Process:PSCONFIG (2624) Machine:machinename Time:April 22, 2015 10:54:48.0000 Current update information: User: machinename\username Process:PSCONFIG (2624) Machine:machinename Time:April 22, 2015 10:54:48.2154
Exception: System.NullReferenceException: Object reference not set to an instance of an object.
at Microsoft.SharePoint.Upgrade.SPContentDatabaseIntegrity.CheckAppOrphans()
at Microsoft.SharePoint.Upgrade.SPContentDatabaseIntegrity.Check(SPContentDatabaseIntegrityCheckOptions options)
at Microsoft.SharePoint.Upgrade.SPContentDatabaseSequence.ContentDatabaseDataIntegrityCheck()
at Microsoft.SharePoint.Upgrade.SPContentDatabaseSequence.PreUpgrade()
Upgrade.log:
This upgrade session has been stopped. Possible causes include the process being terminated abruptly or the OS has rebooted. Please restart the upgrade again.
PSCDiagnostics logs:
An exception of type Microsoft.SharePoint.Upgrade.SPUpgradeException was thrown. Additional exception information: Upgrade completed with errors. Review the upgrade log file located in C:\Program Files\Common Files\Microsoft Shared\Web Server Extensions\14\LOGS\Upgrade-20150422-104856-16.log. The number of errors and warnings is listed at the end of the upgrade log file.
Microsoft.SharePoint.Upgrade.SPUpgradeException: Upgrade completed with errors. Review the upgrade log file located in C:\Program Files\Common Files\Microsoft Shared\Web Server Extensions\14\LOGS\Upgrade-20150422-104856-16.log. The number of errors and warnings is listed at the end of the upgrade log file.
at Microsoft.SharePoint.Upgrade.SPUpgradeSession.CheckPoint()
at Microsoft.SharePoint.Upgrade.SPUpgradeSession.LogEnd()
at Microsoft.SharePoint.PostSetupConfiguration.UpgradeTask.Run()
at Microsoft.SharePoint.PostSetupConfiguration.TaskThread.ExecuteTask()
Troubleshooting steps tried:
To resolve the issue I tried to run below command, but it did not help:
PSCONFIG -cmd upgrade -inplace b2b -wait -force
Confirmed that there was no password change in SharePoint farm, No issues related to content databases. Checked permission for the farm account on SQL server and SharePoint server.
User Account Control (UAC) was enabled on server to disabled it so disabled it. Tried to reboot SharePoint machine and disabled Firewall.
Resolution:
After some research I found that configuration database was locked which caused this issue. To resolve the issue I executed below command in powershell:
stsadm -o setproperty -pn “command-line-upgrade-running” -pv No
Then tired to refresh sharePoint by running below command:
IISreset
net stop sptimerv4
net start sptimerv4
Now when I try to run PSconfig wizard from PowerShell, it completed without any issue:
PSCONFIG -cmd upgrade -inplace b2b -wait -force
Hope this will help you in case you face any similar issue.
If you have SharePoint 2010, you need to know SharePoint build and plan upgrade to SharePoint 2013 as Microsoft support will end soon
Hi Friends,
I hope you are aware but incase if you don’t know, Microsoft does not provide complete support if you dont have your SharePoint 2010 build higher then SP1 (14.0.6029.1000).
After 13th October 2015, SharePoint 2010 main stream support will end, so you need to plan upgrade of your SharePoint to 2013.
The support of SharePoint 2010 versions between RTM(14.0.4762.1000) and SP1 (14.0.6029.1000) is ended as you can double check in the following link:
http://support.microsoft.com/lifecycle/?p1=14944
Support for Service pack 1 was stopped on 14th October 2014. That is because the SP1 was released 4 year ago and ,as you may know, the Office Business Group Service Pack policy states “When a new service pack is released, Microsoft will provide 12 months of support for the previous service pack”. More info in the following link:
http://support.microsoft.com/lifecycle/#tab2
Then, the new support cases opened regarding issues between RTM and SP1 versions will be treated as “limited support”. That means that you will face the following limitations:
- Limited break/fix support incidents will be provided through Microsoft Customer Service and Support; and through Microsoft’s managed support offerings (such as Premier Support).
- There will be no option to engage Microsoft’s product development resources, and technical workarounds may be limited or not possible.
- If the support incident requires escalation to development for further guidance, requires a hotfix, or requires a security update, customers will be asked to upgrade to a supported service pack.
As far as I know soon SharePoint SP2 will be the minimum requirement to get support from Microsoft.
Hope this will help you.
“Webmin” installation on Linux syste
Hello Everyone,
Today we are installing “webmin”
Being as a windows administrator working on Linux system it’s quite difficult to understand black screen. so you can do most of your work using webmin, it’s PHP based GUI application so can configure your linux system, can take system backup, manage your postfix server & do more.
“What is webmin”
Webmin is a web-based system configuration tool for Unix-like systems, although recent versions can also be installed and run on Windows.[4] With it, it is possible to configure operating system internals, such as users, disk quotas, services or configuration files, as well as modify and control open source apps, such as the Apache HTTP Server, PHP or MySQL.[5][6]
Webmin is largely based on Perl, running as its own process and web server. It defaults to TCP port 10000 for communicating, and can be configured to use SSL if OpenSSL is installed with additional required Perl Modules.
It is built around modules, which have an interface to the configuration files and the Webmin server. This makes it easy to add new functionality. Due to Webmin’s modular design, it is possible for anyone who is interested to write plugins for desktop configuration.
Webmin also allows for controlling many machines through a single interface, or seamless login on other webmin hosts on the same subnet or LAN.
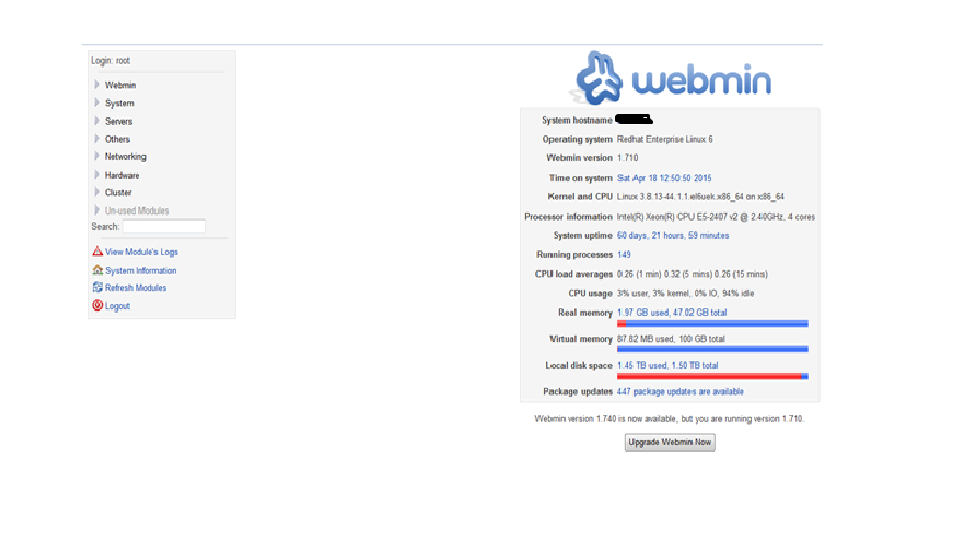
Webmin interface
Let’s start webmin installation
I already install one centos 6.4 OS
First command should be
Yum install update
For debian & ubuntu
Apt-get install update
Webmin RPM available on http://www.webmin.com
Or you can download it using wget command
You have to install wget
Yum install wget
cd /opt
wget http://www.webmin.com/jcameron-key.asc
[root@mail opt]# wget http://www.webmin.com/jcameron-key.asc
–2015-04-18 13:11:06– http://www.webmin.com/jcameron-key.asc
Resolving www.webmin.com… 216.34.181.97
Connecting to www.webmin.com|216.34.181.97|:80… connected.
HTTP request sent, awaiting response… 200 OK
Length: 1320 (1.3K) [text/plain]
Saving to: “jcameron-key.asc”
100%[======================================>] 1,320 –.-K/s in 0s
2015-04-18 13:11:11 (177 MB/s) – “jcameron-key.asc” saved [1320/1320]
wget http://www.webmin.com/download/rpm/webmin-current.rpm
[root@mail opt]# wget http://www.webmin.com/download/rpm/webmin-current.rpm
–2015-04-18 13:13:24– http://www.webmin.com/download/rpm/webmin-current.rpm
Resolving www.webmin.com… 216.34.181.97
Connecting to www.webmin.com|216.34.181.97|:80… connected.
HTTP request sent, awaiting response… 302 Found
Location: http://prdownloads.sourceforge.net/webadmin/webmin-1.740-1.noarch.rpm [following]
–2015-04-18 13:13:30– http://prdownloads.sourceforge.net/webadmin/webmin-1.740-1.noarch.rpm
Resolving prdownloads.sourceforge.net… 216.34.181.59
Connecting to prdownloads.sourceforge.net|216.34.181.59|:80… connected.
HTTP request sent, awaiting response… 301 Moved Permanently
Location: http://downloads.sourceforge.net/project/webadmin/webmin/1.740/webmin-1.740-1.noarch.rpm [following ]
–2015-04-18 13:13:36– http://downloads.sourceforge.net/project/webadmin/webmin/1.740/webmin-1.740-1.noarch .rpm
Resolving downloads.sourceforge.net… 216.34.181.59
Connecting to downloads.sourceforge.net|216.34.181.59|:80… connected.
HTTP request sent, awaiting response… 302 Found
Location: http://softlayer-sng.dl.sourceforge.net/project/webadmin/webmin/1.740/webmin-1.740-1.noarch.rpm [fo llowing]
–2015-04-18 13:13:41– http://softlayer-sng.dl.sourceforge.net/project/webadmin/webmin/1.740/webmin-1.740-1 .noarch.rpm
Resolving softlayer-sng.dl.sourceforge.net… 216.12.198.152
Connecting to softlayer-sng.dl.sourceforge.net|216.12.198.152|:80… connected.
HTTP request sent, awaiting response… 200 OK
Length: 25030571 (24M) [application/octet-stream]
Saving to: “webmin-current.rpm”
100%[===========================================================================================================================================================>] 25,030,571 23.0K/s in 9m 41s
2015-04-18 13:23:28 (42.1 KB/s) – “webmin-current.rpm” saved [25030571/2503057
Import PGP key
rpm –import jcameron-key.asc
[root@mail opt]# rpm –import jcameron-key.asc
now install webmin
yum install webmin-current.rpm
[root@mail opt]# yum install webmin-current.rpm
Loaded plugins: fastestmirror
Setting up Install Process
Examining webmin-current.rpm: webmin-1.740-1.noarch
Marking webmin-current.rpm to be installed
Loading mirror speeds from cached hostfile
* base: centosmirror.go4hosting.in
* extras: centosmirror.go4hosting.in
* updates: centosmirror.go4hosting.in
ox-backend | 1.3 kB 00:00
ox-frontend | 1.3 kB 00:00
ox-usm | 1.3 kB 00:00
Resolving Dependencies
–> Running transaction check
—> Package webmin.noarch 0:1.740-1 will be installed
–> Processing Dependency: /usr/bin/perl for package: webmin-1.740-1.noarch
–> Processing Dependency: /usr/bin/perl for package: webmin-1.740-1.noarch
–> Running transaction check
—> Package perl.x86_64 4:5.10.1-136.el6_6.1 will be installed
–> Processing Dependency: perl-libs = 4:5.10.1-136.el6_6.1 for package: 4:perl-5.10.1-136.el6_6.1.x86_64
–> Processing Dependency: perl-libs for package: 4:perl-5.10.1-136.el6_6.1.x86_64
–> Processing Dependency: perl(version) for package: 4:perl-5.10.1-136.el6_6.1.x86_64
–> Processing Dependency: perl(Pod::Simple) for package: 4:perl-5.10.1-136.el6_6.1.x86_64
–> Processing Dependency: perl(Module::Pluggable) for package: 4:perl-5.10.1-136.el6_6.1.x86_64
–> Processing Dependency: libperl.so()(64bit) for package: 4:perl-5.10.1-136.el6_6.1.x86_64
–> Running transaction check
—> Package perl-Module-Pluggable.x86_64 1:3.90-136.el6_6.1 will be installed
—> Package perl-Pod-Simple.x86_64 1:3.13-136.el6_6.1 will be installed
–> Processing Dependency: perl(Pod::Escapes) >= 1.04 for package: 1:perl-Pod-Simple-3.13-136.el6_6.1.x86_64
—> Package perl-libs.x86_64 4:5.10.1-136.el6_6.1 will be installed
—> Package perl-version.x86_64 3:0.77-136.el6_6.1 will be installed
–> Running transaction check
—> Package perl-Pod-Escapes.x86_64 1:1.04-136.el6_6.1 will be installed
–> Finished Dependency Resolution
Dependencies Resolved
=====================================================================================================================================================================================================
Package Arch Version Repository Size
=====================================================================================================================================================================================================
Installing:
webmin noarch 1.740-1 /webmin-current 64 M
Installing for dependencies:
perl x86_64 4:5.10.1-136.el6_6.1 updates 10 M
perl-Module-Pluggable x86_64 1:3.90-136.el6_6.1 updates 40 k
perl-Pod-Escapes x86_64 1:1.04-136.el6_6.1 updates 32 k
perl-Pod-Simple x86_64 1:3.13-136.el6_6.1 updates 212 k
perl-libs x86_64 4:5.10.1-136.el6_6.1 updates 578 k
perl-version x86_64 3:0.77-136.el6_6.1 updates 51 k
Transaction Summary
=====================================================================================================================================================================================================
Install 7 Package(s)
Total size: 76 M
Total download size: 11 M
Installed size: 100 M
Is this ok [y/N]: y
Downloading Packages:
http://centosmirror.go4hosting.in/centos/6.6/updates/x86_64/Packages/perl-5.10.1-136.el6_6.1.x86_64.rpm: [Errno 12] Timeout on http://centosmirror.go4hosting.in/centos/6.6/updates/x86_64/Packages/perl-5.10.1-136.el6_6.1.x86_64.rpm: (28, ‘Operation too slow. Less than 1 bytes/sec transfered the last 30 seconds’)
Trying other mirror.
(1/6): perl-5.10.1-136.el6_6.1.x86_64.rpm | 10 MB 00:03
(2/6): perl-Module-Pluggable-3.90-136.el6_6.1.x86_64.rpm | 40 kB 00:00
(3/6): perl-Pod-Escapes-1.04-136.el6_6.1.x86_64.rpm | 32 kB 00:00
(4/6): perl-Pod-Simple-3.13-136.el6_6.1.x86_64.rpm | 212 kB 00:00
(5/6): perl-libs-5.10.1-136.el6_6.1.x86_64.rpm | 578 kB 00:01
(6/6): perl-version-0.77-136.el6_6.1.x86_64.rpm | 51 kB 00:00
—————————————————————————————————————————————————————————————————–
Total 16 kB/s | 11 MB 11:46
Running rpm_check_debug
Running Transaction Test
Transaction Test Succeeded
Running Transaction
Installing : 1:perl-Pod-Escapes-1.04-136.el6_6.1.x86_64 1/7
Installing : 1:perl-Module-Pluggable-3.90-136.el6_6.1.x86_64 2/7
Installing : 4:perl-libs-5.10.1-136.el6_6.1.x86_64 3/7
Installing : 1:perl-Pod-Simple-3.13-136.el6_6.1.x86_64 4/7
Installing : 3:perl-version-0.77-136.el6_6.1.x86_64 5/7
Installing : 4:perl-5.10.1-136.el6_6.1.x86_64 6/7
Installing : webmin-1.740-1.noarch 7/7
Operating system is CentOS Linux
Webmin install complete. You can now login to http://mail.local:10000/
as root with your root password.
Verifying : 3:perl-version-0.77-136.el6_6.1.x86_64 1/7
Verifying : 1:perl-Pod-Simple-3.13-136.el6_6.1.x86_64 2/7
Verifying : 1:perl-Module-Pluggable-3.90-136.el6_6.1.x86_64 3/7
Verifying : 4:perl-5.10.1-136.el6_6.1.x86_64 4/7
Verifying : 4:perl-libs-5.10.1-136.el6_6.1.x86_64 5/7
Verifying : webmin-1.740-1.noarch 6/7
Verifying : 1:perl-Pod-Escapes-1.04-136.el6_6.1.x86_64 7/7
Installed:
webmin.noarch 0:1.740-1
Dependency Installed:
perl.x86_64 4:5.10.1-136.el6_6.1 perl-Module-Pluggable.x86_64 1:3.90-136.el6_6.1 perl-Pod-Escapes.x86_64 1:1.04-136.el6_6.1 perl-Pod-Simple.x86_64 1:3.13-136.el6_6.1
perl-libs.x86_64 4:5.10.1-136.el6_6.1 perl-version.x86_64 3:0.77-136.el6_6.1
Complete!
[root@mail opt]#
Webmin default port is 10000, we need to open this port in IPTABLE
[root@mail opt]# vi /etc/sysconfig/iptables
# Firewall configuration written by system-config-firewall
# Manual customization of this file is not recommended.
*filter
:INPUT ACCEPT [0:0]
:FORWARD ACCEPT [0:0]
:OUTPUT ACCEPT [0:0]
-A INPUT -m state –state ESTABLISHED,RELATED -j ACCEPT
-A INPUT -p icmp -j ACCEPT
-A INPUT -i lo -j ACCEPT
-A INPUT -m state –state NEW -m tcp -p tcp –dport 22 -j ACCEPT
-A INPUT -m state –state NEW -m tcp -p tcp –dport 10000 -j ACCEPT
-A INPUT -j REJECT –reject-with icmp-host-prohibited
-A FORWARD -j REJECT –reject-with icmp-host-prohibited
COMMIT
Save & exit
Restart the iptable service
[root@mail opt]# /etc/init.d/iptables restart
iptables: Setting chains to policy ACCEPT: filter [ OK ]
iptables: Flushing firewall rules: [ OK ]
iptables: Unloading modules: [ OK ]
iptables: Applying firewall rules: [ OK ]
Restart the webmin service
[root@mail opt]# /etc/init.d/webmin restart
Stopping Webmin server in /usr/libexec/webmin
Starting Webmin server in /usr/libexec/webmin
Pre-loaded WebminCore
Now you can access it using
http://ip:10000 or http://FQDN:10000
You can see the modules below even you can add more modules using same console
It’s Done
–Sachin
ASP .NET MVC Life Cycle
Hello Everyone,
In this blog we will discuss life cycle for ASP.NET MVC. Before starting with MVC, it’s a very important to know that how does your request process.
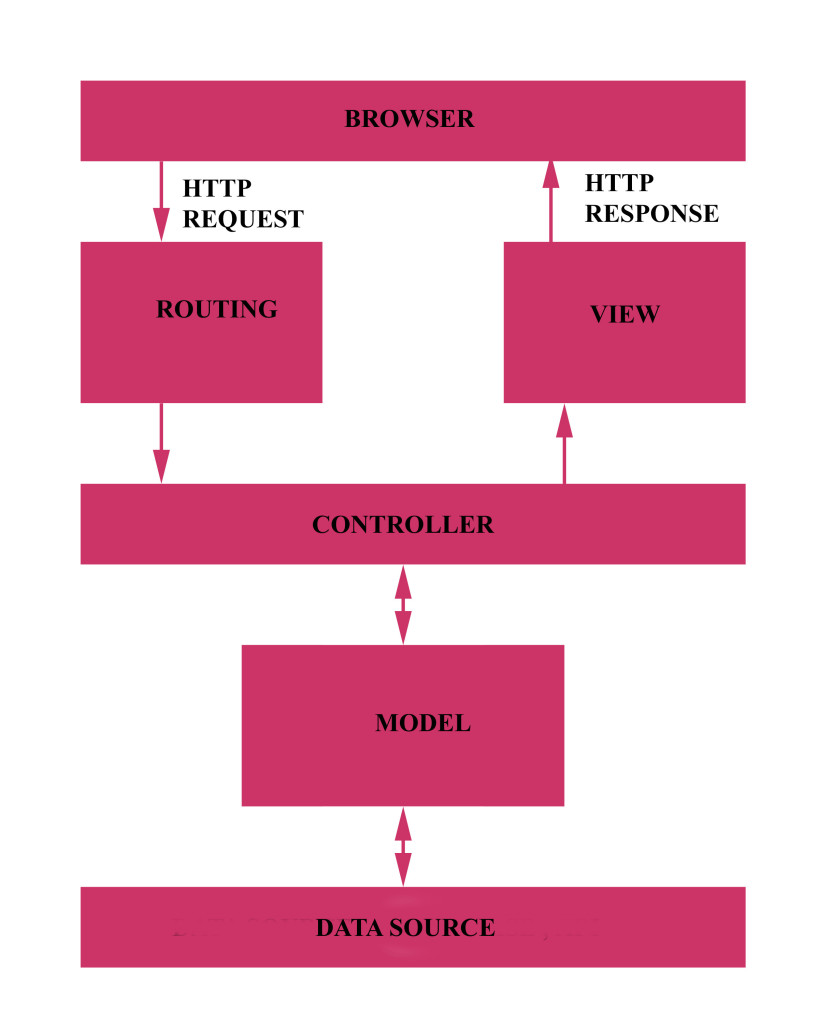
In above figure I tried to show how MVC application process. Your browser sends and receive request in form of HTTP Request and HTTP Response respectively. Routing is a process in which it analyzes the request and invokes an Action of the appropriate Controller. Action calls appropriate method of the model.The Model communicates with the data source (e.g. database or API). Once the Model completes its operation it returns data to the Controller which then loads the appropriate View. The View executes presentation logic using the supplied data. In the end, an HTTP response is returned to the browser.This is just a quick view of MVC life-cycle.
Let’s see details view of MVC life cycle.
This is performed by following steps.
- Receive first request for the application: An MVC application contains only one Route Table. The Route Table maps particular URLs to particular controllers. Check below code of Global.asax: Routes objects are add to RouteTable object when application starts first.The Application_Start() method is invokes only once when the very first page is requested.
public class MvcApplication : System.Web.HttpApplication
{
public static void RegisterGlobalFilters(GlobalFilterCollection filters)
{
filters.Add(new HandleErrorAttribute());
}
public static void RegisterRoutes(RouteCollection routes)
{
routes.IgnoreRoute(“{resource}.axd/{*pathInfo}”);
routes.MapRoute(
“Default”, // Route name
“{controller}/{action}/{id}”, // URL with parameters
new { controller = “Home”, action = “Index”, id = UrlParameter.Optional } // Parameter defaults
);
}
protected void Application_Start()
{
AreaRegistration.RegisterAllAreas();
RegisterGlobalFilters(GlobalFilters.Filters);
RegisterRoutes(RouteTable.Routes);
}
}
- Perform routing : When we make a request in MVC, UrlRoutingModule reads these request to create a RequestContext object.When requested URL found in RouteTable, the Routing engine forwards the request to the corresponding IRouteHandler for that request. The default one calls the MvcHandler. The routing engine returns a 404 HTTP status code against that request if the URL patterns is not found in the Route Table.
- Create MVC request handler: MVC handler implements IHttpHandler interface and further process the request by using ProcessRequest method.When ProcessRequest() is called on the MvcHandler object created, a new controller is created, as show in below code.
- Create and Execute controller: The controller is created from a ControllerFactory. This is an extensibility point since you can create your own ControllerFactory. The default ControllerFactory is named, appropriately enough, DefaultControllerFactory.The RequestContext and the name of the controller are passed to the ControllerFactory. CreateController() method to get a particular controller. Next, a ControllerContext object is constructed from the RequestContext and the controller. Finally, the Execute() method is called on the controller class. The ControllerContext is passed to the Execute() method when the Execute() method is called. For reference check below code.
virtual void ProcessRequest(HttpContextBase httpContext)
{
SecurityUtil.ProcessInApplicationTrust(delegate {
IController controller;
IControllerFactory factory;
this.ProcessRequestInit(httpContext, out controller, out factory);
try
{
controller.Execute(this.RequestContext);
}
finally
{
factory.ReleaseController(controller);
}
});
}
- Invoke action:The Execute() method finds a action of the controller to execute. Controller class can be created by us and Execute() method finds one of the methods that we write into the controller class and executes it.
- Execute result: Action method of controller receives the user input data, process these data and returns result. The built-in result types can be ViewResult, RedirectToRouteResult, RedirectResult, ContentResult, JsonResult, FileResult, and EmptyResult.
For more details Visit HERE
I hope this will help you.Your valuable feedback and comments are important for me.
Installation of OTRS 2.4.7 & up gradation to OTRS 4
Hello Everyone,
Today we are doing installation & up gradation of OTRS 2.4.7 to OTRS 4
so lets get started
What is the OTRS
OTRS, an initialism for Open-source Ticket Request System, is a free and open-source trouble ticket system software package that a company, organization, or other entity can use to assign tickets to incoming queries and track further communications about them
Lets install OTRS 2.4.7
My environment : centos 6.6 with 1GB RAM ( not really require)
After installing Centos you have to update the OS first
command
yum update
install wget
yum install wget
Adding EPEL Repository to RHEL / CentOS / Scientific Linux 6.x
wget http://epel.mirror.net.in/epel/6/i386/epel-release-6-8.noarch.rpm
rpm -Uvh epel-release-6-8.noarch.rpm
yum install yum-priorities –y
now you have to edit centos base repo
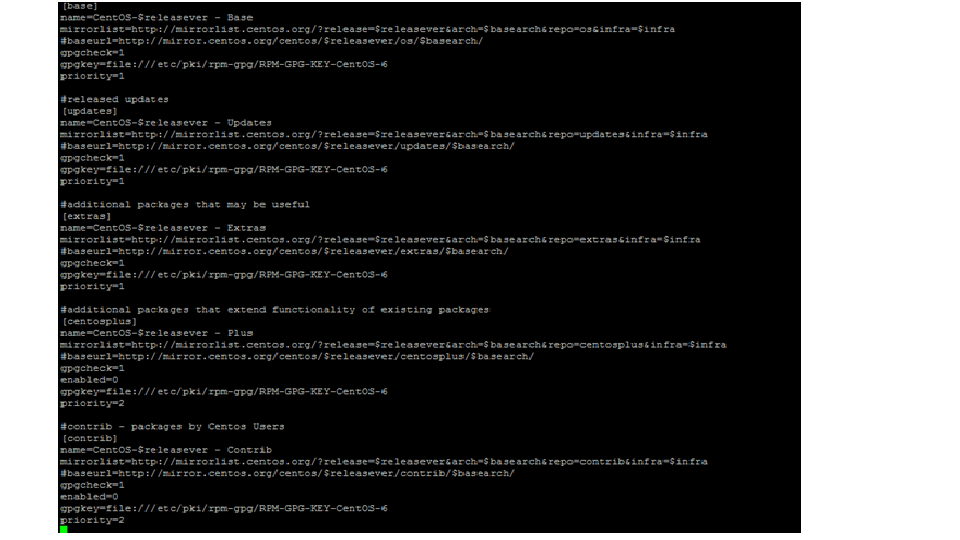
vi /etc/yum.repos.d/CentOS-Base.repo
Change the priority for [base], [updates], [extras]: priority=1.
cd /tmp
wget http://mirror.de.leaseweb.net/epel/6/x86_64/epel-release-6-8.noarch.rpm
rpm –import https://fedoraproject.org/static/0608B895.txt
rpm -i epel-release-6-8.noarch.rpm
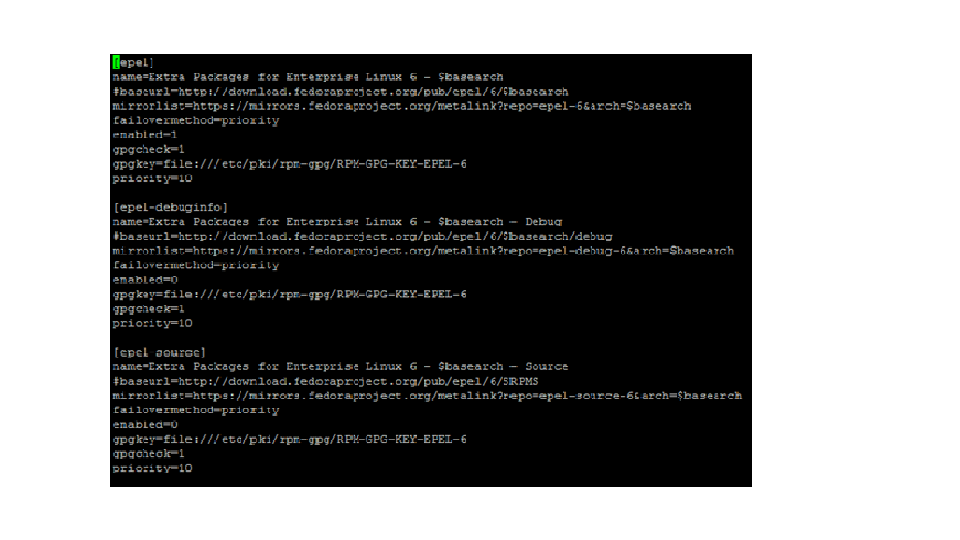
now edit epel repo
vi /etc/yum.repos.d/epel.repo to priority=10
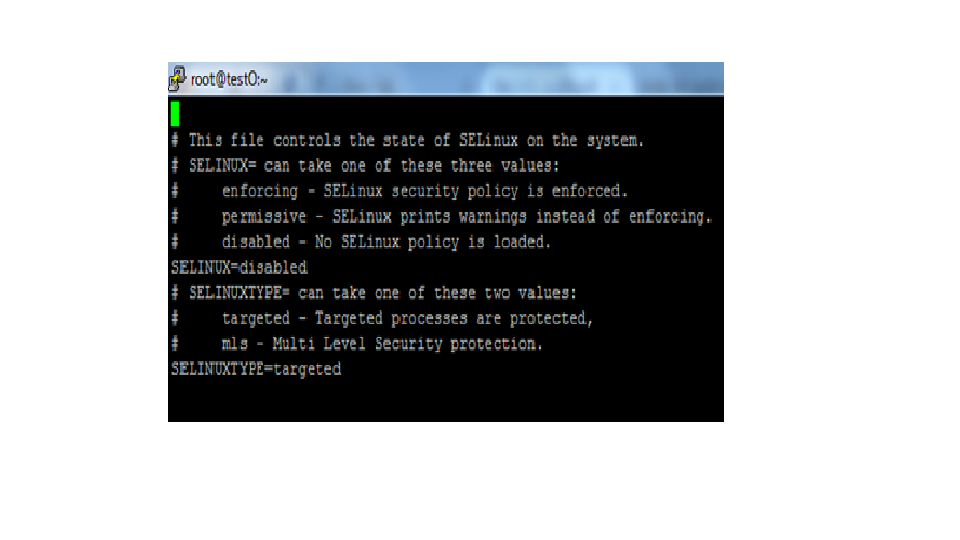
Deactivate SELINUX
Vi /etc/sysconfig/selinux
SELINUX=disabled
Reboot
Init 6
Installing Apache webserver
yum install httpd –y
service httpd start
chkconfig httpd on
installing MySQL DB
yum install mysql-server –y
Set Mysql caching
vi /etc/my.cnf
add below lines
max_allowed_packet=500M
MySQL 4.x has query caching available.
Enable it for vast improvement and it may be all you need to tweak.
query_cache_type=1
query_cache_limit=1M
query_cache_size=32M
service mysqld start
chkconfig mysqld on
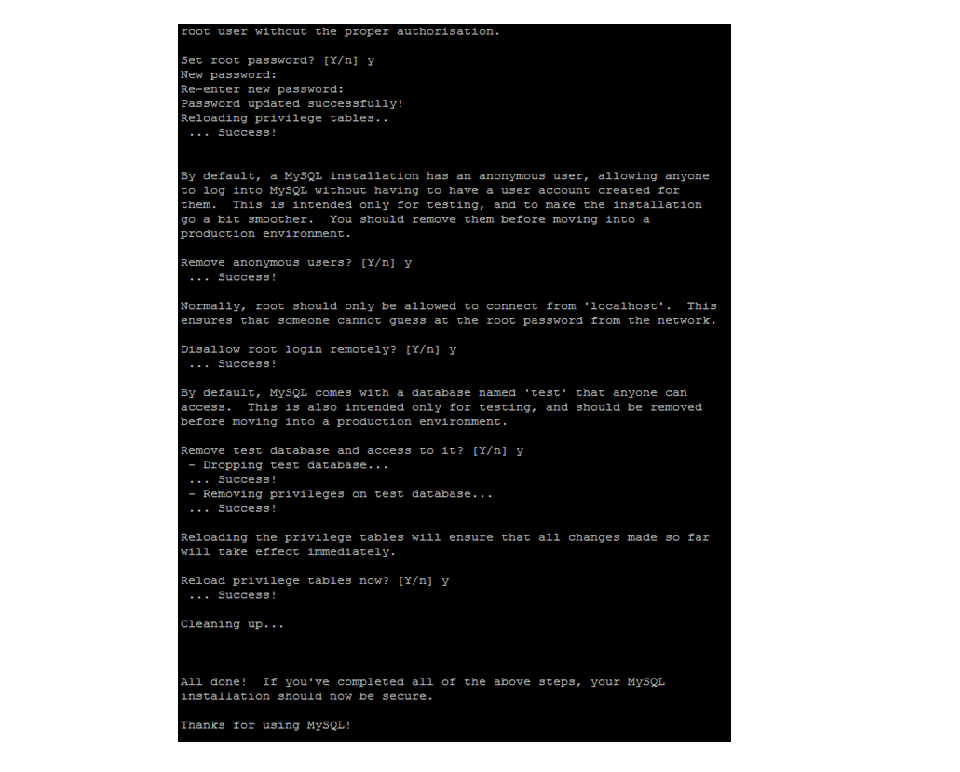
Configuring mysql
mysql_secure_installation
Install prerequisites for OTRS 2.4.7
yum install perl perl-Bit-Vector perl-CPAN perl-Carp-Clan perl-DBD-MySQL perl-DBI perl-Date-Calc perl-Digest-HMAC perl-Digest-SHA perl-Digest-SHA1 perl-ExtUtils-MakeMaker perl-ExtUtils-ParseXS perl-GD perl-GDGraph perl-GDGraph3d perl-GDTextUtil perl-Module-Pluggable perl-Net-DNS perl-Pod-Escapes perl-Pod-Simple perl-Test-Harness perl-devel perl-libs perl-version vim-enhanced zlib-devel libpng-devel libjpeg-devel freetype-devel fontconfig-devel gd gd-devel perl-Bit-Vector perl-Date-Calc perl-Date-Leapyear perl-Date-ICal perl-DBI perl-Digest-HMAC perl-Digest-SHA1 perl-Net-DNS perl-GD perl-GD-Graph3d perl-GDGraph perl-GDTextUtil mod_perl make gcc perl-CGI perl-SOAP-Lite perl-XML-Parser perl-Net-SMTP-SSL perl-DateTime-Format-DateParse perl-DateTime-Format-Mail perl-DateTime libgdata perl-core perl-Crypt-SSLeay perl-LDAP procmail perl-YAML perl-YAML-LibYAML perl-Text-CSV_XS perl-JSON-XS perl-YAML-LibYAML perl-JSON-XS perl-PDF-API2 –y
installing OTRS
wget http://ftp.otrs.org/pub/otrs/RPMS/redhat/8.0/otrs-2.4.7-01.noarch.rpm
yum install otrs-2.4.7-01.noarch.rpm
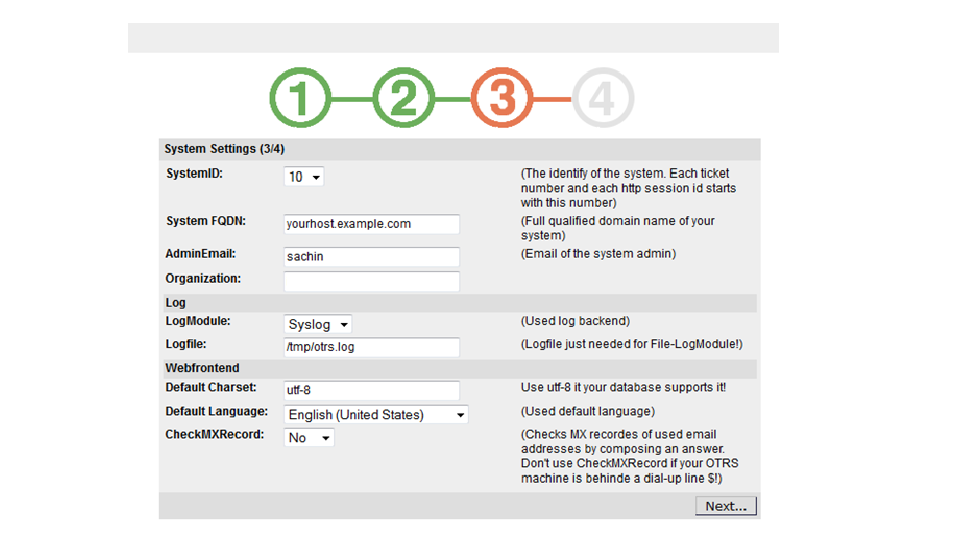
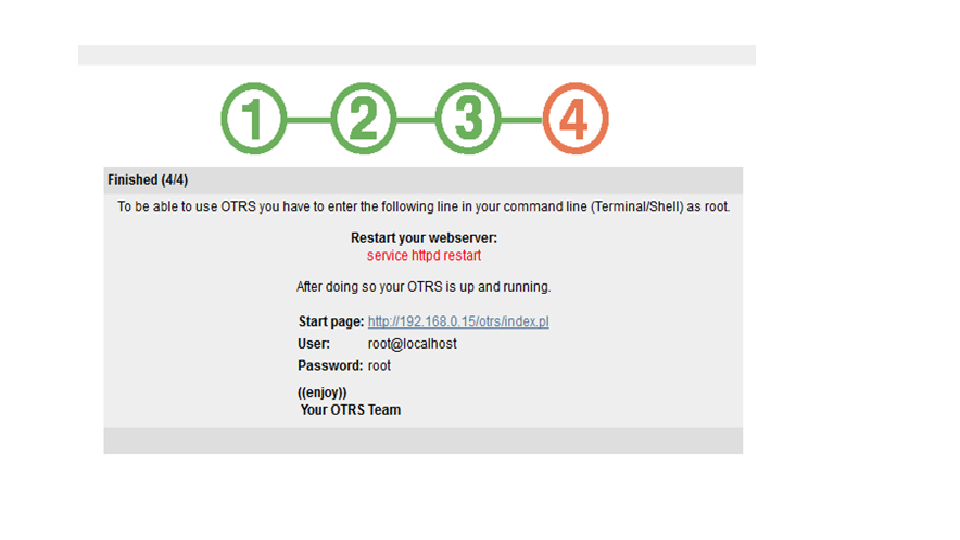
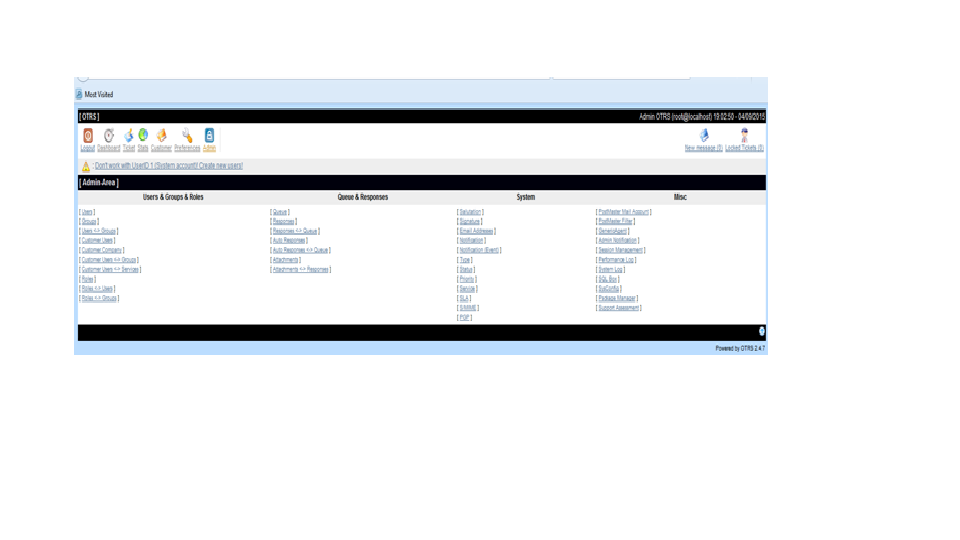
OTRS 2.4.7
Three new users are created
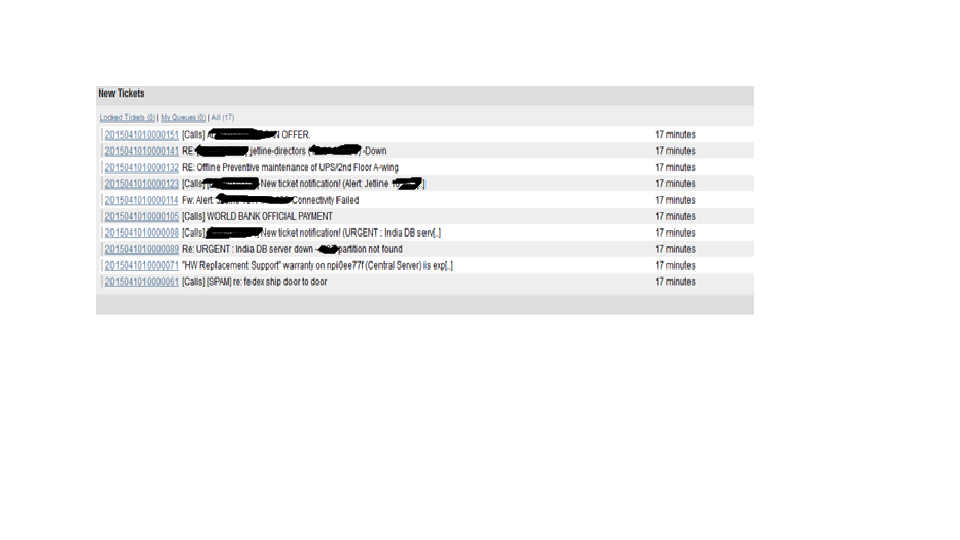
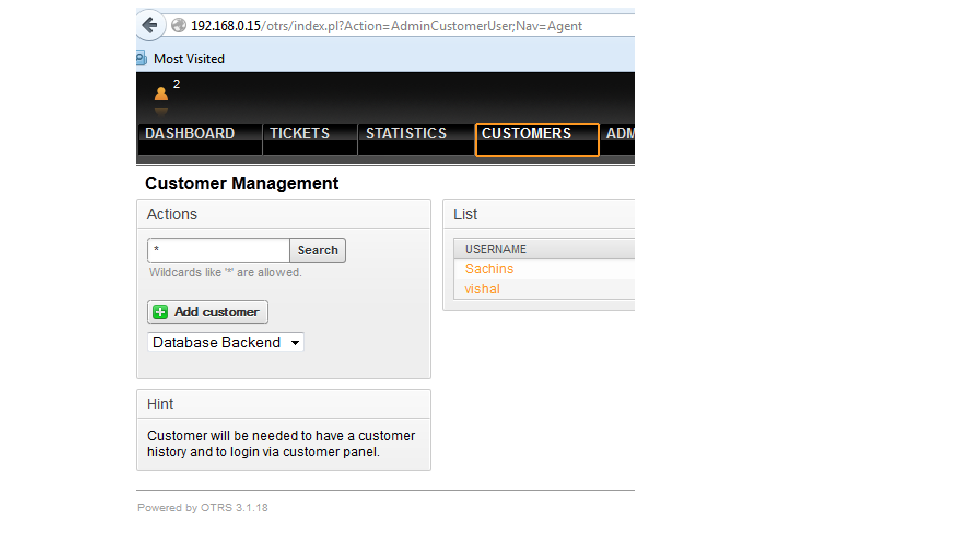
New tickets are generated using Email ID
installation is done now upgradation
Preparation for up gradation
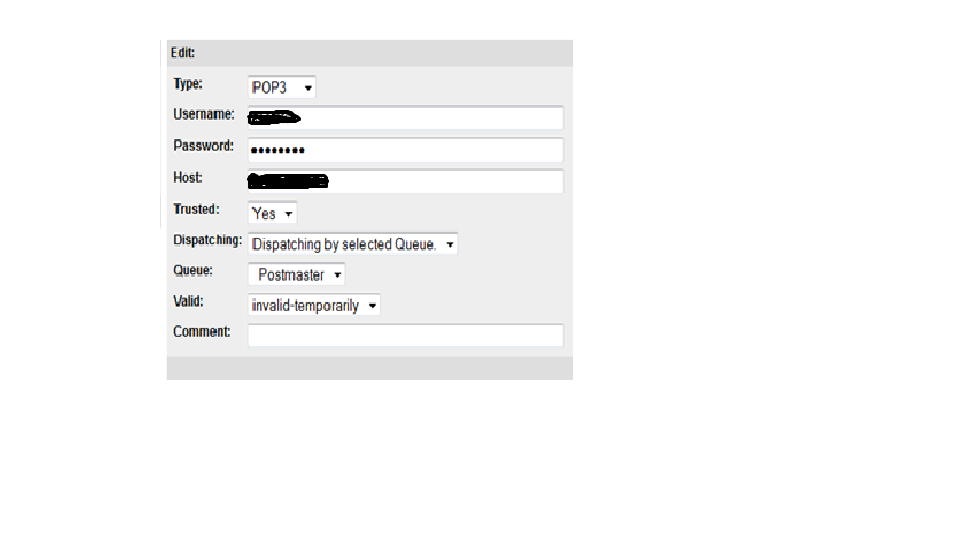
Deactivate E-Mail
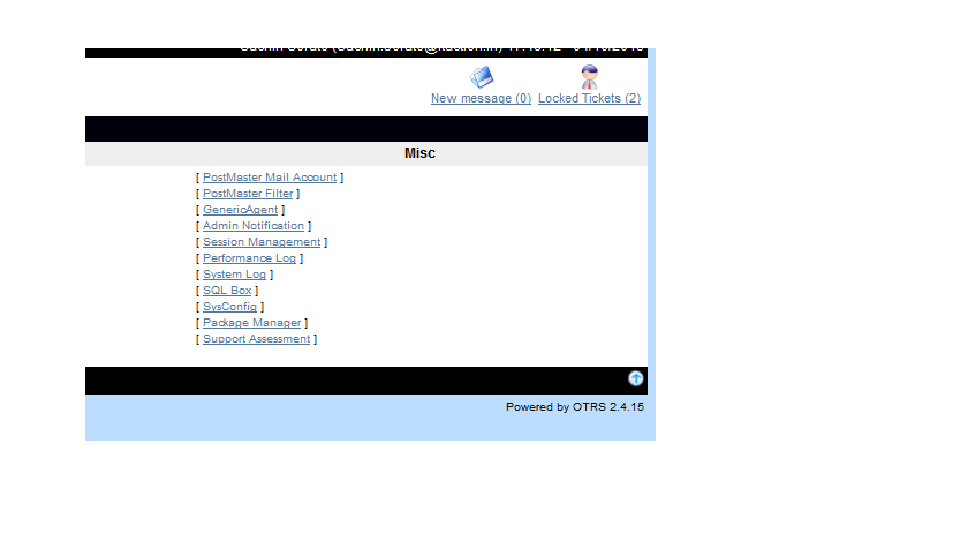
Admin -> SysConfig -> Framework -> Core::Sendmail
Disable the postmaster email account
Admin -> PostMaster Mail Account
Change to invalid temporary
Log off all users session except your session
Stop the require services
Service otrs stop
Service httpd stop
Service crond stop
Service postfix stop
Taking database backup using backup script
root@testO scripts]# ./backup.pl -d /opt/otrs/ -c gzip -t dbonly
download version 3.1.12
[root@testO ~]# cd /tmp/
[root@testO tmp]# wget http://ftp.otrs.org/pub/otrs/RPMS/redhat/8.0/otrs-2.4.15-01.noarch.rpm
[root@testO tmp]# yum install otrs-2.4.15-01.noarch.rpm
[root@testO scripts]# /opt/otrs/bin/otrs.SetPermissions.pl –otrs-user=otrs –web-user=apache –otrs-group=apache –web-group=apache /opt/otrs
cat /opt/otrs/scripts/DBUpdate-to-2.3.mysql.sql | mysql -p -f -u root otrs
cat /opt/otrs/scripts/DBUpdate-to-2.3-post.mysql.sql | mysql -p -f -u root otrs
[root@testO tmp]# service httpd restart
Stopping httpd: [FAILED]
Starting httpd: [ OK ]
[root@testO tmp]# service crond restart
Starting crond: [ OK ]
[root@testO tmp]# service postfix restart
Shutting down postfix: [FAILED]
Starting postfix: [ OK ]
[root@testO tmp]# service otrs start
hostname: Unknown host
Starting OTRS..
Checking httpd … done.
Checking MySQL … done.
Checking database connect… It looks Ok! done.
Enable /opt/otrs/bin/PostMaster.pl … done.
Checking otrs spool dir… done.
Creating cronjobs (source /opt/otrs/var/cron/*) …
done.
–>> http:///otrs/index.pl <<–
Final start of OTRS.. done
ok we have upgraded OTRS 2.4.7 to 2.4.15 now we are upgrading 2.4.15 to 3.0.1
now here come the tricky part, i have tried to upgrade using slandered procedure but Database not migrated
so here is my procedure upgrade otrs to 3.0.1
Upgrading OTRS from 2.4.15 to 3.0.1
I have download the “otrs-3.0.1.tar.gz” from http://ftp.otrs.org/pub/otrs/
i transfer downloaded file using WINSCP
Take OTRS backup using ./backup.pl script
Take mysql backup using
mysqldump -u root -proot123 –all-databases > /tmp/all-database.sql
mysqldump -u root -proot123 otrs > /tmp/otrs.sql
Transfers downloaded file to OTRS system to
/opt/
Stop the required services
httpd
otrs
postfix
crond
Rename the otrs folder to otrs.old
Rename the otrs-3.0.1 to otrs
Copy the below files in new OTRS folder
Kernel/Config.pm
Kernel/Config/GenericAgent.pm
Kernel/Config/Files/ZZZAuto.pm
var/*
Run the below commands step by step
/opt/otrs/bin/SetPermissions.pl –otrs-user=otrs –web-user=apache –otrs-group=apache –web-group=apache /opt/otrs
Check if any module missing
/opt/otrs/bin/otrs.CheckModules.pl
cat /opt/otrs/scripts/DBUpdate-to-3.0.mysql.sql | mysql -p -f -u root otrs
su -s /bin/bash -c “/opt/otrs/scripts/DBUpdate-to-3.0.pl” otrs
cat /opt/otrs/scripts/DBUpdate-to-3.0-post.mysql.sql | mysql -p -f -u root otrs
su -s /bin/bash -c “/opt/otrs/bin/otrs.RebuildConfig.pl” otrs
Start require services
service httpd start
service crond start
service postfix start
service otrs start
log in to the otrs you can see otrs has been updated to version 3.0.1
u can see users & tickets are there
now we are upgrading 3.1.18 -> 3.2.12
OTRS Upgrade 3.1.18 -> 3.2.12
Take backup before up gradation
Stop require services
service httpd stop
service crond stop
service postfix stop
service otrs stop
wget http://ftp.otrs.org/pub/otrs/RPMS/rhel/6/otrs-3.2.12-01.noarch.rpm
yum install otrs-3.2.12-01.noarch.rpm
/opt/otrs/bin/otrs.SetPermissions.pl –otrs-user=otrs –web-user=apache –otrs-group=apache –web-group=apache /opt/otrs
cat /opt/otrs/scripts/DBUpdate-to-3.2.mysql.sql | mysql -p -f -u root otrs
cat /opt/otrs/scripts/DBUpdate-to-3.2.mysql.sql | mysql -p -f -u root otrs
su -s /bin/bash -c “/opt/otrs/scripts/DBUpdate-to-3.2.pl” otrs
su -s /bin/bash -c “/opt/otrs/bin/otrs.DeleteCache.pl” otrs
Start require services
service httpd start
service crond start
service postfix start
service otrs start
upgraded to 3.1.18 -> 3.2.12
now i am not getting this document tooo long
you have to follow same procedure up-gradation of 3.1.18 to 3.2.12
each time make sure your taking backup
& one more thing there is sequence of up gradation 2.4.7>>2.4.15>>3.0.1>>3.1.18>>3.2.12>>3.3.3>>4.0.
i have successfully completed to 4.0
Best Of Luck
-Sachin..
Seminar on 18th April on Sharepoint & Knockout by Inderjeet Singh and Pradeep Shet
Hello Friends,
Mark your calender for weekend to make it worth. We are coming up with our next offline seminar which we are planning to conduct on 18th April, Sunday from 11:00 am to 4:00 pm. This time we have a session on Sharepoint Installation & configuration which would be conducted by my friend me Inderjeet Singh (MVP) and other half of the session would be conducted by (Pradeep Shet) on JavaScript framework i.e. – Knockout. This will be an hands on session so get your laptops with you.
We want lots of people to take the benefit of these sessions. Contact your friends and tell them about this free seminar.
Venue: – Microsoft Office (4th Floor, Windsor Bldg, Off. CST Road, Kalina, Santacruz[E], Mumbai – 400098.
Landmark:- Near Mumbai University
Date :- 18th April, 2015
Timings :- 11:00 am to 4:00 pm
Pre requisites :
Get your laptop with you as this would be hands on session. Please don’t forget to bring it if you have it.
Share this event details across your friend circle who are interested in attending. We have created facebook event for this. Mark it as going if you are willing to attend it.
Update on SharePoint server 2016 release date
Today big news coming from Microsoft is release date of SharePoint 2016
Finally, Microsoft announced the most awaited release dates of on-premises SharePoint 2016.
Microsoft Blog site “SharePoint Server 2016 update” says that the next version of SharePoint Server 2016 has advanced content management, team collaboration, user experiences across devices, and how the cloud can be blended into existing on-premises scenarios in new and compelling ways.
Major focused areas for development of SharePoint Server 2016 were to deliver enhancements and new capabilities in three major areas:
1. New user experiences
2. Cloud-inspired infrastructure with Hybrid at the core
3. People-centric compliance
I find the most interesting comment to be “People-Centric File Storage and Collaboration”. I take this to suggest a move to storing the majority of files in OD4B rather than team sites and promote people to use it. Now that Microsoft owns Yammer, I assume Yammer will be tightly integrated with SharePoint and soon may disappear just like Fast search.
Now most awaited SharePoint Server 2016 RTM will be available to customers in Q2 CY 2016 but a Public Beta would be available in Q4 CY 2015.
Another good news is that if your company is interested in providing feedback on early versions of SharePoint 2016, Microsoft can invite you to nominate them for the Technology Adoption Program (TAP). Joining the on-premises TAP Program provides companies with a number of advantages, such as providing input and feedback for future releases of SharePoint, Project Server, and/or Exchange Server; developing a close relationship with the Product Teams; and receiving pre-release information about SharePoint, Project Server and Exchange.
To apply for TAP you need to visit
http://prereleaseprograms-public.sharepoint.com/Pages/BusinessProfile.aspx

