Creating a Lab on Windows Azure – Continue
- Create a Virtual Network in Azure.
Now let’s create a Virtual Network in Azure like we do in our Hyper-V servers. We need this Virtual network so that all the new and old Machine are in same IP range and can communicate with each other. You don’t need to be a Networking expert to do so. Just follow steps mentioned below.
- Login to your Azure Subscription Portal site https://manage.windowsazure.com
- Select “Network” from left hand menu > Select “New” on left bottom corner
- Now in the Menu select “Custom Create”
- Now type the network name and select the data center for that network(note all computers should be in the same datacenter)
- For now we will keep this DNS server empty (We should have our Domain controller DNS IP here. Our DC is not yet created so we keep it blank). Click on Next
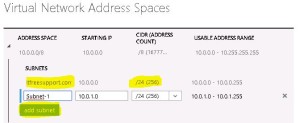
- On “Virtual Network Address Spaces”, provide name of your network and Subnet count (I won’t have more than 256 machines so selected same). Click on “Add Subnet”. Click on Finish
Here we have our Virtual Network created. Note this Network will then be used while creating our Virtual Machine. The very first machine we will create is our Domain controller. Once the domain controller is created we will update it in DNS server records used above.


