- An error has occurred, which probably means the feed is down. Try again later.
Archive for the ‘Azure’ Category
Writing Quantum Code with Microsoft Azure
The realm of quantum computing is rapidly advancing, and Microsoft Azure stands at the forefront of this unprecedented transformation. Through Azure Quantum, you have the capacity to craft your Q# program using the hosted Jupyter Notebooks within your Azure Quantum workspace.
Step 1: Accessing Azure Quantum
Initiating this process entails reaching Azure Quantum itself. This can be achieved by visiting the Azure Quantum website via your web browser. If you lack an Azure account, its creation is a requisite. Subsequently, upon logging in, entry into the Azure Quantum service becomes feasible.
Step 2: Navigating to Jupyter Notebooks
Once ensconced within Azure Quantum, the next step is to make your way to the Jupyter Notebooks segment. Embodying an open-source web application, Jupyter Notebooks provide the avenue to fabricate and disseminate documents integrating live code, equations, visualizations, and narrative text.
Step 3: Writing Your Q# Program
Upon commencing your journey within Jupyter Notebooks, you are empowered to commence crafting your Q# program. Q# stands as a specialized programming language tailored for articulating quantum algorithms. This unique language finds its purpose in conjunction with the Quantum Development Kit (QDK), an inclusive ensemble featuring the Q# programming language, quantum simulators, libraries, and an array of supplementary tools.
Step 4: Using Libraries
To keep your code high level, you can use libraries. Libraries in Q# provide reusable pieces of code that can be called from your Q# program. They include operations (the basic unit of quantum execution in Q#), functions (code that helps to process information within the quantum algorithm), and types (abstractions that are used to represent and manipulate quantum states).
Step 5: Running Your Quantum Code
After writing your Q# program, you can run it directly in the Jupyter Notebook. You can also debug and test your quantum code using the Quantum Development Kit.
Conclusion
Crafting quantum algorithms using Microsoft Azure entails a seamless and accessible procedure. Armed with solely a web browser and an Azure account, one can commence delving into the captivating realm of quantum computation. Whether one is a seasoned quantum computing expert or an inquisitive novice, Azure Quantum furnishes the requisite tools and assets to delve into the intricacies of quantum computation.
Learning Quantum Computing Concepts with Microsoft Azure
The impending quantum revolution—grounded in the abstruse principles of quantum mechanics—ushers in a transformative era. Microsoft Azure offers an extensive learning pathway to unravel the foundational tenets of quantum computing.
Understanding Quantum Computing
Quantum computing constitutes a specialized domain delving into the evolution of computing technologies, hinged upon the precepts of quantum theory. This theory elucidates the characteristics and interactions of energy and substance at the quantum level—pertaining to atomic and subatomic dimensions.
The Building Block of Quantum Computing: The Qubit
Central to quantum computing lies the qubit, which stands in stark contrast to classical bits capable of assuming a singular 0 or 1. Instead, a qubit can exist in a confluence of 0, 1, or both, concurrently, a feat attributable to the phenomenon of superposition. This property empowers quantum computers to enact a multitude of computations in tandem.
Azure Quantum and the Quantum Development Kit
Microsoft Azure has engineered Azure Quantum, an expansive and accessible cloud framework that equips users with an array of resources for delving into quantum computing. Among these resources is the Quantum Development Kit (QDK), a suite of open-source utilities enabling developers to craft, evaluate, and rectify quantum algorithms.
Q#: A Quantum Programming Language
At the core of the QDK lies Q#, a tailored programming language employed for articulating quantum algorithms. Dubbed the quantum equivalent of Python or R in the realm of classical computing, Q# facilitates the advancement of quantum computing capabilities.
Conclusion
Mastering the intricate concepts of quantum computing paves the way to wield the formidable capabilities of quantum mechanics. Microsoft Azure offers an enriching learning path that equips you with a robust groundwork in quantum computing, empowering you to craft your own quantum algorithms using Q#.
Creating and Building a Quantum Workspace with Microsoft Azure
In the ever-changing realm of quantum computing, a dedicated workspace holds paramount importance. Microsoft Azure offers a platform that allows the establishment of a high-performance hybrid Quantum compute environment within your Azure Quantum workspace, all through a simple browser.
Step 1: Accessing Azure Quantum
To begin the journey, one must first gain entry into Azure Quantum. This can be achieved by directing the browser to the Azure Quantum website. Should an individual lack an Azure account, the creation of one becomes necessary. Upon successful login, the Azure Quantum service becomes accessible.
Step 2: Creating a Quantum Workspace
Once immersed in the realm of Azure Quantum, the creation of a new Quantum Workspace beckons. This designated space stands as the hub for all quantum computational endeavors. The initiation of a new workspace entails the act of clicking on the ‘Create a resource’ tab and opting for ‘Quantum Workspace’.
Step 3: Configuring Your Workspace
Upon establishing your workspace, the next step involves its configuration, encompassing the choice of a quantum computing provider and the specification of the target quantum machine. Azure Quantum offers a diverse array of quantum hardware providers, thereby ensuring the availability of requisite tools for delving into the potential of quantum computing.
Step 4: Building Your Quantum Environment
Following the setup and configuration of your workspace, you can embark on constructing your quantum environment. This endeavor entails the composition of quantum programs utilizing Q#, a quantum programming language developed by Microsoft. The capability to craft Q# programs directly within your Azure Quantum workspace is facilitated through the utilization of hosted Jupyter Notebooks.
Step 5: Running Your Quantum Programs
Subsequent to the composition of quantum programs, you can execute them on authentic quantum computers via the Azure Quantum service. Monitoring the progression of your tasks is seamlessly achievable from within your Quantum Workspace.
Conclusion
Establishing a high-performance hybrid Quantum compute environment within your Azure Quantum workspace is a streamlined process. Armed solely with a browser and an Azure account, you can initiate an exploration of the captivating realm of quantum computing. Azure Quantum extends its provision of tools and resources, catering to both seasoned quantum computing professionals and inquisitive novices alike.
Quantum Computing and Microsoft Azure: A Revolutionary Partnership
Leveraging the enigmatic laws of quantum mechanics, quantum computing stands poised to catalyze a paradigm shift in myriad domains. Positioned at the vanguard of this transformative wave, Microsoft Azure adeptly wields the potential of quantum computing to unravel intricate quandaries and cultivate novel prospects.
Azure Quantum: The Future of Computing
Dubbed Azure Quantum, this comprehensive cloud framework, conceived by Microsoft, endeavors to democratize the advantages of quantum computing on a global scale. By amalgamating avant-garde quantum hardware, software, and solutions within a unified cloud service, Azure Quantum furnishes individuals and entities with the means to delve into and equip themselves for the epoch of scaled quantum computing, leveraging cutting-edge cloud tools and educational reservoirs.
Quantum Hardware: A Diverse Portfolio
An integral aspect of Azure Quantum encompasses its varied array of quantum hardware. This expansive collection furnishes users with an extensive arsenal to explore the profound capabilities of quantum computing.
Quantum Intermediate Representation (QIR)
Azure Quantum employs the Quantum Intermediate Representation (QIR) to adapt to diverse quantum machines. This approach ensures that code compatibility extends across different hardware platforms, enabling users to compose code once and execute it on various quantum machines.
Conclusion
The convergence of quantum computing with Microsoft Azure promises to reimagine our approach to complex problem-solving. By harnessing the principles of quantum mechanics, Azure Quantum is spearheading a future where intricate dilemmas can be swiftly resolved, thereby unveiling fresh prospects for advancement and expansion.
Blog series: Quantum Computing
I am excited to announce that I have embarked on a journey of learning about quantum computing and Q#, the quantum programming language for Azure Quantum. I will be sharing my insights and discoveries on this site, hoping to help anyone who is interested in learning about quantum computing and Q#. I have chosen Microsoft Azure as my technology partner to explore the fascinating world of quantum computing and its secrets. Let’s get started!
After doing a lot of research, I found that the best way to start learning Q# for Azure Quantum is through Quantum Katas.
The Quantum Katas are open-source, self-paced tutorials and programming exercises that teach the fundamentals of quantum computing and Q# at the same time. Each kata covers a core concept of quantum computing, ranging from the basics to more advanced quantum algorithms and protocols.
https://learn.microsoft.com/en-us/azure/quantum/tutorial-qdk-intro-to-katas
Lets start with Katas Online by browsing. below link
https://quantum.microsoft.com/en-us/experience/quantum-katas
I will talk more about it in my next article
Delete Jobs API to support bulk delete in Azure Digital Twins
The Delete Jobs API doesn’t remove any types of entities, like endpoints, routes or jobs. It’s a part of the data plane APIs within Azure Digital Twins, which are used to manage the elements in an instance. The Delete Jobs API has some characteristics; It’s a feature that aims to make data deletion easier and more efficient for Azure Digital Twins users.
Using the Delete Jobs API brings benefits, including improved security and privacy measures, enhanced performance and efficiency well, as simplified management and operation. By utilizing the Delete Jobs API users can accomplish their goals. Fulfill their requirements while saving time, money and effort. This feature is definitely worth exploring for users who have complex datasets on their Azure Digital Twins instance.
The Delete Jobs API has the following characteristics:
- It requires an operation-id header, which is a unique identifier for the job’s status monitor. The operation-id can be generated by the user or by the service if the header is not passed by the user.
- It supports an optional timeoutInMinutes query parameter, which specifies the desired timeout for the delete job. Once the specified timeout is reached, the service will stop any delete operations triggered by the current delete job that are in progress and go to a failed state. This will leave the instance in an unknown state, as there is no rollback operation.
- It returns a 202 Accepted status code, along with an Operation-Location header, which contains the URL to monitor the status of the job. The response body also contains the job details, such as the id, createdDateTime, finishedDateTime, purgeDateTime, and status.
- It supports four possible statuses for the job: notstarted, running, succeeded, or failed.
- It supports only one bulk delete job at a time within an instance. If the user tries to initiate another delete job while one is already in progress, the service will return a 400 Bad Request status code, along with a JobLimitReached error code.
- The Delete Jobs API is a useful feature that enables users to delete all models, twins, and relationships on their Azure Digital Twins instance in a simple and convenient way. The Delete Jobs API offers several benefits, such as:
- Enhanced security and privacy: The Delete Jobs API allows users to remove their data from the instance when they no longer need or own it, or when they need to comply with regulations that mandate data deletion. The Delete Jobs API also encrypts the data in transit and at rest, and allows users to control access and permissions by using Azure Active Directory and Azure Role-Based Access Control.
- Improved performance and efficiency: The Delete Jobs API reduces the complexity and effort of deleting data manually or programmatically, as it allows users to delete all models, twins, and relationships with a single API call. The Delete Jobs API also improves the performance and efficiency of the instance, as it frees up space and resources for new data and operations.
- Simplified management and operation: The Delete Jobs API leverages the existing capabilities and integrations of Azure Digital Twins, which means that users do not need to deploy or maintain any additional hardware or software for their data deletion. The Delete Jobs API also enables users to monitor and manage their delete jobs from anywhere, by using Azure Portal, Azure CLI, or Azure PowerShell.
The Delete Jobs API is a feature that is worth trying out and exploring, especially for users who have large or complex data sets on their Azure Digital Twins instance. The Delete Jobs API is a feature that can potentially transform the way users use data deletion in Azure Digital Twins.
Encryption with customer-managed keys in Azure Health Data Services
Azure Health Data Services provides an compliant environment, for storing and processing health data. It offers features, including encryption, auditing, role based access control and data protection. By default Azure Health Data Services ensures that the data stored in its underlying Azure services like Azure Cosmos DB, Azure Storage and Azure SQL Database is encrypted using keys managed by Microsoft.
Microsoft managed keys refer to encryption keys that are created and handled by Microsoft on behalf of the customer.
These keys provide an hassle free method of encrypting data without requiring any setup or maintenance, from the customers end.
When customers enable encryption with customer-managed keys for their Azure Health Data Services account, they can specify an Azure Key Vault key URI, which is a unique identifier for their encryption key. Azure Health Data Services then passes this key URI to the underlying Azure services, such as Azure Cosmos DB, Azure Storage, and Azure SQL Database, which use the customer-managed key to encrypt and decrypt the data. Azure Health Data Services also uses the customer-managed key to encrypt and decrypt the data in transit, such as when the data is transferred between Azure services or between Azure and the customer’s applications.
Encryption with customer-managed keys offers several benefits for customers, such as:
- Enhanced security and privacy: Encryption with customer-managed keys adds a second layer of encryption on top of the default encryption with Microsoft-managed keys, which means that the data is encrypted twice. This provides an extra level of protection and assurance for the data, as it prevents unauthorized access or disclosure, even if the Microsoft-managed keys are compromised. Encryption with customer-managed keys also enables customers to control and monitor the access and usage of their encryption keys, by using Azure Key Vault or Azure Key Vault Managed HSM features, such as access policies, logging, and auditing.
- Improved compliance and governance: Encryption with customer-managed keys helps customers to meet their specific security or compliance requirements, such as HIPAA or GDPR, that mandate the use of customer-managed keys. Encryption with customer-managed keys also enables customers to demonstrate their compliance and governance to their stakeholders, such as regulators, auditors, or customers, by using Azure Key Vault or Azure Key Vault Managed HSM features, such as reports, certificates, or attestations.
- Simplified management and operation: Encryption with customer-managed keys leverages the existing capabilities and integrations of Azure Key Vault and Azure Key Vault Managed HSM, which means that customers do not need to deploy or maintain any additional hardware or software for their encryption keys. Encryption with customer-managed keys also allows customers to use the same encryption keys for multiple Azure services, which simplifies the management and operation of their encryption keys.
Encryption with customer-managed keys is currently in public preview, which means that it is available for testing and evaluation purposes, but not for production use.
Encryption with customer-managed keys is a promising feature that aims to make encryption easier and better for customers who use Azure Health Data Services. Encryption with customer-managed keys offers several advantages, such as enhanced security and privacy, improved compliance and governance, and simplified management and operation. Encryption with customer-managed keys can help customers to achieve their goals and requirements, while saving time, money, and effort. Encryption with customer-managed keys is a feature that is worth trying out and exploring, especially for customers who have sensitive or confidential health data. Encryption with customer-managed keys is a feature that can potentially transform the way customers use encryption in Azure Health Data Services.
Public preview: Private subnet
A private subnet serves as an isolated network segment, safeguarded from external networks and the vast world of internet. It is the preferred environment for safeguarding sensitive and confidential data, like databases, servers, and applications, demanding a pristine level of security and privacy. Its efficacy in enhancing the performance and reliability of network traffic by mitigating latency, congestion, and interference cannot be overstated.
Challenges do arise with private subnets. Notably, their inability to directly interact with the public internet hinders access to online resources like web pages, APIs, and cloud storage. Equally limiting is the difficulty in monitoring, managing, or troubleshooting them remotely from outside the network.
To surmount such obstacles, private subnets often lean on intermediary devices or services such as NAT gateways, VPNs, or proxies, facilitating bidirectional or unidirectional communication between the private subnets and the public internet or other networks. Nonetheless, these solutions introduce added complexity, cost, and security risks mandating meticulous configuration, maintenance, and security measures.
In an enterprise to ease and refine the usage of private subnets, Microsoft Azure has recently unveiled the public preview of the groundbreaking feature, “Private Subnet,” within Azure Virtual Network (VNet). This innovation obviates the necessity for intermediary devices or services, empowering private subnets to communicate securely and directly with the public internet and other Azure services like Azure Storage, Azure SQL Database, or Azure App Service, employing private IP addresses. Notably, the Private Subnet offers the flexibility to access and administer private subnets from any location through Azure Portal, Azure CLI, or Azure PowerShell.
The underpinning of Private Subnet lies in the Private Link concept, a paradigm that forges a private endpoint for a service within a VNet. Private Link empowers users to connect to a service using a private IP address, eschewing the need for a public IP address or DNS name. Further, Private Link thwarts data from exiting the VNet, eschewing the use of the public internet or any intermediary devices or services. This heralds a secure, reliable way to link to Azure services and third-party services that support Private Link.
Private Subnet extends the functionality of Private Link, by allowing users to create private endpoints for any subnet within a VNet, not just for specific services. Private Subnet also allows users to create private endpoints for multiple subnets within the same VNet, or across different VNets, regions, or subscriptions. Private Subnet also supports both IPv4 and IPv6 addresses, and integrates with Azure DNS, Azure Firewall, and Azure Network Security Groups.
Private Subnet is a promising feature that aims to make private subnets easier and better to use in Azure. Private Subnet offers several benefits, such as:
- Enhanced security and privacy: Private Subnet protects data from exposure or interception, as it does not use the public internet or any intermediary devices or services. Private Subnet also encrypts data in transit, and allows users to control access and permissions by using Azure Network Security Groups.
- Improved performance and reliability: Private Subnet reduces latency, congestion, and interference, as it uses private IP addresses and private endpoints. Private Subnet also ensures high availability and scalability, as it leverages Azure’s global network and infrastructure.
- Simplified management and operation: Private Subnet eliminates the need for configuration, maintenance, and security measures for intermediary devices or services, such as NAT gateways, VPNs, or proxies. Private Subnet also enables users to access and manage private subnets from anywhere, by using Azure Portal, Azure CLI, or Azure PowerShell.
Private Subnet is a feature that is worth trying out and exploring, especially for users who have workloads or scenarios that require private subnets. Private Subnet can help users to achieve their goals and requirements, while saving time, money, and effort. Private Subnet can also help users to take advantage of the rich and diverse offerings of Azure services and third-party services, without compromising the security and privacy of their data. Private Subnet is a feature that can potentially transform the way users use private subnets in Azure.
Add Google Chrome group policy to Active Directory
Today, I got a very unique requirement to push a group policy for Google Chrome which I did long time back. So 1st I searched for link to download the Google Chrome group policies. It took me sometime to hunt it so I have shared direct links below:
https://chromeenterprise.google/browser/download/?sjid=6066941226709070174-NA#download
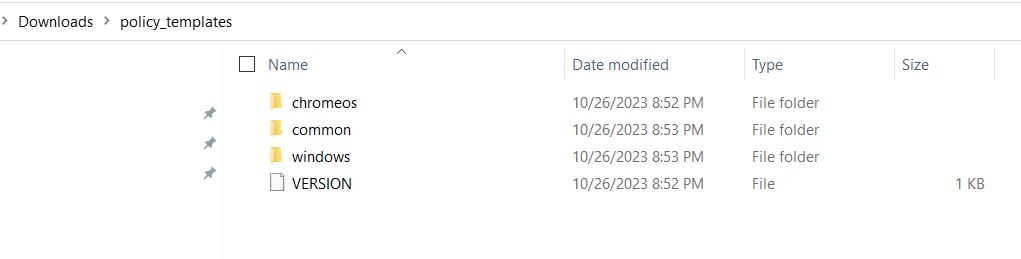
Once download the zip file, we have extracted the folder, and we see 3 folders.
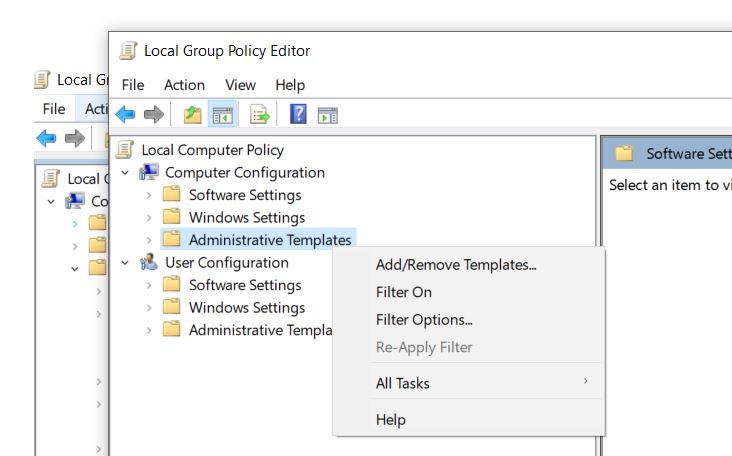
Now, we need to open the Group Policy editor window, Expand Computer configuration > Administrative Templates > Add/Remove Templates
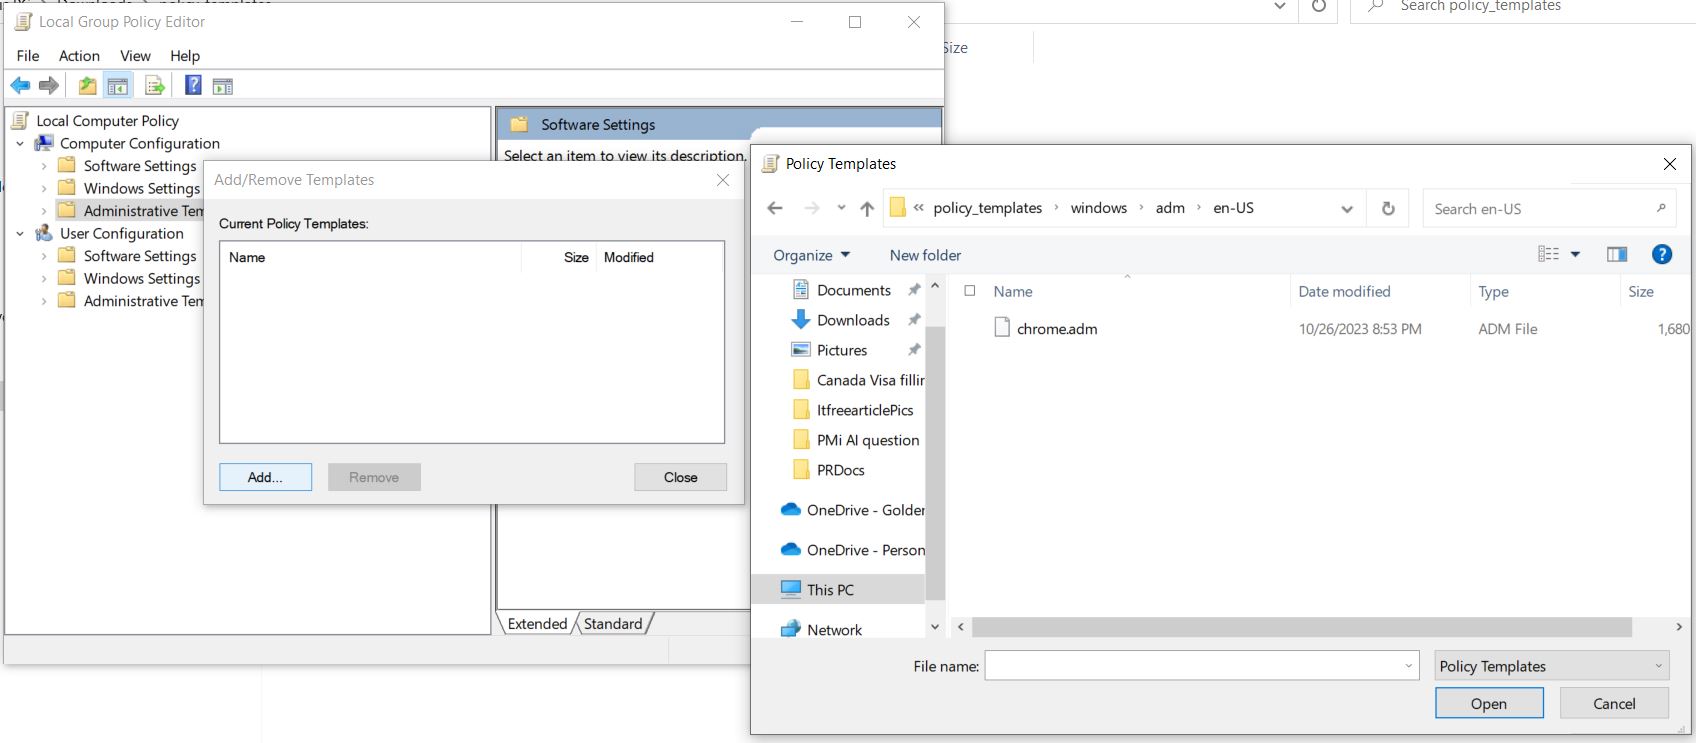
Now select Add > browse to Windows > Adm > En-US > Select Chrome.adm file and select Open
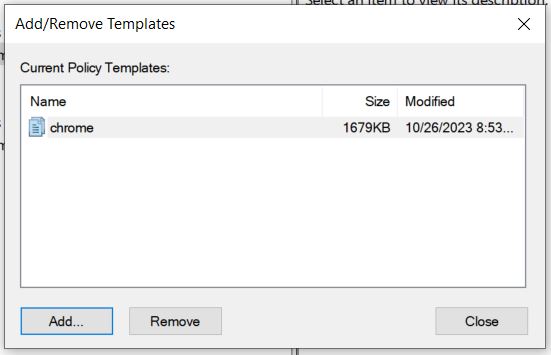
You will see the Name, Size and date of the policy, Click Close
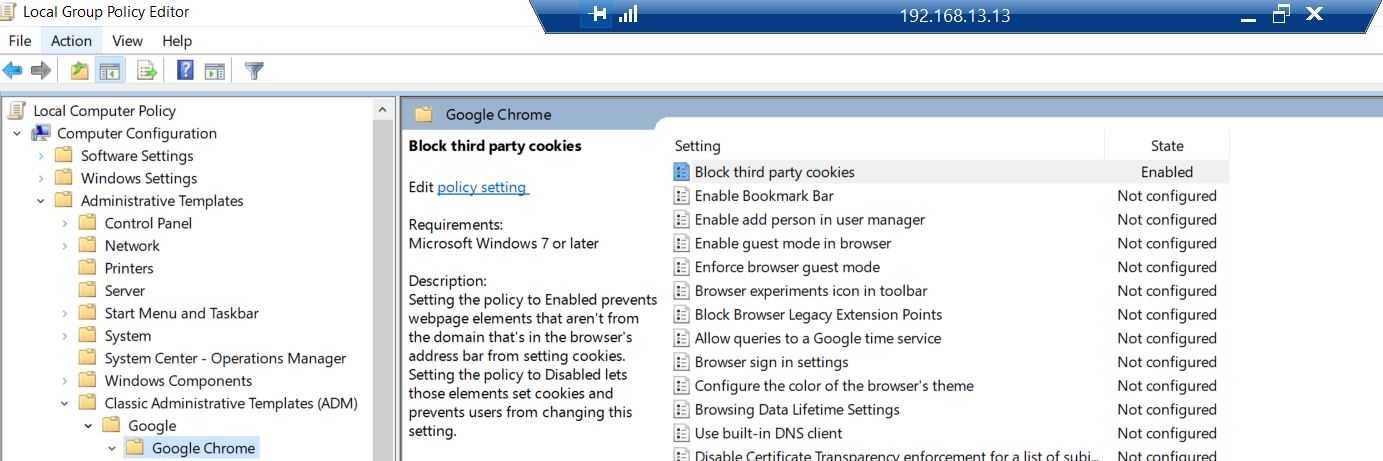
Now when we expand Computer Configuration > Administrative Templates > Classic Administrative Templates(ADM) > Google > Google Chrome
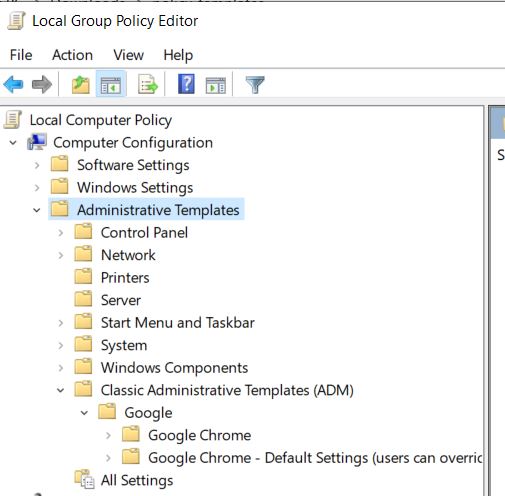
Here we can see all the Google Chrome policies
The Virtual Machine is in Failed state
Today I encountered an error message which says below error.
- The resource operation completed with terminal provisioning state ‘Failed’.
- Details : There is an active shared access signature outstanding for disk Veeam DataDisk Call EndGets before in the disk. Leam more here: akams/evokeaccessapi Target VM: /subscriptionresourceGroupproviders/Microsoft.Compute/virtualMachinesredoopt providers/Microsoft.Compute/disks/VeeamVM_DataDisk0″. Learn moreabout common virtual machine.error.codes,
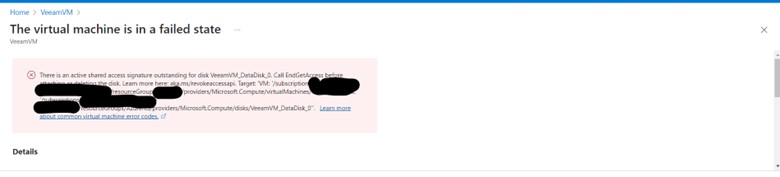
After some research I found it because I was trying to download the disk of this VM and I never revoked the access. Ran below command and the VM started normally.
Revoke-AzDiskAccess -ResourceGroupName ‘ResourceGroup01’ -DiskName ‘Disk01’

If you are using a Azure CLI prompt you need to use below command
az disk revoke-access –name MyManagedDisk –resource-group MyResourceGroup