Archive for the ‘SharePoint’ Category
OneDrive App for Teams vs. Files in Old Teams
- Purpose and Usage:
- OneDrive App for Teams:
- Designed for individual workspace and personal file storage.
- Ideal for files used by a single user.
- Great for business documents, drafts, and personal reference.
- Files in Old Teams:
- Used for collaborative work within channels and teams.
- Shared files accessible to multiple team members.
- Suitable for ongoing projects and long-term collaborations.
- OneDrive App for Teams:
- Access and Integration:
- OneDrive App for Teams:
- Seamlessly integrates with Teams.
- Provides easy access to all Microsoft 365 content.
- Replaces the existing Files menu item.
- Files in Old Teams:
- Accessed directly within Teams.
- Linked to SharePoint libraries behind Teams and channels.
- OneDrive App for Teams:
- File Ownership:
- OneDrive App for Teams:
- Files are owned by individual users.
- Account holder’s departure doesn’t impact shared links.
- Files in Old Teams:
- Files are owned by the team or channel.
- Shared links may be removed if the account holder leaves.
- OneDrive App for Teams:
- Collaboration:
- OneDrive App for Teams:
- Limited sharing—best for personal use.
- Collaboration features are minimal.
- Files in Old Teams:
- Robust collaboration tools.
- Multiple users can work on shared files simultaneously.
- OneDrive App for Teams:
- Future Enhancements:
- The OneDrive app enhancements will roll out to classic Teams in early 2024, with the Files app name unchanged.
Workflow in Microsoft Teams
The Workflow feature enhances collaboration and productivity within Teams by streamlining processes and automating repetitive tasks. Here are some key aspects:
- Approvals and Reviews:
- Teams now allows you to create approval workflows directly within channels or chats.
- You can request approvals for documents, proposals, or any other content.
- Approvers receive notifications and can review and respond without leaving Teams.
- Power Automate Integration:
- Teams integrates seamlessly with Power Automate, Microsoft’s workflow automation platform.
- You can create custom flows to automate actions based on triggers within Teams.
- For example, automatically post a message in a channel when a new file is uploaded to a SharePoint folder.
- Templates and Custom Workflows:
- Teams provides pre-built templates for common workflows.
- Customize these templates or create your own workflows tailored to your team’s needs.
- Examples include employee onboarding, expense approvals, and project management.
- Task Management:
- Use the Tasks by Planner and To Do app to manage tasks within Teams.
- Assign tasks, set due dates, and track progress—all without leaving the collaboration environment.
- Notifications and Reminders:
- Workflow notifications keep team members informed.
- Set reminders for upcoming deadlines, meetings, or important events.
- Integration with Apps and Bots:
- Leverage third-party apps and bots to enhance workflows.
- For instance, integrate with Trello, Jira, or other tools your team uses.
New features of Microsoft Teams V2
Also explained in Youtube Video : https://youtu.be/9jCqcvHY4lg
Let’s learn about new features of Microsoft Teams that enhance collaboration and productivity:
- Forward Chat Messages: Now, you can easily share chat messages by right-clicking any message and selecting “Forward.” No more manual copying and pasting—just smooth communication!
- Immersive Spaces with Microsoft Mesh: Imagine 3D immersive spaces within Teams meetings. It’s like teleporting to a virtual room where interactions feel more face-to-face. You can still use familiar Teams features like shared content, chat, and live reactions.
- Intelligent Recap with Copilot: If you’re a Microsoft 365 user with Copilot, get ready for intelligent recaps. These personalized timeline markers summarize meetings, making it a breeze to browse recordings based on relevant content.
- AI-Generated Backgrounds: Spice up your virtual meetings! Use AI to decorate your real-world room background. Clean up clutter, add plants, or create a serene oasis. Available for Teams Premium users.
- People-Specific Links for Collaborative Notes: Teams meetings now offer people-specific links for Collaborative Notes. These links provide more controlled access, aligning with specific file-sharing policies. Collaboration made smarter!
- Expanded Video Views: In Teams meetings on Chrome and Edge, you’ll automatically see up to 9 videos on your screen (previously limited to 4). Visual collaboration just got an upgrade!
- Simplified Audio and Video Controls: Adjust audio and video settings directly from the meeting controls. Volume, spatial audio, background—manage it all effortlessly.
- Agenda View : It is a scrollable list of your upcoming meetings in chronological order. It’s like having a neat to-do list for your meetings.
- Workflows : The Workflow feature enhances collaboration and productivity within Teams by streamlining processes and automating repetitive tasks. Explained in detail on This artice
- OneDrive : OneDrive Option is replacement of Files in old Teams. It comes with some advanced features which are explained in This Artice
PowerShell to Add a user as admin on all site collections in SharePoint online
Also explained in my Youtube Video : https://youtu.be/icx_m15UIMg
You can modify this script to add these users as a member of visitor to all Site collections.
Connect to SharePoint Online
Connect-SPOService -Url https://contoso-admin.sharepoint.com
Get all site collections
$siteCollections = Get-SPOSite -Limit All
Loop through each site collection and add the user as an admin
foreach ($siteCollection in $siteCollections) {
Set-SPOUser -Site $siteCollection.Url -LoginName “user@contoso.com” -IsSiteCollectionAdmin $true
}
Read Microsoft Teams messages using Graphs API
Explained the same in Youtube Video : https://youtu.be/Uez9QrBNNS0
So today I had a requirement to create a custom app where I can read all MS teams message and use AI to reply to the team’s messages.
The 1st thing we need is to get read all Messages in Microsoft Teams using a Graphs API. I tried to look for option and finally got a Teams Beta API named ‘messages (Without replies) in a channel’ but it needs GroupID and ChannelID to read to the messages.
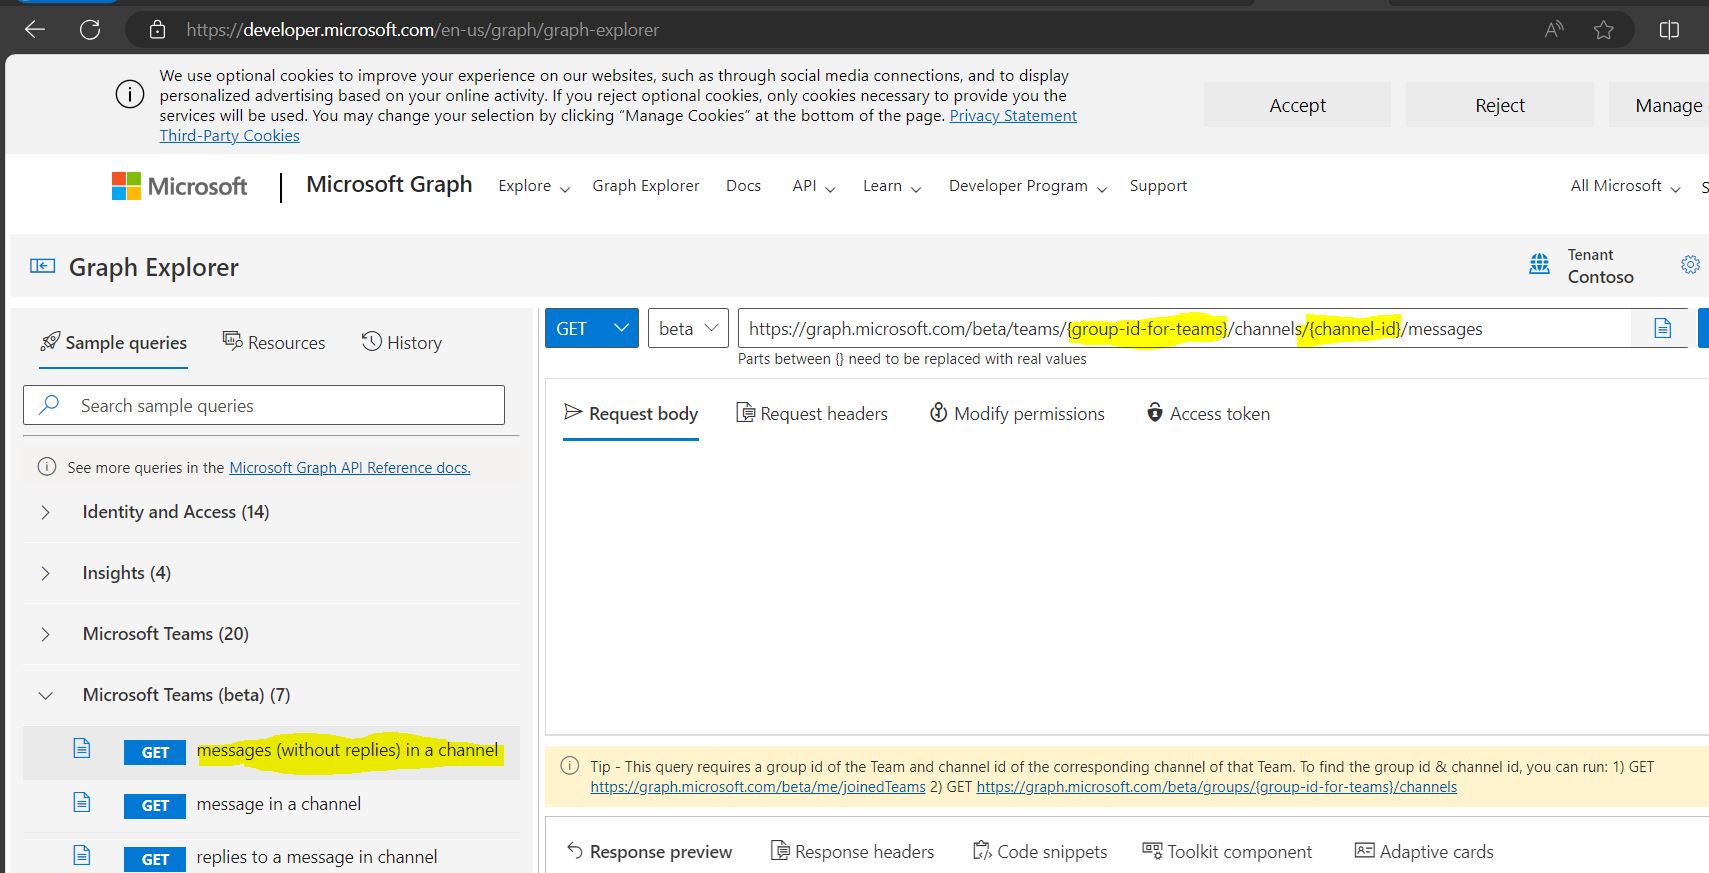
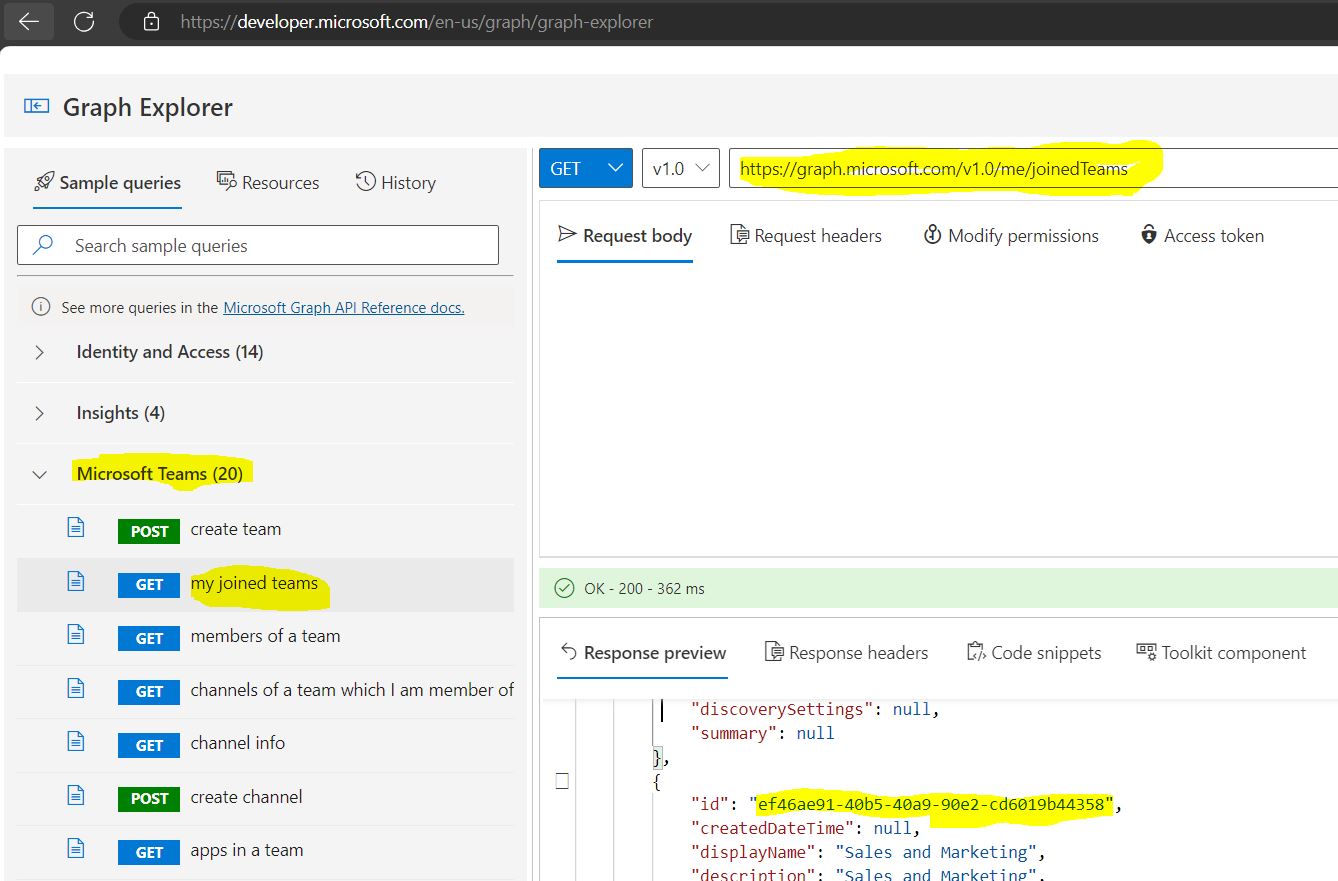
So I ran below Graphs API to get all the Teams I am members of, here we will get the name and the ID of the Teams group as well.
https://graph.microsoft.com/v1.0/me/joinedTeams
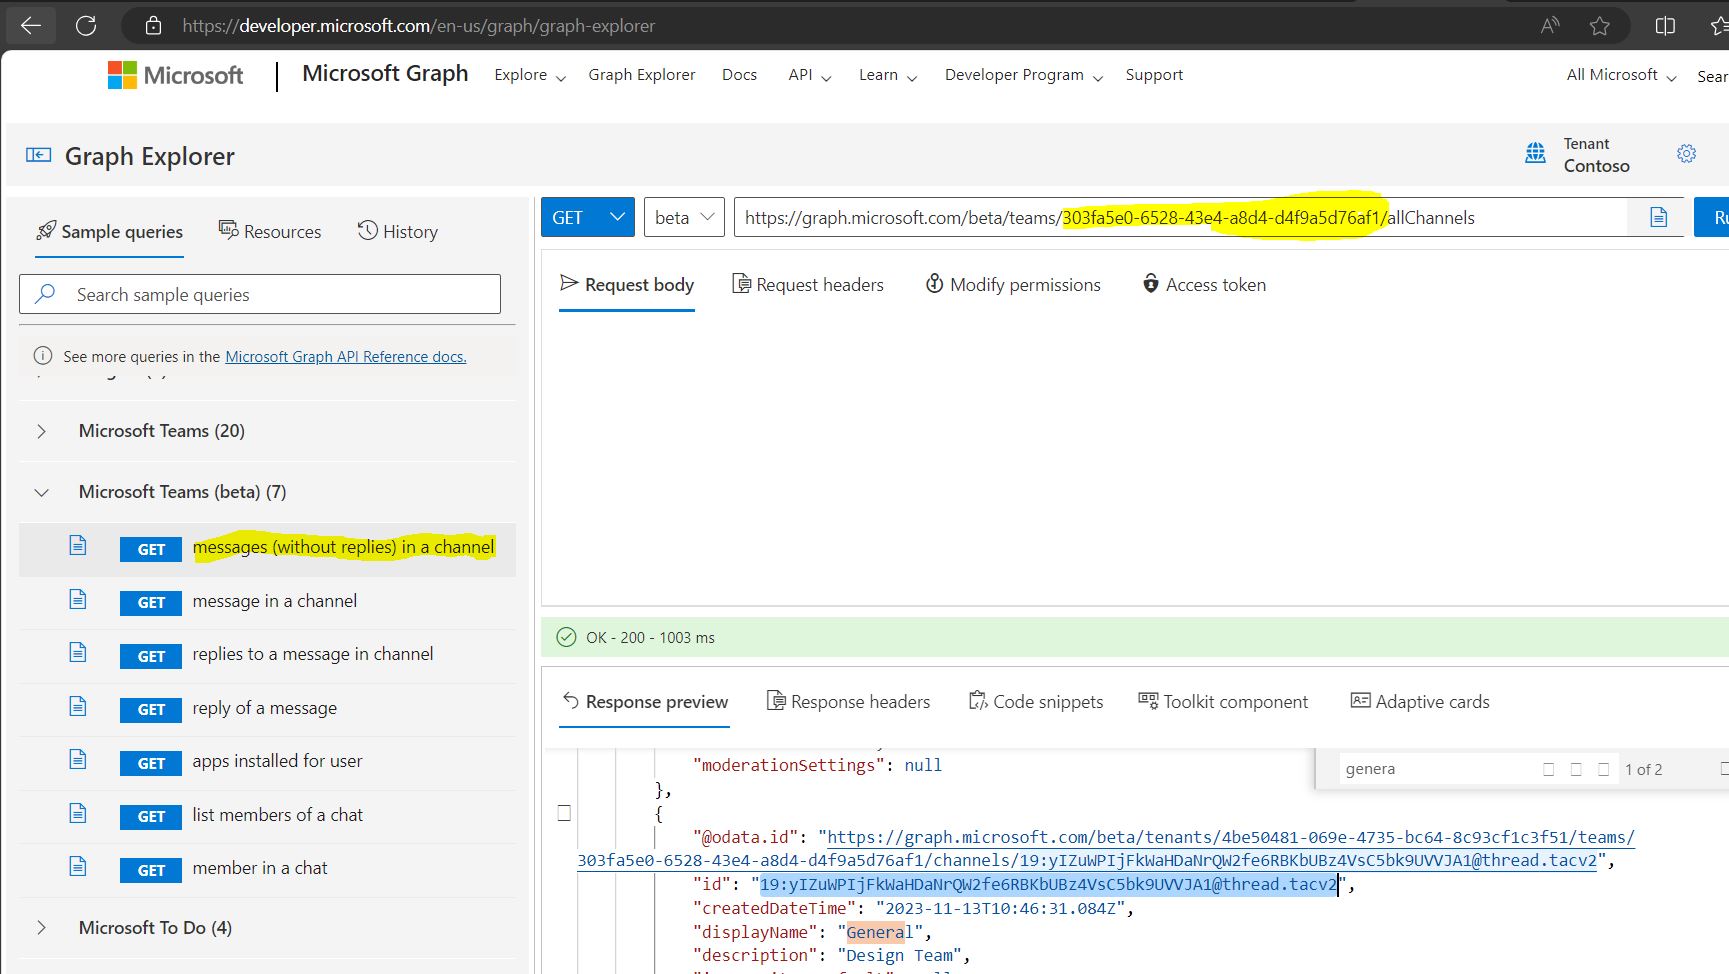
Now we need to use the Group ID in below graphs query to get allchannels in that teams group.
https://graph.microsoft.com/beta/teams/{group-id-for-teams}/Allchannels/
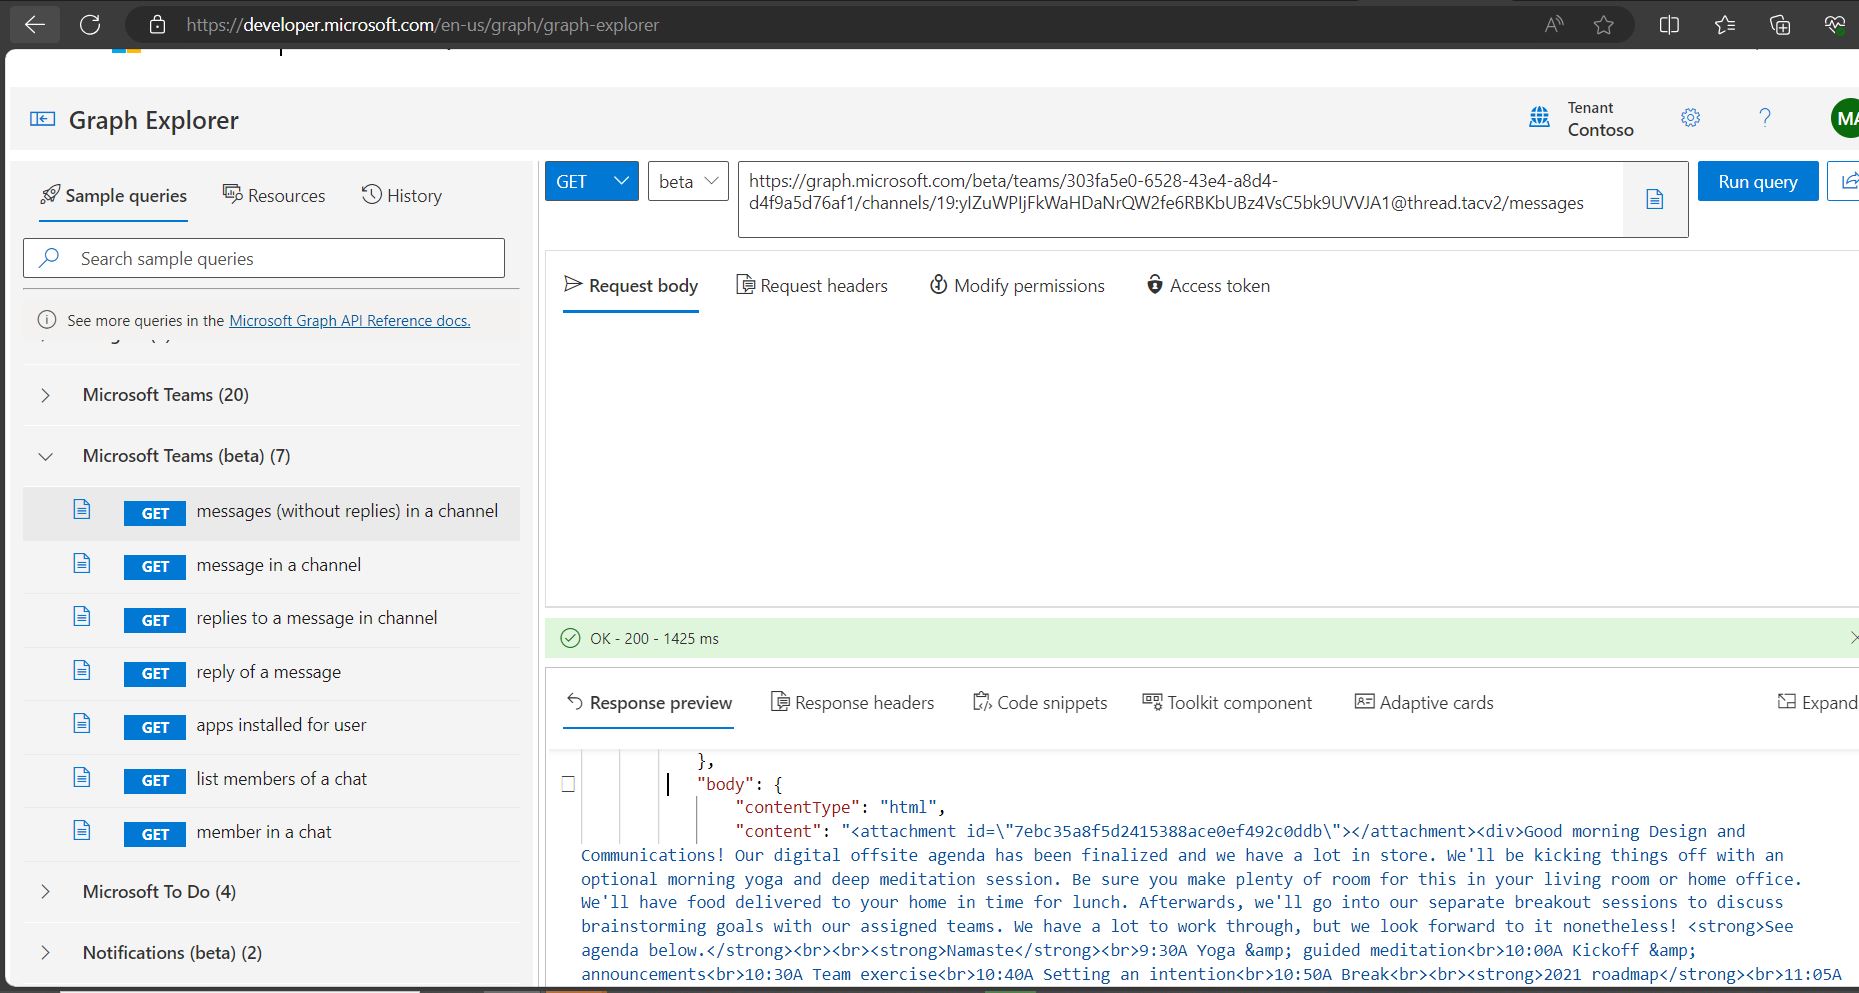
Finally when we have both the Group ID and ChannelID, we will use below graphs API to get all the messages in the ChannelID.
Note: I am only able to see all the unread messages.
https://graph.microsoft.com/beta/teams/{group-id-for-teams}/channels/{channel-id}/messages
Below I am able to see all the same messages using GUI in teams

Ways to add an item to SharePoint lists
Explained the same in Youtube Video : https://youtu.be/xioKl4KrlLo
To use Graph API to add content to a SharePoint list, you need to have the appropriate permissions, the site ID, the list ID, and the JSON representation of the list item you want to create. You can use the following HTTP request to create a new list item:
POST https://graph.microsoft.com/v1.0/sites/{site-id}/lists/{list-id}/items
Content-Type: application/json
{
"fields": {
// your list item properties
}
}
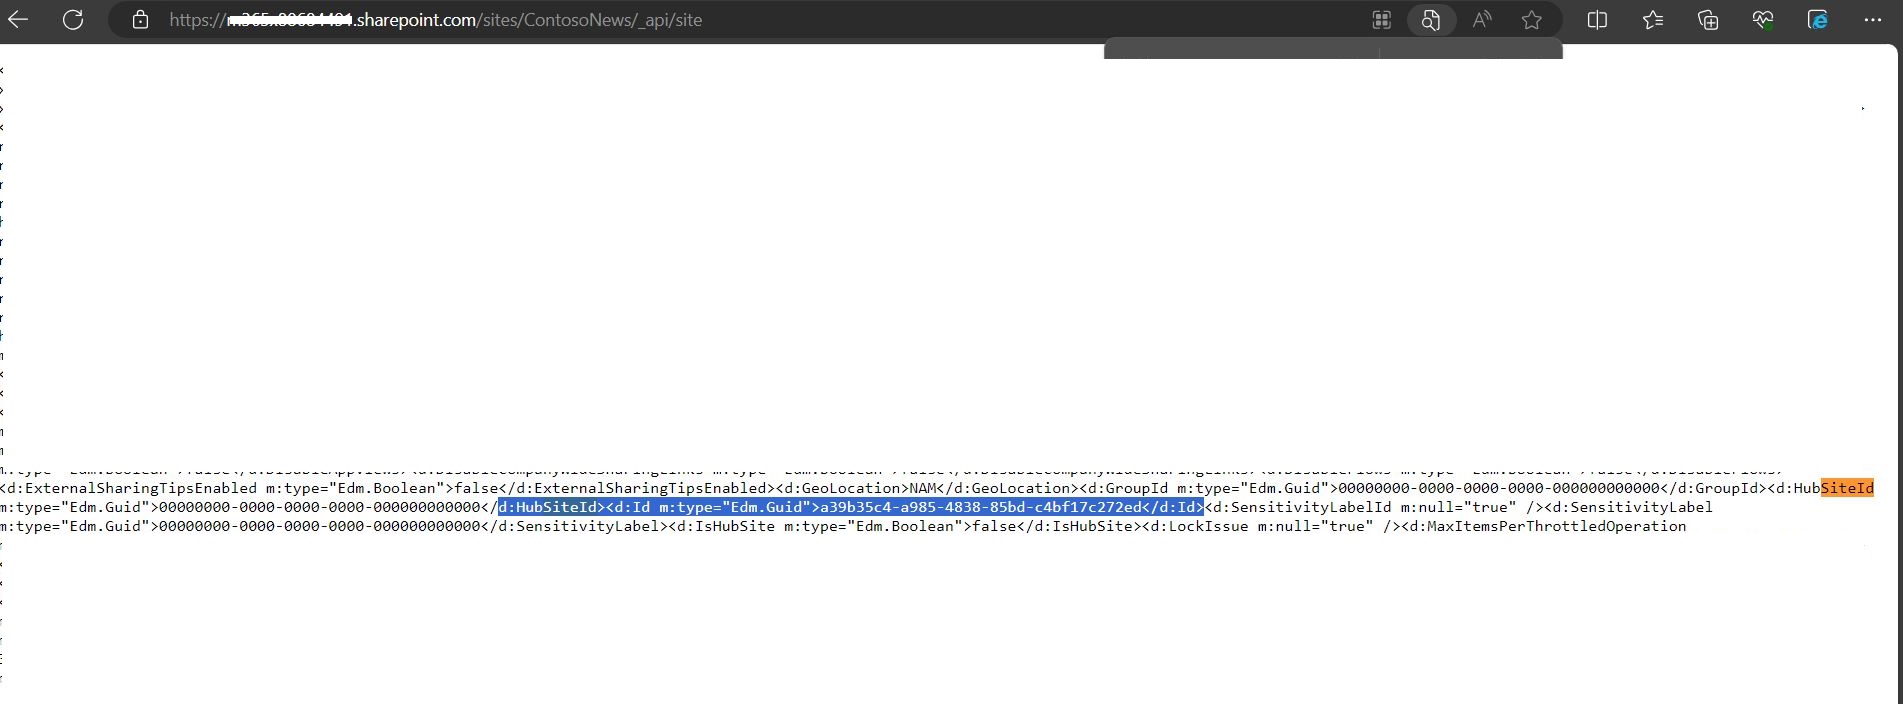
To get site ID, use below URL
https://TenantName.sharepoint.com/sites/SiteName/_api/site
Here at the ID after HUBSiteID tag is actually your Site ID as shown below.
For example, if you want to create a list item with the title “Item2”, the color “Pink”, and the Number 1, you can use this JSON body:
{
  "fields": {
    "Title": "Item2",
    "Color": "Pink",
    "Number": 1
  }
}
If the request is successful, you will get a response with the created list item and its properties.
You can also use the Graph SDKs to simplify the process of creating list items in different programming languages. For example, here is how you can create a list item in C# using the Microsoft Graph SDK:
using Microsoft.Graph;
using Microsoft.Identity.Client;

// Create a public client application
var app = PublicClientApplicationBuilder.Create(clientId)
    .WithAuthority(authority)
    .Build();

// Get the access token
var result = await app.AcquireTokenInteractive(scopes)
    .ExecuteAsync();

// Create a Graph client
var graphClient = new GraphServiceClient(
    new DelegateAuthenticationProvider((requestMessage) =>
    {
        requestMessage
            .Headers
            .Authorization = new AuthenticationHeaderValue("bearer", result.AccessToken);

        return Task.CompletedTask;
    }));

// Create a dictionary of fields for the list item
var fields = new FieldValueSet
{
    AdditionalData = new Dictionary<string, object>()
    {
        {"Title", "Item"},
        {"Color", "Pink"},
        {"Number", 1}
    }
};

// Create the list item
var listItem = await graphClient.Sites[siteId].Lists[listId].Items
    .Request()
    .AddAsync(fields);
Import-Module : Function Remove-MgSiteTermStoreSetParentGroupSetTermRelation cannot be created because function capacity 4096 has been exceeded for this scope
Explained everything in the Video : https://youtu.be/7-btaMI6wJI
Today I got below error when I tried to import my Graphs module to Powershell (Import-Module Microsoft.Graph)
Import-Module : Function Remove-MgSiteTermStoreSetParentGroupSetTermRelation cannot be created because function capacity 4096 has been exceeded for this scope.
At line:1 char:1
+ Import-Module Microsoft.Graph
+ ~~~~~~~~~~~~~~~~~~~~~~~~~~~~~
    + CategoryInfo          : InvalidOperation: (Remove-MgSiteTe...SetTermRelation:String) [Import-Module], SessionSta
   teOverflowException
    + FullyQualifiedErrorId : FunctionOverflow,Microsoft.PowerShell.Commands.ImportModuleCommand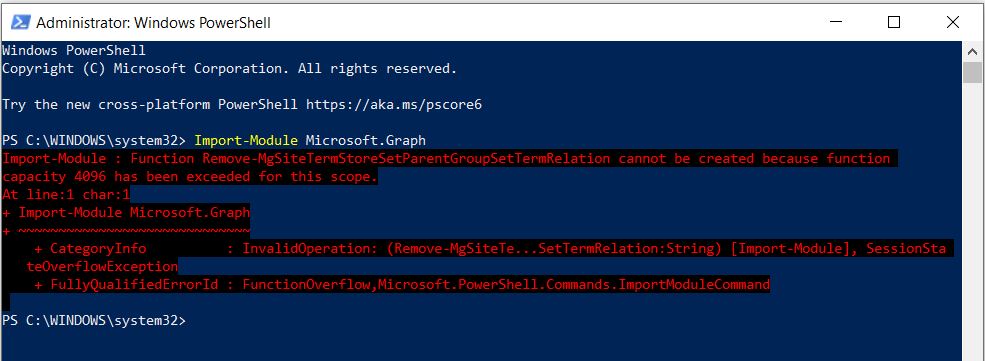
After lot of research I identified that this is a known issue that occurs when importing Microsoft.Graph module in PowerShell 5.1, because the module has more than 4096 functions and PowerShell 5.1 has a limit on the number of functions that can be created in a scope.
There are some possible workarounds that you can try to resolve this error:
- Upgrade to PowerShell 7+ or latest as the runtime version (highly recommended). PowerShell 7+ does not have the function capacity limit and can import the module without any errors.
- Set $maximumfunctioncount variable to its max value, 32768, before importing the module. This will increase the function capacity limit for your scope, but it may not be enough if you have other modules loaded or if the Microsoft.Graph module adds more functions in the future.
To check all Maximum value set in PowerShell
gv Max*Count
To set the Maximum Function Count
$MaximumFunctionCount = 8096
I hope this helps you understand how to fix the error and import the Microsoft.Graph module successfully.
Get duplicate files in all SharePoint site using file HASH
Explained everything in the Video : https://youtu.be/WHk2tIav-sQ
The task was to find a way to identify all duplicate files in all SharePoint sites. I searched online for a solution, but none of the scripts I found were accurate. They used different criteria to detect duplicates, such as Name, modified date, size, etc.
After extensive research, I developed the following script that can generate a hash for each file on the SharePoint sites. The hash is a unique identifier that cannot be the same for two files, even if they differ by a single character.
If you want to do the same for only one SharePoint site, you can use below link: Get duplicate files in SharePoint site using file HASH. (itfreesupport.com)
I hope this script will be useful for many people.
Register a new Azure AD Application and Grant Access to the tenant
Register-PnPManagementShellAccess
Then paste and run below pnp script:
Parameters
$TenantURL = “https://tenant-admin.sharepoint.com”
$Pagesize = 2000
$ReportOutput = “C:\Temp\DupSitename.csv”
Connect to SharePoint Online tenant
Connect-PnPOnline $TenantURL -Interactive
Connect-SPOService $TenantURL
Array to store results
$DataCollection = @()
Get all site collections
$SiteCollections = Get-SPOSite -Limit All -Filter “Url -like ‘/sites/‘”
Iterate through each site collection
ForEach ($Site in $SiteCollections)
{
#Get the site URL
$SiteURL = $Site.Url
#Connect to SharePoint Online site
Connect-PnPOnline $SiteURL -Interactive

#Get all Document libraries
$DocumentLibraries = Get-PnPList | Where-Object {$_.BaseType -eq "DocumentLibrary" -and $_.Hidden -eq $false -and $_.ItemCount -gt 0 -and $_.Title -Notin ("Site Pages","Style Library", "Preservation Hold Library")}

#Iterate through each document library
ForEach ($Library in $DocumentLibraries)
{
    #Get All documents from the library
    $global:counter = 0;
    $Documents = Get-PnPListItem -List $Library -PageSize $Pagesize -Fields ID, File_x0020_Type -ScriptBlock `
    { Param ($items) $global:counter += $items.Count; Write-Progress -PercentComplete ($global:Counter / ($Library.ItemCount) * 100) -Activity `
    "Getting Documents from Library '$($Library.Title)'" -Status "Getting Documents data $global:Counter of $($Library.ItemCount)";} | Where {$_.FileSystemObjectType -eq "File"}
    $ItemCounter = 0

    #Iterate through each document
    Foreach ($Document in $Documents)
    {
        #Get the File from Item
        $File = Get-PnPProperty -ClientObject $Document -Property File

        #Get The File Hash
        $Bytes = $File.OpenBinaryStream()
        Invoke-PnPQuery
        $MD5 = New-Object -TypeName System.Security.Cryptography.MD5CryptoServiceProvider
        $HashCode = [System.BitConverter]::ToString($MD5.ComputeHash($Bytes.Value))

        #Collect data
        $Data = New-Object PSObject
        $Data | Add-Member -MemberType NoteProperty -name "FileName" -value $File.Name
        $Data | Add-Member -MemberType NoteProperty -Name "HashCode" -value $HashCode
        $Data | Add-Member -MemberType NoteProperty -Name "URL" -value $File.ServerRelativeUrl
        $Data | Add-Member -MemberType NoteProperty -Name "FileSize" -value $File.Length
    $DataCollection += $Data
    $ItemCounter++
    Write-Progress -PercentComplete ($ItemCounter / ($Library.ItemCount) * 100) -Activity "Collecting data from Documents $ItemCounter of $($Library.ItemCount) from $($Library.Title)" `
    -Status "Reading Data from Document '$($Document['FileLeafRef']) at '$($Document['FileRef'])"
}
}
}
Get Duplicate Files by Grouping Hash code
$Duplicates = $DataCollection | Group-Object -Property HashCode | Where {$_.Count -gt 1} | Select -ExpandProperty Group
Write-host “Duplicate Files Based on File Hashcode:”
$Duplicates | Format-table -AutoSize
Export the duplicates results to CSV
$Duplicates | Export-Csv -Path $ReportOutput -NoTypeInformation
Get duplicate files in SharePoint site using file HASH
Explained everything in the Video : https://youtu.be/WHk2tIav-sQ
The task was to find a way to identify all duplicate files in a SharePoint site. I searched online for a solution, but none of the scripts I found were accurate. They used different criteria to detect duplicates, such as Name, modified date, size, etc.
After extensive research, I developed the following script that can generate a hash for each file on the SharePoint sites. The hash is a unique identifier that cannot be the same for two files, even if they differ by a single character.
If you want to do the same for all SharePoint sites, you can use below link:
Get duplicate files in all SharePoint site using file HASH. (itfreesupport.com)
I hope this script will be useful for many people.
Register a new Azure AD Application and Grant Access to the tenant
Register-PnPManagementShellAccess
Then paste and run below pnp script:
$SiteURL = “https://tenant.sharepoint.com/sites/sitename”
$Pagesize = 2000
$ReportOutput = “C:\Temp\DupSitename.csv”
Connect to SharePoint Online site
Connect-PnPOnline $SiteURL -Interactive
Array to store results
$DataCollection = @()
Get all Document libraries
$DocumentLibraries = Get-PnPList | Where-Object {$_.BaseType -eq “DocumentLibrary” -and $_.Hidden -eq $false -and $_.ItemCount -gt 0 -and $_.Title -Notin (“Site Pages”,”Style Library”, “Preservation Hold Library”)}
Iterate through each document library
ForEach ($Library in $DocumentLibraries)
{
#Get All documents from the library
$global:counter = 0;
$Documents = Get-PnPListItem -List $Library -PageSize $Pagesize -Fields ID, File_x0020_Type -ScriptBlock { Param ($items) $global:counter += $items.Count; Write-Progress -PercentComplete ($global:Counter / ($Library.ItemCount) * 100) -Activity
“Getting Documents from Library ‘$($Library.Title)'” -Status “Getting Documents data $global:Counter of $($Library.ItemCount)”;} | Where {$_.FileSystemObjectType -eq “File”}
$ItemCounter = 0
#Iterate through each document
Foreach ($Document in $Documents)
{
    #Get the File from Item
    $File = Get-PnPProperty -ClientObject $Document -Property File

    #Get The File Hash
    $Bytes = $File.OpenBinaryStream()
    Invoke-PnPQuery
    $MD5 = New-Object -TypeName System.Security.Cryptography.MD5CryptoServiceProvider
    $HashCode = [System.BitConverter]::ToString($MD5.ComputeHash($Bytes.Value))

    #Collect data
    $Data = New-Object PSObject
    $Data | Add-Member -MemberType NoteProperty -name "FileName" -value $File.Name
    $Data | Add-Member -MemberType NoteProperty -Name "HashCode" -value $HashCode
    $Data | Add-Member -MemberType NoteProperty -Name "URL" -value $File.ServerRelativeUrl
    $Data | Add-Member -MemberType NoteProperty -Name "FileSize" -value $File.Length
    $DataCollection += $Data
    $ItemCounter++
    Write-Progress -PercentComplete ($ItemCounter / ($Library.ItemCount) * 100) -Activity "Collecting data from Documents $ItemCounter of $($Library.ItemCount) from $($Library.Title)" `
    -Status "Reading Data from Document '$($Document['FileLeafRef']) at '$($Document['FileRef'])"
}
}
Get Duplicate Files by Grouping Hash code
$Duplicates = $DataCollection | Group-Object -Property HashCode | Where {$_.Count -gt 1} | Select -ExpandProperty Group
Write-host “Duplicate Files Based on File Hashcode:”
$Duplicates | Format-table -AutoSize
Export the duplicates results to CSV
$Duplicates | Export-Csv -Path $ReportOutput -NoTypeInformation
Download content from others OneDrive using Graphs API
Explained the same using my Youtube channel : https://www.youtube.com/watch?v=YG19odJN94Q
If you want to download content from other users’ OneDrive accounts, you have a few options. The simplest option is to create a OneDrive link for each user using the Office 365 Admin center. This will allow you to access and download their files through a web browser. However, this option is not very efficient if you have to do it for many users. A better option is to use an API call that can create a custom application for you. This application can download the files for multiple users at once, without requiring you to create individual links. To use this option, you need to follow these steps to get the API calls for the custom application.
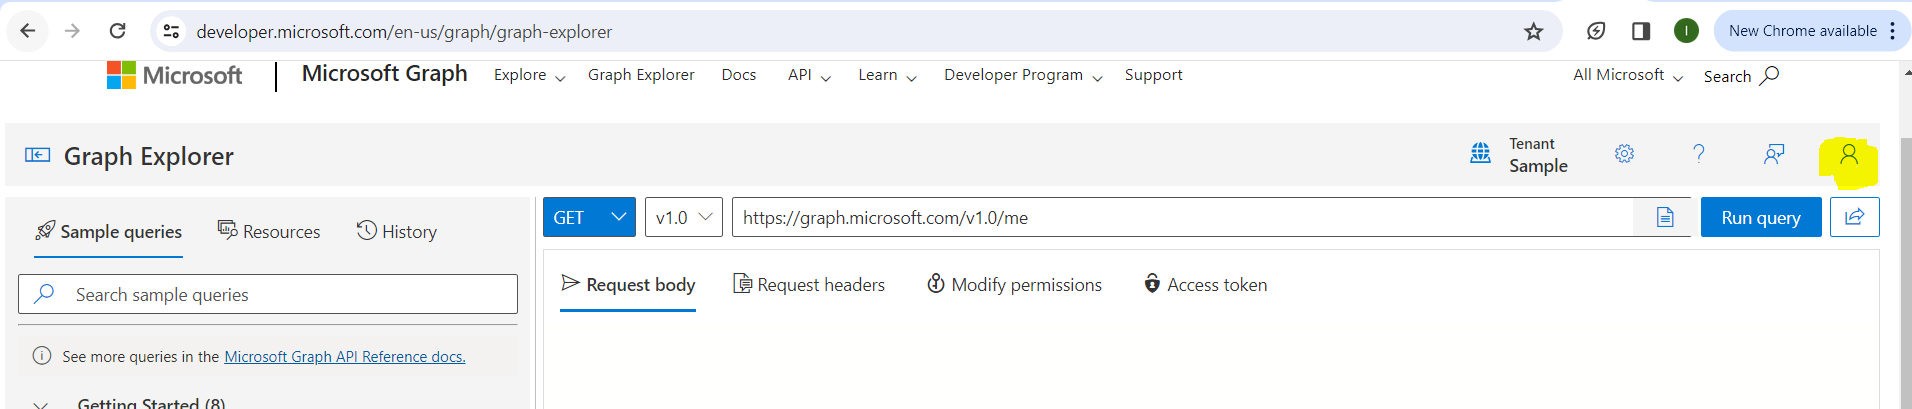
Open Graphs API explorer URL : https://developer.microsoft.com/en-us/graph/graph-explorer
Sign in and give consent to Graphs explorer using the User icon on right corner of the screen
Now type the credentials of the users you want to use and give consent.
Now try to run the initial API and confirm you get OK 200 and your details in the Response View

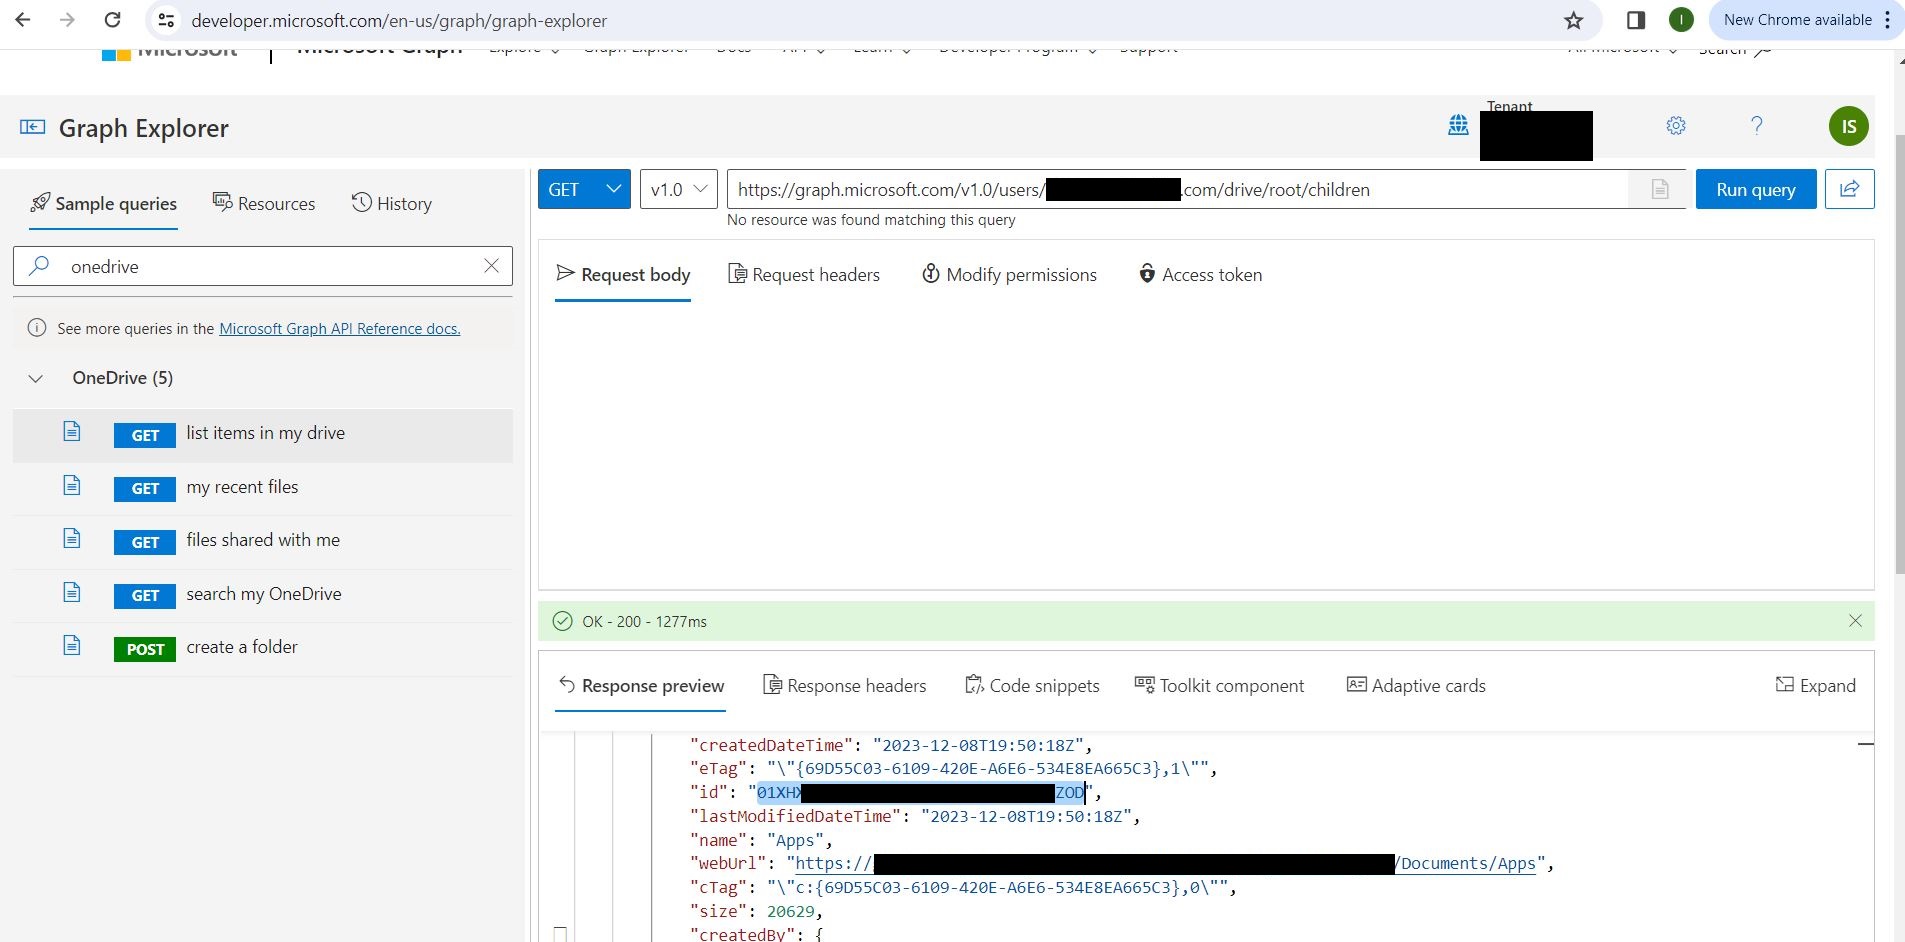
Now the 1st API URL using which you can query other users OneDrive content is https://graph.microsoft.com/v1.0/users/user@domain.com/drive/root/children
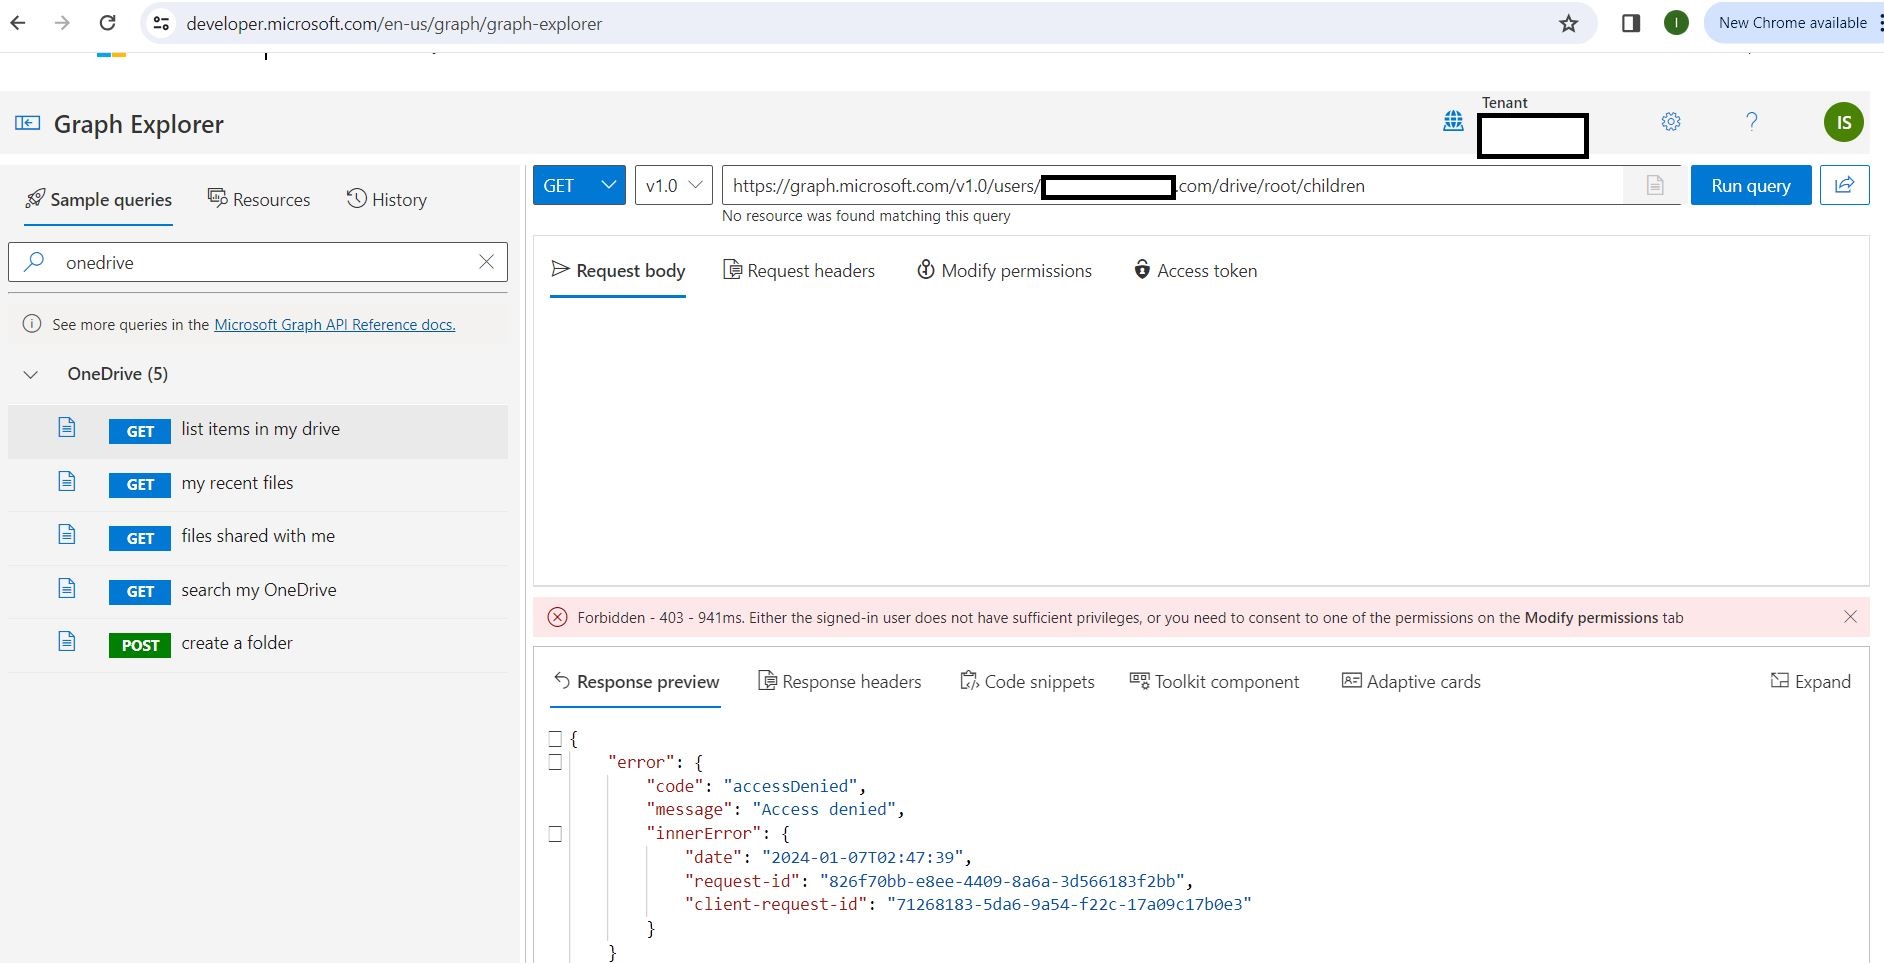
Sometimes, when you try to download content from other users’ OneDrive accounts, you may encounter an access denied error. This means that you do not have the permission to access their files. To fix this error, you need to do one of the following things:
- Make sure that you are a Global Admin for the organization. This role gives you the highest level of access to all the resources in the organization, including other users’ OneDrive accounts.
- Grant admin access to other users’ OneDrive accounts by following these steps:
- In the left pane, select Admin centers > SharePoint. (You might need to select Show all to see the list of admin centers.)
- If the classic SharePoint admin center appears, select Open it now at the top of the page to open the SharePoint admin center.
- In the left pane, select More features.
- Under User profiles, select Open.
- Under People, select Manage User Profiles.
- Enter the former employee’s name and select Find.
- Right-click the user, and then choose Manage site collection owners.
- Add the user to Site collection administrators and select OK.
This option allows you to specify which users’ OneDrive accounts you want to access, without requiring you to be a Global Admin.
After you successfully execute the above API calls, you will get a response that shows you the list of all the folders and files on the root of the other users’ OneDrive accounts. Each folder and file will have a unique ID that you can use to access its contents. To get the downloadable links for all the files in a specific folder, you need to use the following API calls:
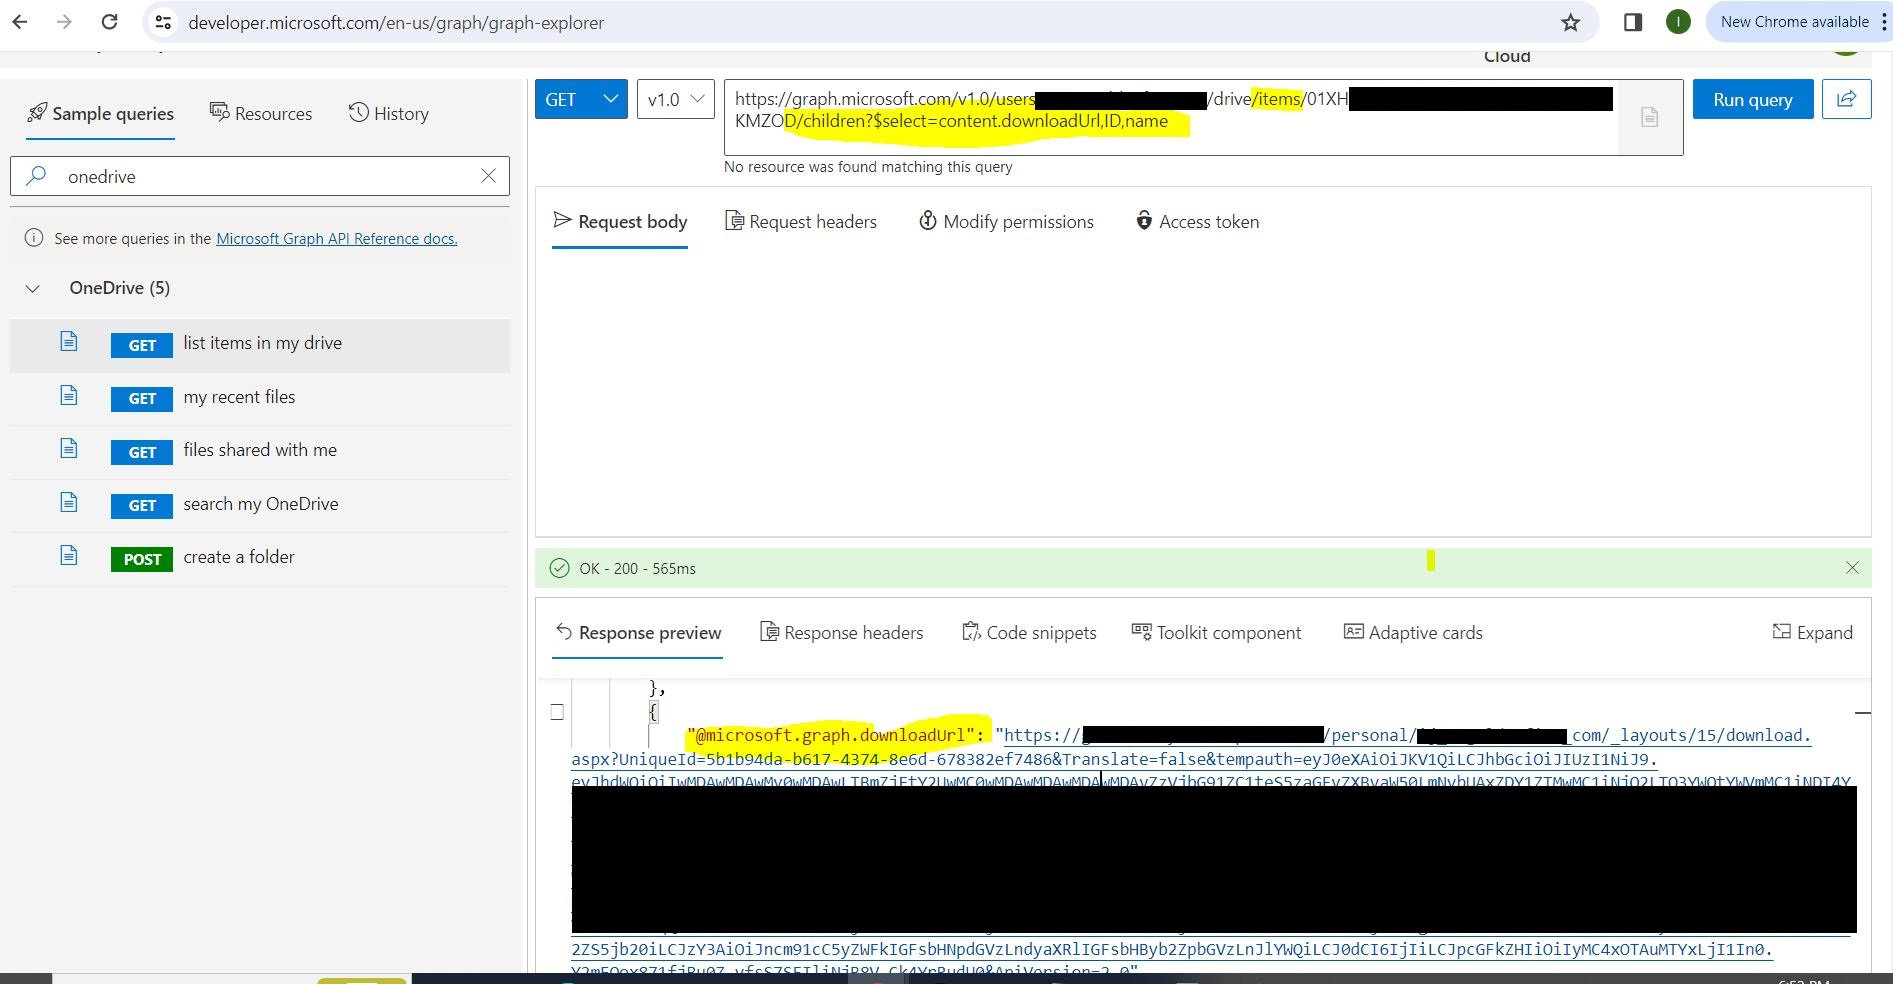
These API calls will return a response that contains the links for each file in the folder. You can download any file by clicking on its link. The file will be saved to your local device.