Posts Tagged ‘Outlook to use RPC over HTTP’
Configure Outlook to use RPC over HTTP for internal network
We have Exchange 2010 server with CAS Array configured as mail.internaldomain.com. We have also configured TMG 2010 which has a rule for Outlook Anywhere. This rule listens to requests for external URL mail.externaldomain.com and routes the filtered traffic to internal URL mail.internaldomain.com.
When I configure my Outlook from internet using autodiscover it works fine configuring mail.internaldomain.com as Exchange server name and mail.externaldomain.com as proxy servername. And once configured outlook pops up for credentials in few seconds.
Also we have internal network which has access to internet but no access to internal Exchange environment. This network clients are serviced by DHCP for LAN configuration and uses internal DNS server and uses Outlook Anywhere. So when an Outlook is configured from this network, it takes around 3minutes to have credential pop up and 4-6 minutes when outlook says all folders are in sync. This seems to be quite long.
I tried to configure this network outlook profile using external DNS server and it takes just few seconds for configuring. Then when we used Netmon trace, we found that since the outlook in internal network uses internal DNS server it first tries to connect to internal server mail.internaldomain.com and resolve this instead of connecting to proxy server mail.externaldomain.com. So once outlook fails to connect to mail.internaldomain.com it tries proxy server mail.externaldomain.com and connects to it successfully. Also found in netmon that Outlook gets a response stating that this route is inaccessible for mail.internaldomain.com URL.
Can I force Outlook to connect to it’s proxyserver and disregard the internal servername?
Ans: Configure Outlook to use RPC over HTTP for internal network using the following settings:
- On the client computer where Outlook 2003 is installed, click Start, and then click Control Pane.
-
In Control Panel, perform one of the following tasks:
- If you are using Category View, in the left pane, under See Also, click Other Control Panel Options, and then click Mail.
- If you are using Classic View, double-click Mail.
-
In Mail Setup, under Profiles, click Show Profiles.
-
In Mail, click Add.
-
In New Profile, in the Profile Name box, type a name for this profile, and then click OK.
-
In the E-mail Accounts wizard, click Add a new e-mail account, and then click Next.
-
On the Server Type page, click Microsoft Exchange Server, and then click Next.
-
On the E-mail Accounts page, do the following:
- In the Microsoft Exchange Server box, type the fully qualified domain name (FQDN) of your back-end Exchange server where your mailbox resides.
- Click to clear the Use Cached Exchange Mode check box.
- In the User Name box, type the name of the user account that you want to use.
- Click More Settings.
- In the Microsoft Exchange Server dialog box, do the following:
- On the Connection tab, in the Connection pane, select either Connect using my Local Area Network (LAN) or Connect using Internet Explorer’s or a 3rd party dialer. Select the connection type based on the method that you use to connect to the Internet.
- On the Connection tab, in the Exchange over the Internet pane, select the Connect to my Exchange mailbox using HTTP check box.
- Click Exchange Proxy Settings.
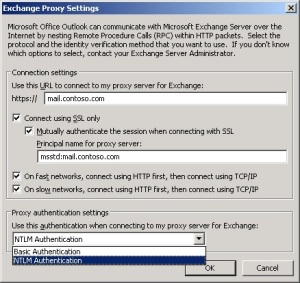
- In the Exchange Proxy Settings dialog box, in the Connections Settings pane, perform the following steps:
- Enter the FQDN of the RPC proxy server in the Use this URL to connect to my proxy server for Exchange box. The RPC proxy server is the Exchange server that users can connect to on the Internet. For example, type mail.contoso.com.
- Select the Connect using SSL only check box.
- If you want to enable mutual authentication, select the Mutually authenticate the session when connecting with SSL check box.
- If you enabled mutual authentication, enter the FQDN of the RPC proxy server in the Principle name for proxy server box. Use the format: msstd:FQDN of RPC Proxy Server.
- As an optional step, you can configure Outlook 2003 to connect to your Exchange server by default by using RPC over HTTP. To do this, select the check box next to On fast networks, connect to Exchange using HTTP first, then connect using TCP/IP.
The following figure shows the Exchange Proxy Settings dialog box.
Exchange Proxy Settings
- In the Exchange Proxy Settings dialog box, in the Proxy authentication settings pane, in the Use this authentication when connecting to my proxy server for Exchange list, select either Basic Authentication or NTLM Authentication.
-
Click OK in the Exchange Proxy Settings box, click OK in the Microsoft Exchange Server box, click Next on the E-mail Accounts page, click Finish to close the wizard, and then click OK.
Refer below article for further details:
http://technet.microsoft.com/en-us/library/aa996069%28v=exchg.65%29.aspx

