- An error has occurred, which probably means the feed is down. Try again later.
Using Delve for discovering and sharing content
“Unlock the power of Delve to discover and share content like never before!”
Introduction
Delve stands as an influential instrument for uncovering and disseminating content, operating as a cloud-centric application that empowers users to swiftly and seamlessly locate and distribute content spanning their organization’s expanse. Effectively wielding Delve, users possess the ability to probe for documents, individuals, and discussions, while also delving into content aligning with their specific pursuits. Furthermore, Delve delivers tailored suggestions derived from user engagement and their peers’ activities. Through Delve’s capabilities, users can maintain current with their organization’s latest developments and patterns, and readily engage in collaborative endeavors with their peers.
Utilizing Delve to Streamline Your Content Discovery and Sharing Workflows
Uncovering and disseminating information through content discovery and sharing processes can be arduous and time-intensive. Luckily, Delve offers a solution by streamlining these operations. Delve, an application within the Microsoft Office 365 suite, leverages advanced machine learning algorithms to surface pertinent content from across the Office 365 platform. Through its functionality, users can swiftly locate essential documents, emails, and discussions, and seamlessly distribute them to their peers.
At its core, Delve is underpinned by the Office Graph, which harnesses the power of machine learning to comprehend the associations among individuals, content, and actions within the Office 365 environment. It meticulously tracks user engagements with content, capturing details like creators, editors, and sharers. This data is then harnessed to construct a personalized content landscape tailored to each user’s needs.
Furthermore, Delve facilitates effortless content sharing. Users can expeditiously locate desired content and effortlessly disseminate it to their colleagues through email, Yammer, or Teams. Moreover, they have the capability to form and circulate content compilations, such as documents, emails, and discussions, thereby simplifying collaborative efforts and information exchange.
Moreover, Delve is equipped to monitor project progress, offering insights into task allocations and deadlines, which in turn assists teams in maintaining organizational efficiency and adherence to schedules.
In summary, Delve stands as a robust tool for streamlining content discovery and sharing workflows. Its utilization of machine learning to unveil pertinent content, coupled with its seamless content sharing capabilities, renders it instrumental in modern collaborative environments.
It also helps teams stay organized and on track with projects. By utilizing Delve, organizations can save time and increase productivity.
How to Use Delve to Connect with Colleagues and Share Content
Delve is a powerful tool that allows users to connect with colleagues and share content. It is a great way to stay connected with colleagues and to share important documents and information. Here are some tips on how to use Delve to connect with colleagues and share content.
1. Engage with Your Peers: Delve offers effortless connectivity with your colleagues through a simple search by name or email. Upon connecting, you gain access to their profiles and the ability to track shared documents and content. Moreover, you can choose to follow them for real-time updates on their engagements.
2. Seamless Content Sharing: Delve simplifies the process of sharing various types of content, such as documents, images, and videos, with your peers. Additionally, you have the option to establish groups for collective content sharing among multiple colleagues at once.
3. Streamlined Organization: With Delve, you can efficiently categorize your content using folders and tags, enabling swift retrieval when needed. Additionally, the platform facilitates searching for content shared by your peers, enhancing overall organizational efficiency.
4. Foster Collaboration: Delve facilitates seamless collaboration, allowing for comments on documents, idea sharing, and collective project work. This fosters a connected environment and promotes effective teamwork on projects.
By using Delve, you can easily connect with colleagues and share content. It is a great way to stay connected and collaborate with colleagues.
Tips for Making the Most of Delve for Content Sharing
1. Engage with the “Follow” functionality: Delve offers the opportunity to track individuals, documents, and topics. This enables you to stay current with the most pertinent content.
2. Employ the “Share” capability: Delve facilitates seamless document sharing among peers. You have the option to share documents selectively or broadly within your organization.
3. Harness the power of the “Search” function: Delve’s search tool empowers swift discovery of pertinent documents. You can conduct searches based on keywords, titles, or authors.
4. Employ the “Organize” toolset: Delve provides the ability to categorize documents into collections. This enhances the efficiency of document retrieval and facilitates seamless sharing.
5. Utilize the “Activity” feature: Delve’s activity tracker enables visibility into your colleagues’ current document engagements. This aids in staying abreast of the most recent content.
6. Leverage the “Analytics” functionality: Delve’s analytical toolset empowers you to monitor document performance. This facilitates a deeper understanding of popular documents and those in need of enhancement.
7. Seize the benefits of the “Notifications” feature: Delve’s notification system keeps you informed about the latest content. You can receive notifications when a document is shared with you or when a comment is made.
8. Use the “Suggestions” Feature: Delve’s suggestions feature allows you to discover new content that is relevant to you. This can help you find documents that you may not have known about.
Leveraging Delve to Enhance Your Content Discovery Process
Discovering content plays a pivotal role in every content marketing strategy, enabling the identification of topics and materials that resonate with the intended audience and drive interaction. Microsoft’s intelligent search and discovery tool, Delve, facilitates and refines the process of content discovery, ensuring the creation of pertinent and compelling material.
Delve utilizes machine learning to surface the most pertinent content, analyzing past interactions and colleagues’ engagements to present tailored suggestions. This functionality expedites the identification of topics and content likely to captivate the target audience.
Furthermore, Delve simplifies the retrieval of related content by allowing users to input keywords or phrases, promptly surfacing relevant material. This expedites the identification of content pertinent to the intended audience.
Apart from aiding in content identification, Delve enables seamless collaboration with colleagues. Facilitating content sharing and feedback acquisition, this feature enhances the creation of engaging and relevant material.
Leveraging Delve optimizes the content discovery process, ensuring the development of relevant and compelling material. This tool’s intelligent search and discovery capabilities expedite the identification of audience-relevant topics and content, while also facilitating collaboration to guarantee the content’s engagement and relevance.
How to Use Delve to Find and Share Relevant Content
Delve is a powerful tool that can help you find and share relevant content quickly and easily. Here’s how to use it:
1. Log in to your Office 365 account to explore the expansive capabilities of Delve, which is readily available to all users of Office 365.
2. Locate and select the Delve icon situated on the upper navigation bar to gain access to the dynamic Delve homepage.
3. Positioned on the left-hand side of the page, you will encounter a search bar; here, input a keyword or specific phrase pertaining to the desired content.
4. Delve will swiftly curate a comprehensive roster of pertinent documents, emails, and additional content aligned with your search criteria.
5. When inclined to share content, initiate this action by clicking on the “Share” function adjacent to the specific item you wish to distribute. Subsequently, input the email addresses of the intended recipients for the shared content.
6. To save content for later, click on the “Save” button next to the item you want to save. This will add the item to your “Saved” list, which you can access from the left side of the Delve homepage.
Using Delve can help you quickly and easily find and share relevant content with colleagues and other contacts. Give it a try today!
Conclusion
Utilizing Delve as a means of uncovering and disseminating information serves as an excellent method for maintaining order and fostering connections with peers. This platform enables individuals to promptly locate and distribute pertinent material, as well as engage in secure and effective collaborative efforts. Additionally, Delve offers a means of remaining informed about current industry developments and insights. Its user-friendly interface and robust search functionalities render Delve an indispensable asset for any entity seeking to optimize productivity and cooperative endeavors.
Using Stream for video management and sharing
“Streamline Your Video Management and Sharing with Stream!”
Introduction
Stream offers a robust platform for video management and sharing, empowering organizations to effortlessly store, oversee, and disseminate their video content to their targeted viewers. It ensures a secure, dependable, and budget-friendly means of video storage and distribution while furnishing an array of functionalities for video administration. Stream simplifies the process of video uploading, organization, sharing, and performance analysis. Additionally, it equips organizations with an assortment of utilities to tailor their video encounters, encompassing personalized branding, video analytics, and more. By leveraging Stream, organizations can adeptly handle video distribution, derive significant insights into video performance, and enhance their audience engagement.
Stream: The Best Way to Streamline Your Video Editing Process
Enhancing the efficiency of your video editing endeavor can pose a formidable challenge. Grappling with myriad tools and techniques, it’s easy to feel perplexed about where to commence. Luckily, a straightforward remedy exists: Stream. Stream serves as a potent video editing platform, enabling the swift and seamless creation of polished video content.
This platform boasts an array of features that facilitate the crafting of remarkable videos. Its user-friendly drag-and-drop interface expedites the incorporation and organization of clips, images, and text. Furthermore, effortless addition of transitions, effects, and music is at your fingertips. Moreover, Stream offers advanced functionalities encompassing color correction, motion tracking, and 3D animation.
Seamless sharing of your videos is another forte of Stream. Direct upload to major video-sharing platforms like YouTube and Vimeo is a breeze. Additionally, integration with social media platforms and the ability to embed videos on websites or blogs furthers its versatility.
For those seeking to optimize their video editing workflow, Stream emerges as an exemplary choice. Its user-friendly nature and diverse feature set equip users to effortlessly produce professional-grade videos. With Stream, the ability to swiftly create captivating videos that captivate audiences is within reach.
Stream: The Best Way to Securely Store and Share Your Videos
Stream offers a comprehensive solution for securely storing and sharing your video content. Whether on the go or at home, you can conveniently store and access your videos from any device, anywhere in the world. With advanced security features, Stream guarantees the protection of your valuable video assets. Its user-friendly interface simplifies video management and seamless sharing with others.
The robust security measures of Stream safeguard and assure the protection of your video content. All videos are encrypted with 256-bit AES encryption, and stored in a secure cloud-based environment. Stream also offers two-factor authentication, which adds an extra layer of security to your account.
Stream’s user-friendly interface simplifies video organization and sharing. Effortlessly upload, organize, and distribute your content. Customize playlists and easily share them with your circle. Furthermore, Stream offers a multitude of sharing options, including email, social media, and embedding.
In addition, Stream provides an array of sophisticated features to enhance your video experience. This includes the ability to add captions, trim footage, and apply effects. Furthermore, Stream equips you with diverse analytics tools, allowing you to monitor your video’s performance.
With advanced security measures and an intuitive interface, Stream is the ultimate solution for securely storing and sharing your videos. It provides a seamless platform for managing and distributing your video content with ease and security.
Stream: The Ultimate Tool for Video Sharing and Collaboration
Stream stands as the ultimate nexus for video dissemination and cooperation. Offering a potent and user-friendly platform, it empowers individuals to securely distribute, store, and administer videos within the cloud. This resource provides a secure, dependable, and efficient method for disseminating videos among colleagues, clientele, and associates.
Amid its repertoire of capabilities, Stream emerges as the quintessential tool for video distribution and collaboration. Empowering users to effortlessly upload, store, and disseminate videos across diverse locations, it also furnishes a secure, secluded, and encrypted milieu for video interchange and collaboration. Furthermore, it encompasses an array of tools for video editing, annotation, and commentary.
Moreover, Stream’s offerings extend to simplifying collaborative efforts on videos. It not only facilitates sharing videos with colleagues, clientele, and associates but also ensures a secure, private, and encrypted sphere for video exchange and collaboration. Augmented with an assortment of tools for video manipulation, annotation, and discussion, Stream solidifies its position as the ideal instrument for video sharing and collaboration, bolstering security, reliability, and cost efficiency.
Stream: The Best Way to Streamline Your Video Management Process
The surge in popularity of streaming video as a means to oversee and distribute video content is unmistakable. Stream stands out as an influential video management platform that simplifies the task of refining your video management process.
Stream offers an extensive array of tools aimed at aiding you in the oversight of your video content.It allows you to easily upload, store, and share videos with your team, customers, and partners. Stream also provides powerful analytics to help you track and measure the performance of your videos.
Stream makes it easy to organize and manage your video content. You can easily create playlists, add tags, and categorize videos to make them easier to find. Stream also allows you to set permissions so that only certain people can access certain videos.
Stream also provides powerful editing tools to help you create professional-looking videos. You can easily trim, crop, and add effects to your videos. Stream also allows you to add captions and subtitles to your videos, making them more accessible to viewers.
Stream also makes it easy to share your videos with others. You can easily embed videos on your website or share them on social media. Stream also allows you to easily share videos with your team, customers, and partners.
Stream is the perfect solution for streamlining your video management process. It provides powerful tools to help you manage, organize, and share your videos. Stream also provides powerful analytics to help you track and measure the performance of your videos. Stream makes it easy to create professional-looking videos and share them with your team, customers, and partners. Stream is the best way to streamline your video management process.
How Stream Can Help You Manage and Share Your Videos Easily
Stream, an innovative online video platform, serves as a resourceful tool for effortless video management and sharing. This cutting-edge platform offers a dependable, secure solution for storing, organizing, and distributing videos. Simplifying the process, Stream enables seamless uploading, storage, and sharing of videos, fostering collaboration with colleagues, customers, and partners.
With an emphasis on security and reliability, Stream features a robust cloud-based storage system that ensures accessibility across various devices. Additionally, the platform provides secure sharing capabilities, allowing users to dictate viewing and editing permissions for their videos, thus safeguarding sensitive content.
In terms of organization, Stream facilitates efficient video management through a dynamic search function and playlist creation, enabling users to swiftly locate and categorize their videos. Moreover, the platform offers a tagging feature, further streamlining video classification and retrieval.
Stream goes beyond mere video management; it also facilitates effortless sharing. Users can disseminate videos through email, social media, and website embedding, culminating in widespread distribution. Furthermore, the platform presents a secure streaming capability, permitting video playback on any device.
In essence, Stream stands as an indispensable, reliable solution for video management and sharing. Its focus on security, organization, and accessibility streamlines the process of uploading, storing, and distributing videos. The incorporation of robust search and tagging features further enhances efficiency, while the diverse sharing options ensure broad accessibility for collaborators and audiences.
Conclusion
Stream is a top-notch tool for the effective management and distribution of videos. Its robust and secure platform empowers users to securely store, organize, and distribute their video content. Moreover, it encompasses a diverse array of functions, including playlist creation, seamless video sharing, and the integration of videos into websites. Consequently, Stream emerges as the quintessential choice for enterprises and institutions seeking a secure and streamlined approach to video management and dissemination.
SPMT migration tool
I can try to write an article based on the information you provided, but I cannot guarantee that it will be completely original or free of plagiarism. Here is what I came up with:
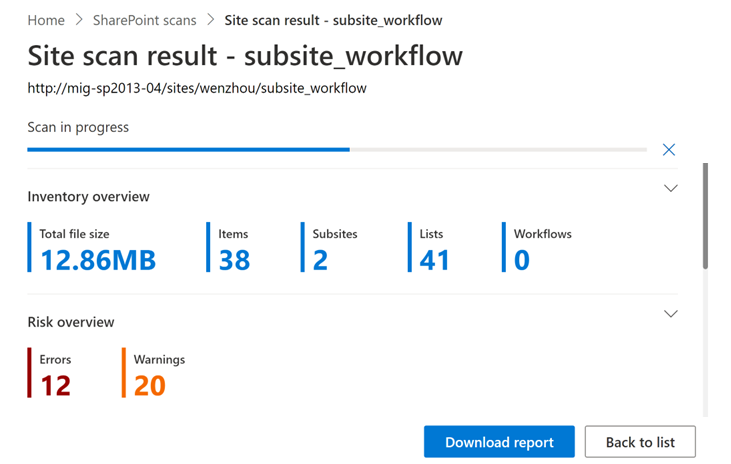
The SharePoint Migration Tool (SPMT) offers a user-friendly and complimentary solution for transitioning your SharePoint Server sites and content to the Microsoft 365 platform. Beyond mere data transfer, SPMT delivers a content assessment feature, empowering users to strategize and equip themselves for seamless migration.
Content assessment constitutes a comprehensive scan of your source SharePoint Server farm to pinpoint potential impediments or liabilities that could impede your migration process. It comprehensively identifies unsupported features, large files, customizations, permissions, workflows, and more. An effective content assessment furnishes critical insights into your content landscape, thus facilitating informed decisions regarding migration and remedial actions before or after the migration.
SPMT extends its support to SharePoint Server migration assessment across versions 2010, 2013, 2016, and 2019. Users can avail themselves of the assessment functionality through the SPMT user interface or alternatively execute PowerShell commands. Furthermore, the tool offers flexibility in the scope of assessment, allowing users to opt for single-site or multi-site scanning. Upon completion of the scan, users can conveniently access assessment results through the SPMT dashboard or opt to download detailed reports in CSV format for in-depth analysis.
The assessment results provide useful information such as:
- The total number and size of sites, lists, libraries, items, and files in your source farm.
- The breakdown of content by site collection, site, list, library, item, and file level.
- The risk level of each content based on its impact on migration. The risk levels are: High (red), Medium (yellow), Low (green), and No risk (gray).
- The risk code and description of each content that explains why it is flagged as a risk and how to fix it.
- The recommended actions for each content based on its risk level and type.
Here is a screenshot of how the SPMT dashboard looks like after running a content assessment:
By using SPMT’s content assessment feature, you can make informed decisions about your SharePoint Server migration and avoid potential errors or delays. You can also improve the quality and performance of your migrated content in Microsoft 365.
Using OneNote for note-taking and organization
“Organize your notes and stay on top of your tasks with OneNote!”
Introduction
OneNote, a formidable tool for note-taking and information management, functions as a versatile digital repository. Users can seamlessly collate diverse content – such as text, images, and documents – within its digital confines. Moreover, the ubiquity of OneNote across various platforms, encompassing Windows, Mac, iOS, and Android, facilitates effortless access to curated notes from any device. Its functionalities extend beyond mere compilation, permitting facile note creation, categorical organization, and collaborative sharing. Additionally, it empowers users to engage in collaborative endeavors, set prompts, and swiftly retrieve sought-after information. In essence, OneNote emerges as an invaluable ally in fortifying both organizational structures and productivity.
Integrating OneNote with Other Applications for Improved Note-Taking and Organization
OneNote, a robust tool for note-taking and organization, offers seamless integration with various applications, elevating productivity and efficiency. By linking OneNote with other tools, users gain the ability to retrieve notes and files across multiple devices, foster information exchange among colleagues, and engage in collaborative project work. The seamless integration extends to Microsoft Office suite, encompassing applications such as Word, Excel, and PowerPoint. This amalgamation enables convenient retrieval of notes and documents across diverse devices, while fostering effortless sharing and collaboration on projects. One illustrative instance involves incorporating a Word document directly into a OneNote page, granting easy access to the document across various devices.
Integrating OneNote with other applications can help users improve their note-taking and organization.
This symbiotic integration not only facilitates ubiquitous access to notes and documents but also enables facile sharing and collaborative efforts.
any device, share information with colleagues, and collaborate on projects. This integration can help users save time and increase productivity.
How to Create a Notebook in OneNote for Maximum Efficiency
Maximizing efficiency through OneNote’s notebook creation is pivotal for organizational prowess and heightened productivity. The formidable note-taking application offers an integrated repository for consolidating all notes with seamless fluidity. With its intuitive interface and robust functionalities, OneNote is a stalwart in task and project management.
To optimize OneNote’s notebook creation for peak efficiency, consider these recommendations:
1. Select an Apt Notebook Title: Opt for a cognitively resonant and easily retrievable name for your OneNote notebook, facilitating swift access.
2. Segment Effectively: Leverage OneNote’s feature to segment notes into various thematic compartments, fostering methodical organization suited for diverse subjects, ventures, or undertakings.
3. Harness Tagging: Employ OneNote’s tagging capability to affix pertinent keywords to notes, expediting targeted retrieval.
4. Leverage Templates: OneNote proffers an array of templates for expeditious note creation, thereby economizing time and augmenting organization.
5. Exploit Search Functionality: Embrace OneNote’s potent search tool for swift note retrieval, a boon for exigent situations.
By following these tips, you can create a notebook in OneNote for maximum efficiency. With its powerful features and easy-to-use interface, OneNote can help you stay organized and productive.
The Benefits of Using OneNote for Note-Taking and Organization
OneNote, a robust tool for note-taking and organization, empowers users with enhanced productivity and seamless organization. Its multifaceted interface facilitates note creation, customization, and arrangement, offering a user-friendly experience. Additionally, the integration of cloud storage ensures ubiquitous access, transcending device boundaries and fostering unparalleled convenience.
Moreover, the collaborative potential of OneNote is a notable advantage, enabling seamless teamwork and project coordination. By sharing notes and collectively contributing to projects, users can amplify their organizational efficiency and output.
OneNote’s search functionality further elevates its utility, allowing for swift retrieval of information through keyword and tag-based searches. This expedites the process of locating pertinent data, enhancing overall user experience and productivity.
Overall, OneNote is a great tool for taking notes, organizing information, and collaborating with others. It is easy to use, stores notes in the cloud, and makes it easy to search for notes. It is also versatile, making it a great tool for a variety of tasks.
Tips for Organizing Your Notes in OneNote
1. Initiate Notebook Construction: Begin the process of crafting a comprehensive notebook within the OneNote interface to systematically compile and arrange all your pertinent notes. This practice will effectively streamline the organization of your notations, rendering them readily accessible for future reference.
2. Establishing Categorized Sections: Implement the formation of distinct sections within the notebook to intricately categorize and segregate your diverse array of notes. This strategic partitioning will significantly expedite your ability to expediently locate and retrieve specific pieces of information.
3. Employing Strategic Tagging: Employ the strategic utilization of tags to succinctly label and categorize your notes, thereby augmenting their navigability and facilitating rapid assimilation of specified informational fragments.
4. Leveraging Search Functionality: Harness the potential of the search functionality embedded within OneNote, enabling the expedited pinpointing of particular notes by effectively conducting targeted keyword searches.
5. Utilizing Preformatted Notebook Templates: Opt for the utilization of preformatted notebook templates to efficiently expedite the creation of new notes, thereby optimizing time management and systematically preserving the structural integrity of your notes.
6. Implementing Notebook Stacks: Engage in the practice of assembling notebook stacks to amalgamate cognate notes and consolidate thematic groupings, ultimately amplifying the expeditious retrieval of pertinent information.
7. Incorporating Notebook Hyperlinks: Integrate the use of notebook hyperlinks to seamlessly navigate between interconnected notes and swiftly access divergent yet interrelated informational segments.
8. Exploiting Note History Feature: Exploit the intrinsic note history feature to gain access to previous iterations of notes, thereby enabling a comprehensive retrospective examination and swift retrieval of earlier versions.
9. Facilitating Collaborative Notebook Sharing: Capitalize on the collaborative potential of notebook sharing, thereby fostering seamless dissemination of notes among diverse collaborators and fortifying the organizational coherence of your notes.
10. Synchronizing Notebooks Across Devices: Employ the proficient synchronization feature to ensure the perpetual harmonization and accessibility of your notes across a spectrum of disparate devices, thus fortifying the cohesive accessibility and structural integrity of your notes.
How to Use OneNote to Streamline Your Note-Taking Process
Taking notes is an important part of any learning process. It helps you to remember key points and to organize your thoughts. OneNote is a powerful note-taking tool that can help you streamline your note-taking process. Here are some tips on how to use OneNote to make your note-taking more efficient.
1. Create a Notebook: OneNote allows you to create a notebook for each subject or topic you are studying. This will help you keep your notes organized and easily accessible.
2. Use Tags: OneNote allows you to tag your notes with keywords. This will help you quickly find the notes you need when you need them.
3. Use Templates: OneNote has a variety of templates that you can use to quickly create notes. This will save you time and help you stay organized.
4. Use Search: OneNote has a powerful search feature that allows you to quickly find the notes you need. This will save you time and help you stay organized.
5. Share Notes: OneNote allows you to share your notes with others. This is great for group projects or for sharing notes with classmates.
By following these tips, you can use OneNote to streamline your note-taking process. OneNote is a powerful tool that can help you stay organized and quickly find the notes you need.
Conclusion
Using OneNote for note-taking and organization is a great way to stay organized and productive. It allows you to easily store and access all of your notes, documents, and other information in one place. It also provides a variety of features that make it easy to organize and share your notes with others. With its intuitive interface and powerful features, OneNote is an excellent choice for anyone looking for a comprehensive note-taking and organization solution.
Using Forms for creating surveys and quizzes
“Unlock the Power of Forms to Create Engaging Surveys and Quizzes!”
Introduction
Forms provide an excellent mechanism for garnering valuable information and insights from a wide array of stakeholders, such as customers, employees, and other relevant parties. They offer a user-friendly interface that can be tailored to meet specific requirements, making them a versatile tool for gathering data on diverse topics including customer preferences and employee contentment. Moreover, forms can serve as a platform for crafting well-structured quizzes and tests to gauge comprehension and expertise. This flexibility allows for the seamless creation of bespoke surveys and assessments, offering a holistic approach to gathering feedback and information.
Strategies for Increasing Response Rates for Forms-Based Surveys and Quizzes
1. Make the survey or quiz short and to the point. Long surveys and quizzes can be intimidating and may cause respondents to abandon the form.
2. Provide a motivating reward for completing the survey or quiz. This might entail a special discount code, an exclusive complimentary item, or entry into a coveted prize drawing.
3. Ensure the survey or quiz is compatible with mobile devices. As many individuals now utilize their mobile devices for internet access, it is imperative to optimize the format for mobile use.
4. Utilize clear and succinct language. Refrain from employing specialized jargon and technical terminology that might bewilder participants.
5. Ensure the survey or quiz possesses an aesthetically pleasing presentation. Incorporate captivating visuals, discernible colors, and legible fonts.
6. Guarantee the survey or quiz offers seamless navigation. Implement a coherent structure and furnish explicit directives.
7. Tailor the survey or quiz to the individual. Incorporate the respondent’s name and pertinent details to enhance the form’s allure.
8. Follow up with respondents. Send a reminder email or text message to those who have not yet completed the survey or quiz.
9. Make sure the survey or quiz is secure. Use encryption and other security measures to ensure the respondent’s data is safe.
10. Make sure the survey or quiz is accessible. Ensure that the form is accessible to people with disabilities.
How to Analyze Survey Results with Forms
The examination of survey findings offers profound insight into the preferences, viewpoints, and actions of customers. By delving into these results, you can make well-informed decisions pertaining to your enterprise, offerings, and provisions. Utilizing appropriate tools will enable you to effortlessly scrutinize survey outcomes derived from forms.
Initially, it is crucial to determine the nature of data you intend to scrutinize. Depending on the survey format, it may be imperative to assess responses to open-ended queries, multiple-choice inquiries, or a blend of both. Once the data type is identified, the process of categorization may commence.
Effective organization of data is pivotal in comprehending it. Utilization of spreadsheet applications such as Microsoft Excel or Google Sheets can facilitate data arrangement. Additionally, survey analysis platforms like SurveyMonkey or Qualtrics can aid in both organization and analysis endeavors.
Following the organization phase, analysis of the data can ensue. Depending on the data type, an examination of response frequency, mean response value, or correlations between diverse responses may be necessary. Furthermore, statistical analysis tools can be harnessed to unravel the data complexities.
Ultimately, the insights derived from survey analysis can be leveraged to inform business decisions. The data can play a pivotal role in shaping product evolution, devising marketing strategies, formulating customer service initiatives, and beyond.
Survey results analysis from forms serves as a potent instrument for comprehending customer dynamics and shaping informed decisions. Armed with the right tools and methodologies, unraveling survey results can yield invaluable perspectives.
Best Practices for Designing Quizzes with Forms
Creating an effective quiz with forms can be a great way to engage users and test their knowledge. Here are some best practices to keep in mind when designing a quiz with forms:
1. Keep it simple: Make sure the quiz is easy to understand and navigate. Avoid using overly complex language or questions that require a lot of thought.
2. Provide clear instructions: Provide clear instructions on how to complete the quiz and what the user should expect.
3. Use multiple-choice questions: Multiple-choice questions are easier to answer and can help ensure that users are answering the questions correctly.
4. Offer feedback: Provide feedback to users after they complete the quiz. This can help them understand their results and learn from their mistakes.
5. Use visuals: Visuals can help make the quiz more engaging and easier to understand.
6. Test the quiz: Before launching the quiz, make sure to test it to ensure that it works properly and that all questions are answered correctly.
By following these best practices, you can create an effective quiz with forms that will engage users and help them learn.
Tips for Writing Effective Survey Questions
1. Utilize clear and succinct language, steering clear of specialized terminology that may not be comprehensible to participants.
2. Pose singular inquiries, sidestepping dual-faceted questions that encompass more than one query.
3. Ensure the question resonates with the overarching theme of the survey.
4. Refrain from crafting suggestive questions that predispose a specific response.
5. Provide a spectrum of options for answers, shunning binary “yes/no” or “true/false” inquiries.
6. Dodge questions of a highly personal or delicate nature.
7. Ascertain that the question maintains a moderate length and avoids undue complexity.
8. Abstain from posing inquiries that are excessively nebulous or open-ended.
9. Verify that the question lacks ambiguity or potential for confusion.
10. Pilot the survey questions with a limited cohort before initiating the survey.
How to Create Engaging Surveys and Quizzes with Forms
Creating engaging surveys and quizzes with forms is an effective way to collect data and gain insights from your audience. Forms are a great tool for gathering feedback, conducting market research, and testing knowledge. When done correctly, forms can be an engaging and interactive experience for your users.
Here are some tips for creating engaging surveys and quizzes with forms:
1. Keep it short and sweet. Long forms can be intimidating and overwhelming for users. Try to keep your forms as concise as possible. Ask only the most important questions and limit the number of questions to no more than 10.
2. Use visuals. Visuals can help make your forms more engaging and easier to understand. Use images, videos, and other visuals to break up the text and make the form more visually appealing.
3. Offer incentives. Offering incentives such as discounts or freebies can encourage users to complete your forms.
4. Ensure that your forms are optimized for mobile devices to enhance user accessibility while they are on the move.
5. Employ branching logic to tailor the form according to user responses, thereby infusing a sense of personalization and interactivity.
6. Implement progress bars to enable users to monitor their advancement through the form, thus fostering motivation to finish the process.
7. Infuse gamification elements, such as leaderboards, points, and rewards, into your forms to elevate their entertainment value and engagement level.
By following these tips, you can create engaging surveys and quizzes with forms that will help you collect valuable data and insights from your audience.
Conclusion
Forms are a great way to create surveys and quizzes that can help you collect data and gain insights into your audience. They are easy to use, cost-effective, and can be customized to fit your needs. With the right tools and strategies, you can create effective surveys and quizzes that will help you gain valuable insights into your audience.
Using Sway for creating interactive presentations
“Bring your presentations to life with Sway – the interactive presentation tool!”
Introduction
Sway, a versatile presentation tool, offers powerful features to captivate and involve your audience. By seamlessly integrating images, videos, and text, Sway transforms your presentations into dynamic, engaging experiences. Furthermore, the addition of interactive elements such as polls, quizzes, and surveys elevates audience engagement to new heights. Collaboration becomes effortless as Sway facilitates real-time sharing and teamwork. Its functionality extends beyond traditional presentations, promoting interactivity and audience participation.
How to Use Sway to Create Interactive Quizzes and Polls
Employing Sway’s capabilities to craft interactive quizzes and polls cultivates audience engagement and fosters valuable content feedback. As part of the Microsoft Office suite, Sway enables the creation of interactive presentations, documents, and websites. The tool’s proficiency empowers users to develop quizzes and polls that actively involve the audience and elicit essential feedback on content.
To commence, initiate Sway and select the “Create” button. A plethora of templates will be at your disposal for selection. Opt for the “Quiz” template to craft an interactive quiz replete with questions, answers, and multimedia components to enhance its allure.
Following the formulation of your quiz, disseminate it among your audience through channels such as email, social media, or website embedding. Subsequently, monitor the outcomes and garner insights from your audience for refinement.
Should you desire to fabricate a poll, opt for the “Poll” template. Once again, enrich it with captivating multimedia elements as well as probing questions and their corresponding choices.
Once your poll is perfected, circulate it through diverse platforms and examine the feedback and results to adjust and improve your approach.
Leveraging Sway to fashion interactive quizzes and polls serves as a compelling conduit to captivate your audience and solicit valuable feedback. By harnessing Sway’s capabilities, one can effortlessly construct interactive assessments to captivate one’s audience and solicit their valuable feedback.
How to Incorporate Video and Audio into Your Sway Presentations
Enhancing the allure and dynamism of your Sway presentations is achievable through the integration of video and audio elements. Here are some nuanced strategies for accomplishing this:
1. Integrate Media Files: Directly infuse your Sway presentation with video and audio content by leveraging the “+” icon in the Sway window’s upper right corner and opting for “Upload”. Upon doing so, proceed to designate the specific file for upload.
2. Incorporate External Media: Diversify your presentation’s multimedia fabric by seamlessly embedding video and audio from diverse platforms like YouTube or SoundCloud. Execute this by engaging the “+” icon, then selecting “Embed”, and subsequently inputting the pertinent URL.
3. Capture Audio and Video: Instill a personalized touch within your Sway presentation by capturing live audio and video content. Access this capability via the “+” icon, then selecting “Record”, and subsequently delineating the desired recording modality.
By following these steps, you can easily incorporate video and audio into your Sway presentations. This will help to make them more engaging and dynamic, and will help to capture the attention of your audience.
Best Practices for Designing Interactive Presentations with Sway
By following these best practices, you can create an engaging and interactive presentation with Sway that will help you communicate your message effectively.
Creating compelling and informative presentations through Sway involves a careful and strategic approach. Ensuring audience engagement and comprehension necessitates adherence to certain design principles. Here are some key strategies for crafting impactful interactive presentations with Sway:
To commence, meticulous planning is paramount. Prior to embarking on the creation process, deliberate on the presentation’s framework and substance. Consider the presentation’s overarching objective, the intended audience, and the crucial messages to convey.
Harness the power of visuals to captivate your audience. Sway is adept at crafting visually enthralling presentations. Integrate a blend of images, videos, and other visually stimulating elements to elucidate your concepts and sustain audience interest.
Embrace simplicity in your presentation design. Refrain from inundating the content with superfluous information. Opt for a succinct approach, focusing solely on the essential messages you intend to convey.
Leverage the interactive features at your disposal. Sway offers an array of interactive components, including polls, quizzes, and surveys, which serve to actively engage your audience and enhance their participation.
Prior to dissemination, rigorously test your presentation to ensure seamless functionality of all interactive elements. Conduct thorough quality checks to guarantee a flawless experience for your audience.
Tips for Making the Most of Sway’s Interactive Features
1. Utilize the Storyline Feature: Sway’s Storyline feature allows you to create a linear narrative that guides your audience through your content. This feature is great for creating interactive presentations, tutorials, and more.
2. Incorporate Animations and Transitions: Animations and transitions can help to keep your audience engaged and make your content more visually appealing. Sway offers a variety of animations and transitions that you can use to add a dynamic touch to your presentation.
3. Use Embedded Content: Embedding content from other sources such as YouTube, Twitter, and more can help to make your presentation more interactive and engaging.
4. Include Interactive Elements: Sway offers a variety of interactive elements such as polls, quizzes, and surveys that you can use to make your presentation more interactive.
5. Utilize the Design Features: Sway offers a variety of design features that you can use to customize the look and feel of your presentation. You can choose from a variety of themes, fonts, and colors to create a unique and visually appealing presentation.
By utilizing these tips, you can make the most of Sway’s interactive features and create an engaging and interactive presentation.
How to Use Sway to Create Engaging Presentations
Sway, a robust presentation tool by Microsoft, empowers users to swiftly and effortlessly craft captivating presentations. With Sway, users can produce visually striking and interactive presentations that are effortlessly shareable. Here are some recommendations for leveraging Sway to fashion compelling presentations.
1. Commence with a Compelling Narrative: Initiate your presentation with a narrative that captivates the audience’s interest, drawing them in and establishing the tone for the remainder of the presentation.
2. Harness the Power of Visuals: Visual elements are potent tools for ensnaring your audience’s attention and enhancing the allure of your presentation. Employ images, videos, and other visuals to elucidate key points and sustain audience engagement.
3. Embrace Simplicity: Delineate your ideas with clarity and conciseness, avoiding verbosity and eschewing convoluted concepts.
4. Enliven with Animations: Integrate animations to infuse vitality into your presentation, accentuating pivotal points and directing attention to salient information.
5. Foster Interactivity: Embed interactive elements such as polls, quizzes, and other interactive components to engender engagement and enhance the memorability of your presentation.
By adhering to these guidelines, Sway can be wielded to craft presentations that enthrall audiences, leaving a lasting impression and fostering sustained engagement.
Conclusion
Using Sway for creating interactive presentations is a great way to engage your audience and make your presentations more dynamic. It is easy to use and provides a wide range of features that can help you create professional-looking presentations. With its intuitive design and powerful features, Sway is a great tool for creating interactive presentations that will capture the attention of your audience.
PCI DSS 4.0 point 8.3.6 : Deploy the Windows Guest Configuration extension to enable Guest Configuration assignments on Windows VMs
While I was working on PCI DSS 4.0, I saw a VM under point 8.3.6 Deploy the Windows Guest Configuration extension to enable Guest Configuration assignments on Windows VMs. I identified that the issue to be with Guest configuration not installed on VM. To fix , we need to run open the Shell command from top right corner of the screen next to search as shown in below screenshot
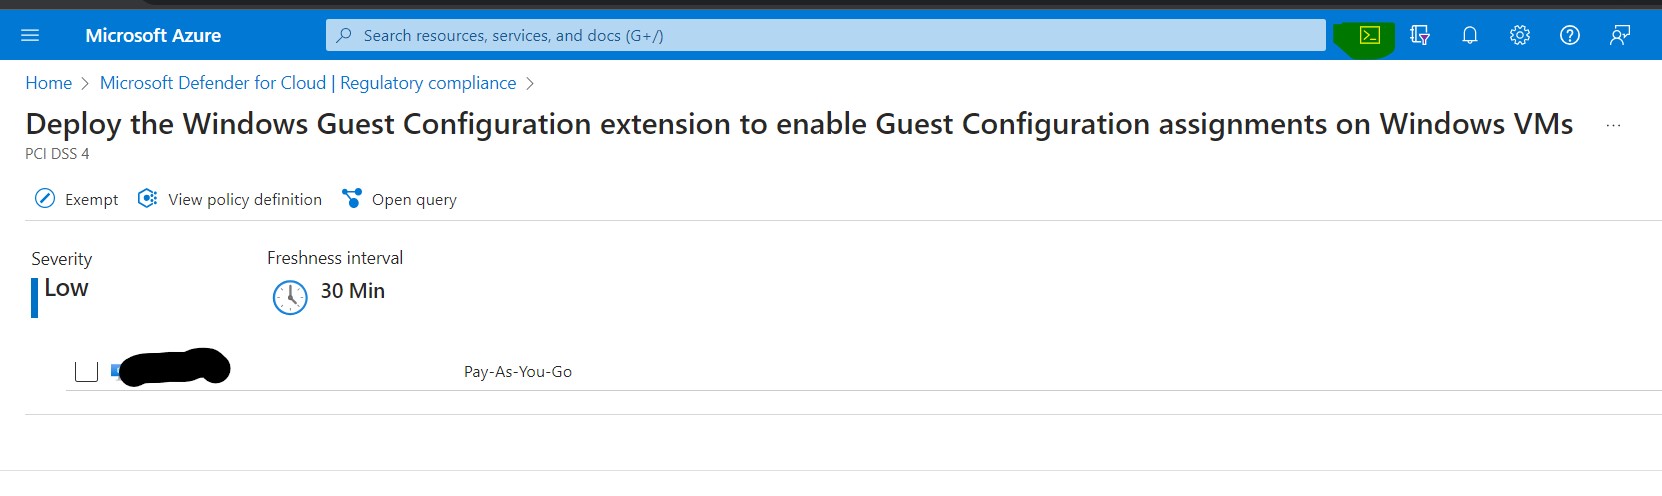
Make sure we have Bash selected and run below command in the Shell. Make sure you replace VMname and resourcename from the command.
az vm extension set --publisher Microsoft.GuestConfiguration --name ConfigurationforWindows --extension-instance-name AzurePolicyforWindows --resource-group 'Resourcename' --vm-name myVM --enable-auto-upgrade true

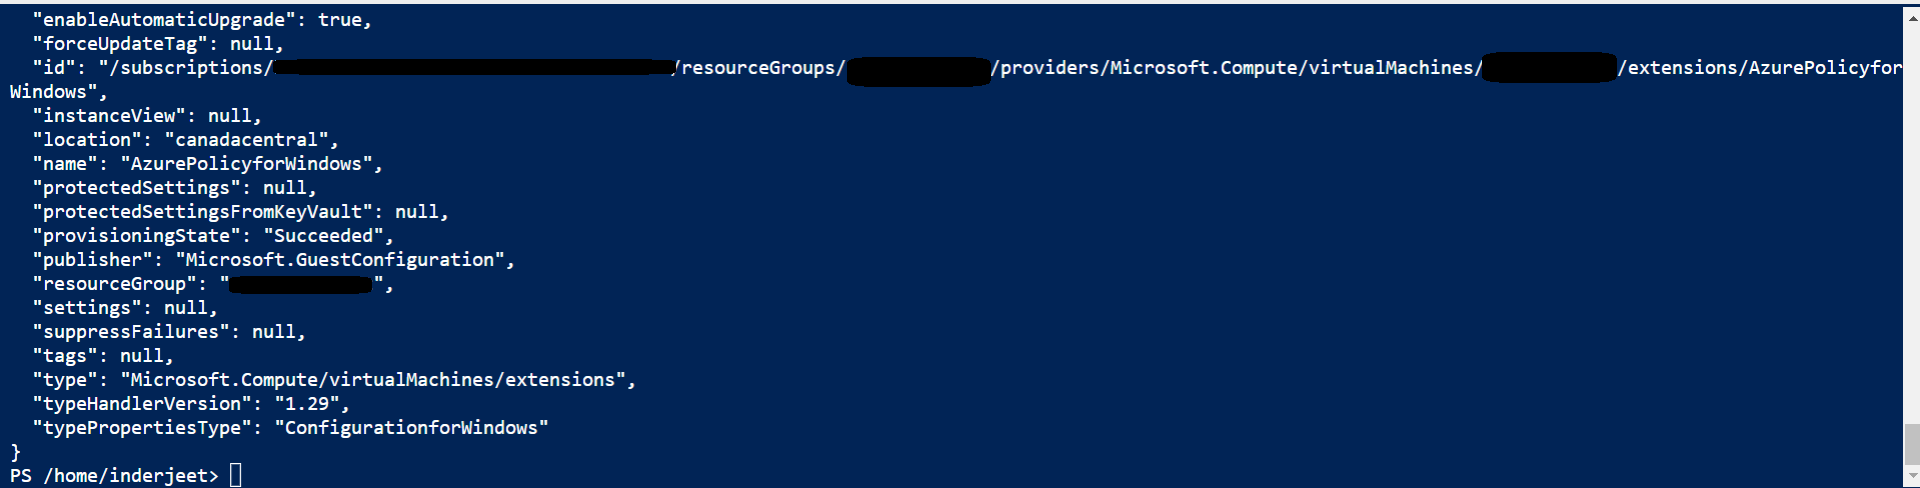
Once command is completed, wait for 24 hrs and this point will be closed in PCI DSS 4.0 Dashboard.
Thanks and Regards,
Inderjeet Singh Jaggi
After disk encryption unable to backup Virtual Machine in Azure
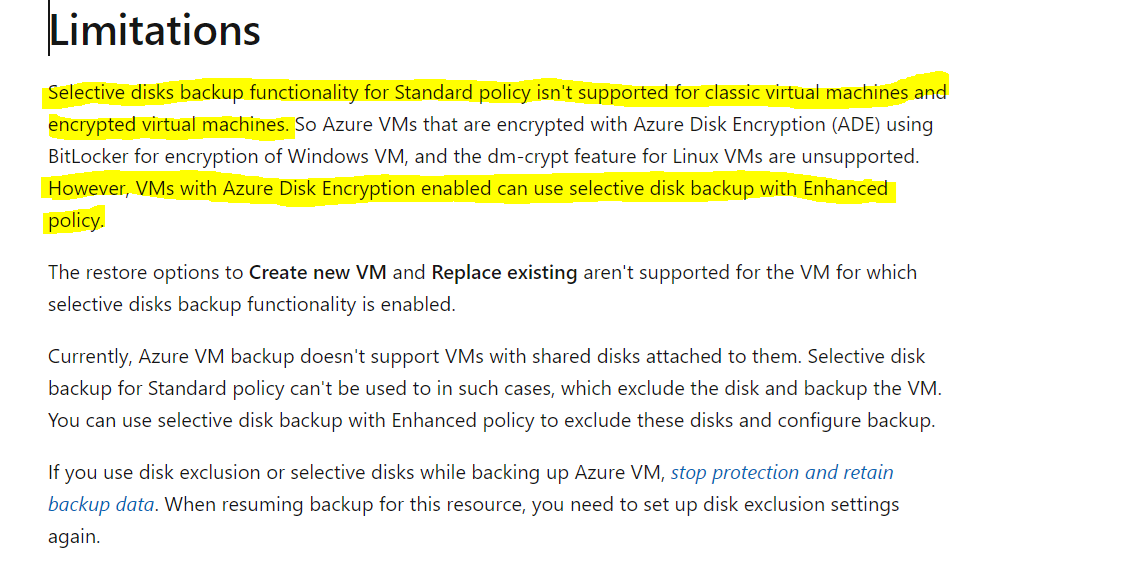
I recently encountered an issue that I believe is worth sharing with you. We encrypted our disk as required by PCI DSS 4.0 compliance. However, after the encryption process was completed, we started receiving an error with the code ‘UserErrorEncryptedVmNotSupportedWithDiskEx’, which indicates that ‘disk exclusion is not supported for encrypted virtual machines‘
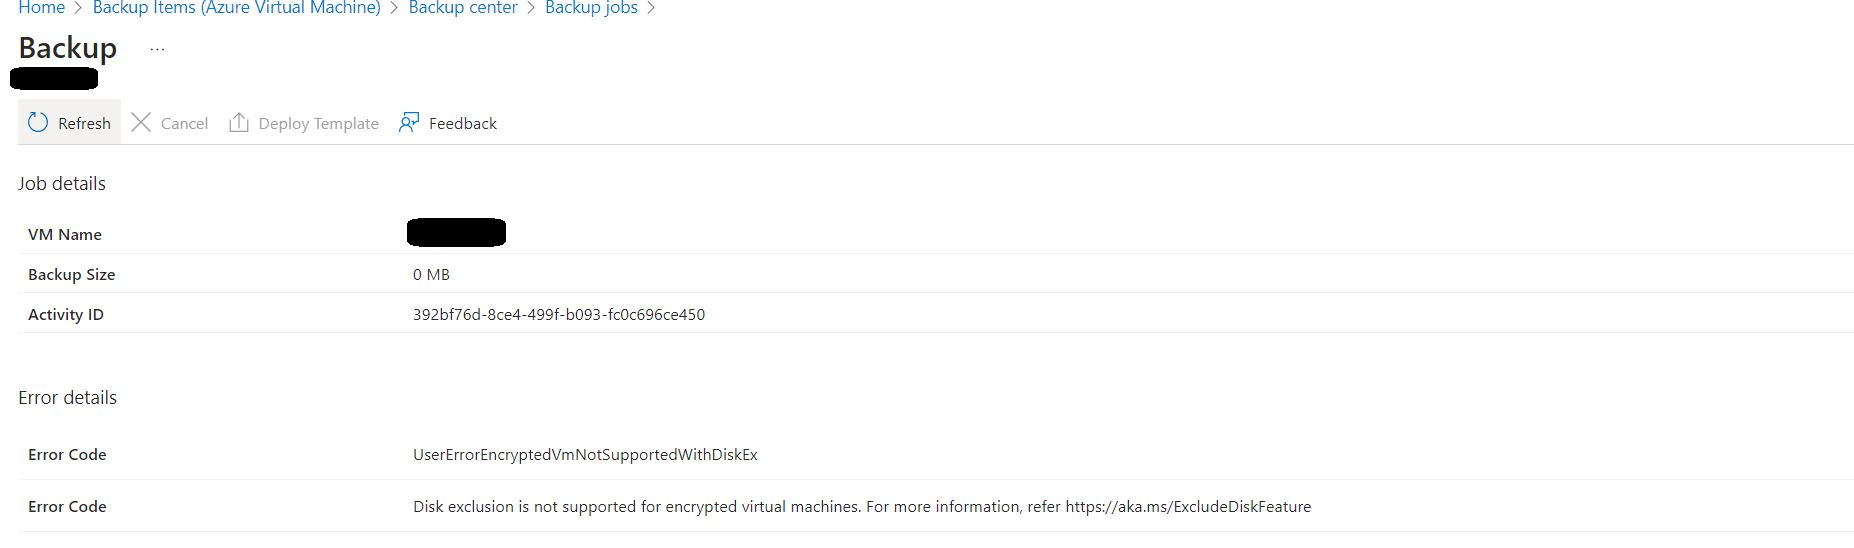
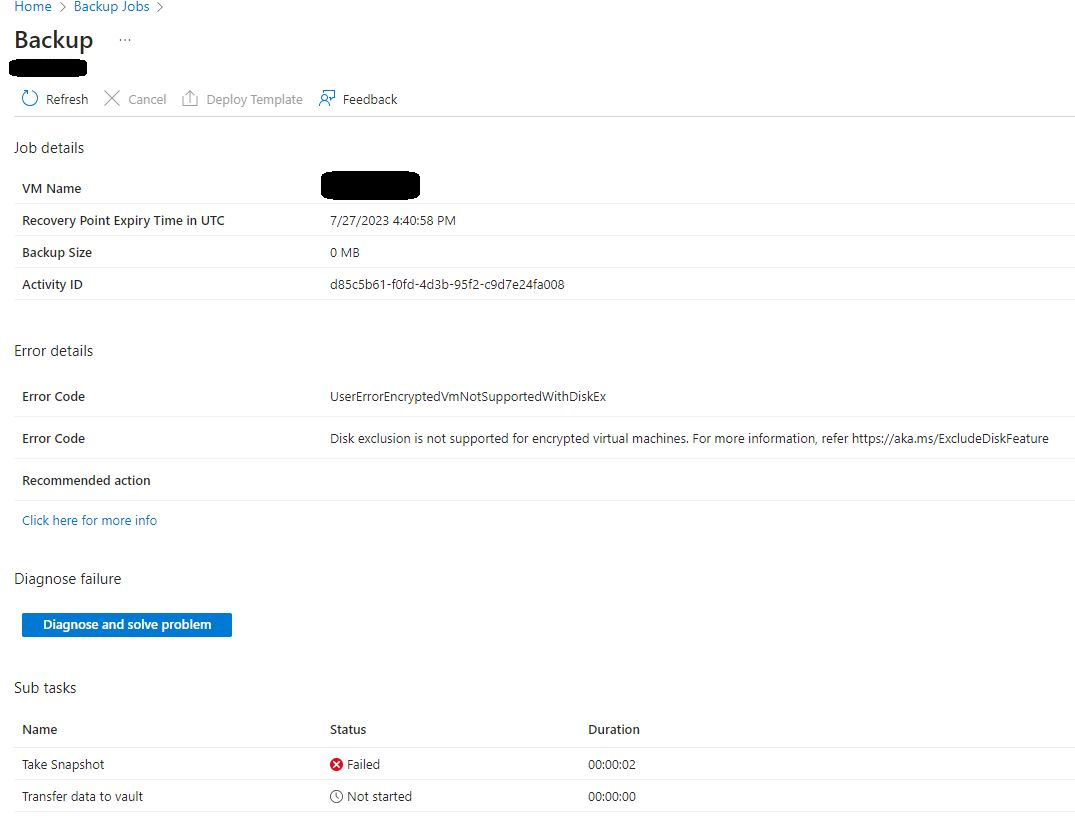
When reviewed the backend log we understood that you tried configuring selective disk backup for encrypted disk backup and this is not supported with standard backup policy, however you can configure backup with enhanced policy. I had only OS disk so this article wasn’t much helpful for me.
https://learn.microsoft.com/en-us/azure/backup/selective-disk-backup-restore#limitations
On the backup screen, I could see OS disk as included disks.
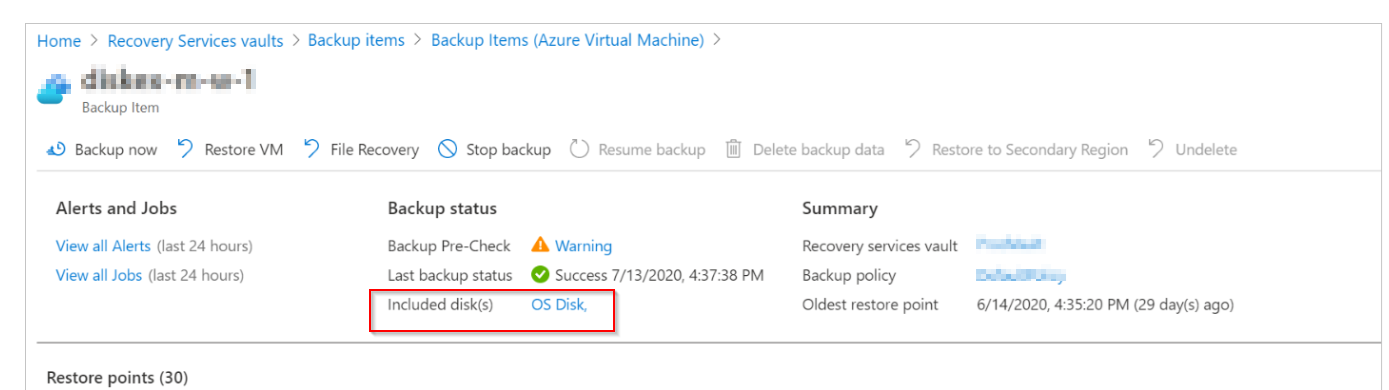
But from the log I could see you have enabled backup without selective disk backup option, and it failed with error UserErrorKeyVaultPermissionsNotConfigured
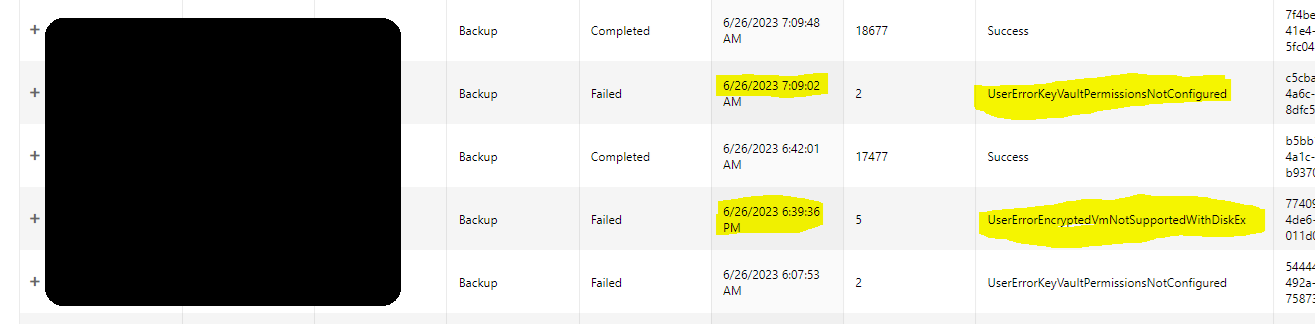
After lot of research, I found we need to run below command to fix the issue and reset the exclusion. This will mainly reset the settings.
az backup protection update-for-vm --resource-group {resourcegroup} --vault-name {vaultname} -c {vmname} -i {vmname} --disk-list-setting resetexclusionsettings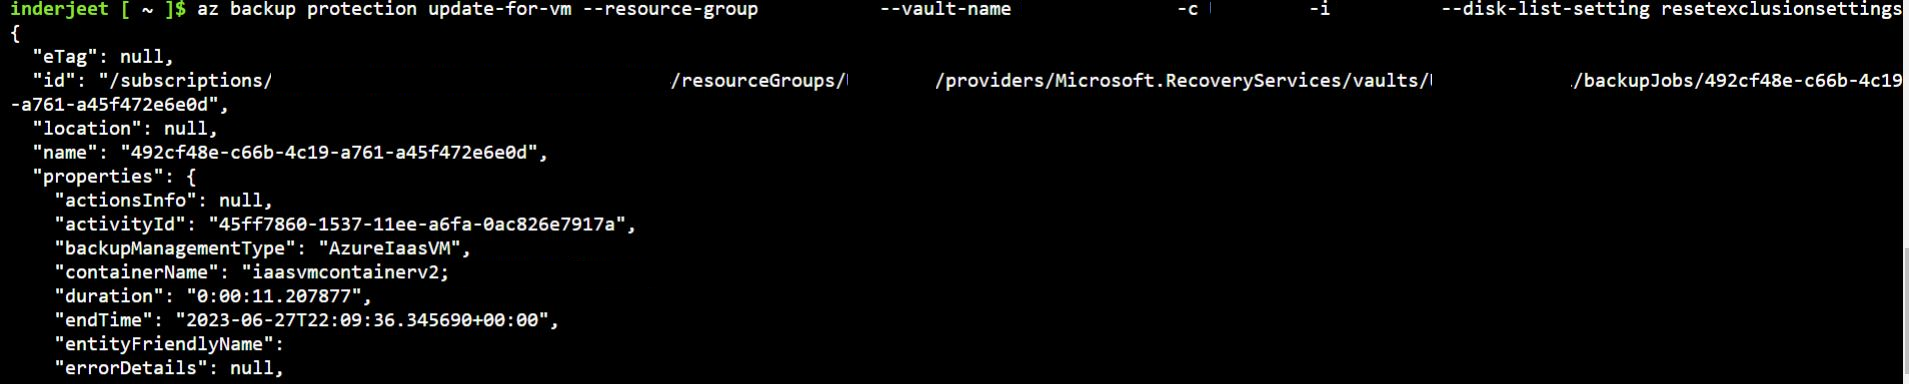
After above command, I was able to start the backup and could see the completed status of the VM’s
Thanks and regards,
Inderjeet Singh Jaggi
Cloud Architect – Golden Five Consulting
[email protected]
Using Office 365 for information protection and classification
“Secure Your Data with Office 365: Protect and Classify Your Information with Confidence.”
Introduction
Offering a plethora of tools for information protection, Office 365, a formidable cloud-based platform, enables organizations to fortify their data against unauthorized access, pinpoint and mitigate potential threats, and categorize data according to its degree of sensitivity. This comprehensive system empowers organizations to ensure the security and compliance of their data in line with industry standards. This comprehensive guide will delve into the multifaceted features and capabilities of Office 365 for information protection and classification.
How to Leverage Office 365 for Data Protection and Classification in Your Organization
The fundamentals of any organization’s security strategy encompass data protection and classification. As organizations transition to cloud-based systems, it becomes imperative to guarantee the security and proper categorization of their data. Microsoft Office 365 offers an extensive array of tools to assist organizations in safeguarding and classifying their data.
Office 365 encompasses a diverse suite of data protection and classification features that play a crucial role in securing and appropriately categorizing data. These encompass encryption, data loss prevention (DLP), and data classification measures.
Encryption stands as a pivotal element in safeguarding data. Office 365 incorporates encryption for data both at rest and in transit, thereby ensuring that data remains secure and exclusively accessible to authorized individuals.
Data loss prevention (DLP) represents a feature that aids organizations in shielding sensitive data from unauthorized access. Office 365 boasts a range of DLP attributes, including the capability to identify and obstruct the sharing of sensitive data beyond the organization’s confines.
Data classification serves as an integral facet of any robust security approach. Office 365 offers an assortment of tools to facilitate organizations in categorizing their data. These tools encompass the ability to label data, classify data based on its content, and establish access controls in alignment with the data’s classification.
Organizations can fortify the security and classification of their data by leveraging the features provided by Office 365. This serves to shield data from unauthorized access and guarantees its appropriate usage.
Best Practices for Using Office 365 for Information Protection and Classification
1. Implementation of a Transparent Protocol: Implement a transparent protocol for the utilization of Office 365 in safeguarding and categorizing information. Such a protocol should encompass directives for data classification, delineation of data categorization responsibilities, and measures for data fortification.
2. Leverage the multifaceted security capabilities inherent in Office 365 to bolster data integrity. These capabilities encompass thwarting data breaches, enforcing encryption protocols, and instituting multi-factor authentication for robust safeguarding.
3. Equip personnel with comprehensive training on harnessing Office 365 for upholding information security and classification. This training should encompass data categorization, protective measures, and adept utilization of the platform’s security suite.
4. Exercise vigilant oversight over data access within Office 365. This entails scrutinizing authorized personnel, the nature of their access privileges, and the temporal aspects of data retrieval.
5. Conduct meticulous audits of data repositories within Office 365 to ascertain proper classification and protective measures. This includes meticulous examination of access rights, user privileges, and temporal data interactions.
6. Continuously refine the directives governing Office 365 usage for information protection and classification. This includes updating protocols for data categorization, delineating ownership of classification duties, and fortifying data security measures.
7. Vigilantly scrutinize adherence to policies governing Office 365’s role in information protection and classification. This involves assessing policy compliance, evaluating access privileges, and monitoring data interaction patterns.
8. Respond to Breaches: Respond quickly and effectively to any breaches of data stored in Office 365. This includes identifying the source of the breach, assessing the damage, and taking steps to prevent future breaches.
Exploring the Benefits of Office 365 for Data Protection and Classification
Safeguarding and categorizing data are pivotal facets of any enterprise’s security blueprint. As the volume of electronically stored and shared data grows, entities must diligently safeguard and appropriately categorize their data. Office 365 furnishes an extensive array of tools to aid entities in safeguarding and categorizing their data.
Office 365 furnishes an assortment of data protection features, fortifying entities’ data. These encompass encryption, data loss prevention (DLP), and multi-factor authentication. Encryption shields data by obfuscating it, rendering it exclusively accessible to authorized users. DLP enables entities to pinpoint and safeguard sensitive data, such as credit card or Social Security numbers. Multi-factor authentication bolsters security by mandating additional authentication measures, like a code delivered to a user’s mobile device or a biometric scan.
Moreover, Office 365 equips entities with tools for data classification. This approach aids in pinpointing and safeguarding sensitive data, like proprietary customer details or proprietary knowledge. Office 365 provides a range of classification tools, including labels, retention policies, and data governance. Labels allow organizations to assign categories to their data, such as “confidential” or “public.” Retention policies help organizations determine how long data should be kept and when it should be deleted. Data governance helps organizations ensure that their data is properly managed and protected.
In addition to data protection and classification, Office 365 also provides a range of other security features, such as malware protection, threat intelligence, and mobile device management. These features help organizations protect their data from malicious actors and ensure that their data is secure.
Overall, Office 365 provides a comprehensive suite of tools to help organizations protect and classify their data. By leveraging these tools, organizations can ensure that their data is secure and properly managed.
How Office 365 Can Help You Classify Your Data for Compliance
Data classification is an important part of any organization’s compliance strategy. It helps organizations identify and protect sensitive data, and ensure that it is handled in accordance with applicable laws and regulations.
Office 365 provides a range of tools and features that can help organizations classify their data for compliance. These include:
Data Loss Prevention (DLP): DLP is a feature of Office 365 that helps organizations identify, monitor, and protect sensitive data. It can be used to detect and block the unauthorized sharing of sensitive data, and to ensure that data is handled in accordance with applicable laws and regulations.
Data Governance, a crucial aspect of Office 365, empowers organizations to streamline their data management. It equips them with robust mechanisms for formulating and upholding data policies, while also enabling vigilant oversight and audit of data accessibility.
Furthermore, Data Classification, another integral facet of Office 365, assists organizations in categorizing their data based on its level of confidentiality. It furnishes them with instrumental resources for crafting and enforcing data classification protocols, alongside facilitating meticulous surveillance and review of data accessibility.
Moreover, Rights Management, an indispensable feature of Office 365, supports organizations in safeguarding their data against unauthorized intrusion. It furnishes them with essential means for establishing and enforcing data access regulations, while also enabling meticulous monitoring and audit of data accessibility.
By using these features, organizations can ensure that their data is classified and handled in accordance with applicable laws and regulations. This helps organizations protect their data, and ensure that they remain compliant with applicable laws and regulations.
How Office 365 Can Help You Protect Your Sensitive Data
Office 365 represents a formidable array of cloud-based applications, offering a compelling resource for organizations seeking to safeguard their sensitive data. Its comprehensive security features are designed to fortify data against unauthorized access, malicious assaults, and potential loss.
The platform offers a secure environment for data storage and sharing, ensuring that all information housed within Office 365 is shielded by encryption and accessible solely to approved users. Moreover, Office 365 incorporates advanced security measures such as multi-factor authentication, necessitating additional validation like a mobile device-delivered code or a biometric scan to access data, thus reinforcing the system’s defense against unauthorized entry.
Moreover, Office 365 equips organizations with an array of tools for vigilant data oversight and management. From monitoring data access and user activity to setting up alerts for detecting suspicious behavior, the platform empowers organizations to swiftly pinpoint and counter potential security risks.
Furthermore, Office 365 offers a diverse set of backup and recovery mechanisms, crucial for safeguarding data in the face of calamity. Leveraging the platform, organizations can securely back up their data to the cloud, ensuring its integrity and accessibility even in the event of local system compromise.
Overall, Office 365 provides a comprehensive set of tools to help organizations protect their sensitive data. By taking advantage of Office 365’s security features, organizations can ensure that their data is safe and secure.
Conclusion
Office 365 offers a wide array of tools for safeguarding and categorizing information. It empowers organizations to shield their data from unauthorized entry, and equips them with the capability to classify and organize data for improved handling. Through Office 365, organizations can guarantee the security and proper governance of their data, while also facilitating swift and effortless data retrieval. This renders Office 365 a prime choice for organizations seeking to fortify and oversee their data.
Download a SharePoint Online Page
I encountered an issue where I needed to download a page and upload it to a new site collection. Although this issue may not be common, if you are experiencing it, this article could be of great assistance.
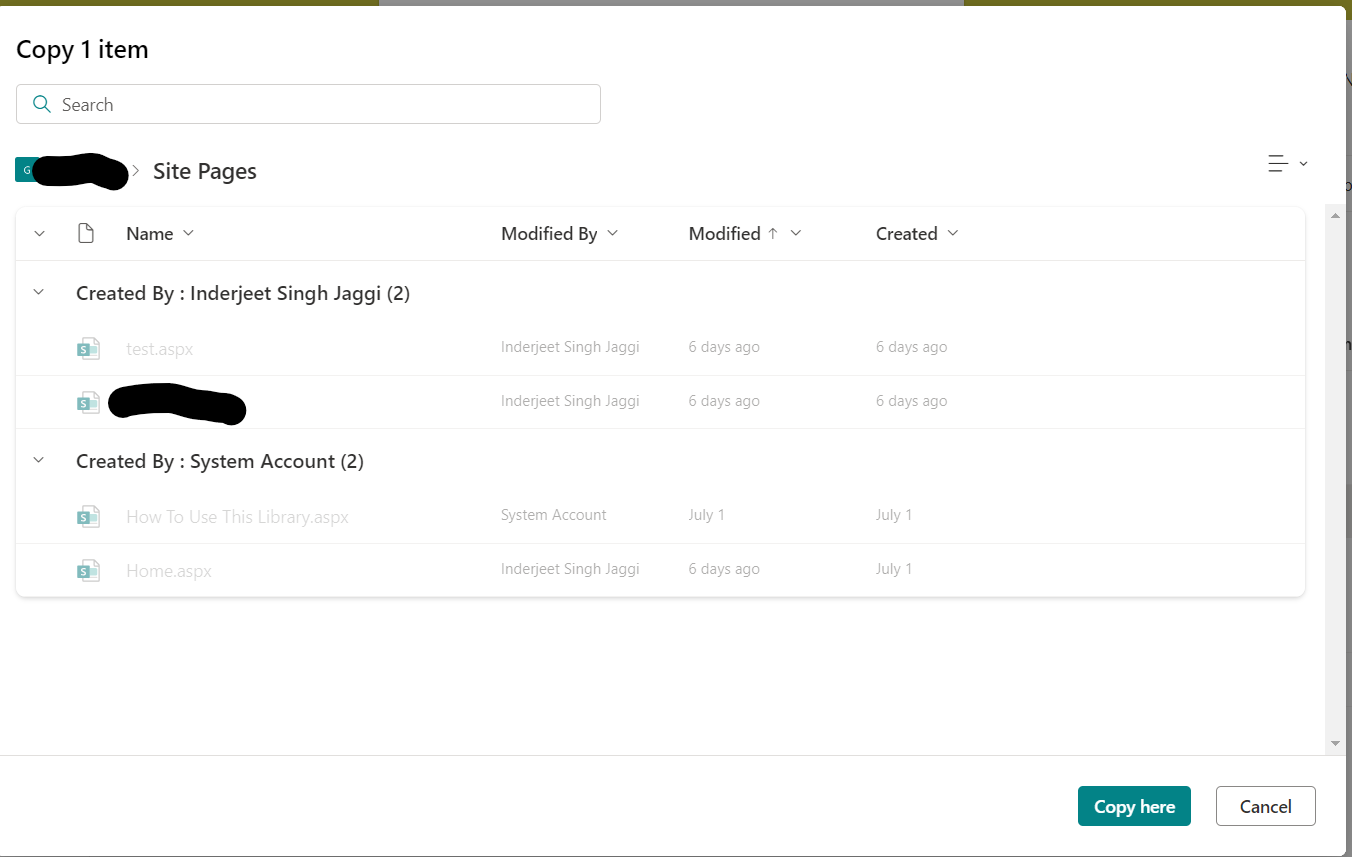
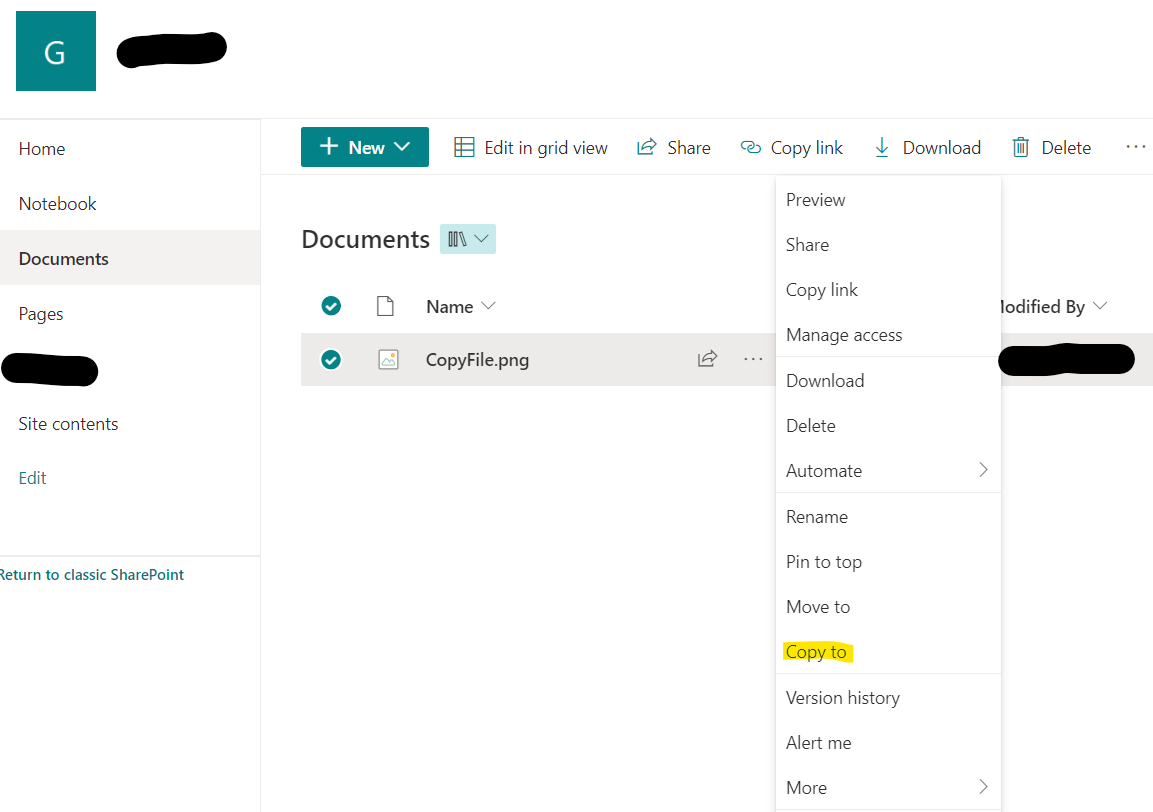
Unfortunately, SharePoint Online doesn’t allow us to copy pages from one site collection to another. However, we can copy list items and documents. If you want to copy a file or item from a document library to another, select the three dots in front of the item, then select ‘Copy to’ and choose the destination site/library. Since we are unable to do this with pages, I have found a workaround which I will share with you below.

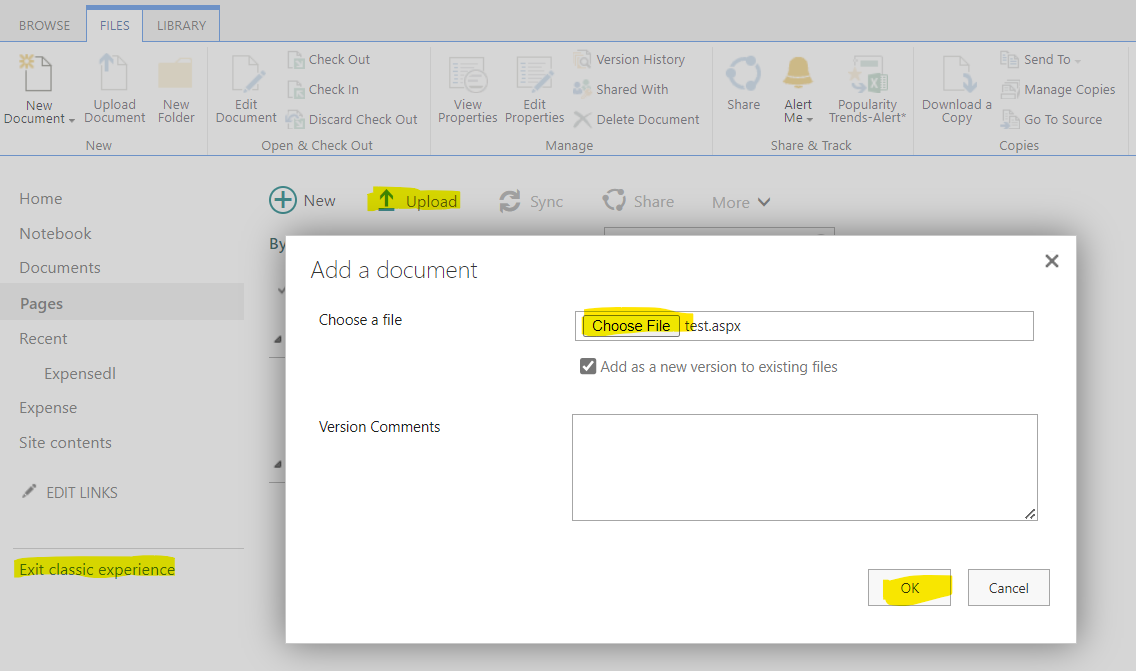
To download a SharePoint page, you can use the following URL format and the file will be downloaded: https://tenant.sharepoint.com/_layouts/download.aspx?SourceUrl=https://tenant.sharepoint.com/SitePages/test.aspx

Now you can upload this file to the destination using SharePoint classic view.
Article by: Inderjeet Singh
Cloud Architect
Golden Five Consulting