Download content from others OneDrive using Graphs API
Explained the same using my Youtube channel : https://www.youtube.com/watch?v=YG19odJN94Q
If you want to download content from other users’ OneDrive accounts, you have a few options. The simplest option is to create a OneDrive link for each user using the Office 365 Admin center. This will allow you to access and download their files through a web browser. However, this option is not very efficient if you have to do it for many users. A better option is to use an API call that can create a custom application for you. This application can download the files for multiple users at once, without requiring you to create individual links. To use this option, you need to follow these steps to get the API calls for the custom application.
Open Graphs API explorer URL : https://developer.microsoft.com/en-us/graph/graph-explorer
Sign in and give consent to Graphs explorer using the User icon on right corner of the screen

Now type the credentials of the users you want to use and give consent.

Now try to run the initial API and confirm you get OK 200 and your details in the Response View
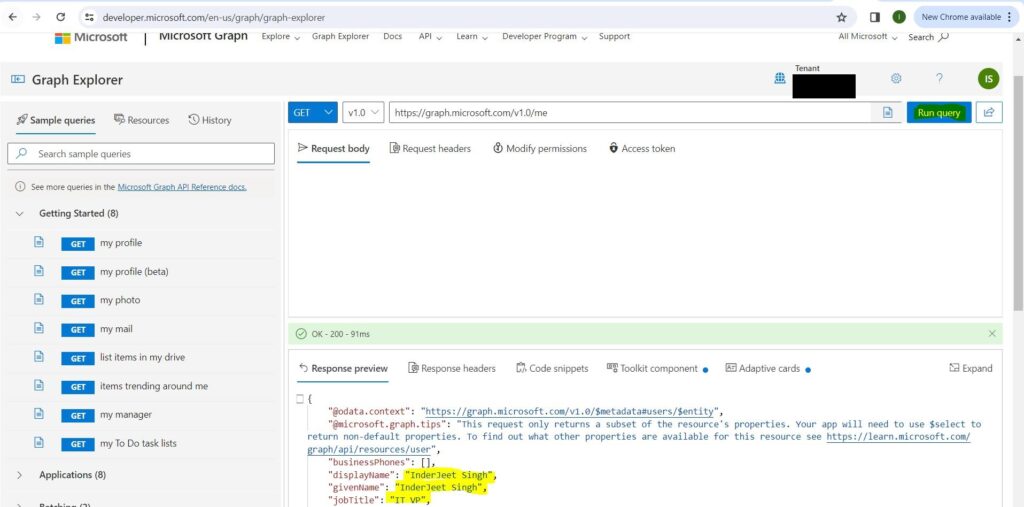
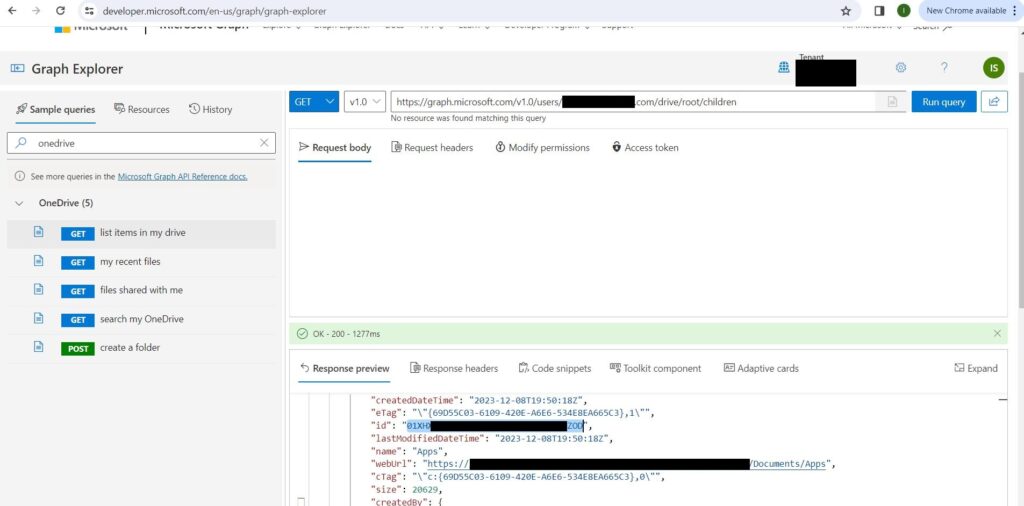
Now the 1st API URL using which you can query other users OneDrive content is https://graph.microsoft.com/v1.0/users/[email protected]/drive/root/children
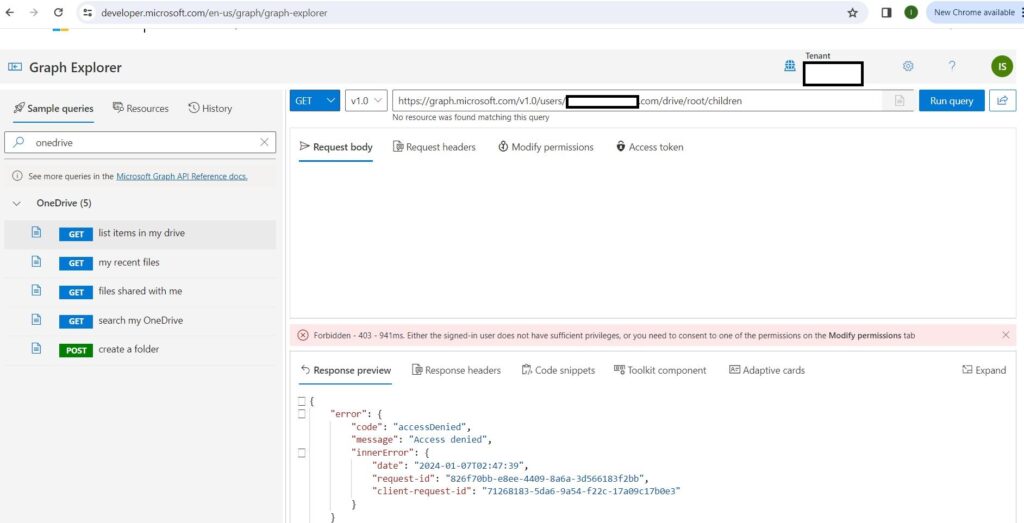
Sometimes, when you try to download content from other users’ OneDrive accounts, you may encounter an access denied error. This means that you do not have the permission to access their files. To fix this error, you need to do one of the following things:
- Make sure that you are a Global Admin for the organization. This role gives you the highest level of access to all the resources in the organization, including other users’ OneDrive accounts.
- Grant admin access to other users’ OneDrive accounts by following these steps:
- In the left pane, select Admin centers > SharePoint. (You might need to select Show all to see the list of admin centers.)
- If the classic SharePoint admin center appears, select Open it now at the top of the page to open the SharePoint admin center.
- In the left pane, select More features.
- Under User profiles, select Open.
- Under People, select Manage User Profiles.
- Enter the former employee’s name and select Find.
- Right-click the user, and then choose Manage site collection owners.
- Add the user to Site collection administrators and select OK.
This option allows you to specify which users’ OneDrive accounts you want to access, without requiring you to be a Global Admin.
After you successfully execute the above API calls, you will get a response that shows you the list of all the folders and files on the root of the other users’ OneDrive accounts. Each folder and file will have a unique ID that you can use to access its contents. To get the downloadable links for all the files in a specific folder, you need to use the following API calls:
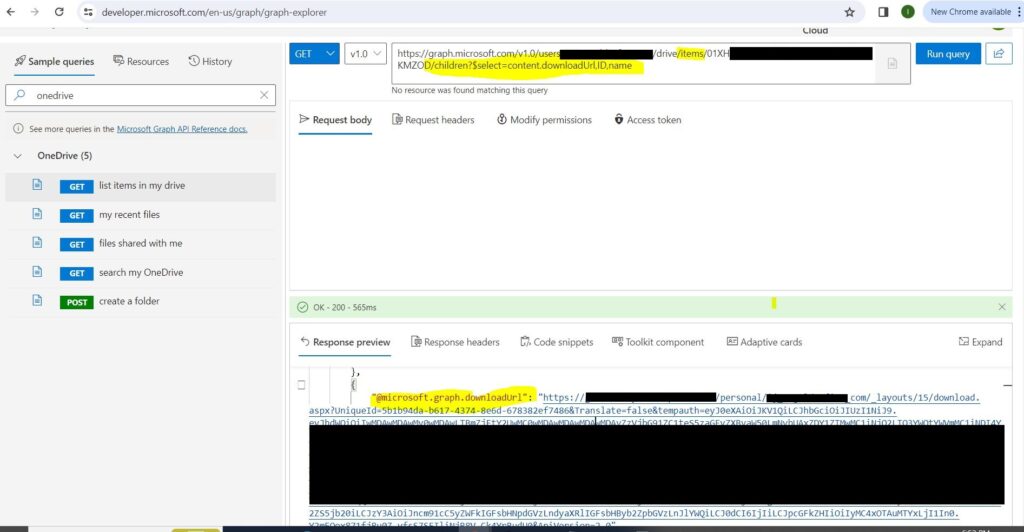
These API calls will return a response that contains the links for each file in the folder. You can download any file by clicking on its link. The file will be saved to your local device.
Office 365 get all sites with its size in GB
Explained everything in the Video : https://youtu.be/rqn1KNYKlhE
Recently I was asked to get a script or command which can get all sites in Office 365 with its size in GB. I tried to look for ways to do so but could not find anything to help with same. After some research I tried to use ChatGPT and Bard but the scripts didn’t work for me and kept getting error. Same of not working command and its error is shown below:
THIS COMMAND IS NOT WORKING
Get-SPOSite | Select Title, Url, Owner, SharingCapability, LastContentModifiedDate, @{Name=”Size (GB)”;Expression={ [math]::round ($_.length/1GB,4)}} Get-SPOSite | Select Title, Url, Owner, SharingCapability, LastContentModifiedDate, @{Name=”Size (GB)”;Expression={ [math]::round ($_.length/1GB,4)}} | Export-CSV “C:\SharePoint-Online-Sites.csv” -NoTypeInformation -Encoding UTF8
At line:1 char:115
+ ... {Name="StorageUsageCurrent (GB)";Expression={ [math]::Round ($_.Stora ...
+                                                                 ~
Unexpected token '(' in expression or statement.
At line:1 char:203
+ ... 2)}}, @{Name="StorageQuota (GB)";Expression={ [math]::Round ($_.Stora ...
+                                                                 ~
Unexpected token '(' in expression or statement.
    + CategoryInfo          : ParserError: (:) [], ParentContainsErrorRecordException
    + FullyQualifiedErrorId : UnexpectedToken

I did a lot of research and found the issue in above command and a way to get all sites with its size in GB.
THIS IS WORKING COMMAND
Get-SPOSite | Select Title, Url, Owner, SharingCapability, LastContentModifiedDate, @{Name=”Size (GB)”;Expression={ ($_.StorageUsageCurrent/1024)}}
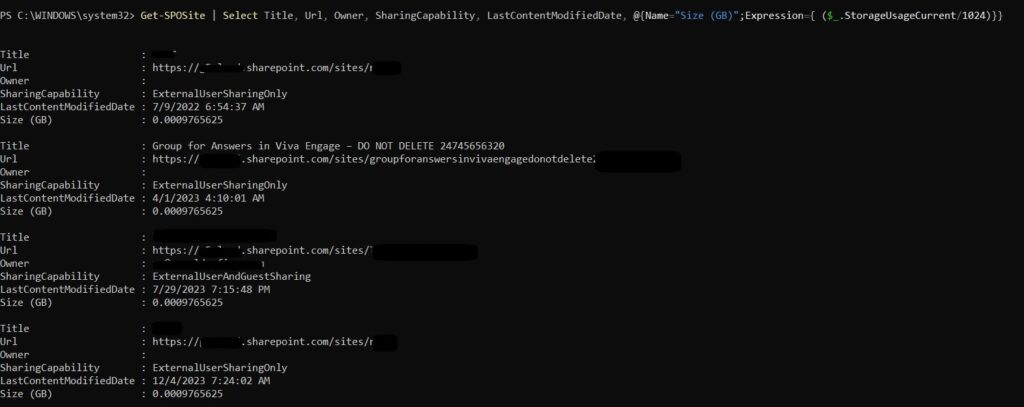
Also if you want to export the results to CSV file, use below command
Get-SPOSite | Select Title, Url, Owner, SharingCapability, LastContentModifiedDate, @{Name=”Size (GB)”;Expression={ ($_.StorageUsageCurrent/1024)}} | Export-CSV “C:\SharePoint-Online-Sites.csv” -NoTypeInformation -Encoding UTF8
You will also have to connect to your Office subscription, use below commands to do so
Install-Module -Name Microsoft.Online.SharePoint.PowerShell
Connect-SPOService -Url https://YOURTENANTNAE-admin.sharepoint.com
Note if you are using GCC or GCCHIgh, add ‘-ExchangeEnvironmentName O365UsGovGCCH’ in above ConnectSPOservice command
Estimating Physical Resources in Quantum Computing with Microsoft Azure
Resource estimation is a vital aspect in the realm of quantum computing. Microsoft Azure offers a sophisticated tool known as the Azure Quantum Resource Estimator to facilitate this critical process. Resource estimation plays a crucial role in evaluating the computational needs of quantum algorithms and optimizing computing resource usage. Leveraging the Azure Quantum Resource Estimator empowers users to gain insightful understanding of the computational demands of quantum algorithms, enabling informed decision-making about resource allocation. This tool assists in fine-tuning resource utilization, ultimately improving the efficiency and performance of quantum computing tasks.
The Importance of Resource Estimation
Quantum computing hinges on resource estimation, a vital process for gauging the requisites of executing a quantum program, encompassing qubit count, quantum circuit depth, and quantum operation tally.
Estimating these resources is crucial for several reasons:
- By treading the path of resource estimation, quantum programmers can meticulously craft efficient codes, tuning the allocation of resources, and streamlining their utilization.
- Resource estimation also elucidates the feasibility quotient pertaining to quantum operations vis-à-vis different quantum hardware, helping decipher the viability of executing specific quantum programs.
- Considering the lofty expenses endemic to quantum computing, resource estimation assumes a pivotal role in fiscal governance, furnishing an empirical basis for prognosticating the costs entailed in running quantum programs.
Using the Azure Quantum Resource Estimator
The Azure Quantum Resource Estimator is a tool provided by Microsoft Azure that helps in estimating the resources required to run a quantum program. Here’s how you can use it:
- Commencing the quantum odyssey, the initial stride involves scripting the quantum program employing Q#, an avant-garde quantum programming dialect incubated by Microsoft.
- Post-scripting, the foray into resource estimation unfurls, facilitated by the Azure Quantum Resource Estimator, which furnishes an insightful appraisal of the resources indispensable for program execution.
- Subsequently, delving into a comprehensive dissection of the resource estimation outcomes proffered by the Azure Quantum Resource Estimator allows intricate insights, paving the way for nimble program optimization.
Conclusion
Resource estimation galvanizes the bedrock of quantum computing, and with the Azure Quantum Resource Estimator as your compass, you can steer through the uncharted waters of resource quantification, birthing sagacious and cost-effective quantum algorithms.
Interacting with Azure Quantum Cloud Service
The realm of quantum computing is rapidly advancing, and Microsoft Azure stands at the vanguard of this transformative juncture. Through Azure Quantum, you have the capacity to script your quantum algorithms and execute them on bona fide quantum processors. The process unfolds as follows:
Step 1: Writing Your Quantum Programs
Firstly, you compose your quantum algorithms. This is achievable through Q#, an exclusive programming language crafted by Microsoft for articulating quantum computations. Q# is encompassed within the Quantum Development Kit (QDK), comprising an array of open-source utilities that facilitate developers in coding, assessing, and debugging quantum algorithms.
Step 2: Accessing Azure Quantum
Subsequently, upon crafting your quantum algorithms, the next strategic maneuver is to engage with Azure Quantum. This entails steering towards the Azure Quantum website using your web browser. If you don’t possess an Azure account, you’ll be obliged to create one. Once authenticated, you gain entry to the Azure Quantum service.
Step 3: Running Your Quantum Programs
Upon gaining access to Azure Quantum, you can set in motion the execution of your quantum programs on authentic quantum processors. This action entails navigating to the ‘Jobs’ segment within your designated Azure Quantum workspace. Here, you dispatch your quantum programs as jobs earmarked for enactment on the quantum hardware. You are at liberty to select from a diverse pool of quantum hardware providers, guaranteeing that you are endowed with the requisite resources to delve into the potency of quantum computing.
Step 4: Monitoring Your Jobs
Following the submission of your jobs, you are in a position to directly oversee their progression via your Azure Quantum workspace. Azure Quantum furnishes comprehensive insights into each job, encompassing its status, the quantum apparatus upon which it is being executed, and the resultant findings.
Conclusion
Interacting with Azure Quantum Cloud Service is a straightforward process. With just a browser and an Azure account, you can start exploring the exciting world of quantum computing. Whether you’re a seasoned quantum computing professional or a curious beginner, Azure Quantum provides the tools and resources you need to dive into quantum computing.
Quantum Intermediate Representation (QIR) in Azure Quantum
In the realm of quantum computing, the paramount factors are interoperability and hardware independence. Microsoft Azure Quantum attains this by leveraging Quantum Intermediate Representation (QIR), a universal language that ensures compatibility of code across various quantum hardware platforms.
Understanding QIR
Quantum Intermediate Representation (QIR) stands as a hardware-agnostic intermediary representation for quantum programs. Founded upon LLVM, an extensively utilized open-source endeavor, it furnishes a language-agnostic structure for presenting program code in a ubiquitous intermediate language.
QIR in Azure Quantum
Azure Quantum utilizes QIR to target diverse quantum machines. Consequently, developers can craft their quantum program just once and subsequently execute it across varied quantum hardware sans the need for code rewrites. This presents a notable advantage, enabling developers to concentrate on formulating their quantum algorithms without fretting over the specific intricacies of the underlying quantum hardware.
Benefits of QIR
The use of QIR in Azure Quantum has several benefits:
- Hardware Independence: Quantum Intermediate Representation (QIR) facilitates hardware independence, allowing quantum algorithms to be authored once and executed on any quantum processor compatible with QIR’s specifications.
- Interoperability: QIR fosters seamless interoperability across diverse quantum programming languages, streamlining collaboration among developers and facilitating the exchange of code.
- Optimization: QIR empowers the implementation of sophisticated optimization methodologies, enhancing the efficiency and efficacy of quantum algorithms.
Conclusion
Employing Quantum Intermediate Representation (QIR) within Azure Quantum constitutes a pivotal advancement in the realm of quantum computing. QIR guarantees seamless code compatibility across diverse quantum hardware, fostering interoperability and emancipating it from hardware constraints. Consequently, developers can channel their energy towards the quintessential task: crafting potent and efficacious quantum algorithms.
Writing Quantum Code with Microsoft Azure
The realm of quantum computing is rapidly advancing, and Microsoft Azure stands at the forefront of this unprecedented transformation. Through Azure Quantum, you have the capacity to craft your Q# program using the hosted Jupyter Notebooks within your Azure Quantum workspace.
Step 1: Accessing Azure Quantum
Initiating this process entails reaching Azure Quantum itself. This can be achieved by visiting the Azure Quantum website via your web browser. If you lack an Azure account, its creation is a requisite. Subsequently, upon logging in, entry into the Azure Quantum service becomes feasible.
Step 2: Navigating to Jupyter Notebooks
Once ensconced within Azure Quantum, the next step is to make your way to the Jupyter Notebooks segment. Embodying an open-source web application, Jupyter Notebooks provide the avenue to fabricate and disseminate documents integrating live code, equations, visualizations, and narrative text.
Step 3: Writing Your Q# Program
Upon commencing your journey within Jupyter Notebooks, you are empowered to commence crafting your Q# program. Q# stands as a specialized programming language tailored for articulating quantum algorithms. This unique language finds its purpose in conjunction with the Quantum Development Kit (QDK), an inclusive ensemble featuring the Q# programming language, quantum simulators, libraries, and an array of supplementary tools.
Step 4: Using Libraries
To keep your code high level, you can use libraries. Libraries in Q# provide reusable pieces of code that can be called from your Q# program. They include operations (the basic unit of quantum execution in Q#), functions (code that helps to process information within the quantum algorithm), and types (abstractions that are used to represent and manipulate quantum states).
Step 5: Running Your Quantum Code
After writing your Q# program, you can run it directly in the Jupyter Notebook. You can also debug and test your quantum code using the Quantum Development Kit.
Conclusion
Crafting quantum algorithms using Microsoft Azure entails a seamless and accessible procedure. Armed with solely a web browser and an Azure account, one can commence delving into the captivating realm of quantum computation. Whether one is a seasoned quantum computing expert or an inquisitive novice, Azure Quantum furnishes the requisite tools and assets to delve into the intricacies of quantum computation.
Learning Quantum Computing Concepts with Microsoft Azure
The impending quantum revolution—grounded in the abstruse principles of quantum mechanics—ushers in a transformative era. Microsoft Azure offers an extensive learning pathway to unravel the foundational tenets of quantum computing.
Understanding Quantum Computing
Quantum computing constitutes a specialized domain delving into the evolution of computing technologies, hinged upon the precepts of quantum theory. This theory elucidates the characteristics and interactions of energy and substance at the quantum level—pertaining to atomic and subatomic dimensions.
The Building Block of Quantum Computing: The Qubit
Central to quantum computing lies the qubit, which stands in stark contrast to classical bits capable of assuming a singular 0 or 1. Instead, a qubit can exist in a confluence of 0, 1, or both, concurrently, a feat attributable to the phenomenon of superposition. This property empowers quantum computers to enact a multitude of computations in tandem.
Azure Quantum and the Quantum Development Kit
Microsoft Azure has engineered Azure Quantum, an expansive and accessible cloud framework that equips users with an array of resources for delving into quantum computing. Among these resources is the Quantum Development Kit (QDK), a suite of open-source utilities enabling developers to craft, evaluate, and rectify quantum algorithms.
Q#: A Quantum Programming Language
At the core of the QDK lies Q#, a tailored programming language employed for articulating quantum algorithms. Dubbed the quantum equivalent of Python or R in the realm of classical computing, Q# facilitates the advancement of quantum computing capabilities.
Conclusion
Mastering the intricate concepts of quantum computing paves the way to wield the formidable capabilities of quantum mechanics. Microsoft Azure offers an enriching learning path that equips you with a robust groundwork in quantum computing, empowering you to craft your own quantum algorithms using Q#.
Creating and Building a Quantum Workspace with Microsoft Azure
In the ever-changing realm of quantum computing, a dedicated workspace holds paramount importance. Microsoft Azure offers a platform that allows the establishment of a high-performance hybrid Quantum compute environment within your Azure Quantum workspace, all through a simple browser.
Step 1: Accessing Azure Quantum
To begin the journey, one must first gain entry into Azure Quantum. This can be achieved by directing the browser to the Azure Quantum website. Should an individual lack an Azure account, the creation of one becomes necessary. Upon successful login, the Azure Quantum service becomes accessible.
Step 2: Creating a Quantum Workspace
Once immersed in the realm of Azure Quantum, the creation of a new Quantum Workspace beckons. This designated space stands as the hub for all quantum computational endeavors. The initiation of a new workspace entails the act of clicking on the ‘Create a resource’ tab and opting for ‘Quantum Workspace’.
Step 3: Configuring Your Workspace
Upon establishing your workspace, the next step involves its configuration, encompassing the choice of a quantum computing provider and the specification of the target quantum machine. Azure Quantum offers a diverse array of quantum hardware providers, thereby ensuring the availability of requisite tools for delving into the potential of quantum computing.
Step 4: Building Your Quantum Environment
Following the setup and configuration of your workspace, you can embark on constructing your quantum environment. This endeavor entails the composition of quantum programs utilizing Q#, a quantum programming language developed by Microsoft. The capability to craft Q# programs directly within your Azure Quantum workspace is facilitated through the utilization of hosted Jupyter Notebooks.
Step 5: Running Your Quantum Programs
Subsequent to the composition of quantum programs, you can execute them on authentic quantum computers via the Azure Quantum service. Monitoring the progression of your tasks is seamlessly achievable from within your Quantum Workspace.
Conclusion
Establishing a high-performance hybrid Quantum compute environment within your Azure Quantum workspace is a streamlined process. Armed solely with a browser and an Azure account, you can initiate an exploration of the captivating realm of quantum computing. Azure Quantum extends its provision of tools and resources, catering to both seasoned quantum computing professionals and inquisitive novices alike.
Quantum Computing and Microsoft Azure: A Revolutionary Partnership
Leveraging the enigmatic laws of quantum mechanics, quantum computing stands poised to catalyze a paradigm shift in myriad domains. Positioned at the vanguard of this transformative wave, Microsoft Azure adeptly wields the potential of quantum computing to unravel intricate quandaries and cultivate novel prospects.
Azure Quantum: The Future of Computing
Dubbed Azure Quantum, this comprehensive cloud framework, conceived by Microsoft, endeavors to democratize the advantages of quantum computing on a global scale. By amalgamating avant-garde quantum hardware, software, and solutions within a unified cloud service, Azure Quantum furnishes individuals and entities with the means to delve into and equip themselves for the epoch of scaled quantum computing, leveraging cutting-edge cloud tools and educational reservoirs.
Quantum Hardware: A Diverse Portfolio
An integral aspect of Azure Quantum encompasses its varied array of quantum hardware. This expansive collection furnishes users with an extensive arsenal to explore the profound capabilities of quantum computing.
Quantum Intermediate Representation (QIR)
Azure Quantum employs the Quantum Intermediate Representation (QIR) to adapt to diverse quantum machines. This approach ensures that code compatibility extends across different hardware platforms, enabling users to compose code once and execute it on various quantum machines.
Conclusion
The convergence of quantum computing with Microsoft Azure promises to reimagine our approach to complex problem-solving. By harnessing the principles of quantum mechanics, Azure Quantum is spearheading a future where intricate dilemmas can be swiftly resolved, thereby unveiling fresh prospects for advancement and expansion.
Blog series: Quantum Computing
I am excited to announce that I have embarked on a journey of learning about quantum computing and Q#, the quantum programming language for Azure Quantum. I will be sharing my insights and discoveries on this site, hoping to help anyone who is interested in learning about quantum computing and Q#. I have chosen Microsoft Azure as my technology partner to explore the fascinating world of quantum computing and its secrets. Let’s get started!
After doing a lot of research, I found that the best way to start learning Q# for Azure Quantum is through Quantum Katas.
The Quantum Katas are open-source, self-paced tutorials and programming exercises that teach the fundamentals of quantum computing and Q# at the same time. Each kata covers a core concept of quantum computing, ranging from the basics to more advanced quantum algorithms and protocols.
https://learn.microsoft.com/en-us/azure/quantum/tutorial-qdk-intro-to-katas
Lets start with Katas Online by browsing. below link
https://quantum.microsoft.com/en-us/experience/quantum-katas
I will talk more about it in my next article
