Difference between Beta/me/profile and v1.0/me
Also explained in my Youtube video: https://www.youtube.com/watch?v=_XKrZvCIG98
The difference between the two endpoints is that https://graph.microsoft.com/beta/me/profile is in the beta version of the Microsoft Graph API, while https://graph.microsoft.com/v1.0/me is in the v1.0 version of the API . The beta version is used for testing new features and is not recommended for production use. The v1.0 version is the stable version of the API and is recommended for production use.
The https://graph.microsoft.com/beta/me/profile endpoint is used to retrieve information about a given user or yourself, such as the user’s profile information, interests, languages, skills, and more. To call this API, your app needs the appropriate permissions, such as User.Read.
On the other hand, the https://graph.microsoft.com/v1.0/me endpoint is used to retrieve information about the signed-in user, such as the user’s display name, email address, job title, and more. To call this API, your app needs the appropriate permissions, such as User.Read.
Administering Office 365 for your organization
“Office 365: Empower Your Organization with Confident Administration!”
Introduction
Step into the realm of Office 365! As an administrator, the imperative task of managing and overseeing Office 365 for your organization rests squarely on your shoulders. This comprehensive guide is the compass to steer you through the initial steps of Office 365 deployment, guaranteeing its meticulous configuration and sustained upkeep for your organization. You’ll delve into the diverse facets of Office 365, mastering the art of user setup and management alongside adept issue troubleshooting. Moreover, you’ll unravel the realm of security features inherent to Office 365, ensuring watertight protection of your organization’s data. Upon concluding this guide, you’ll possess a profound comprehension of how to expertly administer Office 365 for your organization.
How to Monitor Office 365 Usage in Your Organization
Monitoring the utilization of Office 365 within an organization is a critical component in upholding its efficient and secure operation. Understanding the manner in which the system is utilized, identifying the users involved, and ascertaining the nature of data access are pivotal. This article will furnish an overview of measures that organizations can implement to monitor Office 365 usage effectively.
1. Formulate a Comprehensive Monitoring Plan: The initial stride in monitoring Office 365 usage encompasses the formulation of a meticulous monitoring plan. This plan should encompass the categories of data slated for surveillance, the periodicity of monitoring activities, and the methodologies for data collection and analysis.
2. Surveillance of User Activity: It is imperative for organizations to closely monitor user activity to preclude unauthorized data access. This involves vigilance over user logins, file access, and related activities.
3. Oversight of Data Access: Apart from monitoring user activity, organizations ought to uphold vigilant surveillance over data access to forestall unauthorized entry to sensitive information. This vigilance extends to scrutinizing user logins, file access, and relevant activities.
4. Vigilance over Network Traffic: Ensuring that only authorized users access the system warrants vigilant oversight of network traffic. This takes the form of monitoring user logins, file access, and other related activities.
5. Surveillance of System Performance: Organizations need to monitor system performance to guarantee its efficient and secure operation. This monitoring encompasses metrics such as response time, uptime, and resource utilization.
6. Emphasis on Security Surveillance: Maintaining a watchful eye on security is crucial to guard the system against external threats. This extends to monitoring user logins, file access, and other relevant activities.
By following these diligent measures, organizations can ensure effective monitoring of their Office 365 usage, thus fortifying the system’s efficient and secure usage. Effective monitoring of Office 365 usage is indispensable in ensuring its proper usage and secure data access.
Strategies for Securing Office 365
Office 365, a robust suite of cloud-based tools, holds the potential to enhance productivity and foster collaboration across businesses of varying scales. Nevertheless, the escalating reliance on cloud applications amplifies the vulnerability to data breaches and other security menaces. Safeguarding the integrity of Office 365 necessitates the implementation of the following measures:
1. Integrate Multi-Factor Authentication: Multi-factor authentication, or MFA, serves as a stringent layer of security by necessitating users to furnish at least two forms of verification to confirm their identity. These may encompass something known only to the user, such as a password, something physically possessed, like a smartphone or security token, or biometric factors like a fingerprint. The implementation of MFA within Office 365 fortifies defenses against unauthorized account access.
2. Employ Encryption Techniques: Encryption, a method of encoding data to allow access solely to authorized parties, presents a crucial safeguard. Office 365 provides assorted encryption mechanisms, comprising data encryption at rest, encryption during transit, and email encryption. This fortification serves to shield data from unauthorized entry, thus guaranteeing that sensitive information is exclusively accessible to authorized personnel.
3. Vigilantly Monitor User Activity: Diligent scrutiny of user actions aids in the identification of suspicious behavior and potential security risks. Office 365 incorporates various monitoring tools, including audit logs, activity reports, and alerts, empowering organizations to pinpoint potential security vulnerabilities and proactively counteract them, further fortifying their data.
4. Provide Comprehensive Employee Training: Educating staff members on security best practices assumes paramount importance in safeguarding Office 365. Employees should receive training on detecting phishing attempts, creating robust passwords, and utilizing Office 365 in a secure manner.
By undertaking these initiatives, businesses can bolster the security posture of their Office 365 ecosystem, mitigating the likelihood of unauthorized data breaches.
Tips for Troubleshooting Office 365 Issues
1. Monitoring the Service Health Dashboard is essential for addressing any Office 365 issues. This real-time resource offers insights into the status of Office 365 services and any ongoing problems or disruptions.
2. Utilizing the Office 365 Admin Center is crucial for troubleshooting Office 365 issues. This centralized hub grants access to comprehensive service status details and diagnostic tools for effective issue resolution.
3. Leveraging the Office 365 Support Site is pivotal for resolving Office 365 issues. It furnishes intricate insights into prevalent issues and effective resolution strategies.
4. Engaging with the Office 365 Community Forum is instrumental for tackling Office 365 issues. This platform facilitates collaborative problem-solving through user queries and input from both peers and Microsoft support personnel.
5. Contact Microsoft Support: If you are unable to resolve the issue on your own, you can contact Microsoft Support for assistance. Microsoft Support can provide additional information and help you troubleshoot the issue.
Best Practices for Administering Office 365
1. The essential foundation for effective Office 365 administration rests upon the establishment of a robust governance plan. Such a plan encompasses delineating roles, responsibilities, robust policies and procedures, as well as a well-structured communication framework.
2. Vigilant monitoring of user activity is imperative to uphold adherence to established protocols. This oversight can be efficiently carried out through the Office 365 Security & Compliance Center.
3. The meticulous management of user access constitutes a pivotal aspect in guaranteeing that the Office 365 ecosystem remains accessible solely to authorized personnel. This task can be executed through the Office 365 Admin Center.
4. The diligent monitoring of security measures is vital in fortifying the integrity of the Office 365 environment against potential threats. This surveillance can be effectuated through the Office 365 Security & Compliance Center.
5. Efficient management of updates stands as a linchpin in ensuring the perpetual currency of the Office 365 environment. This endeavor can be facilitated through the Office 365 Admin Center.
6. The meticulous scrutiny of performance metrics is paramount in guaranteeing the optimal functioning of the Office 365 environment. This meticulous task can be seamlessly accomplished through the Office 365 Admin Center.
7. Safeguarding data through systematic backups stands as a critical measure to avert data loss in the event of outages or unforeseen complications. This imperative can be fulfilled through the Office 365 Admin Center.
8. Equipping users with comprehensive training resources is indispensable in fostering familiarity and adept utilization of the Office 365 environment. This pivotal effort can be channeled through the Office 365 Training Center.
9. The vigilant monitoring of compliance obligations is pivotal in ensuring that the Office 365 environment adheres scrupulously to pertinent laws and regulations. This keen oversight is feasible through the Office 365 Security & Compliance Center.
10. Monitoring the judicious usage of resources is pivotal in ensuring that the Office 365 environment operates with maximum efficiency and effectiveness. This vigilance can be sustained through the Office 365 Admin Center.
How to Set Up Office 365 for Your Organization
Establishing Office 365 for your organization may seem overwhelming at first. However, with proper preparation and direction, it can unfold as a seamless and triumphant endeavor. This guide will provide you with the steps necessary to get your organization up and running with Office 365.
1. Select the appropriate Office 365 plan. The platform provides an array of plans tailored to accommodate diverse organizational requirements. Factor in your organization’s size, necessary features, and budget constraints when determining the most suitable plan.
2. Configure your domain. Procuring a domain name for your organization and aligning it with Office 365 is imperative. This process encompasses configuring DNS records and validating your domain with Microsoft.
3. Create user accounts. Once your domain is set up, you can create user accounts for each of your employees. This will involve assigning licenses to each user and setting up their passwords.
4. Configure email. You will need to configure your email settings to ensure that emails sent from Office 365 are delivered to the correct recipients. This will involve setting up mail routing, SMTP settings, and SPF records.
5. Once your users have been provisioned, it is imperative to initiate the installation of the requisite Office applications. This task can be accomplished either through the Office 365 portal or by procuring the applications directly from Microsoft.
6. Subsequently, securing your organization’s data becomes paramount. This necessitates the establishment of robust security policies and procedures encompassing multi-factor authentication, data encryption, and other pertinent security measures.
Compliance with these imperative steps is pivotal in facilitating the expeditious and secure integration of Office 365 within your organization. Through meticulous planning and adept guidance, the seamless implementation of Office 365 can be swiftly actualized.
Conclusion
Managing Office 365 for your company can significantly enhance efficiency and teamwork, while also delivering a secure and dependable framework for your business operations. Equipped with the appropriate tools and support, you can guarantee that your organization optimally leverages the functionalities and advantages of Office 365. By delving into the intricacies and potential of Office 365, you can secure maximum benefits for your organization.
PowerShell to Add a user as admin on all site collections in SharePoint online
Also explained in my Youtube Video : https://youtu.be/icx_m15UIMg
You can modify this script to add these users as a member of visitor to all Site collections.
Connect to SharePoint Online
Connect-SPOService -Url https://contoso-admin.sharepoint.com
Get all site collections
$siteCollections = Get-SPOSite -Limit All
Loop through each site collection and add the user as an admin
foreach ($siteCollection in $siteCollections) {
Set-SPOUser -Site $siteCollection.Url -LoginName “[email protected]” -IsSiteCollectionAdmin $true
}
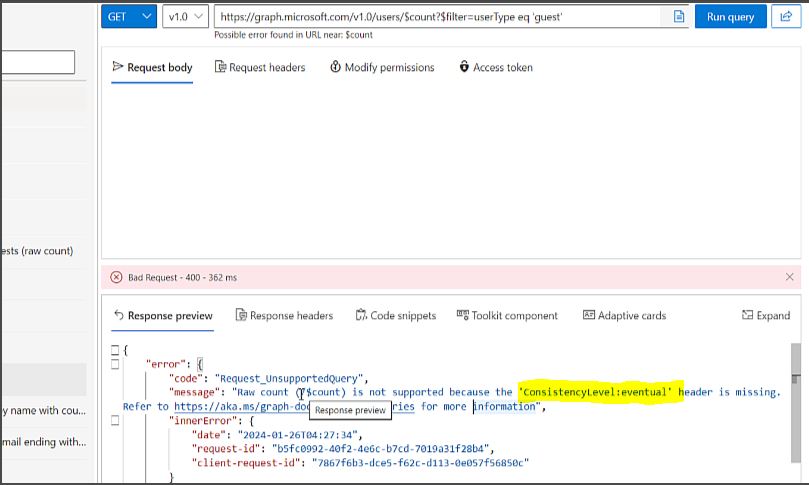
ConsistencyLevel:eventualError when using graphs API ‘count the guest users in your organization’
Read Microsoft Teams messages using Graphs API
Explained the same in Youtube Video : https://youtu.be/Uez9QrBNNS0
So today I had a requirement to create a custom app where I can read all MS teams message and use AI to reply to the team’s messages.
The 1st thing we need is to get read all Messages in Microsoft Teams using a Graphs API. I tried to look for option and finally got a Teams Beta API named ‘messages (Without replies) in a channel’ but it needs GroupID and ChannelID to read to the messages.
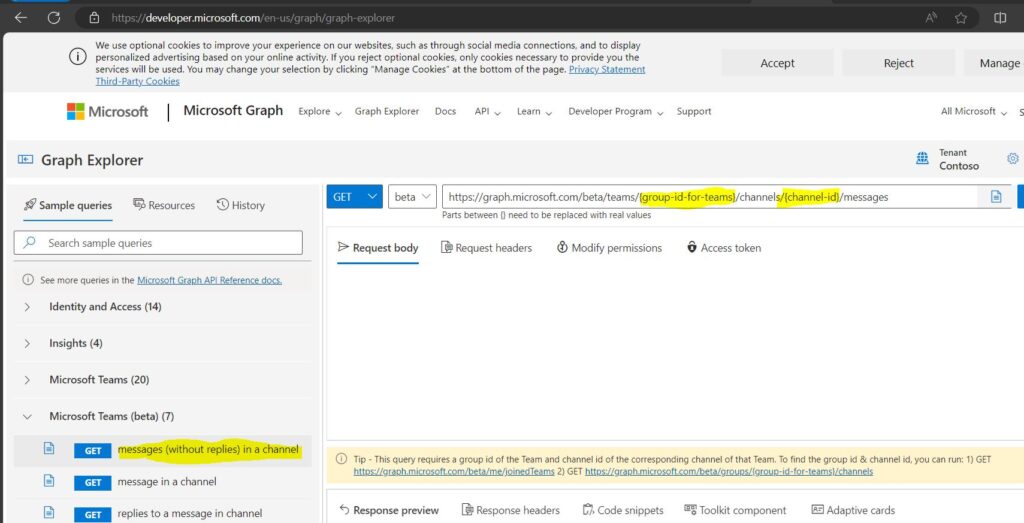
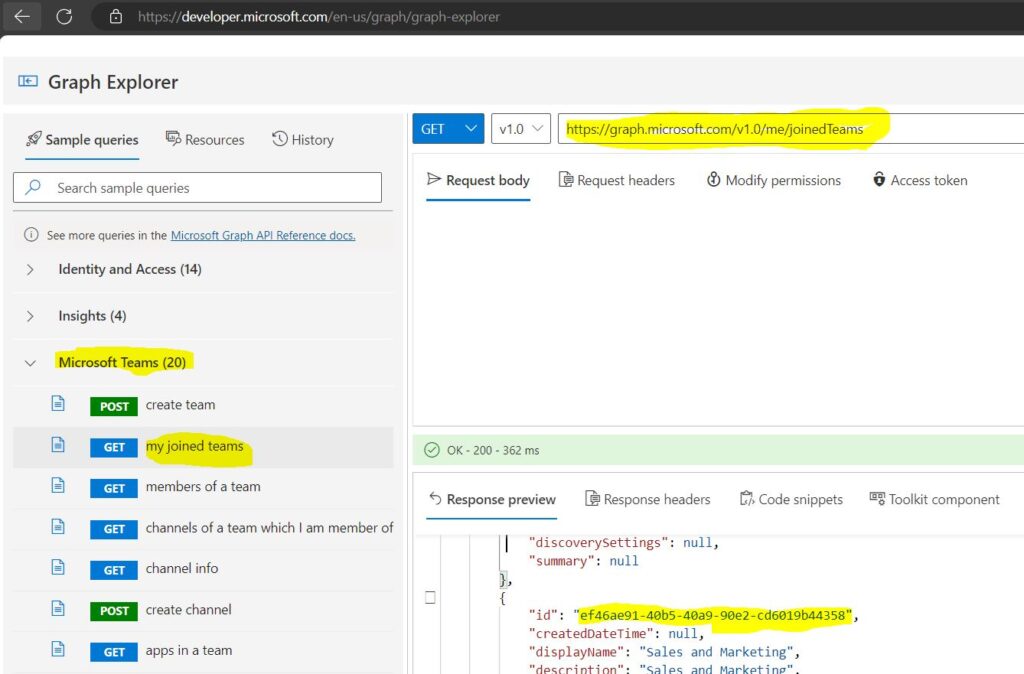
So I ran below Graphs API to get all the Teams I am members of, here we will get the name and the ID of the Teams group as well.
https://graph.microsoft.com/v1.0/me/joinedTeams
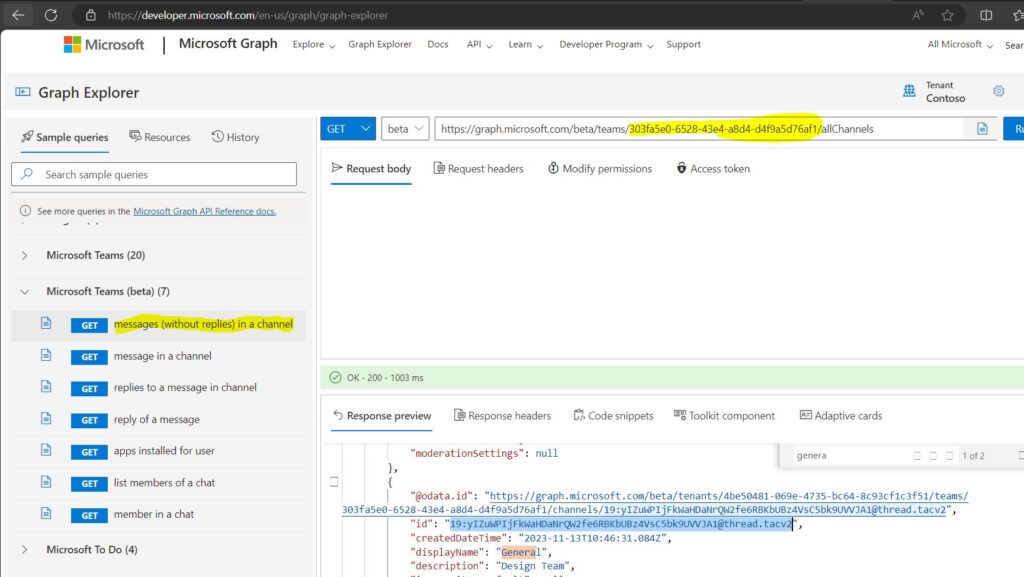
Now we need to use the Group ID in below graphs query to get allchannels in that teams group.
https://graph.microsoft.com/beta/teams/{group-id-for-teams}/Allchannels/
Finally when we have both the Group ID and ChannelID, we will use below graphs API to get all the messages in the ChannelID.
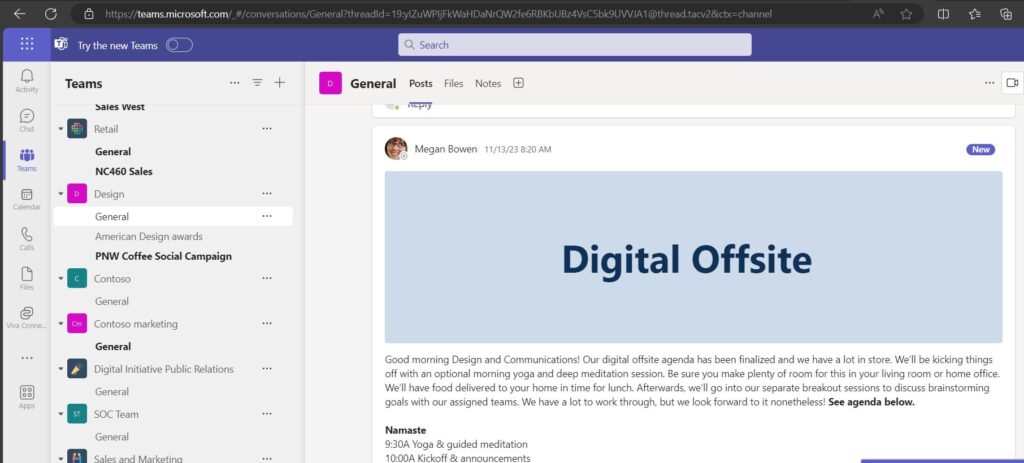
Note: I am only able to see all the unread messages.
https://graph.microsoft.com/beta/teams/{group-id-for-teams}/channels/{channel-id}/messages
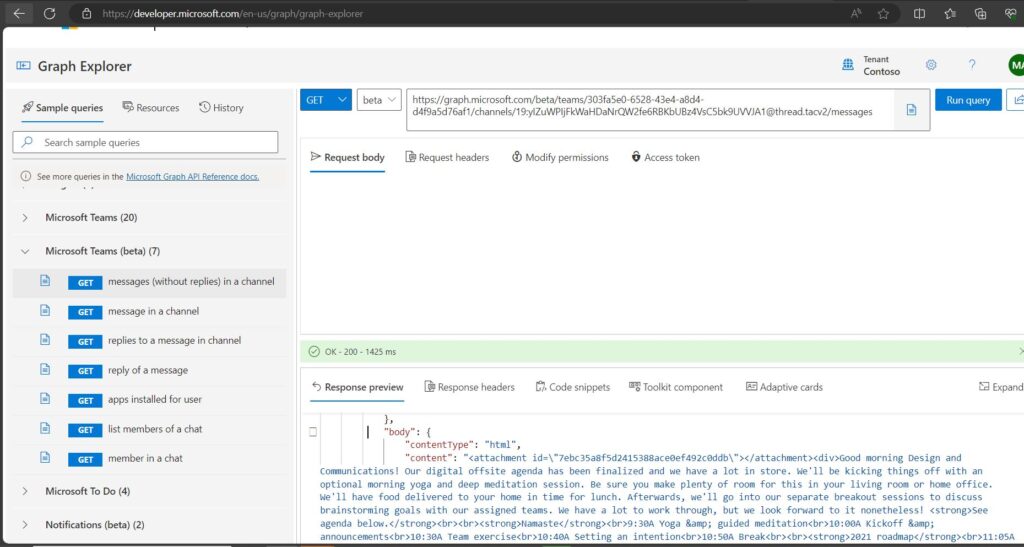
Below I am able to see all the same messages using GUI in teams
Ways to add an item to SharePoint lists
Explained the same in Youtube Video : https://youtu.be/xioKl4KrlLo
To use Graph API to add content to a SharePoint list, you need to have the appropriate permissions, the site ID, the list ID, and the JSON representation of the list item you want to create. You can use the following HTTP request to create a new list item:
POST https://graph.microsoft.com/v1.0/sites/{site-id}/lists/{list-id}/items
Content-Type: application/json

{
  "fields": {
    // your list item properties
  }
}

To get site ID, use below URL
https://TenantName.sharepoint.com/sites/SiteName/_api/site

Here at the ID after HUBSiteID tag is actually your Site ID as shown below.
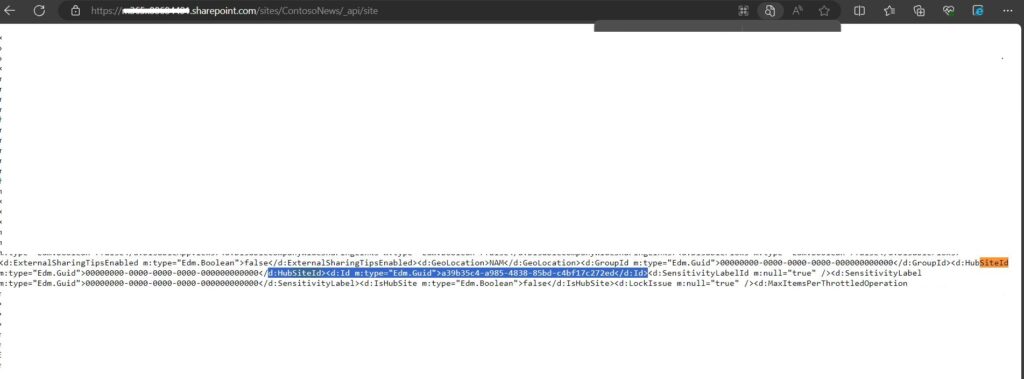
For example, if you want to create a list item with the title “Item2”, the color “Pink”, and the Number 1, you can use this JSON body:
{
  "fields": {
    "Title": "Item2",
    "Color": "Pink",
    "Number": 1
  }
}
If the request is successful, you will get a response with the created list item and its properties.
You can also use the Graph SDKs to simplify the process of creating list items in different programming languages. For example, here is how you can create a list item in C# using the Microsoft Graph SDK:
using Microsoft.Graph;
using Microsoft.Identity.Client;

// Create a public client application
var app = PublicClientApplicationBuilder.Create(clientId)
    .WithAuthority(authority)
    .Build();

// Get the access token
var result = await app.AcquireTokenInteractive(scopes)
    .ExecuteAsync();

// Create a Graph client
var graphClient = new GraphServiceClient(
    new DelegateAuthenticationProvider((requestMessage) =>
    {
        requestMessage
            .Headers
            .Authorization = new AuthenticationHeaderValue("bearer", result.AccessToken);

        return Task.CompletedTask;
    }));

// Create a dictionary of fields for the list item
var fields = new FieldValueSet
{
    AdditionalData = new Dictionary<string, object>()
    {
        {"Title", "Item"},
        {"Color", "Pink"},
        {"Number", 1}
    }
};

// Create the list item
var listItem = await graphClient.Sites[siteId].Lists[listId].Items
    .Request()
    .AddAsync(fields);
Import-Module : Function Remove-MgSiteTermStoreSetParentGroupSetTermRelation cannot be created because function capacity 4096 has been exceeded for this scope
Explained everything in the Video : https://youtu.be/7-btaMI6wJI
Today I got below error when I tried to import my Graphs module to Powershell (Import-Module Microsoft.Graph)
Import-Module : Function Remove-MgSiteTermStoreSetParentGroupSetTermRelation cannot be created because function capacity 4096 has been exceeded for this scope.
At line:1 char:1
+ Import-Module Microsoft.Graph
+ ~~~~~~~~~~~~~~~~~~~~~~~~~~~~~
    + CategoryInfo          : InvalidOperation: (Remove-MgSiteTe...SetTermRelation:String) [Import-Module], SessionSta
   teOverflowException
    + FullyQualifiedErrorId : FunctionOverflow,Microsoft.PowerShell.Commands.ImportModuleCommand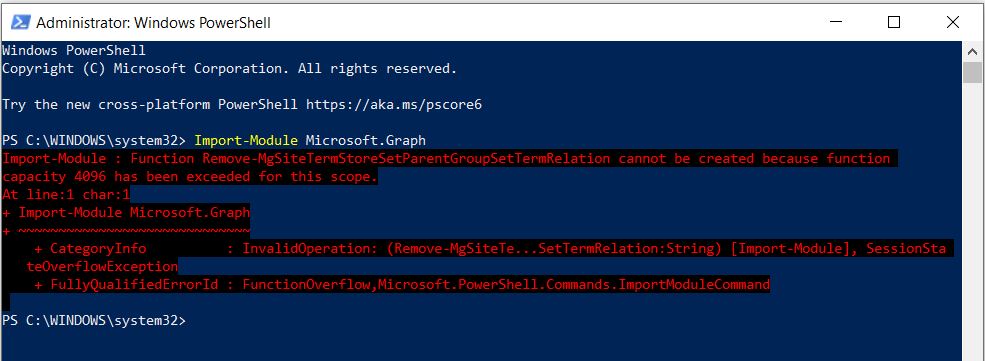
After lot of research I identified that this is a known issue that occurs when importing Microsoft.Graph module in PowerShell 5.1, because the module has more than 4096 functions and PowerShell 5.1 has a limit on the number of functions that can be created in a scope.
There are some possible workarounds that you can try to resolve this error:
- Upgrade to PowerShell 7+ or latest as the runtime version (highly recommended). PowerShell 7+ does not have the function capacity limit and can import the module without any errors.
- Set $maximumfunctioncount variable to its max value, 32768, before importing the module. This will increase the function capacity limit for your scope, but it may not be enough if you have other modules loaded or if the Microsoft.Graph module adds more functions in the future.
To check all Maximum value set in PowerShell
gv Max*Count
To set the Maximum Function Count
$MaximumFunctionCount = 8096
I hope this helps you understand how to fix the error and import the Microsoft.Graph module successfully.
Classic application insights will be retired on 29 February 2024—migrate to workspace-based application insights
I recently got a email which says ‘Classic application insights will be retired on 29 February 2024—migrate to workspace-based application insights’.
Further it adds, classic application insights in Azure Monitor will be retired and you’ll need to migrate your resources to workspace-based application insights by that date.
Now if we move to Workspace-based application insights, it will offer improved functionality such as:
- Continuous export of app logs via diagnostic settings.
- The ability to collect data from multiple resources in a single Azure Monitor log analytics workspace.
- Enhanced encryption and optimization with a dedicated cluster.
- New options to reduce costs.
Now let’s logon to Azure and check what it means and how to migrate to workspace-based application insights.
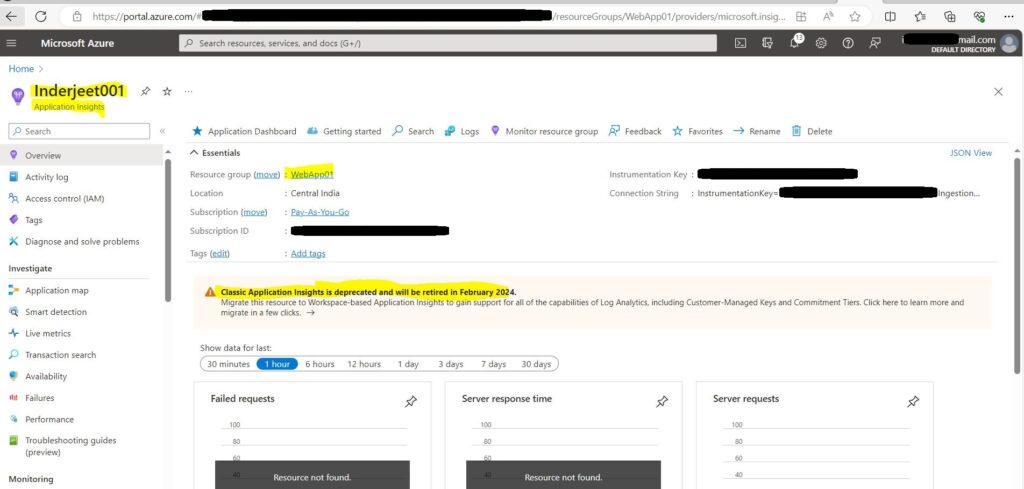
Access the Application Insights and then click on ‘Classic Application Insights is deprecated and will be retired in February 2024. Migrate this resource to Workspace-based Application Insights to gain support for all of the capabilities of Log Analytics, including Customer-Managed Keys and Commitment Tiers. Click here to learn more and migrate in a few clicks’.
Now you will see the Subscription and the new Log Analytics Workspace getting created. Just click Apply at bottom of screen.
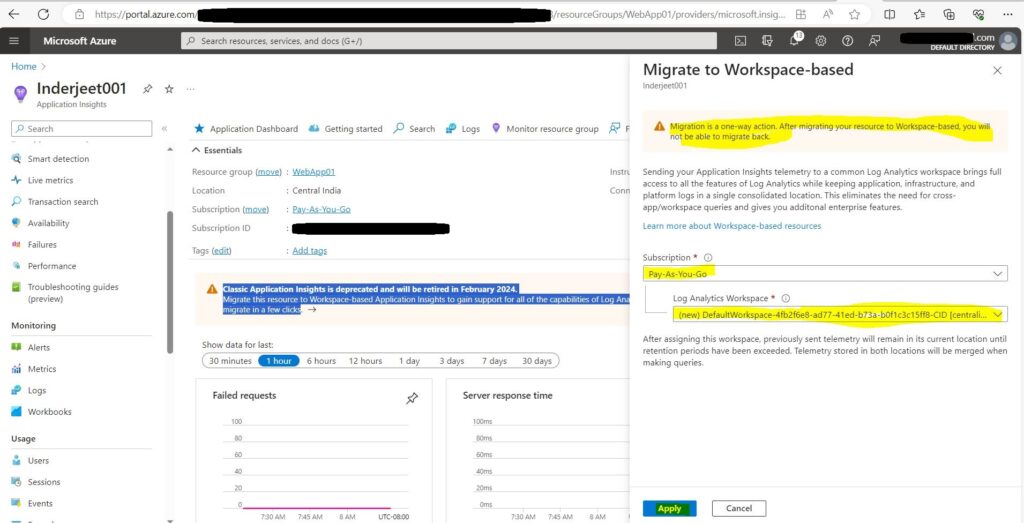
Once done, you will see the new workspace created and all the content of classic application.
You can also watch the whole process in my Youtube Video
https://www.youtube.com/watch?v=gvQp_33ezqg
Get duplicate files in all SharePoint site using file HASH
Explained everything in the Video : https://youtu.be/WHk2tIav-sQ
The task was to find a way to identify all duplicate files in all SharePoint sites. I searched online for a solution, but none of the scripts I found were accurate. They used different criteria to detect duplicates, such as Name, modified date, size, etc.
After extensive research, I developed the following script that can generate a hash for each file on the SharePoint sites. The hash is a unique identifier that cannot be the same for two files, even if they differ by a single character.
If you want to do the same for only one SharePoint site, you can use below link: Get duplicate files in SharePoint site using file HASH. (itfreesupport.com)
I hope this script will be useful for many people.
Register a new Azure AD Application and Grant Access to the tenant
Register-PnPManagementShellAccess
Then paste and run below pnp script:
Parameters
$TenantURL = “https://tenant-admin.sharepoint.com”
$Pagesize = 2000
$ReportOutput = “C:\Temp\DupSitename.csv”
Connect to SharePoint Online tenant
Connect-PnPOnline $TenantURL -Interactive
Connect-SPOService $TenantURL
Array to store results
$DataCollection = @()
Get all site collections
$SiteCollections = Get-SPOSite -Limit All -Filter “Url -like ‘/sites/‘”
Iterate through each site collection
ForEach ($Site in $SiteCollections)
{
#Get the site URL
$SiteURL = $Site.Url
#Connect to SharePoint Online site
Connect-PnPOnline $SiteURL -Interactive

#Get all Document libraries
$DocumentLibraries = Get-PnPList | Where-Object {$_.BaseType -eq "DocumentLibrary" -and $_.Hidden -eq $false -and $_.ItemCount -gt 0 -and $_.Title -Notin ("Site Pages","Style Library", "Preservation Hold Library")}

#Iterate through each document library
ForEach ($Library in $DocumentLibraries)
{
    #Get All documents from the library
    $global:counter = 0;
    $Documents = Get-PnPListItem -List $Library -PageSize $Pagesize -Fields ID, File_x0020_Type -ScriptBlock `
    { Param ($items) $global:counter += $items.Count; Write-Progress -PercentComplete ($global:Counter / ($Library.ItemCount) * 100) -Activity `
    "Getting Documents from Library '$($Library.Title)'" -Status "Getting Documents data $global:Counter of $($Library.ItemCount)";} | Where {$_.FileSystemObjectType -eq "File"}
    $ItemCounter = 0

    #Iterate through each document
    Foreach ($Document in $Documents)
    {
        #Get the File from Item
        $File = Get-PnPProperty -ClientObject $Document -Property File

        #Get The File Hash
        $Bytes = $File.OpenBinaryStream()
        Invoke-PnPQuery
        $MD5 = New-Object -TypeName System.Security.Cryptography.MD5CryptoServiceProvider
        $HashCode = [System.BitConverter]::ToString($MD5.ComputeHash($Bytes.Value))

        #Collect data
        $Data = New-Object PSObject
        $Data | Add-Member -MemberType NoteProperty -name "FileName" -value $File.Name
        $Data | Add-Member -MemberType NoteProperty -Name "HashCode" -value $HashCode
        $Data | Add-Member -MemberType NoteProperty -Name "URL" -value $File.ServerRelativeUrl
        $Data | Add-Member -MemberType NoteProperty -Name "FileSize" -value $File.Length
    $DataCollection += $Data
    $ItemCounter++
    Write-Progress -PercentComplete ($ItemCounter / ($Library.ItemCount) * 100) -Activity "Collecting data from Documents $ItemCounter of $($Library.ItemCount) from $($Library.Title)" `
    -Status "Reading Data from Document '$($Document['FileLeafRef']) at '$($Document['FileRef'])"
}
}
}
Get Duplicate Files by Grouping Hash code
$Duplicates = $DataCollection | Group-Object -Property HashCode | Where {$_.Count -gt 1} | Select -ExpandProperty Group
Write-host “Duplicate Files Based on File Hashcode:”
$Duplicates | Format-table -AutoSize
Export the duplicates results to CSV
$Duplicates | Export-Csv -Path $ReportOutput -NoTypeInformation
Get duplicate files in SharePoint site using file HASH
Explained everything in the Video : https://youtu.be/WHk2tIav-sQ
The task was to find a way to identify all duplicate files in a SharePoint site. I searched online for a solution, but none of the scripts I found were accurate. They used different criteria to detect duplicates, such as Name, modified date, size, etc.
After extensive research, I developed the following script that can generate a hash for each file on the SharePoint sites. The hash is a unique identifier that cannot be the same for two files, even if they differ by a single character.
If you want to do the same for all SharePoint sites, you can use below link:
Get duplicate files in all SharePoint site using file HASH. (itfreesupport.com)
I hope this script will be useful for many people.
Register a new Azure AD Application and Grant Access to the tenant
Register-PnPManagementShellAccess
Then paste and run below pnp script:
$SiteURL = “https://tenant.sharepoint.com/sites/sitename”
$Pagesize = 2000
$ReportOutput = “C:\Temp\DupSitename.csv”
Connect to SharePoint Online site
Connect-PnPOnline $SiteURL -Interactive
Array to store results
$DataCollection = @()
Get all Document libraries
$DocumentLibraries = Get-PnPList | Where-Object {$_.BaseType -eq “DocumentLibrary” -and $_.Hidden -eq $false -and $_.ItemCount -gt 0 -and $_.Title -Notin (“Site Pages”,”Style Library”, “Preservation Hold Library”)}
Iterate through each document library
ForEach ($Library in $DocumentLibraries)
{
#Get All documents from the library
$global:counter = 0;
$Documents = Get-PnPListItem -List $Library -PageSize $Pagesize -Fields ID, File_x0020_Type -ScriptBlock { Param ($items) $global:counter += $items.Count; Write-Progress -PercentComplete ($global:Counter / ($Library.ItemCount) * 100) -Activity
“Getting Documents from Library ‘$($Library.Title)'” -Status “Getting Documents data $global:Counter of $($Library.ItemCount)”;} | Where {$_.FileSystemObjectType -eq “File”}
$ItemCounter = 0
#Iterate through each document
Foreach ($Document in $Documents)
{
    #Get the File from Item
    $File = Get-PnPProperty -ClientObject $Document -Property File

    #Get The File Hash
    $Bytes = $File.OpenBinaryStream()
    Invoke-PnPQuery
    $MD5 = New-Object -TypeName System.Security.Cryptography.MD5CryptoServiceProvider
    $HashCode = [System.BitConverter]::ToString($MD5.ComputeHash($Bytes.Value))

    #Collect data
    $Data = New-Object PSObject
    $Data | Add-Member -MemberType NoteProperty -name "FileName" -value $File.Name
    $Data | Add-Member -MemberType NoteProperty -Name "HashCode" -value $HashCode
    $Data | Add-Member -MemberType NoteProperty -Name "URL" -value $File.ServerRelativeUrl
    $Data | Add-Member -MemberType NoteProperty -Name "FileSize" -value $File.Length
    $DataCollection += $Data
    $ItemCounter++
    Write-Progress -PercentComplete ($ItemCounter / ($Library.ItemCount) * 100) -Activity "Collecting data from Documents $ItemCounter of $($Library.ItemCount) from $($Library.Title)" `
    -Status "Reading Data from Document '$($Document['FileLeafRef']) at '$($Document['FileRef'])"
}
}
Get Duplicate Files by Grouping Hash code
$Duplicates = $DataCollection | Group-Object -Property HashCode | Where {$_.Count -gt 1} | Select -ExpandProperty Group
Write-host “Duplicate Files Based on File Hashcode:”
$Duplicates | Format-table -AutoSize
Export the duplicates results to CSV
$Duplicates | Export-Csv -Path $ReportOutput -NoTypeInformation

