Archive for the ‘Office 365’ Category
Using Office 365 for eDiscovery and legal holds
“Unleash the Potential of Office 365 for eDiscovery and Legal Holds – Effectively Manage Your Data and Maintain Compliance.”
Introduction
Office 365, a robust cloud-based platform, offers organizations a diverse array of tools and services for efficient data management. A pivotal feature of Office 365 lies in its capacity to facilitate eDiscovery and legal holds, critical processes in the realm of electronic information management. eDiscovery involves the collection, preservation, and analysis of electronically stored information (ESI) for utilization in legal proceedings, while legal holds entail the preservation of ESI pertinent to legal matters. Office 365 furnishes a comprehensive suite of tools and services to streamline organizations’ eDiscovery and legal holds processes. This article aims to present an overview of Office 365’s utilization for eDiscovery and legal holds.
Best Practices for Managing eDiscovery and Legal Holds with Office 365
1. Establish a Legal Hold Process
The initial stage in handling eDiscovery and legal holds using Office 365 involves establishing a rigorous legal hold process. This entails clearly defining the circumstances under which a legal hold is warranted, identifying the party responsible for implementing the hold, and outlining the communication protocol for notifying affected individuals. Additionally, there must be a mechanism for monitoring the hold, encompassing its initiation, notification recipients, and cessation.
2. Utilize Office 365’s eDiscovery Tools
Office 365 offers an array of eDiscovery tools for overseeing eDiscovery and legal holds. Such utilities encompass the eDiscovery Center, enabling users to search for and safeguard content, and the Compliance Center, serving as a central hub for legal hold administration. Deploying these tools can significantly streamline the eDiscovery process and guarantee comprehensive preservation of pertinent content.
3. Educate Staff on Legal Holds Ensuring that all staff members are well-versed in the legal hold protocol and their obligations upon initiation is paramount. Training should encompass an overview of the legal hold process and guidelines on responding to a legal hold. Moreover, employees should be fully cognizant of the repercussions of non-compliance with a legal hold. 4. Supervise Adherence to Regulations Following the initiation of a legal hold, meticulous monitoring of adherence is crucial to confirm compliance across all affected parties. This necessitates regular scrutiny of the Compliance Center to ascertain that all implicated individuals have been duly informed and that all relevant content has been conserved.
5. Document the Process
Finally, it is important to document the entire legal hold process. This includes documenting when the hold was initiated, who was notified, and when the hold was lifted. This documentation can be used to demonstrate compliance with the legal hold process and can help protect the organization in the event of a dispute.
How to Set Up an Effective eDiscovery Process with Office 365
Establishing a robust eDiscovery process within Office 365 can pose a significant challenge. However, with careful implementation of appropriate procedures and tools, the task can be executed promptly and effectively. This comprehensive guide delineates the overall process and essential initial steps required for commencement.
The cornerstone of setting up an efficient eDiscovery process with Office 365 entails the establishment of an eDiscovery Center. Serving as a central locus for all eDiscovery activities, it forms the foundational gateway for any eDiscovery undertaking. The eDiscovery Center facilitates the management and oversight of all eDiscovery operations, encompassing searches, holds, and exports.
Subsequently, the pivotal next phase involves crafting an eDiscovery search, constituting a specific inquiry designed to retrieve pertinent data within Office 365. Searches can be formulated utilizing keywords, phrases, or even specific file formats. Following the search formulation, it becomes imperative to impose holds on the identified data, ensuring its preservation from deletion or alteration.
The subsequent imperative step necessitates the extraction of the located data, achievable through a diverse array of formats encompassing PST, EML, and HTML. Once exported, the data undergoes a phase of review and analysis.
To culminate, the eDiscovery Center assumes the role of monitoring the progression of the eDiscovery process. Its function encompasses tracking the advancement of searches, holds, and exports. This vigilance ensures the seamless operation of the process and the meticulous preservation and analysis of all pertinent data.
By meticulously observing these procedural strategies, the establishment of an effective eDiscovery process within Office 365 is swiftly and effortlessly realized. With the appropriate tools and processes at the helm, the preservation and accurate analysis of all data is assured, thereby safeguarding the organization against potential legal jeopardy and ensuring the meticulous handling of all data.
Understanding the Role of Office 365 in eDiscovery
Office 365 is gaining traction as a widely adopted cloud-based solution catering to organizations of diverse scopes. It offers an extensive array of applications facilitating communication, teamwork, and efficiency. Consequently, it is assuming an increasingly pivotal role in the realm of eDiscovery.
Notably, eDiscovery, an abbreviation for electronic discovery, encompasses the procedures of gathering, safeguarding, and presenting electronically stored information (ESI) for legal purposes. It constitutes a pivotal facet of the litigation trajectory, underscoring the necessity for establishments to possess adept mechanisms to uphold conformity with eDiscovery directives.
The multifaceted array of advantages offered by Office 365 renders it an optimal solution for eDiscovery. Its diverse storage options encompass Exchange Online, SharePoint Online, and OneDrive for Business, enabling organizations to securely centralize their Electronically Stored Information (ESI).
Moreover, Office 365 furnishes a plethora of tools for searching and analyzing ESI, such as the eDiscovery Center for comprehensive ESI search and review, and the Compliance Search feature, facilitating precise keyword and phrase searches.
Furthermore, Office 365 streamlines the production of ESI for legal proceedings by allowing exportation to various formats and facilitating the redaction of sensitive information.
In essence, Office 365 stands as an increasingly indispensable asset for eDiscovery, offering an all-encompassing toolkit for ESI storage, search, and production, making it the platform of choice for organizations striving to adhere to eDiscovery mandates.
The Benefits of Using Office 365 for Legal Holds
Office 365 stands as a robust and adaptable cloud-based platform, offering an array of services and tools tailored to assist businesses in effectively overseeing their operations, irrespective of their scale. A pivotal attribute of this platform is its capacity to facilitate legal holds, a cornerstone of any enterprise’s compliance and risk management strategy. Office 365 furnishes a secure and dependable environment for administering such imperative measures.
Legal holds serve the purpose of safeguarding pertinent documents and data in the event of a legal dispute or investigation, constituting a vital component of an organization’s compliance and risk management framework. They are instrumental in ensuring the preservation and accessibility of all pertinent materials for scrutiny. Office 365, through its secure and dependable platform, empowers organizations to streamline the setup and management of legal holds across their entire realm swiftly and seamlessly.
With Office 365’s legal hold feature, organizations gain the ability to expeditiously establish and oversee holds across their entire domain. This encompasses a centralized platform for the management of holds, bolstering organizational capacity to effortlessly monitor and trace holds, while also configuring notifications for impending hold expirations. This functionality proves instrumental in guaranteeing the retention and accessibility of essential documents and data for evaluation.
Office 365 also provides a secure platform for managing legal holds. All documents and data stored in Office 365 are encrypted, ensuring that they remain secure and confidential. This helps organizations protect their data and ensure that it is not accessed or used without their permission.
Finally, Office 365’s legal hold feature is easy to use and cost-effective. It is a cloud-based platform, so there is no need to purchase or maintain additional hardware or software. This makes it an ideal solution for organizations of all sizes, as it is both cost-effective and easy to use.
In summary, Office 365 provides a secure and reliable platform for managing legal holds. It allows organizations to quickly and easily set up and manage holds across their entire organization, while also providing a secure platform for storing and protecting documents and data. Additionally, it is easy to use and cost-effective, making it an ideal solution for organizations of all sizes.
How Office 365 Can Help Streamline Your eDiscovery Process
The intricate realm of eDiscovery, also known as electronic discovery, encompasses the intricate process of procuring, safeguarding, and presenting electronically stored information (ESI) for legal proceedings. In a landscape where the volume of ESI burgeons, organizations seek a dependable and effective approach to govern the process. Office 365 emerges as a facilitator, artfully streamlining the eDiscovery endeavor with its secure platform for ESI collection, preservation, and production.
Within Office 365, a secure bastion for ESI collection from diverse sources such as emails, documents, and cloud-stored data materializes. The platform offers a fortified milieu for ESI preservation, ensuring its integrity and protection from tampering or obliteration during the eDiscovery phase.
Moreover, Office 365 furnishes a secure stage for ESI production in versatile formats like PDF, HTML, and XML, permitting swift and seamless presentation of ESI in legal proceedings.
Effectuating an impeccable eDiscovery orchestration, Office 365 furnishes a suite of tools, including a potent search utility for rapid and effortless ESI retrieval. This feature expedites the identification and location of pertinent ESI, expediting their deployment in legal proceedings.
Furthermore, Office 365 equips organizations with an array of tools to deftly oversee the eDiscovery process. This includes a workflow tool, empowering organizations to craft and regulate eDiscovery workflows to ensconce a prompt and efficient eDiscovery process.
In sum, Office 365 not only provides a secure enclave for ESI collection, preservation, and production but also furnishes an arsenal of tools to expedite and refine the eDiscovery process. By leveraging Office 365, organizations ensure the expeditious and efficient conclusion of the eDiscovery phase.
Conclusion
Office 365 stands as a robust resource for eDiscovery and legal holds. It furnishes a secure, dependable, and economical means to store and oversee data for legal purposes. Additionally, it presents a diverse array of features and tools to aid organizations in overseeing their eDiscovery and legal holds procedures. Through Office 365, organizations can effortlessly retrieve and scrutinize data, establish legal holds, and guarantee adherence to relevant statutes and standards. In conclusion, Office 365 is an ideal solution for organizations looking to streamline their eDiscovery and legal holds processes.
Using Office 365 to meet compliance requirements (e.g. GDPR, HIPAA)
“Ensuring Compliance with Office 365: Effectively Managing Data Security and Fulfilling Obligations”
Introduction
Deploying Office 365, a robust cloud-centric platform, empowers organizations to meet their multifaceted compliance mandates. This sophisticated suite offers an array of tools and services to aid adherence to stringent regulations like the General Data Protection Regulation (GDPR) and the Health Insurance Portability and Accountability Act (HIPAA). It furnishes a secure ecosystem for data storage and administration, boasting features for surveillance, audit trails, and data encryption, coupled with safeguards like data loss prevention and multi-factor authentication, all imperative for fortifying data protection and regulatory alignment. Herein, we delve into how Office 365 augments organizational compliance efforts.
How Office 365 Can Help You Manage and Monitor Compliance Requirements
Office 365 encompasses an arsenal of cloud-based utilities that adeptly facilitate oversight and management of compliance prerequisites. By leveraging Office 365, establishments can seamlessly fashion, archive, and disseminate documents, emails, and assorted information within a secure and compliance-driven milieu.
The suite proffers a comprehensive array of compliance resources to underpin organizations in aligning with regulatory stipulations. Evidently, Office 365 encompasses pivotal features, including data loss prevention (DLP) and encryption, which are pivotal in fortifying data security and ensuring confluence with data privacy statutes. Moreover, Office 365 integrates advanced auditing and reporting capabilities, which ameliorate operational oversight and fortify adherence to internal policies.
Moreover, Office 365 integrates an array of tools to streamline compliance management. Notably, the suite incorporates a sophisticated Compliance Manager, instrumental in evaluating compliance status and identifying potential risk domains. Furthermore, the presence of a Compliance Scorecard enriches the suite, allowing for meticulous tracking of compliance progress over time.
Furthermore, Office 365 furnishes a diverse set of tools to proactively address compliance exigencies. Notably, the suite integrates a multifaceted Compliance Center that expedites identification and resolution of compliance complications. Additionally, the inclusion of a dynamic Compliance Dashboard empowers real-time surveillance of compliance posture.
In summation, Office 365 stands as a formidable suite of tools enabling comprehensive management and oversight of compliance prerequisites. Beyond the seamless creation, storage, and dissemination of information, Office 365 offers a suite of tools catering to compliance posture assessment, progress tracking, and agile response to compliance exigencies.
Best Practices for Using Office 365 to Ensure Compliance with Data Protection Regulations
1. Establish a Data Governance Plan: Establishing a data governance plan is essential for ensuring compliance with data protection regulations. This plan should include policies and procedures for data classification, access control, data retention, and data security.
2. Implement Multi-Factor Authentication: Multi-factor authentication (MFA) is a security measure that requires users to provide two or more pieces of evidence to verify their identity. This helps to protect against unauthorized access to Office 365 data.
3. Monitor User Activity: Monitoring user activity is important for ensuring compliance with data protection regulations. Office 365 provides tools for monitoring user activity, such as the Office 365 Security & Compliance Center.
4. Encrypt Data: Encrypting data is an important security measure for protecting sensitive data. Office 365 provides tools for encrypting data, such as Azure Information Protection.
5. Use Data Loss Prevention (DLP): Data loss prevention (DLP) is a security measure that helps to prevent the accidental or intentional loss of sensitive data. Office 365 provides tools for implementing DLP, such as the Office 365 Security & Compliance Center.
6. Implement Access Controls: Access controls are an important security measure for ensuring that only authorized users can access sensitive data. Office 365 provides tools for implementing access controls, such as Azure Active Directory.
7. Monitor Third-Party Access: Monitoring third-party access is important for ensuring compliance with data protection regulations. Office 365 provides tools for monitoring third-party access, such as the Office 365 Security & Compliance Center.
8. Train Employees: Training employees on data protection regulations and best practices is essential for ensuring compliance. Office 365 provides tools for training employees, such as Microsoft Teams.
9. Regularly Audit Data: Regularly auditing data is important for ensuring compliance with data protection regulations. Office 365 provides tools for auditing data, such as the Office 365 Security & Compliance Center.
Understanding the Security Features of Office 365 to Meet Compliance Requirements
Office 365, a suite of cloud-based productivity tools, presents organizations with a reliable platform for collaboration and communication. As the trend of cloud migration continues to expand, it becomes increasingly essential for organizations to comprehend the security components of Office 365 to synchronize with regulatory standards.
The security facets of Office 365 encompass a diverse array of measures facilitating organizations in fulfilling compliance requisites. These encompass data loss prevention (DLP), multi-factor authentication (MFA), encryption, and identity and access management (IAM).
Data Loss Prevention (DLP) serves as a protective mechanism assisting organizations in shielding sensitive data from unauthorized access or inadvertent disclosure. It effectively detects and obstructs the transmission of sensitive information, for instance, credit card numbers or Social Security numbers, through email or other communication channels.
Multi-Factor Authentication (MFA) stands as a security attribute mandating users to present two or more authentication elements to verify their identity. This significantly enhances the assurance that solely authorized personnel can access sensitive data and applications.
Encryption, a pivotal security feature, safeguards data from unauthorized access by transforming it into a format decipherable solely by authorized users. Office 365 incorporates encryption protocols for data at rest, in transit, and in use.
Identity and Access Management (IAM) emerges as a critical feature aiding organizations in regulating user access to data and applications. It empowers entities to govern access rights, ensuring designated individuals have appropriate data and application access, while also monitoring user activity.
A thorough grasp of Office 365’s security features enables organizations to fortify the security and compliance of their data and applications. These functionalities not only shield data from unauthorized access but also ensure that solely authorized personnel can access sensitive data and applications.
How Office 365 Can Help You Meet HIPAA Compliance Requirements
Office 365 is a cloud-based suite of services that can help organizations meet the requirements of the Health Insurance Portability and Accountability Act (HIPAA). HIPAA is a federal law that sets standards for the protection of sensitive patient health information. It requires organizations to implement safeguards to protect the privacy and security of this information.
Office 365 offers a range of tools to assist organizations in meeting the rigorous demands of HIPAA compliance. These encompass:
1. Encryption: Office 365 furnishes robust encryption for data both at rest and in transit, shielding it from unauthorized intrusion.
2. Access Control: Through its access control functionalities, Office 365 empowers organizations to regulate access to sensitive data, thereby mitigating the risk of unauthorized exposure.
3. Auditing and Reporting: By facilitating meticulous auditing and reporting capabilities, Office 365 enables organizations to monitor user activities closely and proactively identify potential security vulnerabilities.
4. Data Loss Prevention: Office 365’s sophisticated data loss prevention features provide a safeguard against inadvertent or deliberate leakage of sensitive data.
5. Office 365 offers multi-factor authentication, demanding users to provide extra verification like a mobile code or a biometric scan. This add-on security measure guarantees only authorized users can access the data.
By utilizing the features of Office 365, organizations can help ensure that they are meeting the requirements of HIPAA and protecting the privacy and security of sensitive patient health information.
How Office 365 Can Help You Meet GDPR Compliance Requirements
The General Data Protection Regulation (GDPR) is a framework designed to safeguard the personal information of European Union (EU) citizens. For businesses, adhering to GDPR guidelines is crucial. Office 365 can facilitate GDPR compliance by offering a secure infrastructure for data storage and administration.
Within Office 365, data is safeguarded within a secure environment. Encryption and multi-factor authentication fortify data stored in the platform, granting exclusive access to authorized individuals. In addition to the safeguarding measures, Office 365 furnishes an array of tools for data oversight. These instruments empower businesses to regulate data access, craft usage policies, and dictate data sharing parameters.
Moreover, Office 365 is equipped with functionalities that align with GDPR compliance criteria. Notably, the Data Loss Prevention (DLP) feature bolsters security by identifying and mitigating unauthorized dissemination of sensitive data. Further enhancing data security, the Rights Management Service (RMS) within Office 365 empowers users to control data access and usage.
Furthermore, Office 365 encompasses tools for monitoring and auditing data usage. These utilities enable comprehensive tracking of data access and utilization, ensuring alignment with GDPR provisions.
Overall, Office 365 furnishes a secure data management platform that aids in achieving GDPR compliance. Its comprehensive suite of data management tools not only fortifies data security but also assures adherence to GDPR regulations, promoting a robust foundation for data governance.
Conclusion
Office 365 offers robust capabilities for organizations aiming to adhere to stringent compliance standards like GDPR and HIPAA. It furnishes a secure infrastructure for housing and disseminating data, alongside a diverse array of functions that assist entities in fulfilling their compliance responsibilities. Leveraging Office 365 empowers organizations to safeguard their data and ensure alignment with current regulations, rendering it an optimal selection for meeting compliance needs.
SharePoint PowerShell to identify all OneDrive sites and migrate content to SharePoint sites
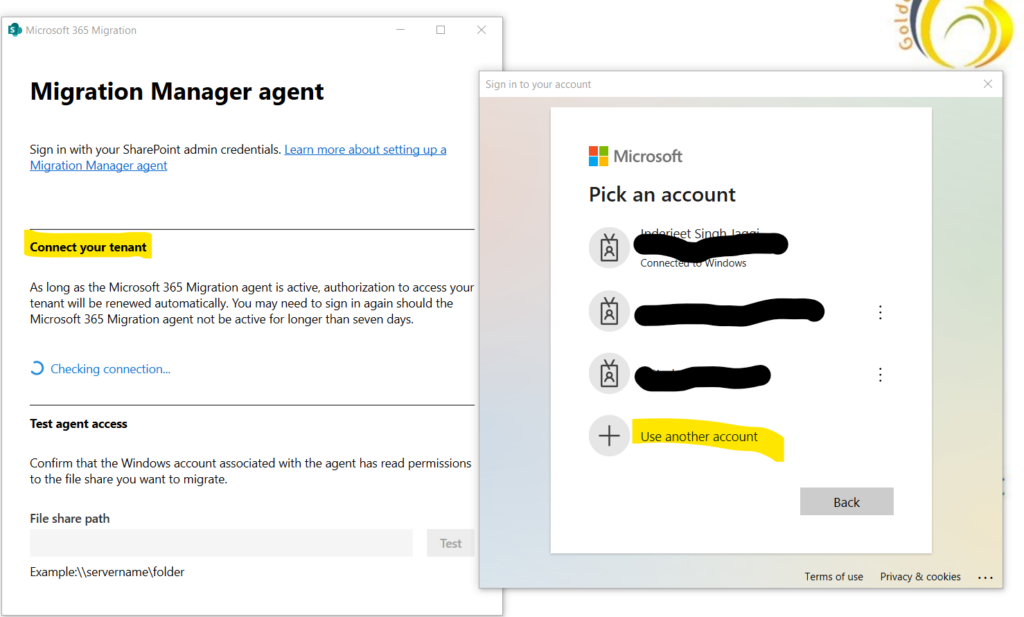
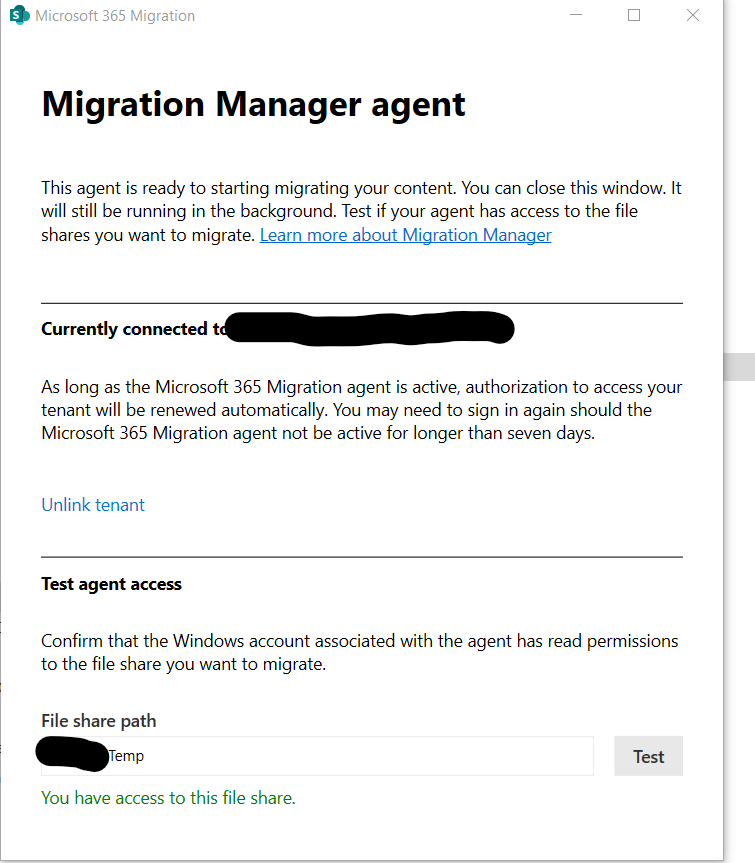
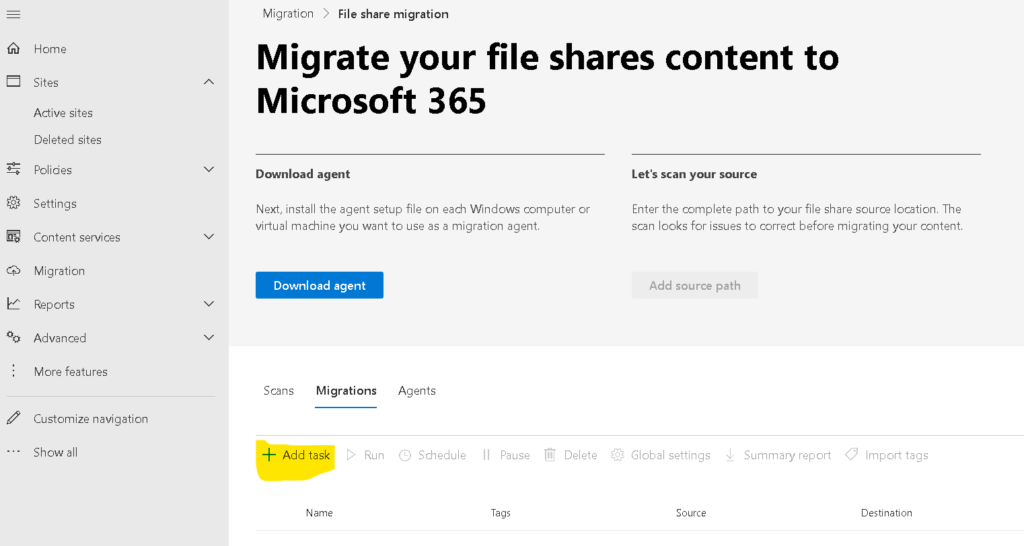
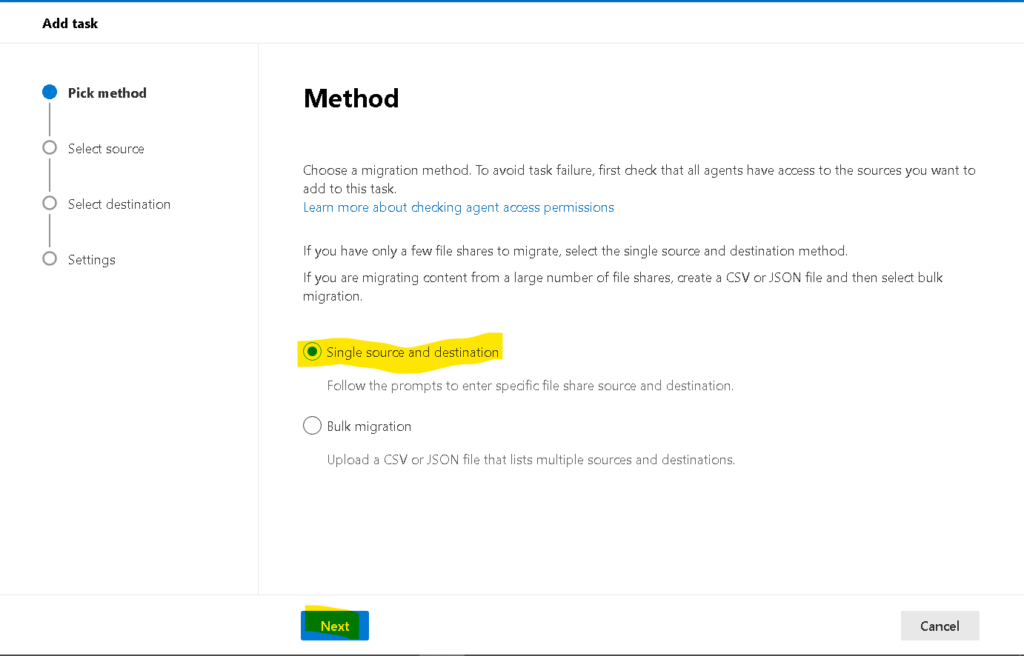
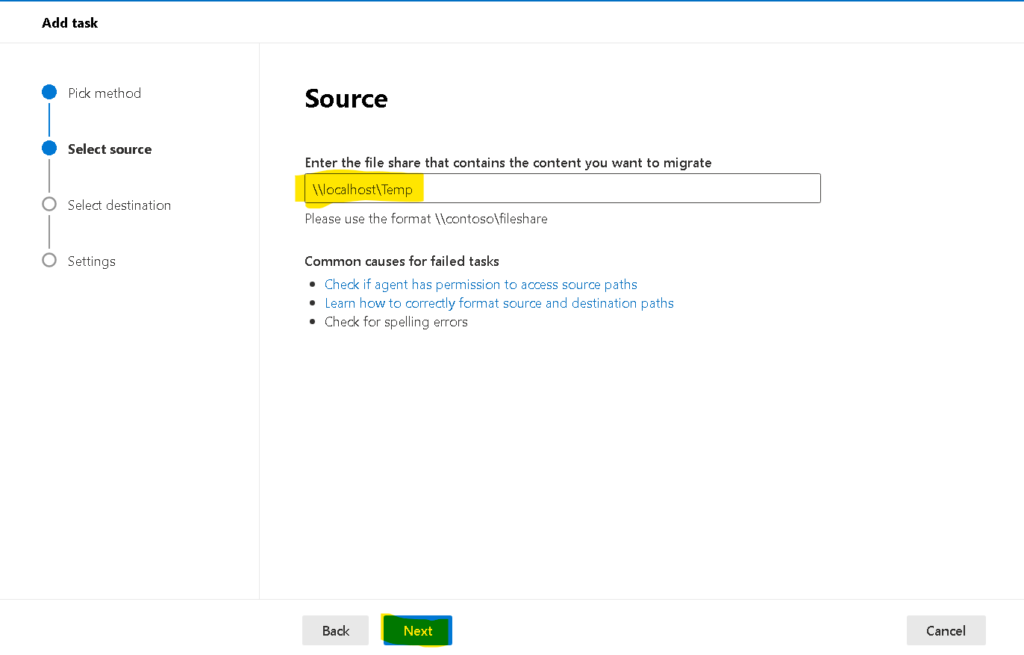
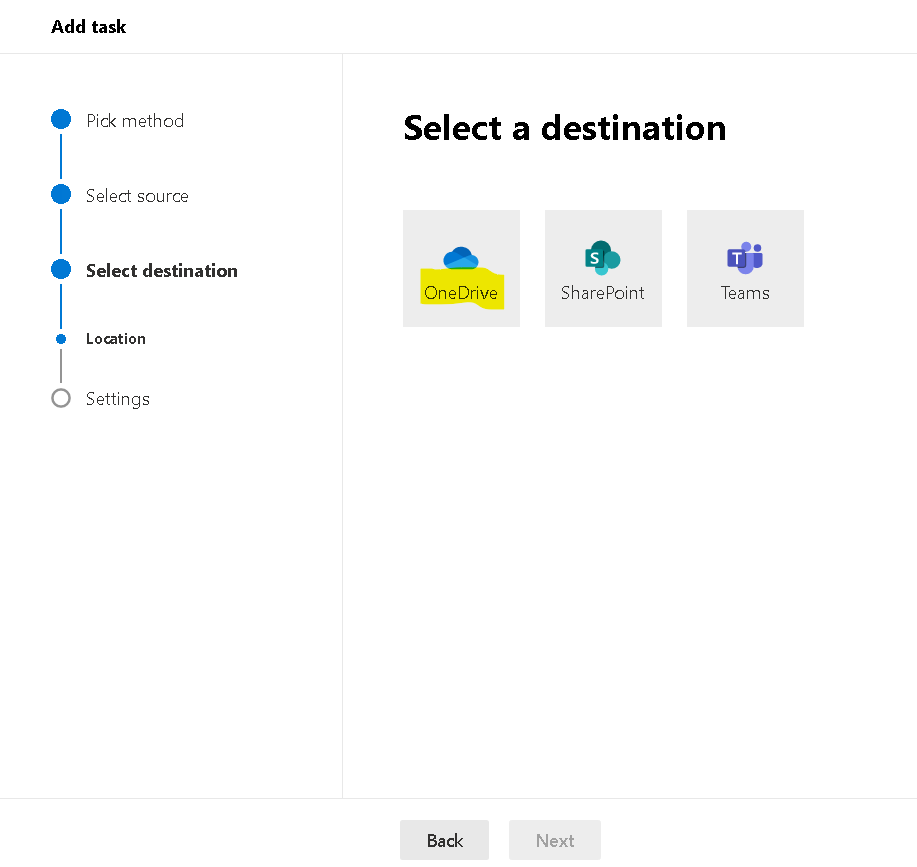
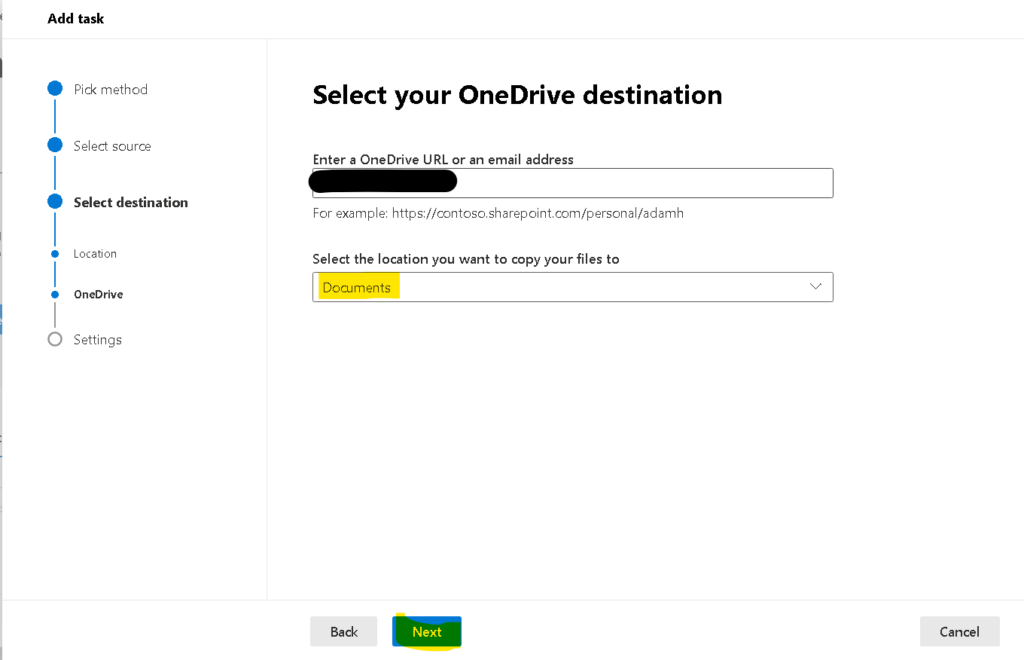
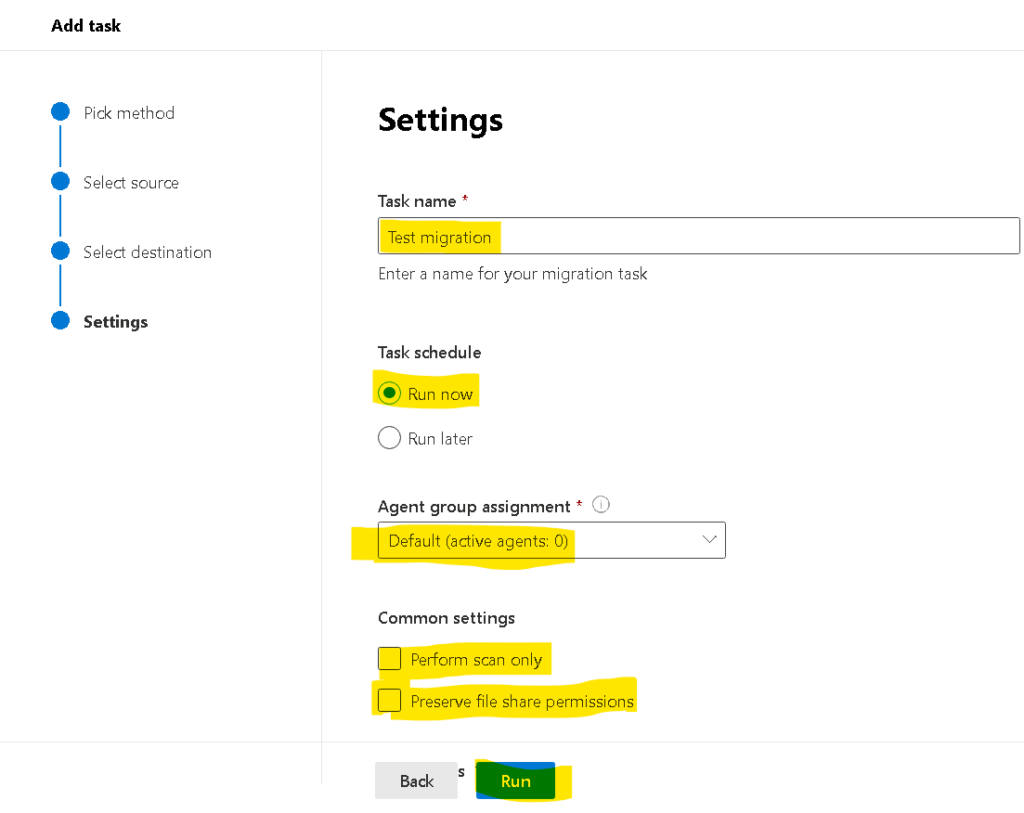
I wanted to perform migration of few of my users content to their respective OneDrive site. To do so, I used below PowerShell to identify URL of all users who already have a OneDrive sites and then used FileMigration wizard to import their content in the respective OneDrive Site.
$TenantUrl = Read-Host "https://tenantname-admin.sharepoint.com/"
$LogFile = [Environment]::GetFolderPath("Desktop") + "\OneDriveSites.log"
Connect-SPOService -Url $TenantUrl
Get-SPOSite -IncludePersonalSite $true -Limit all -Filter "Url -like '-my.sharepoint.com/personal/'" | Select -ExpandProperty Url | Out-File $LogFile -Force
Write-Host "Done! File saved as $($LogFile)."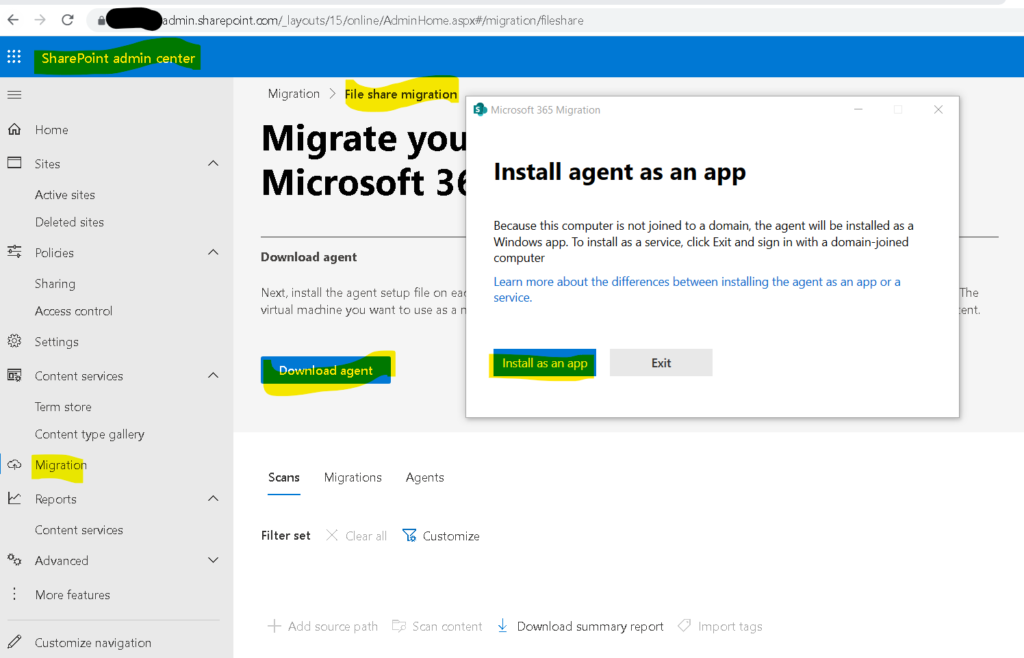
Note : Note agent should be installed on a system which should have access to the files through network drive we want to migrate
PowerShell to find duplicate files on SharePoint online site
You can use below PowerShell to find all duplicate files(regardless of document libraries) on SharePoint online site.
Make sure you update the parameters such as SiteURL and ReportOutput. This may take time based on number of items in SharePoint site. I have kept it running for 3 days and it worked like a charm. I have seen other Powershell’s which don’t work if you have MFA enabled whereas this script works regardless you have MFA enabled or disabled.
#Before running the below script, kindly follow below steps :
#1. Open you PowerShell ISE in your system and run it as administrator

#cls2. Install the New PnP PowerShell Module using below commands:
        Install-Module PnP.PowerShell

#3. Register a new Azure AD Application and Grant Access to the tenant
        Register-PnPManagementShellAccess

#Then paste and run below pnp script:

#Parameters
$SiteURL = "https://tenantname.sharepoint.com/sites/Sitename"
$Pagesize = 2000
$ReportOutput = "C:\Temp\Sitename.csv"

#Connect to SharePoint Online site
Connect-PnPOnline $SiteURL -Interactive

#Array to store results
$DataCollection = @()

#Get all Document libraries
$DocumentLibraries = Get-PnPList | Where-Object {$_.BaseType -eq "DocumentLibrary" -and $_.Hidden -eq $false -and $_.ItemCount -gt 0 -and $_.Title -Notin("Site Pages","Style Library", "Preservation Hold Library")}

#Iterate through each document library
ForEach($Library in $DocumentLibraries)
{
    #Get All documents from the library
    $global:counter = 0;
    $Documents = Get-PnPListItem -List $Library -PageSize $Pagesize -Fields ID, File_x0020_Type -ScriptBlock `
        { Param($items) $global:counter += $items.Count; Write-Progress -PercentComplete ($global:Counter / ($Library.ItemCount) * 100) -Activity `
             "Getting Documents from Library '$($Library.Title)'" -Status "Getting Documents data $global:Counter of $($Library.ItemCount)";} | Where {$_.FileSystemObjectType -eq "File"}

    $ItemCounter = 0
    #Iterate through each document
    Foreach($Document in $Documents)
    {
        #Get the File from Item
        $File = Get-PnPProperty -ClientObject $Document -Property File

        #Get The File Hash
        $Bytes = $File.OpenBinaryStream()
        Invoke-PnPQuery
        $MD5 = New-Object -TypeName System.Security.Cryptography.MD5CryptoServiceProvider
        $HashCode = [System.BitConverter]::ToString($MD5.ComputeHash($Bytes.Value))

        #Collect data
        $Data = New-Object PSObject
        $Data | Add-Member -MemberType NoteProperty -name "FileName" -value $File.Name
        $Data | Add-Member -MemberType NoteProperty -Name "HashCode" -value $HashCode
        $Data | Add-Member -MemberType NoteProperty -Name "URL" -value $File.ServerRelativeUrl
        $Data | Add-Member -MemberType NoteProperty -Name "FileSize" -value $File.Length
        $DataCollection += $Data
        $ItemCounter++
        Write-Progress -PercentComplete ($ItemCounter / ($Library.ItemCount) * 100) -Activity "Collecting data from Documents $ItemCounter of $($Library.ItemCount) from $($Library.Title)" `
                     -Status "Reading Data from Document '$($Document['FileLeafRef']) at '$($Document['FileRef'])"
    }
}
#Get Duplicate Files by Grouping Hash code
$Duplicates = $DataCollection | Group-Object -Property HashCode | Where {$_.Count -gt 1}  | Select -ExpandProperty Group
Write-host "Duplicate Files Based on File Hashcode:"
$Duplicates | Format-table -AutoSize

#Export the duplicates results to CSV
$Duplicates | Export-Csv -Path $ReportOutput -NoTypeInformation
Using Microsoft Teams for virtual meetings and collaboration
“Connect with your team, wherever you are, with Microsoft Teams!”
Introduction
Microsoft Teams represents a robust tool for collaboration and communication, facilitating virtual meetings and cooperation among users, whether they be colleagues, partners, or customers. It furnishes a secure and dependable space for sharing documents, engaging in real-time communication, and jointly working on projects. Its user-friendly interface simplifies the organization and administration of virtual meetings, enabling users to sustain connectivity and productivity irrespective of physical proximity. Furthermore, Teams encompasses an array of functionalities, encompassing audio and video conferencing, file distribution, and task administration, making it an optimal platform for virtual meetings and teamwork. With Microsoft Teams, users can seamlessly maintain connections and foster collaboration with their associates, allies, and clientele, regardless of their locations.
Leveraging Microsoft Teams for Effective Virtual Meetings and Collaboration
In the current business landscape, virtual meetings and collaboration play a pivotal role. The surge in remote work makes it crucial for teams to adeptly interact and work together in a virtual environment. Microsoft Teams stands out as a robust tool enabling teams to maintain connectivity and efficiency, irrespective of their physical locations.
Functioning as a cloud-based collaboration platform, Microsoft Teams facilitates seamless real-time communication and cooperation. Teams can use the platform to host virtual meetings, share files, and work together on projects. Teams can also use the platform to chat, share documents, and create virtual workspaces.
Microsoft Teams revolutionizes the management of virtual meetings, offering a versatile platform to effortlessly orchestrate gatherings, extending seamless scheduling, participant invitation, and document dissemination. Furthermore, it empowers users with the ability to capture meetings, exhibit screens, and engage in synchronous document collaboration.
Beyond meeting management, the platform facilitates agile project collaboration, establishing virtual workspaces for seamless task allocation and progress monitoring. Users leverage the platform to engage in dynamic conversations, partake in file sharing, and provide insights through document commentary.
Microsoft Teams emerges as a formidable ally, bridging the gap for interconnected and productive teams, transcending physical boundaries. Its intuitive interface promotes organizational efficiency and superior collaborative potential in the virtual realm.
How to Use Microsoft Teams to Facilitate Collaboration Among Remote Teams
Microsoft Teams, a robust collaboration tool, empowers remote teams to effectively collaborate. The platform offers a secure environment for team members to communicate, exchange files, and engage in joint project endeavors. Its user-friendly interface facilitates seamless connectivity and sustained productivity, particularly in remote work settings.
To enhance collaboration among remote teams via Microsoft Teams, consider the following strategies:
1. Establish a Team: Commence by creating a secure Team within Microsoft Teams, providing a dedicated space for communication, file sharing, and project collaboration.
2. Invite Team Members: Once the Team is set up, extend invitations to team members, either through email or direct addition to the Team.
3. Configure Channels: Organize discussions and files within the Team by creating distinct channels for specific subjects or projects, ensuring streamlined and focused conversations.
4. Leverage Video Conferencing: Utilize Microsoft Teams’ video conferencing features to enable face-to-face connections, fostering interpersonal relationships and maintaining connectivity with remote colleagues.
5. Facilitate File Sharing: Seamlessly share files with team members using Microsoft Teams, ensuring universal access and project relevance.
6. Utilize Chat Functionality: Engage in real-time communication via Microsoft Teams’ chat feature, fostering swift idea exchange and sustained connectivity.
By implementing these tips, remote teams can harness the full potential of Microsoft Teams to bolster collaboration and productivity.
With its intuitive user interface and powerful features, Microsoft Teams makes it easy for teams to stay productive and connected, even when working remotely.
Best Practices for Hosting Virtual Meetings with Microsoft Teams
1. Prior Preparations: Prior to convening a virtual assembly using Microsoft Teams, meticulous planning and arrangement are imperative. This encompasses crafting a precise agenda, extending invitations to pertinent individuals, and verifying that all attendees possess the essential technology and entry to the assembly.
2. Establishment of Protocols: Instituting guidelines for the assembly is crucial for facilitating a seamless progression. This encompasses delineating expectations for engagement, such as muting microphones when not speaking, and stipulating a timeline for the assembly.
3. Leverage the Array of Functions: Microsoft Teams offers an extensive array of functions that can be harnessed to enrich the virtual meeting encounter. These comprise features such as screen sharing, whiteboarding, and video conferencing. Employing these functions can foster sustained engagement among participants and potentiate the meeting’s productivity.
4. Oversee Engagement: It is imperative to oversee the active involvement of all attendees throughout the meeting. This encompasses validating that each individual is actively engrossed and that their inputs are being duly acknowledged.
5. Conduct Follow-Up: Subsequent to the meeting, it is crucial to conduct follow-up with participants to ensure that they are equipped with the requisite information and resources to execute any tasks delineated during the meeting.
By adhering to these optimal methodologies, you can ascertain that your virtual meetings facilitated via Microsoft Teams are efficacious and triumphant.
Tips for Optimizing Microsoft Teams for Virtual Meetings and Collaboration
1. Harness the “Meet Now” functionality provided by Microsoft Teams, enabling swift initiation of meetings without prior scheduling, particularly beneficial for virtual collaboration dynamics.
2. Embrace the versatility of video conferencing within Microsoft Teams, which encompasses diverse meeting formats including one-on-one, group sessions, and seamless screen sharing, fostering continual engagement with team members.
3. Capitalize on the chat feature embedded in Microsoft Teams, streamlining communication channels for prompt sharing of concepts and documents, thus enhancing virtual teamwork efficiencies.
4. Leverage the real-time collaboration potential of the whiteboard feature in Microsoft Teams, particularly advantageous for spontaneous idea exchange, troubleshooting, and sharing of visual content within the team.
5. Capitalize on the seamless file-sharing capabilities facilitated by Microsoft Teams, optimizing the exchange of documents and diverse digital content among team members, thus augmenting virtual collaborative endeavors.
6. Optimize the calendar feature inherent in Microsoft Teams to orchestrate virtual gatherings with finesse, furnishing a comprehensive toolset for seamless meeting coordination and scheduling, thereby fortifying collaborative efforts with team members.
7. Leverage the Task Management Tool: Harness the tasks feature in Microsoft Teams to effortlessly delegate assignments to your team. This valuable functionality is particularly beneficial for fostering virtual teamwork, enabling quick and efficient task delegation and progress monitoring.
8. Take Advantage of the Mobile App: Microsoft Teams offers a mobile app that allows you to stay connected with your team members on the go. This feature is especially useful for virtual collaboration, as it allows you to quickly and easily access your team’s documents and other files from your mobile device.
How to Get Started with Microsoft Teams for Virtual Meetings and Collaboration
Microsoft Teams serves as an influential platform for collaboration and virtual meetings, enabling seamless real-time communication and cooperation among colleagues, partners, and clients. Users can swiftly initiate virtual meetings, exchange files, and engage in project collaborations through this platform.
Embarking on your Microsoft Teams journey involves these essential steps:
1. Procure and install the Microsoft Teams application, which is compatible with Windows, Mac, iOS, and Android devices.
2. Establish a Microsoft account; existing accounts can be utilized as well.
3. Access the application and form a team, tailored for organizational purposes or specific projects.
4. Extend invitations to members for team inclusion, either through email or direct name entry.
5. Institute channels dedicated to distinct subjects or projects, resembling virtual communication centers for team members.
6. Initiate conversations or meetings, whether it involves textual exchanges or multimedia engagements.
7. Foster file sharing and real-time project collaboration within the team framework.
Harness the potential of Microsoft Teams, unlocking the capability to seamlessly organize virtual meetings, share files, and engage in collaborative endeavors with associates, allies, and clientele. Seize this opportunity today and leverage the dynamic collaborative and virtual meeting capabilities inherent in Microsoft Teams.
Conclusion
Microsoft Teams represents a formidable tool for virtual meetings and collaboration. It furnishes a secure and dependable platform for users to communicate and cooperate. Furthermore, it boasts a diverse array of features and tools that simplify the management and organization of virtual meetings and collaboration. Thanks to its intuitive interface, Microsoft Teams stands as an optimal selection for businesses and organizations seeking to enhance their virtual meeting and collaboration capabilities.
Managing and organizing email in Outlook
Revamp Your Email Organization with Microsoft Outlook: Master Your Inbox!
Introduction
In the realm of contemporary communication, email stands as a vital instrument, yet its management and organization pose a formidable challenge. Nevertheless, fear not, for Microsoft Outlook boasts a formidable arsenal of tools adept at aiding you in this endeavor. Harness the capability to craft folders for email storage, establish rules for automatic email sorting, and deploy search resources for swift email retrieval. This instructional tour will shed light on optimizing Outlook for email management and organization.
How to Use Outlook Search to Quickly Find Emails
Beyond question, Outlook Search is a formidable asset, facilitating rapid email retrieval within your Outlook inbox. This feature allows for efficient email pinpointing through keyword, sender name, or alternative criteria search. Herein lies a step-by-step manual on leveraging Outlook Search for expedited email retrieval.
Step 1: Initiate Outlook and designate the target folder for exploration.
Step 2: Direct your attention to the apex of the window and engage the Search tab.
Step 3: Input your specified keyword or search criteria into the designated search box.
Step 4: Launch the search operation by selecting the magnifying glass icon.
Step 5: A compilation of emails aligned with your search parameters will materialize within Outlook.
Step 6: For further refinement, access the “More” option to introduce supplementary criteria.
Step 7: Upon completion, seal your search forays with a click on the “Done” button. By adhering to these instructions, you can deftly harness the prowess of Outlook Search to unearth emails with ease and pace. Whether scouring for keywords, sender names, or any other stipulated criteria, Outlook Search stands as a trusted ally in the pursuit of email management proficiency.
Best Practices for Keeping Your Outlook Inbox Clean and Tidy
1. Opt out of Superfluous Emails: Liberating yourself from emails that have outlived their utility is an effective method to maintain a pristine and orderly inbox. This liberating action can streamline your inbox, facilitating the retrieval of crucial communication amidst the clutter.
2. Establish Categorization Systems: Implementing a framework of folders and labels can significantly enhance email organization and overall inbox cleanliness. By designating folders for distinct subjects or initiatives and labeling correspondences accordingly, you can swiftly locate pertinent emails when required.
3. Utilizing filters and rules can streamline your email management by automatically categorizing incoming messages into specific folders or labels. This facilitates the maintenance of an orderly and structured inbox, easing the burden of manual sorting.
4. Eliminate Excessive Emails: To maintain a pristine and orderly inbox, it is prudent to remove superfluous emails that no longer serve a purpose. This proactive approach aids in decluttering your digital space and streamlines your ability to pinpoint pivotal communications.
5. Employ Email Archiving: The practice of archiving emails offers an effective mechanism for fostering a well-maintained and structured inbox. By relocating emails from the primary inbox to an archive repository, this method significantly contributes to the uncluttered and systematic organization of essential correspondence.
6. Harness Search Features: Harnessing the search functionality inherent in your email platform is instrumental in expediting the retrieval of specific emails as needed. This capability facilitates a streamlined and well-ordered inbox, alleviating the need to sift through a jumbled array of messages.
How to Use Outlook Categories to Organize Your Inbox
Managing your inbox with Outlook Categories can enhance your email efficiency and task management. Follow these steps to optimize your workflow:
1. Establish Diverse Categories: Initiate by formulating diversified categories tailored to your inbox needs. Tailor categories for work, personal correspondence, and familial communication. Additionally, consider crafting categories for specific projects or tasks to streamline organization.
2. Allocate Categories: Once you have defined your categories, allocate them to relevant emails. Access an email and select the “Categorize” button to assign the appropriate category to the email.
3. Implement Color-Coding: Enhance categorization visibility by employing color-coding. Utilize the “Categorize” button and navigate to “All Categories” to designate a distinct color for each category, simplifying visual recognition.
4. Utilize Filtering Tools: Employ filtering mechanisms to swiftly retrieve emails within specific categories. Opt for the “Filter” button and select the desired category to streamline email navigation.
By leveraging Outlook Categories, you can streamline inbox management and prioritize essential tasks. Through these straightforward procedures, you can ensure your emails are systematically organized and readily accessible.
Tips for Managing Email Overload in Outlook
1. Employ the Focused Inbox in Outlook to intelligently categorize vital emails from the vast influx of messages. This tool enables swift identification and prioritization of emails that demand immediate attention.
2. Leverage Outlook’s Rules and Filters functionality to autonomously organize emails into distinct folders according to specific criteria tailored to your needs.
3. Harness the Power of Quick Steps: In the realm of Outlook, Quick Steps serve as a nifty tool enabling the swift execution of multiple email actions with just a single click. This efficiency booster facilitates speedy email processing, minimizing the time spent managing your inbox.
4. Opt Out of Unnecessary Emails: Liberating yourself from the shackles of superfluous emails plays a pivotal role in curbing the influx of your daily email haul.
5. Embrace the Functionality of Search Folders: These nifty folders empower you with the ability to swiftly unearth emails that align with your predetermined criteria, sparing you the arduous task of manually sifting through your deluge of emails.
6. Exploit the Flag Feature: By swiftly flagging emails that demand your attention, Outlook’s Flag feature accentuates your capacity to distinguish and prioritize those crucial emails requiring immediate action.
7. Employ the Delay Delivery Feature: This attribute within Outlook affords you the liberty to schedule emails for dispatch at a later, more opportune time, consequently boosting your email management proficiency.
8. Make Use of the Archive Feature: Leveraging Outlook’s Archive feature to seamlessly relocate emails from your primary inbox to an archive folder can effectively declutter your main workspace and streamline the retrieval of pertinent emails.
How to Create Rules and Filters to Automatically Organize Your Outlook Inbox
Effectively managing your Outlook inbox can seem like a formidable challenge. Nonetheless, leveraging the appropriate rules and filters empowers you to adeptly maintain a clutter-free and well-organized inbox. By delegating the task of sorting incoming emails to rules and filters, you streamline the process of locating specific emails. Here are the steps to establish rules and filters for automating the organization of your Outlook inbox.
1. Establish categorization folders. Preceding the creation of rules and filters, it is imperative to institute folders to facilitate the sorting of your emails. Commence by launching Outlook and navigating to the “Folder” tab. Subsequently, click on “New Folder” and assign a name to the folder. It is permissible to generate multiple folders as per your requirements.
2. Institute rules. Rules furnish the capability to automatically categorize emails predicated on the specified criteria. To set up a rule, access the “Rules” tab and initiate the process by clicking on “Create Rule.” Proceed to select the criteria that will govern the email sorting process, such as sender, subject, or date. Conclusively, designate the folder for the sorted emails.
3. Establish filters to efficiently categorize emails by specific keywords or phrases. Initiate the process by accessing the “Filters” tab and opting for “Create Filter.” Subsequently, input the designated keyword or phrase to streamline email sorting. Conclude the process by specifying the desired folder for the organized emails.
Harness the power of rules and filters to maintain a streamlined Outlook inbox. Through uncomplicated procedures, swiftly allocate incoming emails to designated folders, facilitating easy access to pertinent information.
Conclusion
Effective email management in Outlook is essential for maintaining productivity and organization. Leveraging its tools, users can efficiently categorize emails into folders and establish automated rules to streamline their inbox management. Additionally, Outlook empowers users to schedule reminders and notifications, bolstering their ability to proactively address incoming correspondence. Embracing these functionalities enables users to optimize their time and enhance their overall organization.
Using Office 365 to meet compliance requirements (e.g. GDPR, HIPAA)
“Stay Compliant with Office 365: Securely Manage Your Data and Meet Your Requirements.”
Introduction
The formidable cloud-based platform, Office 365, serves as a robust tool for aiding organizations in fulfilling their compliance obligations. Leveraging a comprehensive array of tools and services, it empowers organizations to adhere to stringent regulations like the General Data Protection Regulation (GDPR) and the Health Insurance Portability and Accountability Act (HIPAA). Office 365 furnishes a secure milieu for data storage and management, along with mechanisms for scrutinizing and auditing user activities. Additionally, it incorporates pivotal features including encryption, data loss prevention, and multi-factor authentication, thereby fortifying organizations in safeguarding their data and satisfying their compliance imperatives. This discourse will expound on how Office 365 lends assistance to organizations in meeting their compliance prerequisites.
How Office 365 Can Help You Manage and Monitor Compliance Requirements
Office 365 offers a robust array of cloud-based resources geared towards aiding organizations in handling and overseeing compliance necessities. Within the framework of Office 365, entities are empowered to effortlessly create, store, and distribute documents, emails, and other information in a secure, compliant setting.
The suite encompasses a comprehensive arsenal of compliance instruments, pivotal in aiding organizations to fulfill their regulatory obligations. For instance, it boasts elements like data loss prevention (DLP) and encryption, pivotal in safeguarding sensitive information and ensuring adherence to data privacy statutes. Moreover, it encompasses cutting-edge auditing and reporting capabilities, instrumental in scrutinizing user activity and enforcing conformity with internal protocols.
Furthermore, Office 365 encompasses an array of tools aimed at helping entities manage their compliance requisites efficiently. Notably, it incorporates a Compliance Manager, serving as a guide for entities in pinpointing and addressing compliance vulnerabilities. Additionally, it avails an assortment of tools designed to automate compliance procedures, encompassing the creation and administration of policies, monitoring user activity, and generating compliance reports.
Lastly, Office 365 equips organizations with an array of tools to keep abreast of the latest compliance mandates. For instance, the Compliance Center within Office 365 acts as a hub for organizations to remain informed about the most recent regulatory alterations and ensure that their compliance mechanisms are current. Furthermore, it provides an array of resources, including webinars and tutorials, to assist organizations in comprehending and integrating the latest compliance requirements.
Overall, Office 365 is a powerful suite of tools that can help organizations manage and monitor compliance requirements. With Office 365, organizations can easily create, store, and share documents, emails, and other data in a secure, compliant environment. Additionally, Office 365 provides a range of tools that can help organizations identify and address compliance risks, automate compliance processes, and stay up-to-date on the latest compliance requirements.
Best Practices for Using Office 365 to Ensure Compliance with Data Protection Regulations
1. Formulate a comprehensive Data Governance Plan to guarantee adherence to data protection laws. This plan must encompass protocols for data categorization, user access management, data longevity, and data fortification.
2. Implement a Robust Multi-Factor Authentication System: Multi-factor authentication (MFA) is a critical security protocol that necessitates users to furnish two or more pieces of evidence to verify their identity. This serves as a formidable barrier against unauthorized access to vital Office 365 data.
3. Vigilantly Monitor User Activity: The meticulous tracking of user activity plays a pivotal role in ensuring strict adherence to data protection mandates. Office 365 offers sophisticated tools for scrutinizing user activity, notably through the Office 365 Security & Compliance Center.
4. Employ Stringent Data Encryption Measures: The deployment of data encryption stands as a fundamental safeguard for shielding sensitive information. Office 365 furnishes robust tools for data encryption, exemplified by the Azure Information Protection feature.
5. Utilize Data Loss Prevention (DLP) Measures: Data loss prevention (DLP) mechanisms provide a bulwark against inadvertent or deliberate leakage of sensitive data. Office 365 boasts comprehensive tools for implementing DLP, prominently showcased in the Office 365 Security & Compliance Center.
6. Enforce Granular Access Controls: Rigorous access controls serve as a linchpin in ensuring that only authorized personnel can access sensitive data. Office 365 offers advanced tools for instituting access controls, notably exemplified by Azure Active Directory.
7. Scrutinize Third-Party Access: Diligently monitoring third-party access is pivotal for upholding compliance with stringent data protection regulations. Office 365 is equipped with sophisticated tools for overseeing third-party access, notably through the Office 365 Security & Compliance Center.
8. Provide Robust Employee Training: Furnishing comprehensive training to employees on data protection regulations and best practices is foundational for upholding compliance. Office 365 features powerful tools for employee training, notably exemplified by Microsoft Teams.
9. Conduct Routine Data Audits: The regular auditing of data stands as a cornerstone for ensuring adherence to data protection regulations. Office 365 provides a suite of tools for conducting data audits, prominently highlighted through the Office 365 Security & Compliance Center.
Understanding the Security Features of Office 365 to Meet Compliance Requirements
Office 365, a cloud-based productivity suite, furnishes organizations with a dependable platform for collaboration. As more data shifts to the cloud, understanding Office 365’s security features is critical for compliance.
The suite offers a wide array of security measures to aid compliance. These encompass data loss prevention (DLP), multi-factor authentication (MFA), encryption, and identity/access management (IAM).
Data Loss Prevention (DLP) shields sensitive data from unauthorized access or accidental loss. It can detect and block transmission of highly sensitive information like credit card or Social Security numbers via email or other channels.
Multi-Factor Authentication (MFA) is a security feature that requires users to provide two or more pieces of evidence to prove their identity. This helps to ensure that only authorized users can access sensitive data and applications.
Encryption is a security feature that helps protect data from unauthorized access by scrambling it so that it can only be read by authorized users. Office 365 provides encryption for data at rest and in transit, helping to ensure that data is secure even if it is intercepted by an unauthorized user.
Identity and Access Management (IAM) is a feature that helps organizations manage user access to data and applications. IAM can be used to control who has access to what data and applications, as well as to set up rules for how users can access and use the data.
By understanding the security features of Office 365, organizations can ensure that their data is secure and compliant with applicable regulations. These features help organizations protect their data from unauthorized access and accidental loss, while also providing a secure platform for collaboration and communication.
How Office 365 Can Help You Meet HIPAA Compliance Requirements
Office 365, a suite of cloud-based services, is instrumental in enabling organizations to adhere to the stringent regulations of the Health Insurance Portability and Accountability Act (HIPAA). This federal law establishes rigorous standards for safeguarding the confidentiality of delicate patient health data, mandating that organizations implement robust measures to ensure its privacy and security.
Among the arsenal of features offered by Office 365, encryption takes the lead, providing protection for data both at rest and in transit, thereby thwarting unauthorized access attempts. In addition, access control functionalities empower organizations to selectively permit access to sensitive data, mitigating the risk of unauthorized personnel breaching the privacy of such information.
Furthermore, Office 365 boasts robust auditing and reporting capabilities, allowing meticulous tracking of user activities and swift identification of potential security vulnerabilities. To counteract the inadvertent or deliberate loss of sensitive data, Office 365 offers data loss prevention features, further bolstering the protective infrastructure.
Notably, the implementation of multi-factor authentication, a feature wherein users are required to furnish additional authentication factors such as a mobile device-generated code or a biometric scan, plays a pivotal role in fortifying access controls.
With Office 365 at their disposal, organizations can confidently ensure their compliance with HIPAA regulations, thus fortifying the sanctity and security of sensitive patient health information.
How Office 365 Can Help You Meet GDPR Compliance Requirements
The General Data Protection Regulation (GDPR) stands as a formidable framework designed to safeguard the personal data of European Union (EU) citizens. Absorbing its implications into your business practices is essential. Luckily, Office 365 emerges as a valuable ally in meeting GDPR compliance standards, furnishing a secure foundation for data storage and management.
Within Office 365, data finds refuge in a fortified environment. Encryption fortifies all stored data while multi-factor authentication stands as an impenetrable barrier against unauthorized access. Moreover, a rich array of tools empowers users to exert authority over data access and institute policies governing its usage and distribution.
Office 365 also provides a number of features that can help you meet GDPR compliance requirements. For example, Office 365 provides a Data Loss Prevention (DLP) feature that can help you detect and prevent the unauthorized sharing of sensitive data. Additionally, Office 365 provides a Rights Management Service (RMS) that allows you to control who can access and use the data. This helps ensure that only authorized users can access the data.
Finally, Office 365 provides a number of tools for monitoring and auditing data usage. These tools allow you to track who is accessing the data and how it is being used. This helps ensure that the data is being used in accordance with GDPR regulations.
Overall, Office 365 provides a secure platform for storing and managing data that can help you meet GDPR compliance requirements. By using Office 365, you can ensure that your data is secure and that it is being used in accordance with GDPR regulations.
Conclusion
Office 365 is an excellent tool for meeting compliance requirements such as GDPR and HIPAA. It provides a secure platform for storing and sharing data, as well as a range of features that help organizations meet their compliance obligations. With Office 365, organizations can ensure that their data is secure and compliant with the latest regulations. This makes it an ideal choice for organizations looking to meet their compliance requirements.
Keyword Query text limit in SharePoint Search
Hi All,
I was recently asked if we have any limit for Query text we use to perform search in SharePoint.
After some research I found that the length limit of a KQL query varies depending on how you create it. If you create the KQL query by using the default SharePoint search front end, the length limit is 2,048 characters. However, KQL queries you create programmatically by using the Query object model have a default length limit of 4,096 characters. You can increase this limit up to 20,480 characters by using the MaxKeywordQueryTextLength property or the DiscoveryMaxKeywordQueryTextLength property (for eDiscovery).
Again the length of FAST Query Language queries is limited to 2,048 characters.
This applies to SharePoint 2010, 2013
Reference : https://msdn.microsoft.com/en-us/library/office/ee558911.aspx
Note: You cannot modify this value in Office 365 SharePoint site
SharePoint “Add to timeline” option is disabled\Grayed out on Project site
Hi All,
Recently I found a issue where “Add to timeline” option is disabled on Project site.
After some research I found that in order to do enable “Add to timeline”, the user must have the permission to “manage” list, the contribution is not enough!
A user with contributor permission will see the option grayed out and won’t be able to use it.
Hope this will be helpful
