Archive for the ‘Office 365’ Category
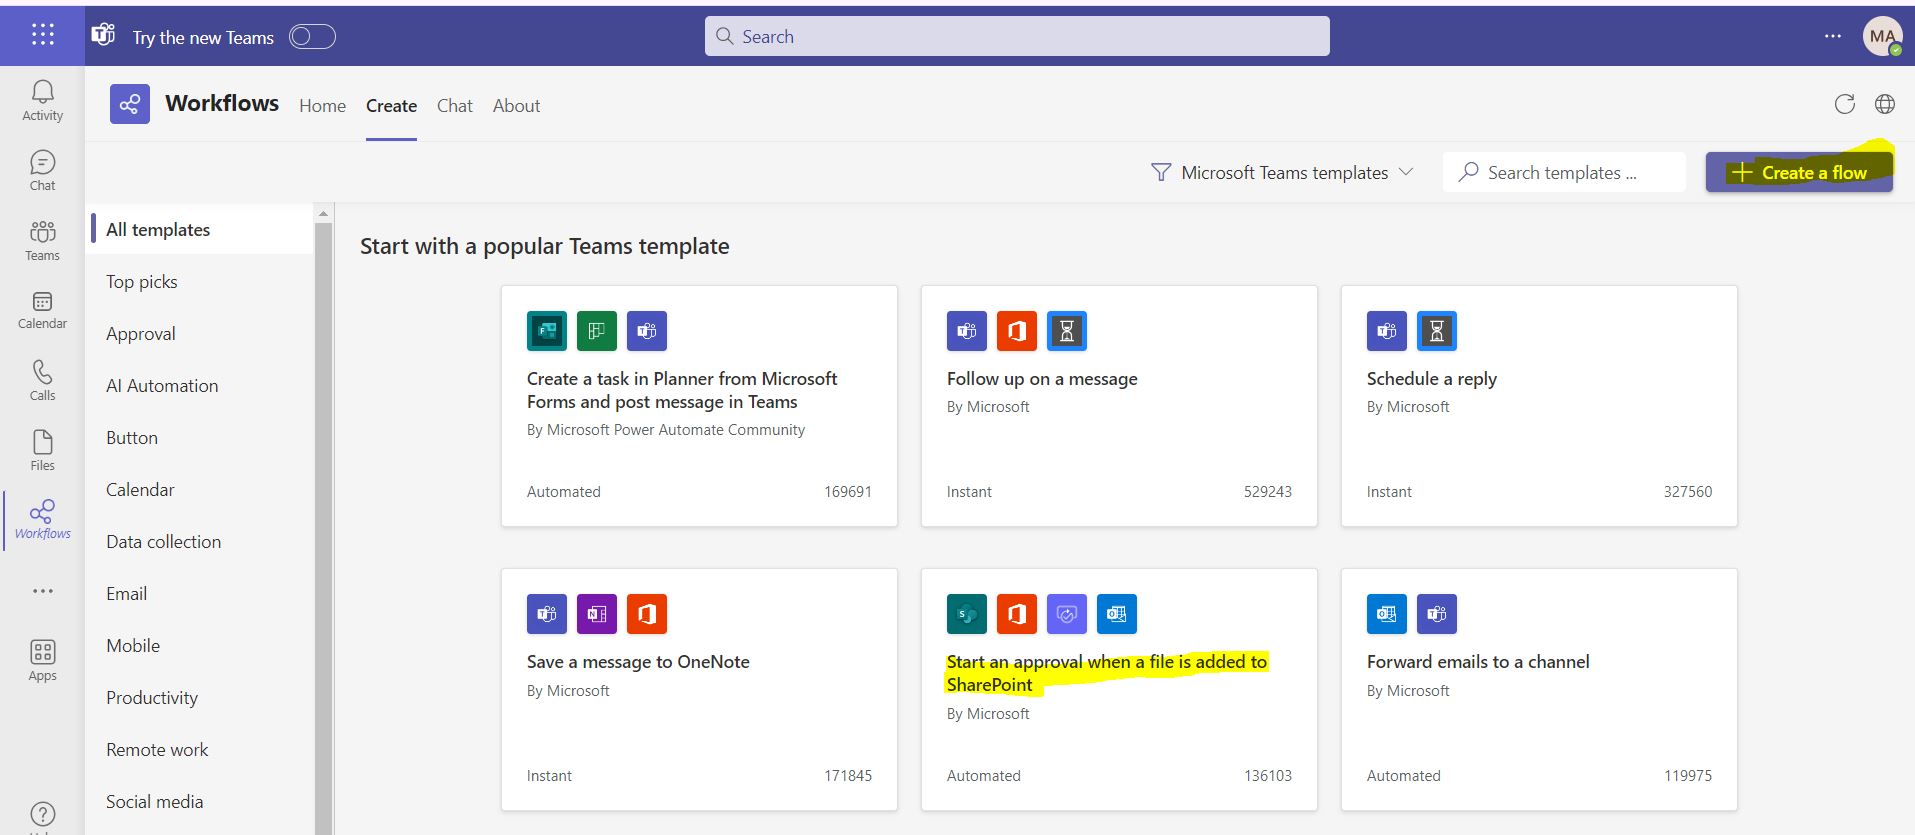
Start an approval when a file is added to SharePoint
Also explained in Youtube Video: https://www.youtube.com/watch?v=wlLohZEZ4E4
Workflow: Start an Approval When a File Is Added to SharePoint
1. Create a Flow in Power Automate or Use the workflow template in Microsoft Teams
1.a Power Automate:
- Navigate to your SharePoint library where you want to implement this workflow.
- Select the file you want to send for approval.
- Click on the “Show actions” button (usually represented by three dots).
- Hover over “Automate” and select “Request sign-off.”
- 1.b Teams Workflow:
- Navigate to the Teams channel.
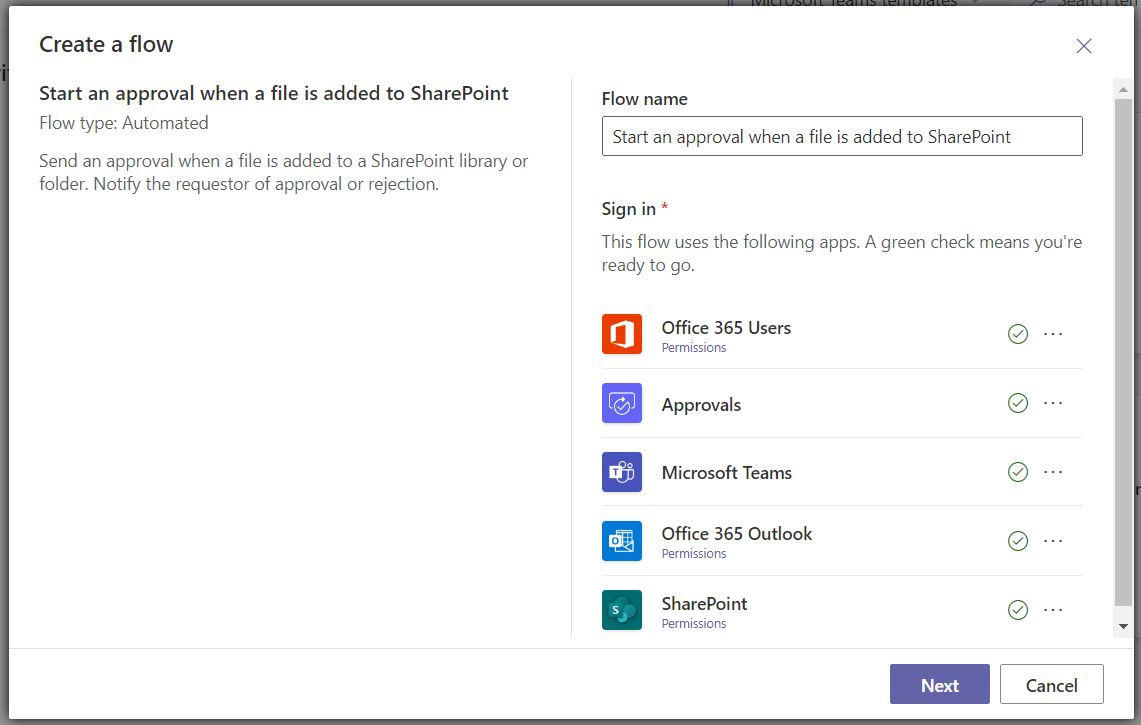
- Select “Create a Flow” then select ‘Start an approval when a file is added to SharePoint”the file you want to send for approval.”
- Give a name to the flow and make sure all authentication is done to all the required resources and then select Next
- Set up your flow with URL, list/library to monitor and users who should get email for approval.
Note : You can select multiple approvers for the library. - Select Create flow

2. Configure the Approval Flow
- In the approval configuration screen, you’ll need to:
- Specify the approvers (individuals or groups who will review the file).
- Enter a message or instructions related to the approval request.
- Click “Run flow” to initiate the approval process.
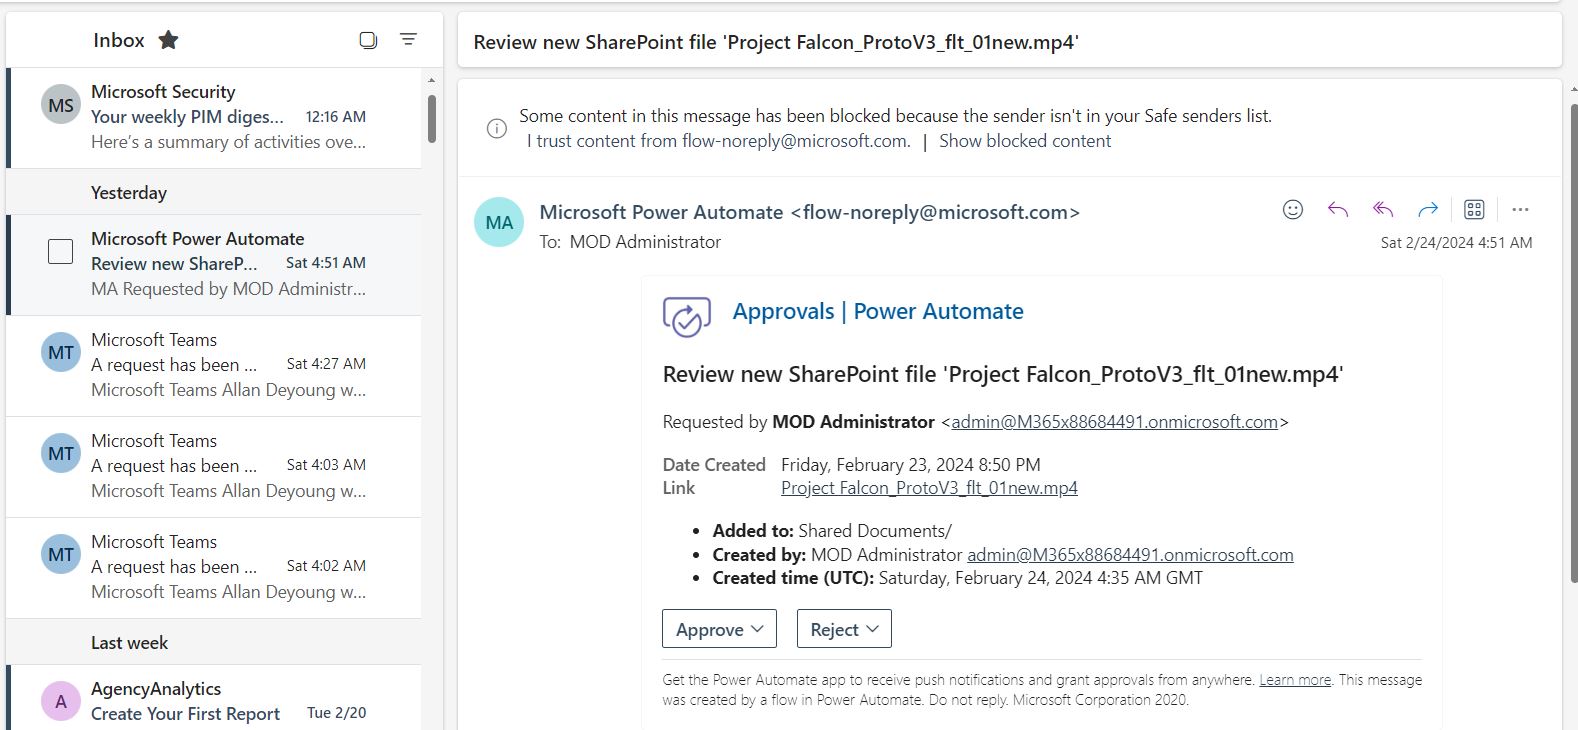
3. Approval Process
- Once the file is added to the SharePoint library, the workflow will trigger.
- The specified approvers will receive an approval request notification.
- Approvers can review the file and either approve or reject it.
- The requestor (the person who added the file) will be notified of the approval or rejection decision.
4. Additional Considerations
- You can customize the approval email template to include relevant details about the file.
- If the file is rejected, you can set up additional actions (such as notifying the requestor or updating the file status).
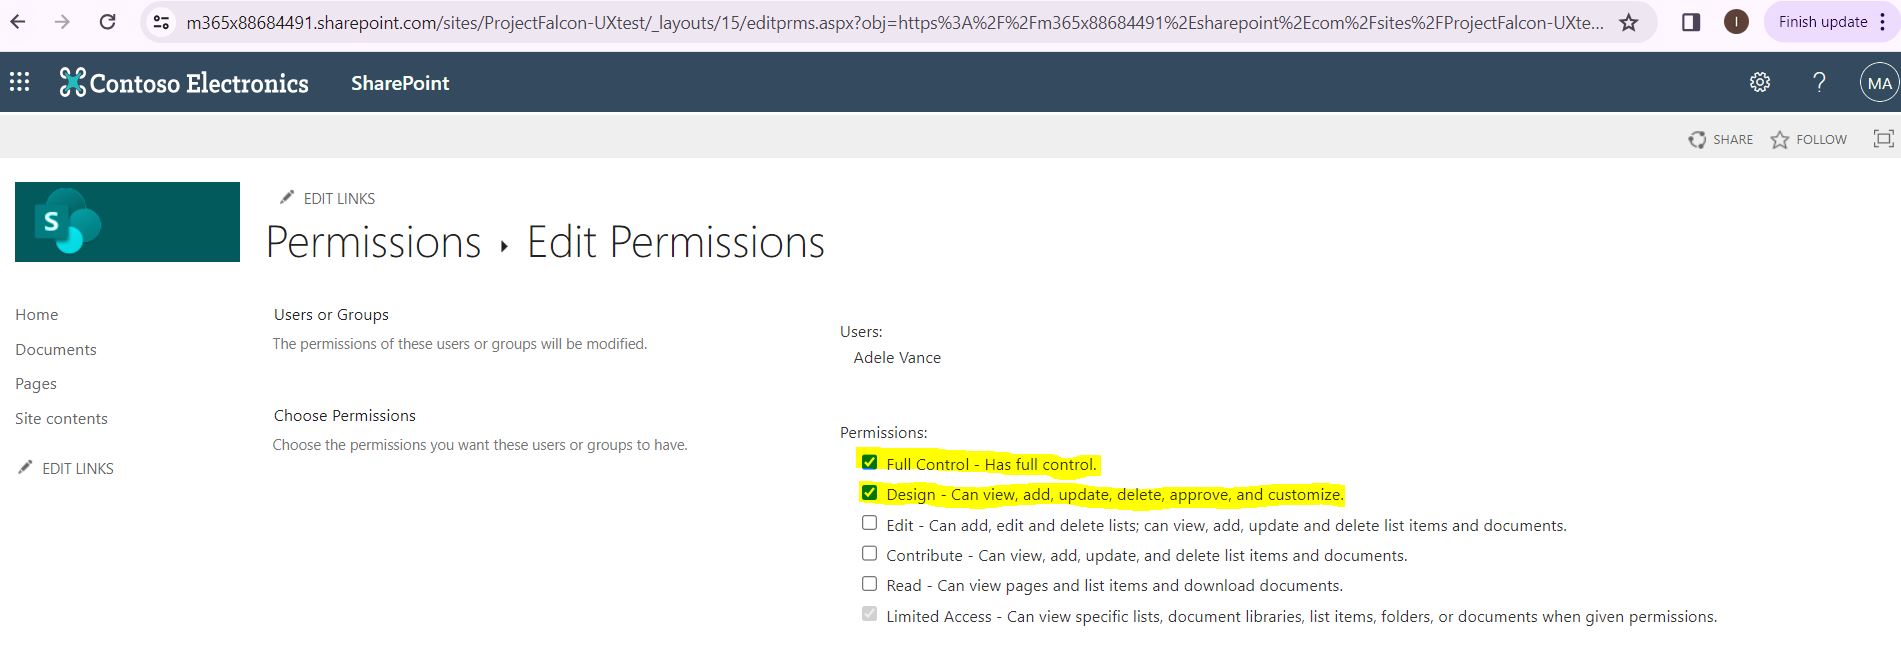
- The Approver set in the flow should have Approver/Design or Owner permission on the list/document library.
OneDrive App for Teams vs. Files in Old Teams
- Purpose and Usage:
- OneDrive App for Teams:
- Designed for individual workspace and personal file storage.
- Ideal for files used by a single user.
- Great for business documents, drafts, and personal reference.
- Files in Old Teams:
- Used for collaborative work within channels and teams.
- Shared files accessible to multiple team members.
- Suitable for ongoing projects and long-term collaborations.
- OneDrive App for Teams:
- Access and Integration:
- OneDrive App for Teams:
- Seamlessly integrates with Teams.
- Provides easy access to all Microsoft 365 content.
- Replaces the existing Files menu item.
- Files in Old Teams:
- Accessed directly within Teams.
- Linked to SharePoint libraries behind Teams and channels.
- OneDrive App for Teams:
- File Ownership:
- OneDrive App for Teams:
- Files are owned by individual users.
- Account holder’s departure doesn’t impact shared links.
- Files in Old Teams:
- Files are owned by the team or channel.
- Shared links may be removed if the account holder leaves.
- OneDrive App for Teams:
- Collaboration:
- OneDrive App for Teams:
- Limited sharing—best for personal use.
- Collaboration features are minimal.
- Files in Old Teams:
- Robust collaboration tools.
- Multiple users can work on shared files simultaneously.
- OneDrive App for Teams:
- Future Enhancements:
- The OneDrive app enhancements will roll out to classic Teams in early 2024, with the Files app name unchanged.
Workflow in Microsoft Teams
The Workflow feature enhances collaboration and productivity within Teams by streamlining processes and automating repetitive tasks. Here are some key aspects:
- Approvals and Reviews:
- Teams now allows you to create approval workflows directly within channels or chats.
- You can request approvals for documents, proposals, or any other content.
- Approvers receive notifications and can review and respond without leaving Teams.
- Power Automate Integration:
- Teams integrates seamlessly with Power Automate, Microsoft’s workflow automation platform.
- You can create custom flows to automate actions based on triggers within Teams.
- For example, automatically post a message in a channel when a new file is uploaded to a SharePoint folder.
- Templates and Custom Workflows:
- Teams provides pre-built templates for common workflows.
- Customize these templates or create your own workflows tailored to your team’s needs.
- Examples include employee onboarding, expense approvals, and project management.
- Task Management:
- Use the Tasks by Planner and To Do app to manage tasks within Teams.
- Assign tasks, set due dates, and track progress—all without leaving the collaboration environment.
- Notifications and Reminders:
- Workflow notifications keep team members informed.
- Set reminders for upcoming deadlines, meetings, or important events.
- Integration with Apps and Bots:
- Leverage third-party apps and bots to enhance workflows.
- For instance, integrate with Trello, Jira, or other tools your team uses.
New features of Microsoft Teams V2
Also explained in Youtube Video : https://youtu.be/9jCqcvHY4lg
Let’s learn about new features of Microsoft Teams that enhance collaboration and productivity:
- Forward Chat Messages: Now, you can easily share chat messages by right-clicking any message and selecting “Forward.” No more manual copying and pasting—just smooth communication!
- Immersive Spaces with Microsoft Mesh: Imagine 3D immersive spaces within Teams meetings. It’s like teleporting to a virtual room where interactions feel more face-to-face. You can still use familiar Teams features like shared content, chat, and live reactions.
- Intelligent Recap with Copilot: If you’re a Microsoft 365 user with Copilot, get ready for intelligent recaps. These personalized timeline markers summarize meetings, making it a breeze to browse recordings based on relevant content.
- AI-Generated Backgrounds: Spice up your virtual meetings! Use AI to decorate your real-world room background. Clean up clutter, add plants, or create a serene oasis. Available for Teams Premium users.
- People-Specific Links for Collaborative Notes: Teams meetings now offer people-specific links for Collaborative Notes. These links provide more controlled access, aligning with specific file-sharing policies. Collaboration made smarter!
- Expanded Video Views: In Teams meetings on Chrome and Edge, you’ll automatically see up to 9 videos on your screen (previously limited to 4). Visual collaboration just got an upgrade!
- Simplified Audio and Video Controls: Adjust audio and video settings directly from the meeting controls. Volume, spatial audio, background—manage it all effortlessly.
- Agenda View : It is a scrollable list of your upcoming meetings in chronological order. It’s like having a neat to-do list for your meetings.
- Workflows : The Workflow feature enhances collaboration and productivity within Teams by streamlining processes and automating repetitive tasks. Explained in detail on This artice
- OneDrive : OneDrive Option is replacement of Files in old Teams. It comes with some advanced features which are explained in This Artice
Using Office 365 for rights management and access control
“Secure your data with Office 365 – Control who has access and manage your rights with ease!”
Introduction
Office 365, a robust cloud-based platform, equips organizations with a wide array of tools to efficiently oversee user access and privileges. It enables seamless regulation of data and application access while also governing user rights and permissions. Furthermore, Office 365 offers an assortment of functionalities to safeguard organizational data and applications from unlawful access and malevolent cyber assaults. This discourse will offer insights into the utilization of Office 365 for rights management and access control.
Best Practices for Implementing Office 365 for Rights Management and Access Control
1. The crucial foundation for successfully implementing Office 365 for Rights Management and Access Control lies in establishing a meticulously crafted governance plan. This comprehensive plan needs to encompass delineated roles and responsibilities, well-defined policies and procedures, and a meticulously organized timeline for execution.
2. It is imperative to meticulously assign appropriate access levels to users in accordance with their distinct roles and corresponding responsibilities. This meticulous allocation will guarantee that users possess the precise level of access essential for executing their duties effectively.
3. The implementation of robust security controls, including the integration of multi-factor authentication, encryption protocols, and vigilant data loss prevention mechanisms, is crucial in safeguarding data from unauthorized incursions.
4. Vigilantly monitoring access and usage of Office 365 is pivotal in ensuring that users do not illegitimately access or utilize data, thus preserving the security and integrity of the system.
5. Delivering comprehensive training to users on the proper utilization of Office 365 for Rights Management and Access Control is imperative for the seamless execution of this system.
6. Ensuring adherence to established governance policies and procedures requires vigilant monitoring to verify user compliance.
7. Consistently reviewing and updating policies and procedures is crucial to maintaining their currency and relevance.
8. Employing automation tools can significantly streamline the management of Office 365 access and usage processes.
9. Capitalizing on third-party solutions, such as identity and access management tools, can greatly simplify the administration of Office 365 access and usage.
10. Vigilantly monitoring Office 365 performance is vital to optimizing its functionality and meeting user requirements.
Understanding the Role of Office 365 in Data Security
Ensuring data security is a pressing concern for businesses across the spectrum. With an escalating dependence on cloud-based services, safeguarding data from unauthorized access and malicious attacks becomes imperative. Office 365, a suite of cloud-based productivity tools, holds the key to securing data and upholding industry regulations.
Office 365 offers an array of security features for data protection. These encompass encryption, multi-factor authentication, and data loss prevention. Encryption shields data by obfuscating it, rendering it accessible solely to authorized users. Multi-factor authentication necessitates additional credentials, such as a code dispatched to a user’s mobile device, for account access. Data loss prevention aids in detecting and curbing unauthorized sharing of sensitive data.
Facilitating compliance with industry regulations, Office 365 encompasses features like audit logging, enabling organizations to trail user activity and detect any dubious behavior. It further includes data classification tools, aiding organizations in recognizing and categorizing sensitive data. This step assures adherence to regulatory requirements, such as the General Data Protection Regulation (GDPR).
Apart from its security measures, Office 365 furnishes organizations with a diverse set of collaboration tools. These enable secure document sharing and real-time project collaboration, fostering heightened productivity and a reduced vulnerability to data breaches.
In essence, Office 365 stands as an indispensable asset for organizations seeking to fortify their data security and uphold industry standards. The suite’s amalgamation of security features and collaboration tools serves as a potent means for data protection and productivity enhancement.
Leveraging Office 365 for Access Control and Data Protection
Office 365 offers a robust array of cloud-based applications designed to fortify organizational data security and regulate data access. It enables the establishment of stringent access control policies to safeguard sensitive data exclusively for authorized users, integrating encryption, data loss prevention, and multi-factor authentication to thwart unauthorized access attempts.
Access control stands as a pivotal component within data security protocols. Office 365 harnesses numerous tools for organizations to manage data access. Leveraging Azure Active Directory, organizations can administer user access to Office 365 applications, implementing access control policies to define permissible access to applications and data. Moreover, organizations can deploy multi-factor authentication through Azure Active Directory, bolstering security by mandating additional authentication factors like phone-delivered codes or fingerprint scans.
Additionally, Office 365 presents robust data protection features to shield organizational data from unauthorized access. It furnishes cloud data encryption, bolstering protection against unauthorized data breaches. Furthermore, it encompasses data loss prevention mechanisms to identify and forestall unauthorized dissemination of sensitive data.
Overall, Office 365 furnishes potent instruments for fortifying data security and governing data access. By harnessing Office 365’s access control and data protection capacities, organizations ensure data integrity and stringent access exclusive to authorized personnel.
Exploring the Benefits of Office 365 for Rights Management
Office 365 stands as a robust suite of cloud-based applications. It proves beneficial for organizations of various sizes in managing data and safeguarding intellectual assets. An integral aspect of Office 365 lies in its Rights Management capabilities. This strategic feature empowers organizations in governing access, viewing, and editing privileges for their documents. Delving into the advantages of Office 365 for Rights Management presents a valuable pursuit and elucidates its pivotal role in fortifying data security.
The domain of Rights Management encompasses a potent mechanism. It endows organizations with the ability to regulate document accessibility, viewing, and editing. With Office 365, entities can impose stringent permissions, granting exclusive access solely to authorized users. This serves to uphold the sanctity of confidential information and restricts access solely to those possessing requisite authorization. Moreover, Office 365 furnishes organizations with the capability to impose expiration dates on documents. This feature ensures automatic deletion upon reaching a specified time threshold.
Office 365 for Rights Management offers a myriad of advantages, one being its capacity to meticulously monitor document usage. This includes tracking the individuals who have accessed a document, the timestamps of access, and the alterations made. This functionality empowers organizations in overseeing document access and averting unauthorized sharing. Furthermore, Office 365 enables the establishment of alerts to promptly notify organizations of any document access or modifications.
Moreover, the capability to rescind access to documents stands as another hallmark of Office 365 for Rights Management. This serves as a swift and efficient measure for deterring unauthorized access or discontinuing access to redundant documents. This feature significantly contributes to upholding the security of sensitive information, preventing its dissemination to unauthorized parties.
In summary, Office 365 for Rights Management stands as a robust asset for safeguarding organizational data and intellectual property. Its offerings encompass the meticulous control of document access, monitoring of usage patterns, and the ability to retract access privileges as deemed necessary. Organizations leveraging these functionalities can fortify the confidentiality of their information and forestall unauthorized disclosure.
How Office 365 Can Help You Securely Manage Access to Your Data
Office 365, a robust cloud-based suite of productivity tools, offers a secure means to manage data access. This comprehensive platform empowers users to wield authority over data accessibility and implement multi-factor authentication for stringent control.
The suite encompasses a plethora of security features to fortify data protection. Users can orchestrate access controls, dictating who can access their data and the extent of permissible actions. Moreover, the option to encrypt data fortifies defenses against unauthorized intrusion. Office 365 also integrates advanced threat protection mechanisms, bolstering the capability to discern and counter potential hazards.
Moreover, Office 365 proffers an array of tools geared towards fine-tuning data accessibility. The capability to establish user roles and permissions is pivotal in dictating data access and manipulation. Furthermore, the imposition of data sharing policies enables granular control over data accessibility and dissemination. Complementing this, the implementation of data retention policies ensures the proper preservation of data for mandated durations.
Finally, Office 365 provides a range of tools to help you monitor and audit access to your data. You can set up alerts to notify you when someone attempts to access your data, and you can use audit logs to track who has accessed your data and what they have done with it.
Overall, Office 365 provides a range of tools to help you securely manage access to your data. With Office 365, you can control who has access to your data, set up data encryption to protect your data, and monitor and audit access to your data.
Conclusion
Office 365 is an excellent tool for rights management and access control. It provides a secure and reliable platform for managing user access and permissions, as well as providing a comprehensive set of tools for managing and monitoring user activity. It also offers a range of features that make it easy to set up and manage access control policies, and to ensure that only authorized users have access to sensitive data. With Office 365, organizations can ensure that their data is secure and that their users have the right level of access to the resources they need.
Keeping up with updates and new features in Office 365
“Stay Ahead of the Curve with Office 365: Get the Latest Updates and Features!”
Introduction
Office 365, a robust array of tools, enhances productivity and organization. Remaining abreast of the suite’s constant evolution unlocks its maximum potential. As new features continually augment its capabilities, staying informed becomes challenging. This comprehensive guide offers insights into the suite’s latest updates, empowering you to optimize your usage.
Making the Most of Office 365 Updates: Tips and Tricks for Power Users
Office 365, an impressive suite of tools, plays a vital role in enhancing productivity and organization. Regular updates bring about an array of new features and changes, making it challenging to keep pace. For those seeking to harness the full potential of Office 365, staying abreast of the latest functionalities is essential. Here are some insights and strategies to optimize Office 365 updates.
Stay Current: Ensuring you perpetually operate on the most recent version of Office 365 guarantees access to cutting-edge features and security enhancements. Regularly checking for updates in the Office 365 admin center or app is advisable.
Embrace Novel Features: Office 365 continually introduces innovative tools. Fully integrating these additions into your routine provides an enriched Office 365 experience.
Leverage Automation: Harnessing the power of automation within Office 365 can significantly augment productivity and efficiency. Numerous built-in automation tools facilitate workflow streamlining.
Prioritize Security Updates: Office 365 consistently delivers crucial security updates to fortify data protection. Embracing these updates is fundamental in safeguarding your valuable information.
Explore Third-Party Applications: A multitude of third-party apps complement Office 365, offering assistance in task automation, project management, and beyond.
By implementing these guidelines, you can optimize your utilization of Office 365 updates, thus elevating productivity and maintaining organizational prowess.
.
Keeping Your Office 365 Environment Secure with the Latest Updates
With the rising reliance of businesses on cloud-based services like Office 365 for data and operations management, securing the environment has become paramount. Maintaining a secure Office 365 environment necessitates regular upkeep and updates to shield data from potential threats.
The primary measure to fortify your Office 365 environment involves verifying that all users are on the latest Office 365 version. Microsoft routinely issues updates encompassing security patches and other enhancements. Enabling automatic updates in the Office 365 Admin Center will guarantee that all users have the most recent version.
Beyond ensuring users are up to date, it’s imperative to routinely assess security settings in the Office 365 Admin Center to align with specific security requirements. This includes configuring settings to bar users from sharing sensitive information externally or mandating multi-factor authentication for designated users.
Lastly, cultivating user awareness about security risks associated with Office 365 is crucial. Regular training should educate users on data protection and identifying potential threats, empowering them to safeguard their data proactively.
Adhering to these measures will safeguard and maintain the security of your Office 365 environment. Consistent maintenance and updates will fortify data protection and elevate user awareness regarding the security ramifications of using Office 365.
What’s New in Office 365: A Guide to the Latest Features
Office 365 represents a robust array of productivity resources adept at fostering connectivity and organization for enterprises, regardless of their magnitude. Its cloud-centric services furnish users with unfettered entry to cutting-edge features and upgrades, positioning them at the vanguard of progress. Within this guide, we shall explore the freshest facets and enhancements accessible in Office 365, and their capacity to optimize your subscription’s utility.
Among the most captivating novelties within Office 365 is the capability for seamless real-time collaboration. With the new co-authoring feature, multiple users can work on the same document at the same time, making it easier to collaborate on projects and get work done faster. Additionally, users can now access their documents from any device, allowing them to work from anywhere.
Office 365 presents a diverse array of cutting-edge security features to bolster the safeguarding of your data. The introduction of Advanced Threat Protection furnishes users with the capability to shield their emails against pernicious links and attachments, while also identifying and obstructing suspicious activities. Furthermore, Office 365 has integrated multi-factor authentication, necessitating users to furnish supplementary verification before gaining access to their accounts.
Moreover, Office 365 has integrated a suite of innovative tools to enhance user productivity and organization. The introduction of the To-Do app empowers users to formulate and manage tasks, set reminders, and monitor their progress. Additionally, the novel Outlook Groups functionality allows users to establish and oversee groups of contacts, thereby facilitating seamless communication with colleagues and clients.
These represent merely a glimpse of the plethora of novel features and enhancements available through Office 365. With its cloud-based services and robust toolkit, Office 365 serves as a pivotal resource for businesses of varied scales, facilitating enhanced connectivity and organization.
Exploring the Benefits of Office 365 Updates
Office 365 represents a robust collection of cloud-based applications known for their ability to bolster productivity, collaboration, and communication across businesses of diverse scales. Its consistent updates guarantee users access to the most cutting-edge features and tools, enabling them to maintain a competitive edge. This piece delves into the advantages of Office 365 updates and their potential to optimize business productivity.
An eminent advantage of Office 365 updates is the capacity to remain current with the most recent features and tools. Regular updates ensure users stay at the forefront and can leverage new capabilities such as real-time collaboration, heightened security measures, and advanced analytics. Furthermore, these updates facilitate businesses in adhering to industry regulations and standards, ensuring compliance.
Furthermore, Office 365 updates drive enhanced collaboration by empowering users to seamlessly interact with colleagues, partners, and customers in real time. This fosters swift decision-making and refined communication. Notably, these updates also enable businesses to maintain strong ties with their customer base by equipping them with the latest functionalities.
Ultimately, Office 365 updates facilitate considerable time and cost savings for businesses. By integrating the latest updates, organizations can automate operations and streamline workflows, thereby diminishing manual processes and curbing the necessity for additional staffing. Additionally, Office 365 updates can help businesses reduce costs by providing them with the latest features and tools at no additional cost.
In conclusion, Office 365 updates can provide businesses with a range of benefits. From staying up-to-date with the latest features and tools to improved collaboration and cost savings, Office 365 updates can help businesses maximize their productivity and stay ahead of the competition.
How to Stay Up-to-Date on the Latest Office 365 Features
Staying abreast of the latest Office 365 features is crucial for businesses aiming to optimize productivity and efficiency. Microsoft consistently unveils fresh attributes and enhancements, making it imperative to remain well-informed. Here are strategies to keep current with the newest Office 365 features:
1. Register for Microsoft’s Office 365 blog, a valuable resource for staying abreast of the latest Office 365 features. This blog is routinely updated with news and insights on new attributes and enhancements.
2. Follow Microsoft’s Office 365 Twitter account to stay informed about the newest features. The account frequently shares updates on the latest features and enhancements.
3. Participate in Microsoft events, where the latest Office 365 features are showcased. Attending these events offers an excellent opportunity to stay informed about the latest developments.
4. Engage with Office 365 user forums, which serve as a valuable resource for staying updated on the latest features. Users often share information about new features and enhancements, making forums an invaluable source of insights.
By implementing these strategies, you can remain updated on the latest Office 365 features, ensuring that your business fully capitalizes on the newest attributes and enhancements.
.
Conclusion
Staying abreast of the latest updates and innovations in Office 365 is imperative for enterprises to maintain a competitive edge and optimize their efficiency. In today’s dynamic tech environment, Office 365 furnishes businesses with the requisite arsenal of tools and functionalities to outpace the competition. By remaining current with the newest updates and features, enterprises can guarantee that their workforce leverages the most streamlined and potent resources at their disposal. Furthermore, organizations can capitalize on the myriad advantages that Office 365 affords, including heightened synergy, bolstered security, and amplified productivity.
Migrating to Office 365
“Migrate to Office 365 and Unlock the Power of Productivity!”
Introduction
The transition to Office 365 presents a thrilling prospect for enterprises to harness cutting-edge cloud-based technology. Office 365 furnishes an extensive array of tools and services, empowering businesses to elevate efficiency, curtail expenses, and enhance teamwork. By embracing Office 365, enterprises can effortlessly retrieve their data from any location, at any hour, and on any device. Furthermore, Office 365 encompasses an assortment of security measures to safeguard data and uphold adherence to industry mandates. This manual will furnish an outline of the advantages of transitioning to Office 365 and delineate the sequential stages of the migration process.
Best Practices for Managing and Securing Office 365 After Migration
Migration to Office 365 presents an opportunity to harness the capabilities of the cloud-based productivity suite and its diverse functionalities. However, optimizing the management and fortification of your Office 365 environment post-migration is imperative. Here are some optimal strategies for the post-migration management and safeguarding of Office 365:
Establishing a Comprehensive Security Plan: Develop a meticulously detailed security plan delineating the measures to safeguard your Office 365 ecosystem. This blueprint should encompass stringent policies and protocols for user authentication, data encryption, and defense against malware.
Monitoring User Activity: Vigilantly scrutinize user activity within Office 365 to ensure that sensitive data is not being inappropriately accessed or shared. Leveraging Office 365’s in-built auditing and reporting tools allows you to closely monitor user actions.
Implementing Multi-Factor Authentication: Integrate multi-factor authentication (MFA) to fortify access control to your Office 365 infrastructure. MFA necessitates users to furnish multiple forms of identity verification, such as a password combined with a code dispatched to their mobile device, for access.
Utilizing Data Loss Prevention (DLP): Employ the in-built data loss prevention (DLP) features of Office 365 to shield sensitive data from unauthorized dissemination. DLP functionality can swiftly detect and prohibit the sharing of sensitive data such as credit card numbers and Social Security numbers.
Activation of Security Alerts: Enable security alerts within Office 365 to receive timely notifications upon detection of suspicious activities. This proactive measure aids in expedited identification and response to potential security hazards.
User Training: Educate users on secure utilization of Office 365, encompassing the ability to discern phishing emails, implementation of robust password practices, and safeguarding their data.
Adherence to these best practices leads to the adept management and protection of your Office 365 environment post-migration, thereby safeguarding data and fortifying your organization against cyber threats.
How to Leverage Office 365 to Improve Collaboration and Productivity
Office 365, a robust collection of tools, holds the potential to enhance collaboration and productivity for enterprises across the spectrum. Leveraging the multifaceted capabilities of Office 365 empowers businesses to optimize operations, boost efficacy, and trim expenses.
Among the arsenal of capabilities within Office 365, its cloud-based storage and collaboration prowess stands out. This suite equips businesses to securely store and seamlessly share a gamut of files such as documents, spreadsheets, and presentations in the cloud. This fosters effortless real-time collaboration for teams, irrespective of their geographical dispersion.
Office 365 provides a diverse array of communication tools, including the robust Skype for Business. This facilitates seamless voice and video calls, alongside instant messaging functionalities. Such integrated features forge a convenient platform for teams to maintain constant connectivity, fostering efficient project collaboration.
Furthermore, Office 365 encompasses an extensive suite of productivity tools, exemplified by Microsoft Teams. This comprehensive tool empowers users to initiate and oversee projects, delegate tasks, and monitor their progress. Consequently, it furnishes teams with the capability to maintain meticulous organization and adherence to project timelines.
In addition to its communication and productivity offerings, Office 365 incorporates a host of security measures. These include the implementation of multi-factor authentication and data encryption, serving as formidable safeguards against cyber threats. The encryption capabilities ensure the preservation of business data integrity and confidentiality.
By harnessing the multifaceted capabilities of Office 365, businesses can elevate their collaborative efforts and operational efficacy. Consequently, they are poised to optimize efficiency, streamline workflows, and curtail operational expenses. Armed with adept strategies and adept utilization of the myriad tools at their disposal, businesses can propel their operations to unprecedented heights through Office 365.
Tips for Ensuring a Successful Office 365 Migration
Planning in advance is crucial before embarking on the migration process, necessitating the creation of a timeline to ensure timely completion and comprehensive execution.
Evaluate your current environment to discern indispensable elements for migration and discern those that may be dispensable, thus streamlining the efficacy of the migration process.
Equipping users with comprehensive preparation for the migration process is pivotal, entailing thorough training on adopting the new system and adapting to potential alterations.
Prior to the commencement of the actual migration, it is imperative to subject it to rigorous testing to validate its success, either through a pilot migration or deployment in a test environment.
Vigilant monitoring of the migration process is paramount once it is underway, encompassing meticulous scrutiny for errors or challenges that may surface during the transition.
Concluding the migration process necessitates a thorough cleansing of residual data or files that were not transferred, ensuring the seamless and efficient functionality of the new system.
Ongoing support post-migration is indispensable to assist users in acclimatizing to the new system and addressing any ensuing queries or concerns.
Provide Support: Once the migration is complete, it is important to provide support to users who may need help with the new system. This includes providing training and troubleshooting any issues that may arise.
What to Consider When Choosing an Office 365 Migration Plan
When deliberating on an Office 365 migration plan, numerous factors warrant consideration. Initially, assessing the scale and intricacy of the migration is crucial. This evaluation is instrumental in gauging the requisite duration and resources necessary for a successful migration. Furthermore, deliberation upon the existing infrastructure and the envisioned end-state is imperative in devising the most optimal migration strategy.
Subsequently, meticulous attention towards the data slated for migration becomes paramount. This encompasses emails, documents, contacts, calendars, and various other data sets. It is essential to strategize the most efficacious data migration method, all the while factoring in pertinent security considerations.
A significant element to contemplate is the timeline earmarked for the migration venture. This decisively influences the chosen approach for the migration as well as the resource allocation requisite for its completion. Moreover, deliberation upon any potential downtime stemming from the migration is indispensable.
Ultimately, the fiscal aspect of the migration necessitates attention. This aspect dictates the most suitable approach for the migration, alongside the resource capacity mandatory for its execution. Additionally, it is prudent to factor in any potential costs associated with the migration process.
By meticulously contemplating these facets, organizations can ensure the selection of an Office 365 migration plan that aligns with their specific requisites.
How to Prepare for a Smooth Migration to Office 365
Migrating to Office 365 can be a complex process, but with the right preparation, it can be a smooth and successful transition. Here are some tips to help you prepare for a successful migration to Office 365:
Assessing your current environment is a critical first step before embarking on the migration process. Understanding the existing infrastructure, applications, and data will provide valuable insights for discerning what necessitates migration and what can be left untouched.
Following the assessment, meticulous planning for the migration process becomes imperative. Decisions regarding which applications and data require migration, alongside establishing a well-structured timeline, warrant careful attention.
Prior to commencing the migration, ensuring data preparedness is paramount. This entails meticulous backup procedures and encryption protocols for safeguarding sensitive information.
Subsequent to data readiness, comprehensive testing of the migration process, as well as thorough scrutiny of applications and data post-migration, cannot be underestimated in importance.
Upon the completion of migration, equipping users with the requisite knowledge and understanding of the new Office 365 environment assumes significance. Comprehensive user training, encompassing familiarity with new applications, features, and collaboration tools, becomes pivotal.
By following these tips, you can ensure that your migration to Office 365 is a smooth and successful process. With the right preparation and planning, you can ensure that your users are up and running quickly and efficiently.
Conclusion
Migrating to Office 365 is a great way to take advantage of the latest technology and features available in the cloud. It can help businesses save time and money, while also providing a secure and reliable platform for their data. With the right planning and implementation, businesses can benefit from the many features and advantages of Office 365, such as improved collaboration, enhanced security, and increased productivity.
Collaborating on documents with OneDrive and SharePoint
“Enhance Collaboration with Assurance – Integrate OneDrive and SharePoint for Effortless Document Sharing!”
Introduction
OneDrive and SharePoint serve as potent resources enabling real-time document collaboration. Utilizing OneDrive enables users to effortlessly store, synchronize, and distribute files with peers, while SharePoint furnishes a secure arena for teams to collectively engage with documents. These platforms boast an array of functionalities facilitating seamless document collaboration, encompassing version control, file sharing, and simultaneous authorship. This comprehensive guide will offer insights into leveraging OneDrive and SharePoint for optimal document collaboration.
How to Leverage OneDrive and SharePoint to Improve Your Team’s Document Collaboration
Effective collaboration on documents is crucial for optimal team productivity. Utilizing the appropriate tools enables seamless sharing and editing, fostering synchronization within the team. Microsoft’s OneDrive and SharePoint stand as robust facilitators of improved document collaboration.
OneDrive, as a cloud storage service, permits file storage and sharing. Its seamless integration with Microsoft Office streamlines document creation, editing, and sharing. Moreover, it simplifies collaborative endeavors by enabling easy file sharing among users.
In contrast, SharePoint serves as a web-based collaboration platform, organizing and sharing documents while offering comprehensive website creation and task/project management tools. The platform’s capability to establish document libraries, facilitating effective document sharing among users, stands as a cornerstone of its collaborative potential.
Combining OneDrive and SharePoint empowers teams to seamlessly collaborate. OneDrive simplifies document storage and sharing, while SharePoint offers invaluable document organization and management tools. Furthermore, the utilization of SharePoint’s document libraries simplifies document sharing among team members.
Consequently, the integration of OneDrive and SharePoint elevates document collaboration. With streamlined document storage, sharing, and management, teams achieve synchronization. Leveraging these proficient tools assures efficient and effective document collaboration.
Tips for Enhancing Collaboration with OneDrive and SharePoint
1. Utilize the OneDrive and SharePoint mobile apps to stay connected and collaborate on the go.
2. Take advantage of the co-authoring feature to work on documents together in real-time.
3. Leverage the version history tool to monitor and synchronize document modifications across collaborators efficiently.
4. Employ the sharing functionality to securely disseminate documents to external stakeholders.
5. Harness the tagging feature to swiftly locate relevant documents and files within the system.
6. Leverage the search tool to promptly retrieve specific documents and files as needed.
7. Take advantage of the notifications feature to remain abreast of alterations and enhancements.
8. Take advantage of the commenting feature to provide feedback and collaborate on documents.
9. Use the task list feature to assign tasks and track progress.
10. Utilize the integration with Microsoft Office to easily create and edit documents.
How to Set Up and Manage Document Sharing with OneDrive and SharePoint
OneDrive and SharePoint, two robust applications, enable seamless document sharing and collaborative endeavors among users. OneDrive facilitates file storage, synchronization, and sharing, whereas SharePoint provides a secure environment for collaborative document work. The guidelines below offer an extensive insight into configuring and supervising document sharing through OneDrive and SharePoint.
Configuring Document Sharing via OneDrive
OneDrive, a cloud-hosted repository, empowers users to store, synchronize, and distribute files. Initiating document sharing via OneDrive mandates the creation of a user account. Post account establishment, files can be uploaded and effortlessly shared. Users can opt to share a file by selecting it and triggering the “Share” command, thereafter inputting the recipient’s email address. Subsequently, they can dispatch the file via the “Share” prompt.
Configuring Document Sharing via SharePoint
SharePoint, a safeguarded platform, caters to collaborative document sharing. Commencing document sharing in SharePoint necessitates the creation of a SharePoint site, empowering users to upload and disseminate files. Similar to OneDrive, users can share a file by selecting it, invoking the “Share” option, then entering the recipient’s email address and forwarding the file via the “Share” command.
Supervising Document Sharing via OneDrive and SharePoint
After sharing documents, users have the prerogative to regulate sharing parameters for each file. By selecting a file and activating the “Manage” function, users can view the list of recipients and fine-tune the sharing settings. Furthermore, users retain the authority to revoke file access by selecting the individual and executing the “Revoke Access” action.
In Conclusion
OneDrive and SharePoint significantly enhance file sharing and collaborative possibilities. This guide comprehensively delineates the procedures for initiating and overseeing document sharing with OneDrive and SharePoint. With these tools, users can easily share documents with others and manage the sharing settings for each file.
Best Practices for Collaborating on Documents with OneDrive and SharePoint
1. Before embarking on any collaborative endeavor, it is imperative to unequivocally designate the proprietor of the document. This foundational step serves to instill proper document management and meticulous tracking of all alterations.
2. Imposing the appropriate permissions for the document prior to commencing collaboration is crucial. This will fortify document security and restrict access solely to those necessitating it.
3. Adhering to version control is of paramount importance when engaging in collaborative document editing. This practice safeguards comprehensive tracking of all alterations and ensures that the most current version is readily accessible.
4. Employing the check-in/check-out feature is vital when multiple individuals are contributing to a document. This method ensures singular docent engagement and meticulous change tracking.
5. Embracing notifications is pivotal to ensuring all collaborators are abreast of document modifications. This fosters alignment and prevents oversight of any alterations.
6. Leveraging comments serves as an invaluable means of providing feedback without directly editing the document. This approach fosters awareness among collaborators regarding necessary adjustments.
7. Harnessing the potential of co-authoring facilitates real-time collaboration on documents. This enables all participants to remain informed of modifications as they occur.
8. Utilizing online meetings offers an avenue for real-time collaboration on documents, promoting simultaneous awareness and providing a forum for discourse on changes.
Adherence to these aforementioned best practices will engender successful document collaboration through OneDrive and SharePoint.
How to Use OneDrive and SharePoint to Streamline Your Team’s Document Collaboration
Effectively collaborating on documents with a dispersed team poses a significant challenge. However, Microsoft’s OneDrive and SharePoint offer robust solutions to enhance document collaboration and facilitate seamless teamwork. OneDrive, a cloud storage platform, enables users to store, synchronize, and disseminate files. Its integration with Microsoft Office permits effortless real-time document creation, editing, and cooperative work.
SharePoint is an online collaboration platform enabling teams to securely store, organize, and share documents. It furnishes a robust work environment with customizable access permissions.
To commence with OneDrive and SharePoint, team members ought to establish a communal folder in OneDrive. This designated space can house the team’s documents and facilitate seamless sharing. Once set up, team members can upload documents and initiate collaboration.
Furthermore, SharePoint offers an array of potent tools for document cooperation. Teams can construct a dedicated workspace within SharePoint to streamline document management. Additionally, they can implement discussion boards and task lists to foster unified progress. Notably, users can fine-tune access rights for specific documents.
Employing OneDrive and SharePoint, teams can optimize their document collaboration, promoting seamless teamwork. These tools facilitate easy document management, secure access, and tailored permissions, enhancing overall teamwork efficiency. Leveraging OneDrive and SharePoint, teams can boost their collaborative prowess and productivity.
Conclusion
Utilizing OneDrive and SharePoint for document collaboration presents an exceptional opportunity for collective project engagement. This tool facilitates concurrent input from multiple individuals on a single document, streamlining the sharing and collaboration process. Its efficacy lies in promoting cohesive teamwork and optimizing operational efficiency. With the integration of OneDrive and SharePoint, teams can seamlessly unify efforts to expedite project completion while ensuring comprehensive collaboration.
Difference between Beta/me/profile and v1.0/me
Also explained in my Youtube video: https://www.youtube.com/watch?v=_XKrZvCIG98
The difference between the two endpoints is that https://graph.microsoft.com/beta/me/profile is in the beta version of the Microsoft Graph API, while https://graph.microsoft.com/v1.0/me is in the v1.0 version of the API . The beta version is used for testing new features and is not recommended for production use. The v1.0 version is the stable version of the API and is recommended for production use.
The https://graph.microsoft.com/beta/me/profile endpoint is used to retrieve information about a given user or yourself, such as the user’s profile information, interests, languages, skills, and more. To call this API, your app needs the appropriate permissions, such as User.Read.
On the other hand, the https://graph.microsoft.com/v1.0/me endpoint is used to retrieve information about the signed-in user, such as the user’s display name, email address, job title, and more. To call this API, your app needs the appropriate permissions, such as User.Read.
Administering Office 365 for your organization
“Office 365: Empower Your Organization with Confident Administration!”
Introduction
Step into the realm of Office 365! As an administrator, the imperative task of managing and overseeing Office 365 for your organization rests squarely on your shoulders. This comprehensive guide is the compass to steer you through the initial steps of Office 365 deployment, guaranteeing its meticulous configuration and sustained upkeep for your organization. You’ll delve into the diverse facets of Office 365, mastering the art of user setup and management alongside adept issue troubleshooting. Moreover, you’ll unravel the realm of security features inherent to Office 365, ensuring watertight protection of your organization’s data. Upon concluding this guide, you’ll possess a profound comprehension of how to expertly administer Office 365 for your organization.
How to Monitor Office 365 Usage in Your Organization
Monitoring the utilization of Office 365 within an organization is a critical component in upholding its efficient and secure operation. Understanding the manner in which the system is utilized, identifying the users involved, and ascertaining the nature of data access are pivotal. This article will furnish an overview of measures that organizations can implement to monitor Office 365 usage effectively.
1. Formulate a Comprehensive Monitoring Plan: The initial stride in monitoring Office 365 usage encompasses the formulation of a meticulous monitoring plan. This plan should encompass the categories of data slated for surveillance, the periodicity of monitoring activities, and the methodologies for data collection and analysis.
2. Surveillance of User Activity: It is imperative for organizations to closely monitor user activity to preclude unauthorized data access. This involves vigilance over user logins, file access, and related activities.
3. Oversight of Data Access: Apart from monitoring user activity, organizations ought to uphold vigilant surveillance over data access to forestall unauthorized entry to sensitive information. This vigilance extends to scrutinizing user logins, file access, and relevant activities.
4. Vigilance over Network Traffic: Ensuring that only authorized users access the system warrants vigilant oversight of network traffic. This takes the form of monitoring user logins, file access, and other related activities.
5. Surveillance of System Performance: Organizations need to monitor system performance to guarantee its efficient and secure operation. This monitoring encompasses metrics such as response time, uptime, and resource utilization.
6. Emphasis on Security Surveillance: Maintaining a watchful eye on security is crucial to guard the system against external threats. This extends to monitoring user logins, file access, and other relevant activities.
By following these diligent measures, organizations can ensure effective monitoring of their Office 365 usage, thus fortifying the system’s efficient and secure usage. Effective monitoring of Office 365 usage is indispensable in ensuring its proper usage and secure data access.
Strategies for Securing Office 365
Office 365, a robust suite of cloud-based tools, holds the potential to enhance productivity and foster collaboration across businesses of varying scales. Nevertheless, the escalating reliance on cloud applications amplifies the vulnerability to data breaches and other security menaces. Safeguarding the integrity of Office 365 necessitates the implementation of the following measures:
1. Integrate Multi-Factor Authentication: Multi-factor authentication, or MFA, serves as a stringent layer of security by necessitating users to furnish at least two forms of verification to confirm their identity. These may encompass something known only to the user, such as a password, something physically possessed, like a smartphone or security token, or biometric factors like a fingerprint. The implementation of MFA within Office 365 fortifies defenses against unauthorized account access.
2. Employ Encryption Techniques: Encryption, a method of encoding data to allow access solely to authorized parties, presents a crucial safeguard. Office 365 provides assorted encryption mechanisms, comprising data encryption at rest, encryption during transit, and email encryption. This fortification serves to shield data from unauthorized entry, thus guaranteeing that sensitive information is exclusively accessible to authorized personnel.
3. Vigilantly Monitor User Activity: Diligent scrutiny of user actions aids in the identification of suspicious behavior and potential security risks. Office 365 incorporates various monitoring tools, including audit logs, activity reports, and alerts, empowering organizations to pinpoint potential security vulnerabilities and proactively counteract them, further fortifying their data.
4. Provide Comprehensive Employee Training: Educating staff members on security best practices assumes paramount importance in safeguarding Office 365. Employees should receive training on detecting phishing attempts, creating robust passwords, and utilizing Office 365 in a secure manner.
By undertaking these initiatives, businesses can bolster the security posture of their Office 365 ecosystem, mitigating the likelihood of unauthorized data breaches.
Tips for Troubleshooting Office 365 Issues
1. Monitoring the Service Health Dashboard is essential for addressing any Office 365 issues. This real-time resource offers insights into the status of Office 365 services and any ongoing problems or disruptions.
2. Utilizing the Office 365 Admin Center is crucial for troubleshooting Office 365 issues. This centralized hub grants access to comprehensive service status details and diagnostic tools for effective issue resolution.
3. Leveraging the Office 365 Support Site is pivotal for resolving Office 365 issues. It furnishes intricate insights into prevalent issues and effective resolution strategies.
4. Engaging with the Office 365 Community Forum is instrumental for tackling Office 365 issues. This platform facilitates collaborative problem-solving through user queries and input from both peers and Microsoft support personnel.
5. Contact Microsoft Support: If you are unable to resolve the issue on your own, you can contact Microsoft Support for assistance. Microsoft Support can provide additional information and help you troubleshoot the issue.
Best Practices for Administering Office 365
1. The essential foundation for effective Office 365 administration rests upon the establishment of a robust governance plan. Such a plan encompasses delineating roles, responsibilities, robust policies and procedures, as well as a well-structured communication framework.
2. Vigilant monitoring of user activity is imperative to uphold adherence to established protocols. This oversight can be efficiently carried out through the Office 365 Security & Compliance Center.
3. The meticulous management of user access constitutes a pivotal aspect in guaranteeing that the Office 365 ecosystem remains accessible solely to authorized personnel. This task can be executed through the Office 365 Admin Center.
4. The diligent monitoring of security measures is vital in fortifying the integrity of the Office 365 environment against potential threats. This surveillance can be effectuated through the Office 365 Security & Compliance Center.
5. Efficient management of updates stands as a linchpin in ensuring the perpetual currency of the Office 365 environment. This endeavor can be facilitated through the Office 365 Admin Center.
6. The meticulous scrutiny of performance metrics is paramount in guaranteeing the optimal functioning of the Office 365 environment. This meticulous task can be seamlessly accomplished through the Office 365 Admin Center.
7. Safeguarding data through systematic backups stands as a critical measure to avert data loss in the event of outages or unforeseen complications. This imperative can be fulfilled through the Office 365 Admin Center.
8. Equipping users with comprehensive training resources is indispensable in fostering familiarity and adept utilization of the Office 365 environment. This pivotal effort can be channeled through the Office 365 Training Center.
9. The vigilant monitoring of compliance obligations is pivotal in ensuring that the Office 365 environment adheres scrupulously to pertinent laws and regulations. This keen oversight is feasible through the Office 365 Security & Compliance Center.
10. Monitoring the judicious usage of resources is pivotal in ensuring that the Office 365 environment operates with maximum efficiency and effectiveness. This vigilance can be sustained through the Office 365 Admin Center.
How to Set Up Office 365 for Your Organization
Establishing Office 365 for your organization may seem overwhelming at first. However, with proper preparation and direction, it can unfold as a seamless and triumphant endeavor. This guide will provide you with the steps necessary to get your organization up and running with Office 365.
1. Select the appropriate Office 365 plan. The platform provides an array of plans tailored to accommodate diverse organizational requirements. Factor in your organization’s size, necessary features, and budget constraints when determining the most suitable plan.
2. Configure your domain. Procuring a domain name for your organization and aligning it with Office 365 is imperative. This process encompasses configuring DNS records and validating your domain with Microsoft.
3. Create user accounts. Once your domain is set up, you can create user accounts for each of your employees. This will involve assigning licenses to each user and setting up their passwords.
4. Configure email. You will need to configure your email settings to ensure that emails sent from Office 365 are delivered to the correct recipients. This will involve setting up mail routing, SMTP settings, and SPF records.
5. Once your users have been provisioned, it is imperative to initiate the installation of the requisite Office applications. This task can be accomplished either through the Office 365 portal or by procuring the applications directly from Microsoft.
6. Subsequently, securing your organization’s data becomes paramount. This necessitates the establishment of robust security policies and procedures encompassing multi-factor authentication, data encryption, and other pertinent security measures.
Compliance with these imperative steps is pivotal in facilitating the expeditious and secure integration of Office 365 within your organization. Through meticulous planning and adept guidance, the seamless implementation of Office 365 can be swiftly actualized.
Conclusion
Managing Office 365 for your company can significantly enhance efficiency and teamwork, while also delivering a secure and dependable framework for your business operations. Equipped with the appropriate tools and support, you can guarantee that your organization optimally leverages the functionalities and advantages of Office 365. By delving into the intricacies and potential of Office 365, you can secure maximum benefits for your organization.