- An error has occurred, which probably means the feed is down. Try again later.
Posts Tagged ‘Azure’
High level features of Azure Machine Learning
Hi All
In our previous article we “Starting with Azure Machine Learning” we created a free Microsoft Machine Learning account. If you haven’t done that, please create your own free ML account so you can practise and understand this article further. If you have an account already created and we are all good to go.
Azure Machine Learning Studio is a GUI-based integrated development.
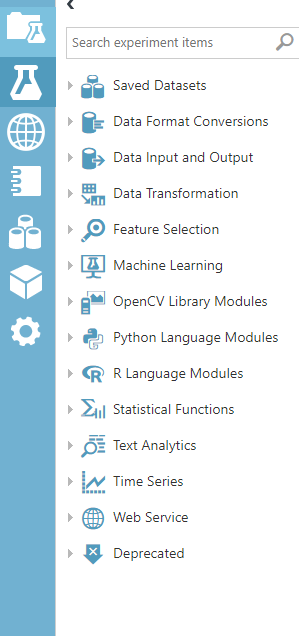
Our next step is to understand very high level Azure ML options. Below are high level feature in Azure ML followed by understanding of each high level feature:
Projects: As you can see in the screenshot, Projects is a newly added feature to Microsoft Azure Machine Learning. An individual can work on multiple dataset, Notebook and experiment for different clients/projects. Unless we use a proper naming convention, it was difficult to understand which dataset is associated to which project/client. To resolve this issue, Projects was introduced so that we can consolidate all information related to single project in same location. I would say Projects was a very small change to Azure ML but it has a very big Impact.
Experiments: This is the brain and heart of Azure ML. Experiments is where we create new models and train our model on smaller data. We can iterate on our model design, editing the experiment and running it until it gives us the results we looking for. Experiments in Azure ML is a showcase for simple experiments that make it easier for someone who wants to start exploring machine learning, through datasets. We would be spending nearly 70 % of our time in Experiments by using different features like data format conversions, data input and output, feature selection, etc. Below is screenshot of same:
Web Services : When our model is ready, we can publish it as a web service so that others can send it new data and get predictions in return. This is a very important feature in Azure ML and we will discuss a lot about this feature in our upcoming articles.
NoteBooks : As you can see in the screenshot, Notebooks is a newly added feature to Microsoft Azure Machine Learning. As we have already seen and discussed, Azure ML is GUI based, drag and drop simple to use ML platform however we have lot of other platform which are non GUI base. Azure ML Notebooks is create to encourage those who still want to continue writing code. We can create a machine learning model in a notebook by writing the code and implementing the machine learning API.
Datasets: The first and the foremost thing we need in Machine Learning is data. Azure ML offers several sample datasets which are part of Machine Learning Studio. We ca use it or we have option to import data from many sources like from our local machine. Very common dataset formats are GenericCSV, Attribute-Relation File Format (ARFF), GenericTSV, DataTableDotnet, etc
Trained Models : We can say that trained Model is a part of web services. When our model is ready, we can publish it as a web service so that others can send it new data and get predictions in return. Similarly, I can use this trained models for my other dataset without publishing it and use it within same workspace. This is a very important feature in Azure ML and we will discuss a lot about this feature in our upcoming articles.
Settings: Workspace name, storage, account information, users, data gateways and Authorization tokens are options available in settings. This is just like any other settings available in applications.

I will explain uses of each and every High level feature and talk more in details about them in my upcoming articles.
Happy Learning!!
Starting with Azure Machine Learning
Hi All,
Today we create a Machine Learning account and will have a glance of very basics of Microsoft Machine Learning. Well machine learning in general helps to predict things based on its learning from data provided, for instance the weather, route you around traffic jams, and display personalized ads on your web pages. Throughout my upcoming articles we will learn how to use Azure machine learning in order to create, deploy, and maintain predictive solutions.
I will try to share my experience with Machine Learning data which issues I faced, solutions we used to resolve our issues. My aim to publish as many articles as possible to share everyday problems and solutions I go through and help you if you face same issues or similar issues with your experiment. So let’s get started with an experiment and ML.
To start with, we will create a free Microsoft Machine learning account. How do we create the same follow below steps:
- Create a new Microsoft live account from URL https://signup.live.com/
- Browse Site https://studio.azureml.net/
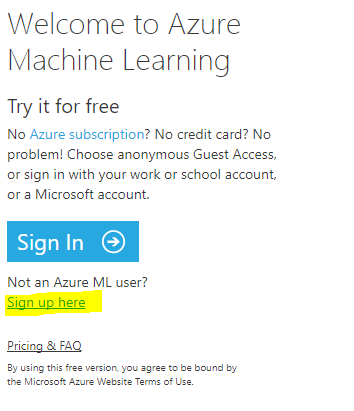
- Click on “Sign up Here
- Select “Sign In” which says “Free Workspace”.
- Once you Sign in with your account, you will have a Free Azure ML subscription ready to use.

So congratulation, you now have a Microsoft Azure Machine Learning account created with just 5 simple steps and less than 10 mins.
Advantages of this account is:
a. Currently this is a life time free account from Microsoft
b. You get free 10 GB of storage space which can be used for data processing.
c. You get R and Python scripts support
d. You will Predictive web services support
Now, I would like you to go through below options like Project, experiment, Web services, etc to understand what they are. I will go through all of them one by one and explain each one of them in detail in my upcoming articles.
Happy Learning!!!!
Reference : https://social.technet.microsoft.com/wiki/contents/articles/43800.starting-with-azure-machine-learning.aspx
Manage Multiple subscriptions in Microsoft Azure PowerShell
Hi All,
We will try to understand if we have multiple Azure subscription in Azure PowerShell, how we need to manage these subscription.
Let us try to find problems when we have Multiple Azure subscriptions in PowerShell.
1. When we run any command we get results only from current subscription
2. Its difficult to find in which subscription our command are being executed
-
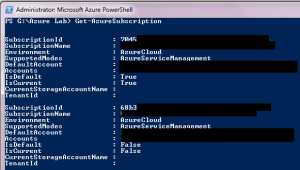
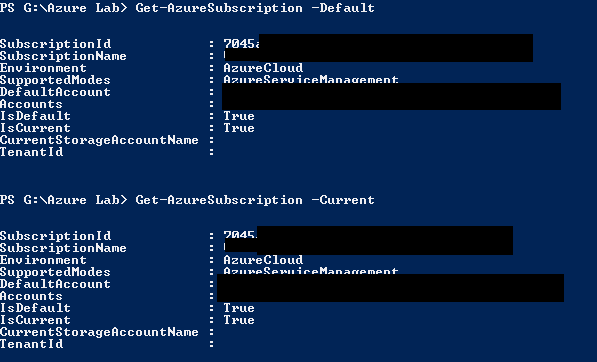
We need to run command “get-azuresubscription” get more details regarding our subscription in PowerShell.
-
You can see that I have 2 subscription with ID 7045 and 68b3. We can see that 7045 subscription status has Isdefault and Iscurrent value marked as True, where as 68b3 is marked as false
-
We can get only subscription 7045 when use command “Get-AzureSubscription –Default” and “Get-AzureSubscription –Current”

-
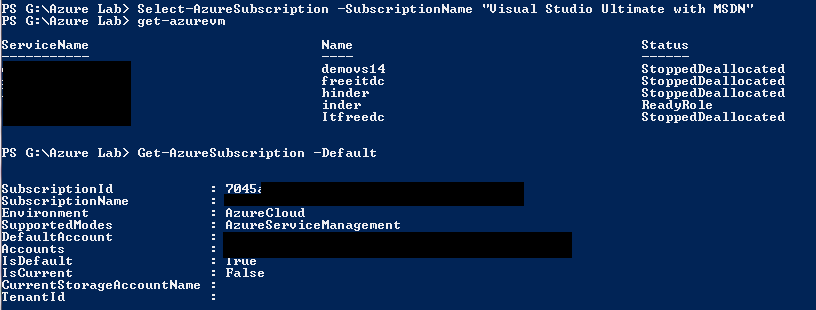
Now when we run command get-azurevm we get details related to current/default subscrption(7045) only.

-
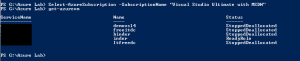
Now I tried below command and see details of other subscriptions
Select-AzureSubscription –SubscriptionName <subscriptionname>
get-azurevm
-
Now if you observe when we run “Get-AzureSubscription –Default” or “Get-AzureSubscription –Current” command we will get 7045 has changed its value to false for Iscurrent.


Microsoft Azure SQL VM not able to access
Issue :
When you logon to some server using Domain account, you cannot access the pre-installed software like SQL server.
Solution:
When the VM is created, it is created account you specify using Azure VM creation screen and then added to domain. So by default other account don’t have access to the application installed during VM creation. You have to 1st Logon to the server using Azure VM account give appropriate permission to domain account and then use it.
Azure Powershell Error No current subscription has been designated. Use Select-AzureSubscription – Current to set the current subscription
Hello Everyone, Today i was doing some testing and configuration on my Windows Azure server and got a weird error message as shown below:
Test-AzureStaticVNetIP : No current subscription has been designated. Use Select-AzureSubscription –
Current <subscriptionName> to set the current subscription.
At line:1 char:1
+ Test-AzureStaticVNetIP –VNetName test –IPAddress 11.0.0.1
+ ~~~~~~~~~~~~~~~~~~~~~~~~~~~~~~~~~~~~~~~~~~~~~~~~~~~~~~~~~~~~~~~~~~~
+ CategoryInfo : NotSpecified: (:) [Test-AzureStaticVNetIP], ApplicationException
+ FullyQualifiedErrorId :
System.ApplicationException,Microsoft.WindowsAzure.Commands.ServiceManagement.IaaS.TestA
zureStaticVNetIPCommand
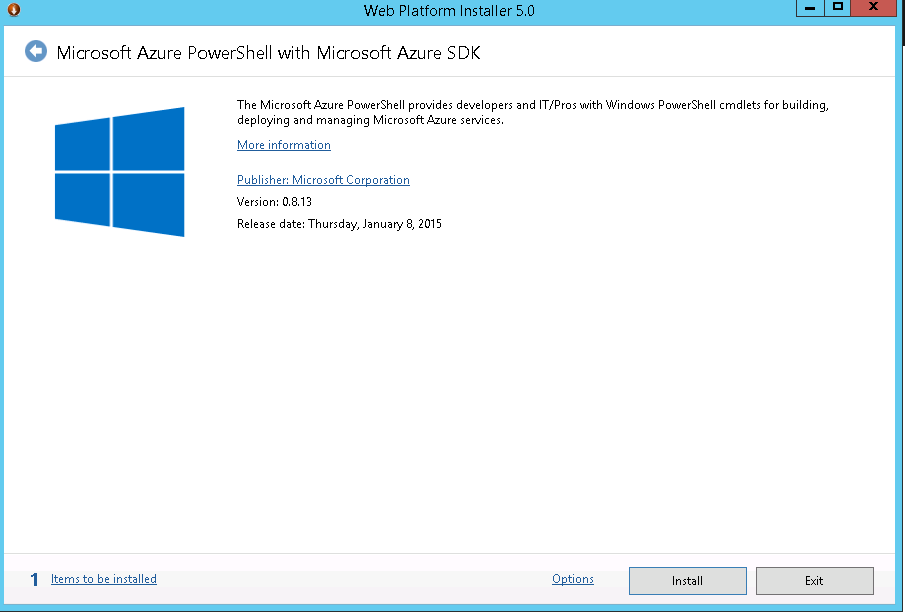
Did some research and found that we need to connect to Azure subscription and then run these command. To do so we need to download and install Azure Powershell. Copy paste below url on your browser and install the Web Platform Installer. This will give you option to download Azure Powershell.
http://go.microsoft.com/fwlink/p/?linkid=320376&clcid=0x409
Once the Powershell is downloaded and installed, we will

Now we will download the Azure Setting file to connect to the azure server. In the Azure Powershell, type below command.
Get-AzurePublishSettingsFile
![]()
Once you login to your Azure website, you will get a file named “Visual Studio Premium with MSDN-date-credentials.publishsettings”. Save it to a secure location. This file contains secure credentials and additional information about subscriptions that you can use in your development environment.
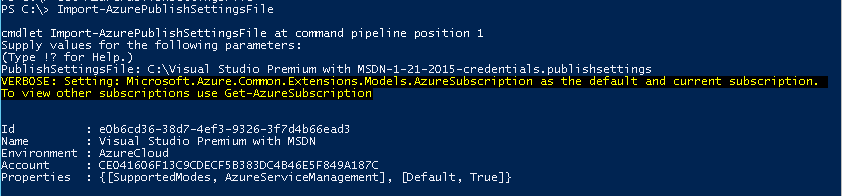
Now Import the Azure Settings file to Powershell. Run “Import-AzurePublisingSettingsFile” and then type path of the file we just downloaded as shown in below image
To check Subscription details run below command
Get-AzureSubscription
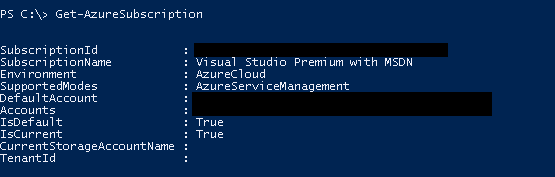
Now the command completed successfully.
Connect to your Azure Subscription using Powershell
Today we will understand we can connect to our Azure Subscription using Powershell and run some basic command on it.
To connect to Azure subscription we need to download and install Azure Powershell. Copy paste below url on your browser and install the Web Platform Installer. This will give you option to download Azure Powershell.
http://go.microsoft.com/fwlink/p/?linkid=320376&clcid=0x409
Once the Powershell is downloaded and installed, we will
Now we will download the Azure Setting file to connect to the azure server. In the Azure Powershell, type below command.
Get-AzurePublishSettingsFile
![]()
Once you login to your Azure website, you will get a file named “Visual Studio Premium with MSDN-date-credentials.publishsettings”. Save it to a secure location. This file contains secure credentials and additional information about subscriptions that you can use in your development environment.
Now Import the Azure Settings file to Powershell. Run “Import-AzurePublisingSettingsFile” and then type path of the file we just downloaded as shown in below image
To check Subsctiption details run below command
Get-AzureSubscription