Archive for August, 2014
Common troubleshooting step : SharePoint 2007, SharePoint 2010 and SharePoint 2013 Alerts issue
- Check whether the account is subscribed for alerts and it has a valid email account. This should be the first thing to check if the problem persists for some users not for all
- Check if those users have at least read permission for the list. Because the first mail should go out for every user without security validation but the next ones won’t be delivered unless the user has at least read permission.
- Go to Central Admin > Operations > Outgoing email settings > verify that SMTP server is mentioned correctly
- Test the connectivity with the SMTP server.
Start Run > type “cmd” > telnet <SMTP server name> 25 ( We connect SMTP server to the port 25)
If response is
220 <server> Microsoft ESMTP MAIL Service, Version: 6.0.3790.3959 ready at date and time
Try sending email from your SMTP server. Type below on telnet screen.
ehlo <server>
Now you should see
250 <server> Hello [IP Address]
Now a test mail can be sent from that SharePoint server. Type below:
mail from: xxxx@SharePoint.com
You should see below output:
250 2.1.0 xxxx@SharePoint.com….Sender OK
Enter the recipient email address. Type recipient details. This should be a valid address:
rcpt to: someID@domain.com
Output should be:
250 2.1.5 someID@domain.com
We just need email data now. Type below details:
Data:
Output should be:
354 Start mail input; end with <CRLF>.<CRLF>
Now we need to type email data:
Subject: this is a test mail
Hi
This is test mail body
I am testing SMTP server.
No Enter then type “ . “ and enter again.
Output should be:
250 2.6.0 <<server>1234@<servername>> Queued mail for delivery
Just quit telnet by typing “quit” . You would see
221 0.0 <server> Service closing transmission channel
- Lot of organizations use a white list to only permit certain servers to send using the SMTP host on their internal email infrastructure. Make sure (especially if this is a new system), that it’s IP address has been added to the SMTP server’s list of allowed servers.
- Check alerts are enabled for your web application:
Stsadm.exe -o getproperty -url http://SharePoint-web-App-URL -pn alerts-enabled
This should return <Property Exist=”Yes” Value=”yes” /> . If Value is no or its unavailable then set it using below command:
stsadm.exe -o setproperty -pn alerts-enabled -pv “true” -url http://SharePoint-web-App-URL
Note: If its already enabled, try turn off and turn on it back.
- Verify if the Windows timer service is running or not
- Check the Timer job and Properties
MOSS 2007 Central Administration > Operations > Timer Job Definitions (under Global Configuration)
SharePoint 2010\2013 > Central Administration > Monitoring > Review Job DefinitionsCheck if “Immediate Alerts” job is enabled for your web application.
job-immediate-alerts
job-daily-alerts
job-weekly-alerts - Set the immediate-alerts property.
To get the property try below
stsadm.exe -o getproperty -url “http://Your-SharePoint-web-App-URL” -pn job-immediate-alerts
The expected output is:
<Property Exist=”Yes” Value=”every 5 minutes between 0 and 59″/>.
If you don’t get this, run the following command to set its value.
stsadm.exe -o setproperty -pn job-immediate-alerts -pv “every 5 minutes between 0 and 59″ -url http://Your-SharePoint-web-App-URL
11. As part of very important troubleshoot step you should try:
a. Run below SQL query to the content db
< Select * from Timerlock>
b. This will give you the name of the server which is locking the content database and since when. We should not have our database locked. Lets unlock the database
c. Logon to server which is locking the Content Database and then restart the Windows Timer service. After some time the lock would be released from Content Database. If database is not unlocked, Stop the timer job for some time while the database is not unlocked
d. Once the lock will be released then try to send some alerts
- Also lets try to re-register the alert template. To do so run below command:
stsadm -o updatealerttemplates -url http://Your-SharePoint-Web-App-URL -f “c:\Program Files\Common Files\Microsoft Shared\web server extensions\15\TEMPLATE\XML\alerttemplates.xml” -LCID 1033
13. Last but not the least; try to clear the configuration cache.
- Stop the SharePoint Timer Service in Administrative Tool/Services.
- Go to the cache folder. Drive:\ProgramData\Microsoft\SharePoint\Config
- Find the folder that contains the file Cache.ini
- Open the Cache.ini file, delete all content in the file and type 1, save and exit.
- Delete all the XML configuration files without deleting cache.ini file in the folder so that you can verify that the folder is replaced by new XML files when the cache is rebuilt.
- Start the SharePoint Timer service
Hope this will help you
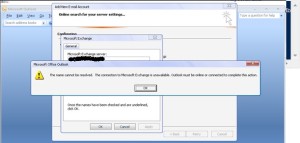
Outlook check name issue “ The name cannot be resolved ”
We have a newly installed Exchange 2010 server and trying to configure Outlook profile for my account on Windows 7 machine. Trying to manually configure my account and also logged into the domain using same account. Credentials are all correct, tried using Exchange server name, CAS server name and IP address of servers, still it gives the error message at checkname stating “The name cannot be resolved. The connection to Microsoft Exchange is unavailable”. Could view all the names listed in Global Address Book.
Tried to configure other user account same error message. All users can access their account using Outlook Web Access (OWA)
Solution:
The name resolution for Outlook on Exchange 2010 server is handled by Microsoft Exchange Address Book service on Client Access server. Please make sure this service is always started on Client Access server
Common troubleshooting step : SharePoint web site and Central Admin 500 Internal Server Error
Saw a number of users facing issue “HTTP 500 Internal Server Error” when try to browse Central Admin site or SharePoint web site.
- Try below Troubleshooting Steps:
- Open IIS Manager to make sure (Central Admin or Web Site) Application Pool was stopped Or SecurityTokenServiceApplicationPool application pool was stopped
- Navigate back to IIS manager -> Central Admin or Web Site or SecurityTokenServiceApplicationPool application pool-> Advanced Settings
- Navigate to the Identity option.
- Now Start the Application pool and try to browse the site.
- Open IIS manager again to check if all Application pool are started
- If we still face same issue, try below:
- Go to Start > Administrative tools > Local Security Policy > Local Policies > User Right Assignments > Impersonate a client after authentication properties
- Add the Application Pool account for the site which is not working
- Reboot the server, so the changes can take effect
- Browse the site and it should work fine
- If we still face same issue, try below:
- Log on to the SharePoint server Domain Administrator.
- Open Internet Information Services (IIS) Manager > In navigation tree, select the server >Click on the Feature Delegation icon
3. In the Actions area, click Custom Site Delegation > select the SharePoint Central Administration\SharePoint Web Site.
4. In the list of features, select the Modules feature > In Actions area, click Read/Write.
5. n the list of features, select the Handler Mappings feature > In Actions area, click Read/Write.
6. In the list of features, select the HTTP Response Headers feature > In Actions area, click Read/Write. - Close Internet Information Services (IIS) Manager
- Perform IISRESET and try to browse site
- If we still face same issue, try below:
- Open powershell > browse to below path
C:\Windows\Microsoft.NET\Framework\v4.0 folder
aspnet_regiis.exe –iru
- Also perform same below folder
C:\Windows\Microsoft.NET\Framework\v2.0 folder
aspnet_regiis.exe –iru
- If we still face same issue, try below:
- Click Start > Run > type Inetmgr
- In the left pane: expand until you see the Central Admin\ Effected website
- Click on it > In the middle pane > double click on IIS-Authentication >Enable Basic Authentication
- Restart IIS
- Try to browse site
Checked all the normal things and the problem seems to point with the site itself. What does this leave? Things like the web.config, applicationHost.config, etc.
Go to c:\inetpub\wwwroot\wss\VirtualDirectories\<sitename>. Look at the web.config file. Does it have a recent modified date? If yes, someone might have modified it
Open IIS and enable Failed Request Tracing.
1. In IIS, click on the down site in the left pane under the Sites heading > In right panel > under the Configure heading > click Failed Request Tracing > Click the Enable checkbox > notice the path of the logfile.
- Now that FRT is enabled, we have to tell it what to capture > In the middle pane, under the IIS group > click the icon called Failed Request Tracing > On the right under Actions > click Add
In the wizard > leave All Content select > choose Next> For the status code, enter 500 > Click Next > Leave all providers checked >Click Finish -
Now go try to access the site, and get the 500 error
4. That should have written what we needed to the log file. Go to the path defined for the log earlier. You will find two files, an XML file (the log with errors) and an XSLT that styles the XML for easy viewing. Open the XML in a browser to see the error. Review the error for details
- In my case, in the web.config there was a Session state entry was duplicated. This is normal, but there was a remove statement that prevented one of them from being loaded, which was commented out, in turn causing the duplicates to both load:
<!– <remove name=”Session” /> –>
I removed the comment out lines (highlight) and saved my web.config. Success – the site came up! Confetti fell from the rooftops, Champagne flowed from the heavens, and there were many celebratory handshakes.
So do you want to leave tracing enabled? I don’t see the harm. It is capped per the initial configuration, so it won’t fill up the C drive. If you’re getting that many HTTP 500 errors, you likely have other issues.
SMTP Authentication to be enabled on mail client
Getting the following undelivery message while sending emails
Delivery has failed to these recipients or groups:
test001@gmail.com (test001@gmail.com) A problem occurred during the delivery of this message to this e-mail address. Try sending this message again. If the problem continues, please contact your helpdesk.
The following organization rejected your message: contoso.com
Solution:
The message error 550 is normally due to SMTP Authentication not enabled on the mail client.
Versions Outlook 98 and later
- Select Services on the Outlook Tools menu, which opens the email Services window (If your Tools menu has Accounts instead of Services, use the Outlook Express instructions above)
- Highlight the Internet E-mail account, and click the Properties button to show the settings
- Click the Servers tab, which shows you all the mail server settings
- In the Outgoing Mail Server section, make sure the My server requires authentication checkbox is checked
- Click the Settings… button next to it and be sure the Use the same settings as my incoming mail server option is selected.
Follow below article for further clarification
Groupwise to Exchange server migration
Migrating Novell Director/Groupwise to Microsoft AD/Exchange with Windows 2008 R2 AD.
You need to follow below steps:
- Perform a pre-migration assessment
- Provision your Exchange 2010 mailboxes
- Integrate GroupWise and Exchange 2010
- Run a pilot migration
- Migrate the data and track migration progress
Please follow below article for detailed steps:
Multiple Roles Load Balancing in Exchange 2010
Need to deploy Exchange 2010 with all roles HUB, CAS and Mailbox to be load balanced. Currently deploying DAG with two members.
Suggestion to deploy all roles redundancy:
To load balance CAS you need to use Windows Network load balancing or Hardware load balancer. If you are also deploying DAG along with load balance CAS then it is recommended to install mailbox and CAS server role on different machines or servers. Because DAG uses Windows Failover Clustering which cant co-exist with Network Load balancer Or you can use Hardware Load balancer.
You could refer below article for regarding Load balancing in Exchange 2010
Understanding Load Balancing in Exchange 2010 http://technet.microsoft.com/en-gb/library/ff625247(v=exchg.141).aspx#options
Uninstalling Exchange errors stating Folder Replicas exist
When try to uninstall exchange 2007 get error
“Uninstall cannot continue. Database “Public Folder Database”: The public folder database “SERVER\Second Storage Group\Public Folder Database” contains folder replicas…
Solution:
Run the Get-PublicFolderStatistics cmdlet using the Exchange Management Shell and check the output. If the folders listed are of no use then you can pipe this command with Remove-PublicFolder
Get-PublicFolderStatistics | Remove-PublicFolder
Once done, confirm there is no folders or no results by running same Get-PublicFolderStatistics cmdlet
Refer below article for further clarification
Clarifying the public folder store removal on Exchange Server 2007
http://blogs.technet.com/b/exchange/archive/2007/11/13/3404348.aspx
Public Folder migration issue from exchange 2003 to exchange 2010
Moving from Exchange 2003 to 2010. When use Public folder Management Console in EMC 2010 to perform Public Folder move, it errors saying
“Multiple MAPI public folder trees were found”
These are the first few steps.
- In the Console tree, click Toolbox.
-
In the Result pane, double-click Public Folder Management Console. The Public Folder Management Console appears.
-
In the public folder tree, click or expand Default Public Folders, and then select the parent public folder of the public folder that you want to move to Exchange 2010. This is where I get the error.
Could see Public folder under Exchange Administrative Group in ESM on 2003 server but on 2010 it errors out. No event generated on either of the Exchange server.
Solution:
The Smart Host impacts Public Folder replication.This setting is found in Exchange 2003 System Manager under:
Administrative Groups > ‘Exchange 2003 Administrative Group’ > Servers > SERVERNAME > Protocols > SMTP > Default SMTP Virtual Server (Properties) > Delivery tab > Advanced Button > “Smart Host” field.
A smarthost specified here will break public folder replication with Exchange 2007/2010.
Generally you should not use a smarthost at this level. In order to have your outbound internet email sent to a smarthost you can set that under Routing Groups and then properties of whatever the name of your internet connector is.
Recovering ost file in Exchange 2003
Someone restored backup to Exchange 2003 Datastore. The mailbox once logged in merges all the changes from restored data into the local .ost file with no emails missing.
Later users complained that there mails missing in the shared mailbox accessed through Outlook.
This seems like .ost file doesn’t merge the data not belonging to its own mailbox/ of another mailbox. Could be let me know resolution as how to merge the shared mailbox data into user’s mailboxes.
Solution:
For OST file recovery in disaster scenario is to login to the user mailbox in offline mode and extract ost file into pst file and then copy that data again from PST file to recovered mailbox after logging as online mode.
For reference
Configure Workflow Manager 2013 with SharePoint Standard or Enterprise
Configure Workflow Manager 2013 with SharePoint Standard or Enterprise
(Workflow 2013 does not work with SharePoint foundation)
I assume you have SharePoint installed and configured on your computer. Also Workflow Manager 1.0 and Wofklow client is installed on the same computer.
When the workflow manager is not configured on your SharePoint farm, you will notice below:
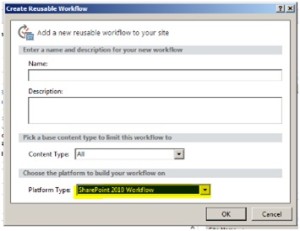
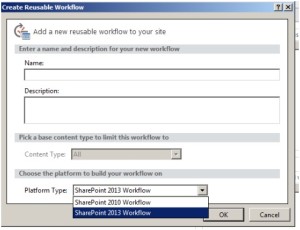
- You don’t see SharePoint 2013 workflow option in SharePoint designer.
- When you go to > Central Admin > Service Application > Workflow management service application > you see Workflow is not connected
Lets Configure Workflow 2013
- Select Start > Select Workflow Manager 1.0 > click on Workflow manager configuration
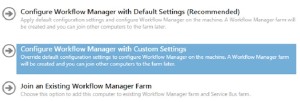
- Now select Configure Workflow Manager with custom Settings
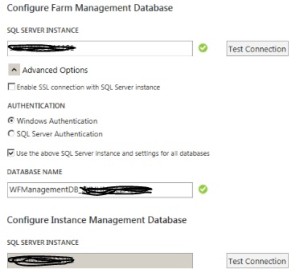
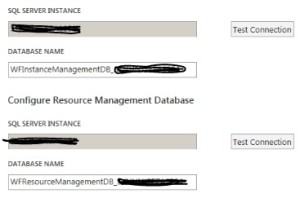
- SQL server Instance name and make sure below database does not exist on that instance. If they do. Rename the database
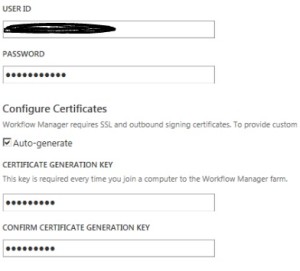
- Provide the Windows account used to manage this service and used in Workflow manager service application pool
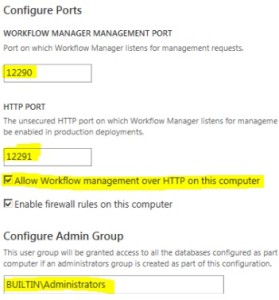
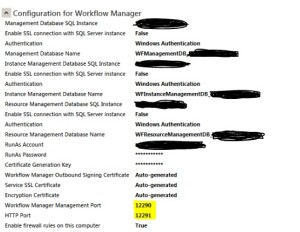
- Make sure port 12290 and 12291 is open on SP and Workflow server for communication. “Allow workflow management over http on this computer” should be checked. By default local administrator will be able to manager workflow services.
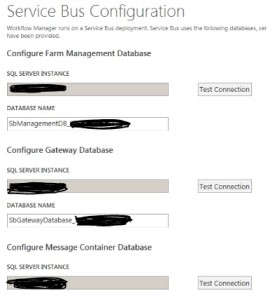
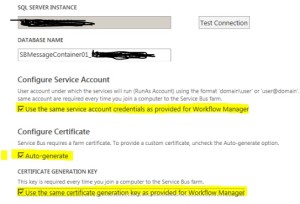
6. Now we need to configure Service Bus. We can use same SQL server and confirm that database names does not exist
7. Important thing to notice is. I have selected “Use the same service account credentials as provided for workflow manager” and “Use same certificate generation key as provided for workflow manager”
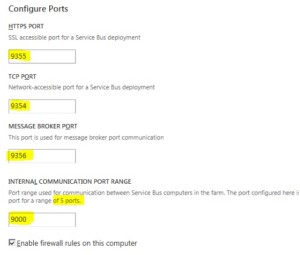
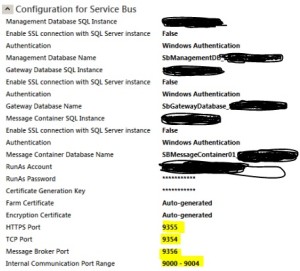
- Surely we need Port number 9355, 9354, 9356 opened between SharePoint server but also we need port 9000 to 9004 opened. It does not use single port as mentioned below
- We can validate the details in summary screen before proceeding with actual configuration. Note that port number is 9000-9004 here
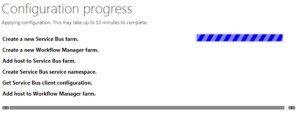
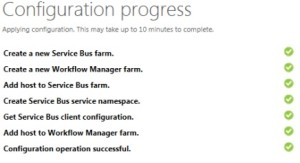
- Once you hit the tick on bottom of page, it will start the configuration of Workflow and Service Bus. It should be completed in couple of minutes
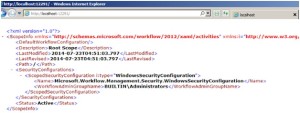
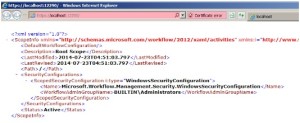
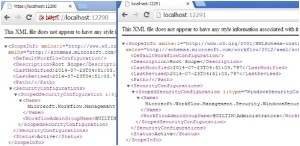
- Now we should be able to see with 2 bindings
- Try to browse them and you should see below reply
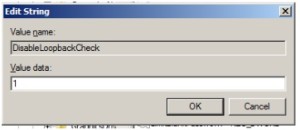
- If you see a 404 or 500 error. Check if your service account has proper permission on local system (Local admin, permission on c:, etc). Try to browse site in different browser. Create DisableLoopbackCheck registry. Add URL in Trusted sites in IE
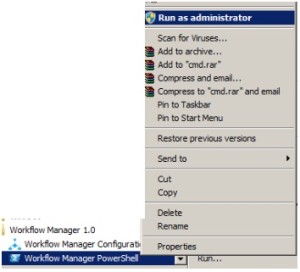
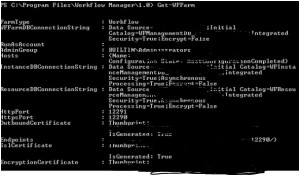
- Now open Workflow Manager Powershell as admin and run command “get-wffarm” to check the details of farm
15. Open SharePoint Powershell as admin and run command “Register-SPwrofklowservice –Spsite http://siteURLwithport –workflowhostURI http://workflowserver:12291 -allowoathhttp”:
- Now you see that Workflow service is connected and your SharePoint 2013 workflow in SharePoint Designer

