- An error has occurred, which probably means the feed is down. Try again later.
Posts Tagged ‘sharepoint 2013’
Bulk create items in SharePoint 2007 2010 2013 list
Hi Guys,
This article has some great link to articles which can help you create Bulk List items.
SharePoint PowerShell How To: Create SharePoint List Items (in Root and in Folders) for Load/Performance Testing
https://camerondwyer.wordpress.com/2014/05/09/sharepoint-powershell-how-to-create-sharepoint-list-items-in-root-and-in-folders-for-loadperformance-testing/
SharePoint 2007/2010 – Powershell script for bulk populating a List
http://saurabhmoss.wordpress.com/2011/03/16/sharepoint-20072010-powershell-script-for-bulk-populating-a-list/
SharePoint – adding list items with Powershell using web services
http://blogs.technet.com/b/lukeb/archive/2011/03/14/sharepoint-adding-list-items-with-powershell.aspx
Batch Update SharePoint List Items using Powershell
http://suryapulipati.blogspot.com/2013/07/batch-update-sharepoint-list-items.html
Hope this will help you all
SharePoint server 2010 \ 2013 \ Online with variation or multilingual site feature
The variations feature in SharePoint Server 2010 and SharePoint Server 2010 and SharePoint Online makes content available to specific audiences on different sites by syncing content from a source variation site to each target variation site. When users visit the root site, they are redirected to the appropriate variation site, based on the language setting of their web browser. Content on a target variation site can be translated into other languages before it is published. Variations can be used only on sites that are created by using one of the Publishing site templates, or on sites for which the SharePoint Server Publishing Infrastructure feature was activated.
It describes the elements of the variations feature; provides an overview of site, list, and page creation for variation sites; lists some limitations of variations; and describes scenarios for using variations in SharePoint. This article does not describe the tasks that are involved in planning a solution that uses variations. For information about how to plan to use variations in your solution, see Plan for variations in SharePoint Server 2013. This article also does not describe how to create variation labels and hierarchies. For information about how to create a variation site, see Create a multi-language website.
SharePoint Server 2013 has several features that enable you to support users in different regions or users who speak different languages. You can use these features to create websites in different languages and to enable users to view the user interface of a site in a language other than the one in which a site was created. If you plan to use variations with multilingual sites, there are additional steps that you must follow to enable multilingual support for the variation sites. For more information about how to plan multilingual sites, see Plan for multilingual sites in SharePoint 2013.
For more details
http://technet.microsoft.com/en-us/library/ff628966%28v=office.15%29.aspx
Difference between SharePoint hosted, Autohosted apps and SharePoint hosted apps
The following image can give you an overview of the entire app schema:
Following you can read the definition for each type of hosted app:
SharePoint hosted app
SharePoint-hosted apps, or apps where all components are hosted on either an on-premises or Office 365 SharePoint farm. SharePoint-hosted apps are installed on a SharePoint 2013 website, called the host web. They have their resources hosted on an isolated subsite of a host web, called the app web. It’s important to know the difference between host webs and app webs. .
Provider hosted apps
Provider-hosted apps for SharePoint include components that are deployed and hosted outside the SharePoint farm. They are installed to the host web, but their remote components are hosted on another server.
Autohosted apps
Autohosted apps for SharePoint are cloud-hosted apps whose remote components are provisioned and deployed for you on Windows Azure. As with a provider-hosted app, an autohosted app for SharePoint can interact with a SharePoint website but also uses resources and services that are located on a remote site that is hosted by Windows Azure. The SharePoint 2013 installation provisions and deploys these resources for you.
The main difference is that with auto-hosted apps all Windows Azure and Windows Azure SQL Database components are provisioned for you when the app is installed and the Windows Azure Web Sites infrastructure handles load balancing and other important maintenance tasks for you.
When using provider-hosted apps, you’re responsible for provisioning what’s necessary to support the app.
For more information, please: http://msdn.microsoft.com/en-us/library/office/fp179887(v=office.15).aspx
Enable Auditing on SharePoint 2010 \ 2013
In this article I have covered steps to enable Auditing on SharePoint 2013 \ 2010 to monitor activity on site.
Steps to Auditing on SharePoint 2013 and SharePoint 2010 are same as shown below:
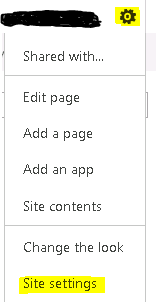
Click on Site Settings Icon on Right hand top corner of screen and select Site Settings
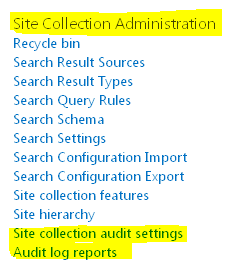
Under Site collection Administration, you should see Site Collection Audit Settings and Audit Log reports. You need to click on site collection audit settings to enable auditing and then select Audit Log reports to view the reports
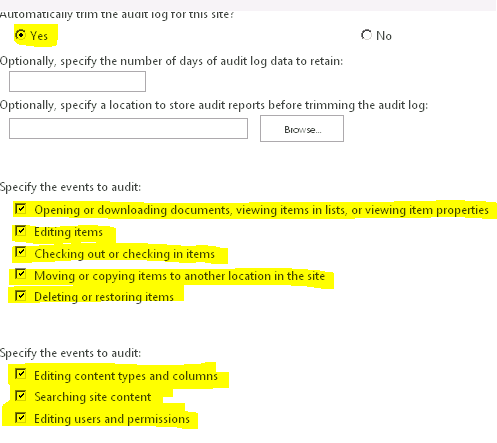
Now select Yes, and select below check boxes to enable logging on specific actions
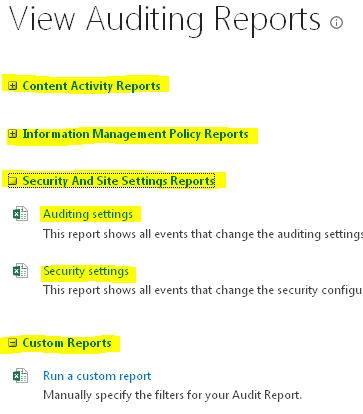
To View Audit logs you need to select Audit Log reports under Site collection Administration.
Note: Auditing some time cause performance issues. Enable it only on required cases or if your system has enough resources to handle it.
SharePoint 2013 \ 2010 ULS logging to troubleshoot issues
In this article I have covered steps to enable ULS logging on SharePoint 2013 \ 2010 to troubleshoot issues.
Steps to enabling logging on SharePoint 2013 and SharePont 2010 are same as shown below:
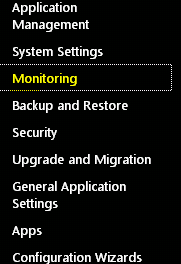
Open Central Admin and Click on Monitoring
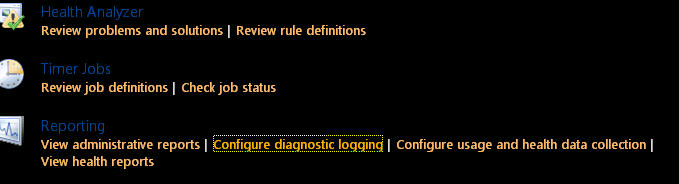
Click on “Configure Diagnostic Logging“
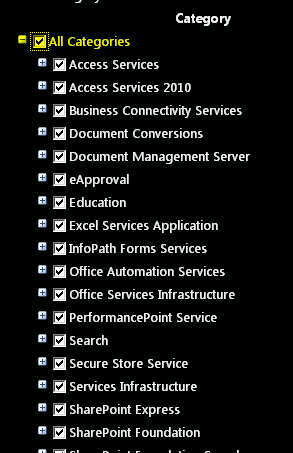
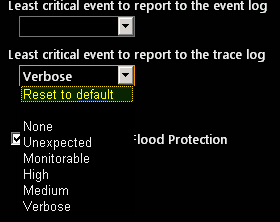
Select “All Categories“
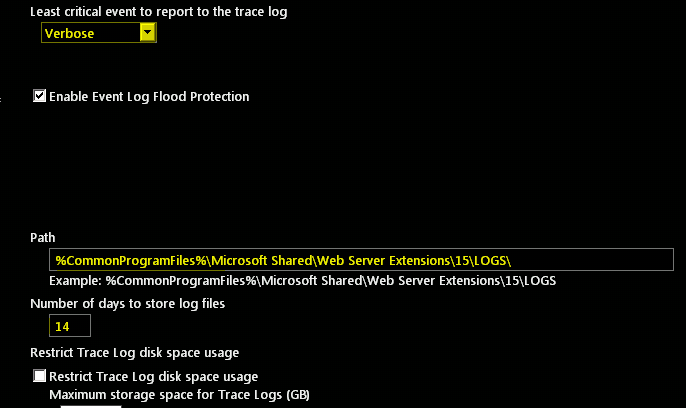
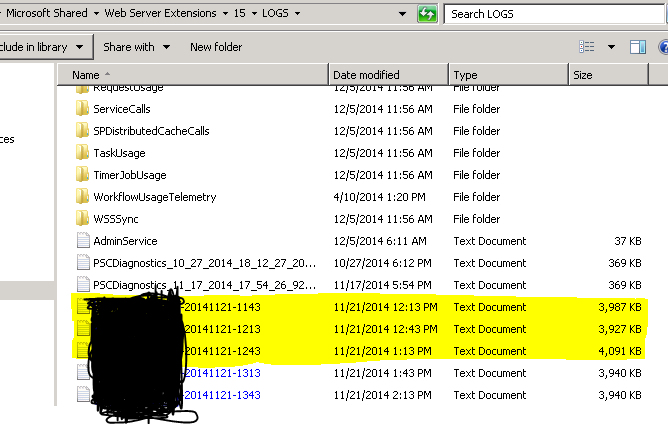
Select Verbose and make sure you remember the path of the logs files. By default it is C:\Program Files\Common Files\Microsoft Shared\Web Server Extensions\15\LOGS
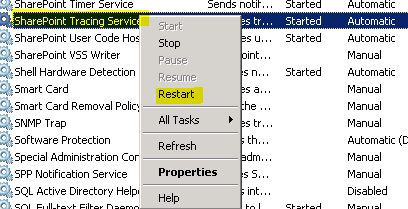
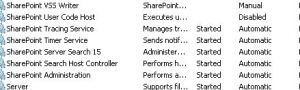
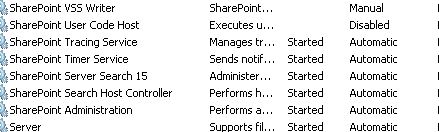
Restart the “SharePoint Tracing services”
 “
“
Now you should see all the logs files with Machine name with today’s date\time. a New file is generated every 30 mins.
Note: Verbose logging cause lot of performance issues. If you are done with Verbose logging, set the logging to default to mitigate performance issues.
SharePoint server Reports and Monitoring system
Introduction:
SharePoint is architecture to proactively monitor lot of system and manage them. Sole purpose is to catch issues before they occur. Still if issues do occur, the system should give the administrator the capability to debug the issues with the least amount of resistance.
Lets talk about logging database. Logging collects information from all the servers and store it in 1 database. They are similar to ULS logs. ULS logs are stored in 14\logs folder collected and in event logs. It strengthens the logging database and make it a valuable tool.
Another area to concentrate on is Reporting services. These Reports are present for site collection level and they are pretty robust. Administrators utilized them as what they are searching for, and uncovers where functionality is lacking. SharePoint 2010 health monitoring jobs have the ability to uncover issues, report them, and then SharePoint is able to automatically correct the issue (in some cases).
Monitoring and reporting capabilities together makes administrator to be proactive when it comes to SharePoint farm management. These capabilities can be leveraged with other SharePoint functions such as alerts, so that the team managing the SharePoint farm should be well versed in the performance of the installation.
SharePoint 2010 logging database information:
SharePoint 2010 logging database is a major enhancement to monitoring, debugging, and protecting the health of the farm.
By default, the database is called WSS_Logging . This database should be the starting point for administrators to collect and analyze information.
ULS Logs are available at C:\Program files\Common Files\Microsoft Shared\Web Server Extensions\14\Logs.
Access logging from SQL server:
- Open up SQL Server Management Studio.
- When asked for authentication, log in to the correct instance where SharePoint is running using your windows authentication credentials.
- Navigate to the WSS_Logging database and click on the plus sign to expand it.
- Under the toolbar at the top, click on the New Query button.
- In the new query window, type in the following query: Select * from RequestUsage.
- Click Execute.
Configuring what gets logged
SharePoint logging database capturing information can be modified via the Central Administration interface. The advantage of this being that the collection of information can be voluminous, which can also be the disadvantage.
Disk space, I/O, and just the amount of data needed to retain this information can become an issue. Being able to reduce the type of information that gets captured is critical to the wellness of your farm.
How to do it…
- Open the SharePoint 2010 Central Administration website.
- Click Monitoring.
- Under the Reporting section, click Configure usage and health data collection.
How it works…
The options presented in the usage and health data collection are logged to the logging database and to the ULS logs.
The health logging schedule can be modified to fit the needs (also known as Service Level Agreements) of your organization. It is important to remember that there is a hidden cost associated with the increased logging. The hidden cost is mainly in the form of storage and possibly performance.
The ULS logs have the potential to grow large. The logs can be moved to a new physical location (physical spindle), which does not contain the operating system or WFE/Application server software. The physical location reference must exist on all servers in the farm.
The location of the logs is set within Central Administration. To access the setting, go to Central Administration, click Monitoring, and then select Configure diagnostic logging. Under the Trace Log section is the Path. This contains the location of the ULS logs.
The logging information is retained for a period of 14 days by default. Using PowerShell you can change this parameter, using the following command:
Set-SPUsageDefinition -Identity <GUID> [-Enable] -DaysRetained 14
To be continued
When try to Publish webpart get below error “Invalid SPlistItem. The SPListItem provided is not compatible with a Publishing Page
When try to Publish webpart get below error “Invalid SPlistItem. The SPListItem provided is not compatible with a Publishing Page”
Event code: 3005
Event message: An unhandled exception has occurred.
Event time: 18/11/2014 08:59:05
Event time (UTC): 18/11/2014 08:59:05
Event ID: e2e43649e2164e399fe0aa85892a002c
Event sequence: 165799
Event occurrence: 17
Event detail code: 0
Application information:
Application domain: /LM/W3SVC/1827921427/ROOT-1-130607489469090399
Trust level: WSS_Custom
Application Virtual Path: /
Application Path: C:\inetpub\wwwroot\wss\VirtualDirectories\SITE\
Machine name: Machinename
Process information:
Process ID: 7392
Process name: w3wp.exe
Account name: Domain\SPaccountname
Exception information:
Exception type: ArgumentException
Exception message: Invalid SPListItem. The SPListItem provided is not compatible with a Publishing Page.
Request information:
Request URL: https://SiteURL/Pages/Test1.aspx
Request path: /Pages/Test1.aspx
User host address: IPAddress
User: Domain\SPaccountname
Is authenticated: True
Authentication Type: Negotiate
Thread account name: Domain\SPaccountname
Thread information:
Thread ID: 41
Thread account name: Domain\SPaccountname
Is impersonating: False
Stack trace: at Microsoft.SharePoint.Publishing.PublishingPage.GetPublishingPage(SPListItem sourceListItem) at Microsoft.SharePoint.Publishing.Internal.WebControls.PublishingPageStateControl.RaisePostBackEventForPageRouting(String ventArgument, SPRibbonCommandHandler control, RaisePostBackEventDelegate raisePostBackEventDelegate) at Microsoft.SharePoint.Publishing.Internal.WebControls.PublishingPageSaveAndStopEditHandler.RaisePostBackEvent(String eventArgument) at System.Web.UI.Page.RaisePostBackEvent(IPostBackEventHandler sourceControl, String eventArgument) at System.Web.UI.Page.ProcessRequestMain(Boolean includeStagesBeforeAsyncPoint, Boolean includeStagesAfterAsyncPoint)
Resolution :
DeActive and then ReActivate Sharepoint Site Publishing Infrastructure feature at both Site And Web level Scope.
To Deactivate at web level:
1. Open SharePoint Site -> Click on Site Actions -> Site Settings
2. Then click on Manage site features -> then Deactivate Publishing Infrastructure feature
3. Similarly you can deactivate at site level, Open SharePoint Site -> Click on Site Actions -> Site Settings, then Site collection administration -> then go to Site collection features
4. There deactivate Publishing Infrastructure feature.
To Reactivate again the feature, again follow above steps
You can try below powershell as well
$web = get-spweb “http://siteURL”
$correctId = $web.Lists[“Pages”].ID
$web.AllProperties[“__PagesListId”] = $correctId.ToString()
$web.Update()
$web.AllProperties[“__PublishingFeatureActivated”] = “True”
$web.Update()
Note: The key point is PublishingFeatureActivated bag which has to be true.
Download and Install Cumulative Update November 2014 for SharePoint 2013
Microsoft has released another SharePoint 2013 Cumulative Update in November 2014. Let me help you know how we can install November 2014 on SharePoint 2013 server.
Its per-requisites is either SharePoint 2013 SP1 or SharePoint 2013 March PU.
Now the most important part is how to install SharePoint server November 2014 Cumulative Update.
Previous releases of the SharePoint Server 2013 cumulative update included both the executable and the .CAB file in the same self-extracting executable download. Because of the file size, the SharePoint Server 2013 package has been divided into several separate downloads. One contains the executable file, while the others contain the CAB file. All are necessary and must be placed in the same folder to successfully install the update. All are available by clicking the same Hotfix Download Available link in the KB article for the release.
Here is link for all the updates:
Sharepoint Foundation 2013 has only 1 setup file 479983_intl_x64_zip.exe
Download SharePoint Foundation 2013 November 2014 CU
Now here the twist starts, SharePoint 2013 update has 3 setup files 479926_intl_x64_zip.exe, 479925_intl_x64_zip.exe, 479924_intl_x64_zip.exe: You can download this from:
Download SharePoint Server 2013 November 2014 CU
Project Server 2013 update has 3 setup files 480040_intl_x64_zip.exe, 479930_intl_x64_zip.exe, 479929_intl_x64_zip.exe: You can download this from below
Download Project Server 2013 November 2014 CU
The KB articles for September CU are available at the following locations:
- KB 2899468 – SharePoint Foundation 2013 November 2014 CU
- KB 2889944 – SharePoint Server 2013 November 2014 CU
- KB 2889949 – SharePoint Server 2013 with Project Server November 2014 CU
- No Office Web Apps Server 2013 CU released this month
Once the updated the downloaded you need to extract all the updates in 1 folder as shown below:
- Now when you run the main setup file ubersrv.exe file, you will be able to extract and install the update.
- Once you install these updates, you need to reboot the server
- Now system needs to be restarted.
- Follow the same steps on all SharePoint servers in farm.
- SharePoint PSconfig wizard on all servers.
- Finally it is installed
Note : SharePoint Server 2013 update contains the SharePoint Foundation update.Where as SharePoint Server 2013 with Project Server update contains Project Server update, SharePoint Server update and SharePoint Foundation update.
[Update 2014-11-12] When trying to download the fix for KB 2889944 (SharePoint Server 2013 November 2014 CU) you will notice that there are 4 files listed rather than the usual 3 files. One of the files is corrupt and does not belong to the CU. You can ignore it. When receiving the mail with the download links just skip the file with name 479985_intl_x64_zip.exe.
[Update 2014-11-12] When trying to download the fix for KB 2889949 (SharePoint Server 2013 with Project Server November 2014 CU) you will notice that there are 4 files listed rather than the usual 3 files. One of the files is corrupt and does not belong to the CU. You can ignore it. When receiving the mail with the download links just skip the file with name 479984_intl_x64_zip.exe.
For more information:
http://blogs.technet.com/b/stefan_gossner/archive/2014/11/11/november-2014-cu-for-sharepoint-2013-has-been-released.aspx
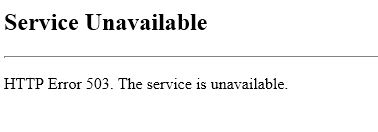
SharePoint Server 2007, 2010, 2013 HTTP Error 503. The service is unavailable
From last few days I have seen lot of people come across error 503 Service Unavailable. Mostly people come up with Plan to update password to resolve the issue. It is 90 % of time that Update Password in IIS and Central Admin does the trick but if you come across a scenario where you are still stuck with “503 Service Unavailable” try below. Verify that all SharePoint services are started, this error mostly occurs because of changing the service account password.
Here is screenshot of error how it looks
Error you might see in Log file
Exception: System.ServiceModel.ServiceActivationException: The service ‘/SecurityTokenServiceApplication/securitytoken.svc’ cannot be activated due to an exception during compilation. The exception message is: Exception has been thrown by the target of an invocation.. —> System.Reflection.TargetInvocationException: Exception has been thrown by the target of an invocation. —>
What is “503 Service Unavailable” error?
Http 503 errors are generated by the IIS and it happens when web server sends data stream back to the web site.
+> First I would like to make sure below steps are followed to update the password.
- Open IIS on SharePoint server > Expand Server > Expand Website
- Check the web site properties in IIS > under home directory tab, check the application pool value and then open that application pool from the application pools (separate node in the IIS tree)
- Click the identity tab and see who the pool is assigned to. For the sake of testing, you can select “Predefined” and select local service from the drop down.
- Restart IIS and see if things work out for you.
- You may need to change the new password to SharePoint timer service in services.msc console.
Here are the Advance troubleshooting steps I followed to resolve this issue
- Incorrect Authentication Settings: Please ensure that the authentication settings for the SecureTokenServiceApplication are correctly configured by completing the following steps:a) Open IIS Manager
Expand “Sites”
Expand “SharePoint Web Services”
Select “SecurityTokenServiceApplication”
From the “Features” pane, double click on “Authentication” under “IIS”
Right click “Forms Authentication” and select “Disable”
 The authentication settings page should only have Windows and Anonymous access enable for the security token service to issue tokens properly (and for claims authentication to work properly)

- Incorrect data in the configuration file: Please review the web.config file of the secure token service application and compare it to a web.config file from a “working” secure token service application or secure token service application on different machine. Lot of people event copy web.config from a working machine which resolves the issue. Here is a copy of my web.config for security token
———————- Security Token Service Application web.config———–Start ——————
<?xml version=”1.0″ encoding=”utf-8″ ?>
<configuration>
<system.serviceModel>
<!– Behavior List: –>
<behaviors>
<serviceBehaviors>
<behavior name=”SecurityTokenServiceBehavior” >
<!– The serviceMetadata behavior allows one to enable metadata (endpoints, bindings, services) publishing.
This configuration enables publishing of such data over HTTP GET.
This does not include metadata about the STS itself such as Claim Types, Keys and other elements to establish a trust.
–>
<serviceMetadata httpGetEnabled=”true” />
<!– Default WCF throttling limits are too low –>
<serviceThrottling maxConcurrentCalls=”65536″ maxConcurrentSessions=”65536″ maxConcurrentInstances=”65536″ />
</behavior>
<behavior name=”ApplicationSecurityTokenServiceBehavior” >
<serviceMetadata httpGetEnabled=”false” httpsGetEnabled=”false” />
<serviceThrottling maxConcurrentCalls=”65536″ maxConcurrentSessions=”65536″ maxConcurrentInstances=”65536″ />
</behavior>
</serviceBehaviors>
</behaviors>
<!– Service List: –>
<services>
<service name=”Microsoft.IdentityModel.Protocols.WSTrust.WSTrustServiceContract”
behaviorConfiguration=”SecurityTokenServiceBehavior” >
<!– This is the HTTP endpoint that supports clients requesing tokens. This endpoint uses the default standard ws2007HttpBinding which requires that clients authenticate using their Windows credentials. –>
<endpoint
address=””
binding=”customBinding”
bindingConfiguration=”spStsBinding”
contract=”Microsoft.IdentityModel.Protocols.WSTrust.IWSTrust13SyncContract” />
<!– This is the HTTP endpoint that supports clients requesting service tokens. –>
<endpoint
name =”ActAs”
address=”actas”
binding=”customBinding”
bindingConfiguration=”spStsActAsBinding”
contract=”Microsoft.IdentityModel.Protocols.WSTrust.IWSTrust13SyncContract” />
<!– This is the HTTP endpoint that supports IMetadataExchange. –>
<endpoint address=”mex”
binding=”mexHttpBinding”
contract=”IMetadataExchange” />
</service>
<service
name=”Microsoft.SharePoint.IdentityModel.ApplicationSecurityTokenService”
behaviorConfiguration=”ApplicationSecurityTokenServiceBehavior”>
<endpoint
name=”app”
address=””
binding=”customBinding”
bindingConfiguration=”spStsApplicationBinding” contract=”Microsoft.SharePoint.IdentityServices.IApplicationSecurityTokenServiceContract” />
</service>
<servicename=”Microsoft.SharePoint.Administration.Claims.SPWindowsTokenCacheService”>
<endpoint address=””
binding=”customBinding”
bindingConfiguration=”SPWindowsTokenCacheServiceHttpsBinding” contract=”Microsoft.SharePoint.Administration.Claims.ISPWindowsTokenCacheServiceContract” />
</service>
</services>
<!– Binding List: –>
<bindings>
<customBinding>
<binding
name=”spStsBinding”>
<binaryMessageEncoding>
<readerQuotas
maxStringContentLength=”1048576″
maxArrayLength=”2097152″/>
</binaryMessageEncoding>
<httpTransport
maxReceivedMessageSize=”2162688″
authenticationScheme=”Negotiate”
useDefaultWebProxy=”false” />
</binding>
<binding
name=”spStsActAsBinding”>
<security
authenticationMode=”SspiNegotiatedOverTransport”
allowInsecureTransport=”true”
defaultAlgorithmSuite=”Basic256Sha256″ messageSecurityVersion=”WSSecurity11WSTrust13WSSecureConversation13WSSecurityPolicy12″ />
<binaryMessageEncoding>
<readerQuotas
maxStringContentLength=”1048576″
maxArrayLength=”2097152″/>
</binaryMessageEncoding>
<httpTransport
maxReceivedMessageSize=”2162688″
authenticationScheme=”Negotiate”
useDefaultWebProxy=”false”/>
</binding>
<binding
name=”spStsApplicationBinding”>
<binaryMessageEncoding>
<readerQuotas
maxStringContentLength=”1048576″
maxArrayLength=”2097152″ />
</binaryMessageEncoding>
<namedPipeTransport
maxPendingAccepts=”250″
maxPendingConnections=”250″
maxReceivedMessageSize=”2162688″>
<connectionPoolSettings
idleTimeout=”00:30:00″
maxOutboundConnectionsPerEndpoint=”250″/>
</namedPipeTransport>
</binding>
<binding name=”SPWindowsTokenCacheServiceHttpsBinding”>
<security
authenticationMode=”IssuedTokenOverTransport”
defaultAlgorithmSuite=”Basic256Sha256″ />
<textMessageEncoding>
<readerQuotas maxStringContentLength=”1048576″ maxArrayLength=”2097152″/>
</textMessageEncoding>
<httpsTransport maxReceivedMessageSize=”2162688″ authenticationScheme=”Anonymous” useDefaultWebProxy=”false” />
</binding>
</customBinding>
</bindings>
</system.serviceModel>
<system.webServer>
<security>
<authentication>
<anonymousAuthentication enabled=”true” />
<windowsAuthentication enabled=”true”>
<providers>
<clear />
<add value=”Negotiate” />
<add value=”NTLM” />
</providers>
</windowsAuthentication>
</authentication>
</security>
<modules>
<add name=”WindowsAuthenticationModule” />
</modules>
</system.webServer>
<system.net>
<connectionManagement>
<clear />
<add address=”*” maxconnection=”10000″ />
</connectionManagement>
</system.net>
</configuration>
———————- Security Token Service Application web.config———–End ——————
- SecureTokenServiceApplication not provisioned: Use the following power shell commands to provision the secure token service application
$sts = Get-SPServiceApplication | ?{$_ -match “Security”}
$sts.Status
$sts.Provision()
$farm = [Microsoft.SharePoint.Administration.SPFarm]::Local
$webServiceCollection = new-object Microsoft.SharePoint.Administration.SPWebServiceCollection($farm)
foreach ($service in $webServiceCollection)
After I run above command I got below error:
Exception calling “SecurityTokenForContext” with “1” argument(s): “The requested service,’http://localhost:32843/SecurityTokenServiceApplication/securitytoken.svc/actas’ could not be activated. See the server’s diagnostic trace logs
- > If you get above error try below in powershell
$sts = Get-SPServiceApplication | ?{$_ -match “Security”}
$sts.Status
$sts.Provision()
Event log :
The Execute method of job definition Microsoft.SharePoint.Publishing.Internal.PersistedNavigationTermSetSyncJobDefinition.
ULS log :
The HTTP service located at http://localhost:32843/SecurityTokenServiceApplication/securitytoken.svc/actas is unavailable. This could be because the service is too busy or because no endpoint was found listening at the specified address. Please ensure that the address is correct and try accessing the service again later
+> If you get above in Powershell try below:
PSCONFIG.EXE -cmd upgrade -inplace b2b –force
Psconfig -cmd Secureresources
Note: Above needs to run in SharePoint Powershell with account which has Farm Admin permission.
- You might have the URL http://+:80 reserved. To check the same run command “netsh http show urlacl” in SharePoint Powershell. If this shows an output similar to
Reserved URL : http://+:80/
User: BUILTIN\IIS_IUSRS
Listen: Yes
Delegate: Yes
User: BUILTIN\Administrators
Listen: Yes
Delegate: Yes
User: NT AUTHORITY\NETWORK SERVICE
Listen: Yes
Delegate: Yes
SDDL: D:(A;;GA;;;IS)(A;;GA;;;BA)(A;;GA;;;NS)
Then you have this port reserved which takes precedence over your http://localhost calls. Go ahead and remove this URL reservation by running the following command,
netsh http delete urlacl url=http://+:80/
- Web Application started out as a 32-bit ASP.NET application, and subsequently got converted (upgraded) to a SharePoint 2010 Web Application. In this case you will see that the application pool has the “Enable 32-Bit Applications” property set to true, which is incompatible with SharePoint 2010. Setting this property to false should solve the problem. In some cases some SharePoint 2013 server Web Applications have this setting as true which is incorrect

Ensure that the enable32BitAppOnWin64 setting for the “SharePoint Central Administration” app pool is set to False, and the same for Other Application pool
+> You can do the same by Editing applicationHost.config located at C:\Windows\System32\inetsrv\config :
Change:
<globalModules>
…
<add name=”SharePoint14Module” image=”C:\Program Files\Common Files\Microsoft Shared\Web Server Extensions\14\isapi\owssvr.dll” preCondition=”appPoolName=SharePoint Central Administration v4″ />
</globalModules>
To:
<add name=”SharePoint14Module” image=”C:\Program Files\Common Files\Microsoft
Shared\Web Server Extensions\14\isapi\owssvr.dll” preCondition=”appPoolName=SharePoint Central Administration v4,bitness64” />
I hope would help you resolve your isue 🙂
Reference:
http://blogs.msdn.com/b/govindr/archive/2007/08/30/503-server-unavailable-failure-with-iis-7-0.aspx
Cumulative Update October 2014 for SharePoint 2013
Microsoft has released SharePoint 2013 Cumulative Update in October 2014.
Its per-requisites is Sharepoint 2013 SP1. It is said that it can work on Sharepoint 2013 March PU as well, but we found couple of issue with just March PU so I would recommend install October update after SP1. Rather I would recommend you to install September 2014 CU before installing October 2014 CU.
Note: This CU does NOT(!) include all SharePoint 2013 fixes previously released! It is recommended to install September 2014 CU before installing this CU. Be aware that for SharePoint Server you have to install the SharePoint Foundation fixes as well! Same for Project Server where you have to install the SharePoint Foundation and the SharePoint Server fixes.
All are available by clicking the same Hotfix Download Available link in the KB article for the release.
Here is link for all the updates:
For Sharepoint foundation you need 479135_intl_x64_zip.exe
Download SharePoint Foundation 2013 October 2014 CU
For Sharepoint server you need setup 479137_intl_x64_zip.exe, 479129_intl_x64_zip.exe, 479131_intl_x64_zip.exe (All below update needs to be installed)
Download SharePoint server 2013 October 2014 CU (KB2899469)
Download SharePoint server 2013 October 2014 CU (KB 2880962)
Download SharePoint server 2013 October 2014 CU (KB 2880485)
For Project server you need setup 479132_intl_x64_zip.exe
Download Project server 2013 October 2014 CU
For Office Web App you need setup 479136_intl_x64_zip.exe
Download Office web App server 2013 October 2014 CU
The KB articles for October CU are available at the following locations:
- KB 2889946 – SharePoint Foundation 2013 October 2014 CU
- KB 2899469, KB 2880962, KB 2880485 – SharePoint Server 2013 October 2014 CU
- KB 2752098 – Fix for SharePoint 2013 Indexing Connector for Documentum (if installed)
- KB 2889959 – Project Server 2013 October 2014 CU
- KB 2889898 – Office Web Apps Server 2013 October 2014 CU
Once the updated are downloaded, you need run the main setup file ubersrv.exe file, you will be able to extract and install the update:
Follow the same steps on all SharePoint servers in farm. Now run SharePoint PSconfig wizard on all servers.
For more information:
http://blogs.technet.com/b/stefan_gossner/archive/2014/10/14/october-2014-cu-for-sharepoint-2013-has-been-released.aspx