- An error has occurred, which probably means the feed is down. Try again later.
Posts Tagged ‘SharePoint 2010’
Duet Enterprise site tempate for SharePoint and SAP connectivity available Out Of box
Duet Enterprise site template is a product development jointly by Microsoft and SAP that enables interoperability between SAP applications and Microsoft SharePoint Server.
Duet Enterprise sites empowers employees to consume and extend SAP processes and information from within SharePoint Server and Microsoft Office client applications. Duet Enterprise includes features and functionality from both Microsoft Corporation and SAP AG.
The Duet SAP and Duet SharePoint add-ons, alongside Microsoft BCS enables communication between SAP NetWeaver and Sharepoint. The addition of SAP for Duet Enterprise is installed directly onto SAP NetWeaver, and with the Business Logic inside Duet Enterprise it acts as broker for SAP systems and SharePoint Server. Different SAP systems can connect to other SAP systems like ERP and BW, which supports high availability, scalability and even load balancing for both SharePoint Server and SAP NetWeaver.
An important consideration in the SAP to SharePoint integration strategy is the use of documents within SAP. Many “inside SAP” business processes are heavily involved with the handling of, or reference to, documents. These can be physical documents that may need to be digitally captured, CAD drawings, images, photos of employees, signed contracts, etc.
The SAP BAPIs used by Duet Enterprise only support the passing and handling of data thru their APIs. The SAP interface for archiving and recalling unstructured content needed for business processes is not BAPI based but rather a sophisticated HTTPS protocol that is based on the SAP ArchiveLink interface. Thus the DMS document services for storing documents, recalling them to workflows, deleting and adding notes to them, etc., in a managed, controlled and traceable framework are a set of functionality not delivered in Duet Enterprise.
The ERP-Link platform adds these capabilities to Duet Enterprise. The ERP-Link Suite for SharePoint and SAP brings the bi-directional access of documents (unstructured content) to users of SharePoint and SAP. With ERP-Link, your SAP and SharePoint users will have common access to documents and the ability to work on shared business processes. ERP-Link can be used for accounts payable and finance, HR, plant maintenance, project management – anywhere documents are needed to support functions based in your SAP system of record.
Duet Enterprise can support multiple SAP Systems, and even other distributed systems, which gives users the option of connecting NetWeaver to a multitude of SAP systems. If an HR system runs SAP ERP 2004 and the other runs 6.0, connectivity can be achieved through the EMEA system with system mapping.
Create a custom MySite host template in SharePoint 2010 and SharePoint 2013
Here I will show you how to create new mysites host. Once you apply this mysite site host template, all new mysite will use this as a tempate to create a mysite
- Create a new Mysite host.
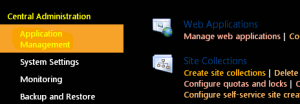
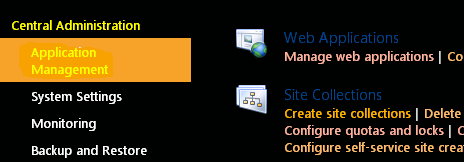
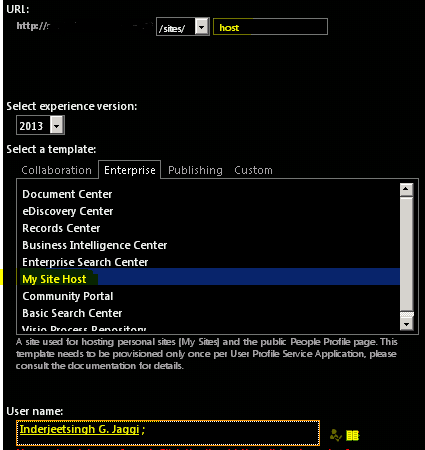
a. Open Central admin > Application management > Create new site collection
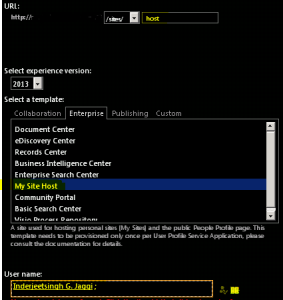
b. Provider Name, URL path, Select template as “My site host” and a site collection admin > Click OK
c. Now you can make the required modification(e.g. custom master page, custom list, library, webpart, etc) in this mysite template. -
Update this Mysite Host site in User profile service application
a. Open Central admin > Application management > Manage service application > User profile service application

b. Under My site settings select “Setup My sites” > In my site host select the new mysite host we just created e.g. http://portal/sites/host > Click ok
C. Now all new my Site collections will use this as Host template

Note. This mysite host does not work on existing site. It only works on new mysites.
SharePoint 2010 \ 2013 warm up scripts using Powershell
SharePoint app pools recycle every night so that old data is flushed and cache is cleared. It is also important from secruity aspects. But because they recycle every night the first person to hit SharePoint each morning has to wait for the app pools to warm back up, which makes them cranky. Over the years a variety of startup scripts have been written to address this, and they all work to varying degrees.
Server Side Warm script
THis script will request the default page of the root site collection of each web application in your farm:
############## Script 1 #################
Get-SPWebApplication | ForEach-Object { Invoke-WebRequest $_.url -UseDefaultCredentials -UseBasicParsing }
############## Script 1 #################
The –UseDefaultCredentials parameter tells Invoke-WebRequest to log in to the web site as the person that PowerShell is running as. –UseBasicParsing tells Invoke-WebRequest to use basic parsing of the web page. We really don’t care about the web page, we just want to wake SharePoint up to send it to us.
You can also try below Warm up script and check if can be of any help.
This passes in the default credentials needed. If you need specific stuff you can use something else to elevate basically the permissions. Or run this task as a user that has a Policy above all the Web Applications with the correct permissions
############## Script 2 #################
$cred = [System.Net.CredentialCache]::DefaultCredentials;
$cred = new-object System.Net.NetworkCredential(“username”,”password”,”machinename”)[xml]$x=stsadm -o enumzoneurls
foreach ($zone in $x.ZoneUrls.Collection)
{
[xml]$sites=stsadm -o enumsites -url $zone.Default;
foreach ($site in $sites.Sites.Site)
{
write-host $site.Url;
$html=get-webpage -url $site.Url -cred $cred;
}
}
############## Script 2 #################
The next script is completely Powershell from http://www.jonthenerd.com/2011/04/19/easy-sharepoint-2010-warmup-script-using-powershell/
############## Script 3 #################
Add-PSSnapin Microsoft.SharePoint.PowerShell;
function Get-WebPage([string]$url)
{
$wc = new-object net.webclient;
$wc.credentials = [System.Net.CredentialCache]::DefaultCredentials;
$pageContents = $wc.DownloadString($url);
$wc.Dispose();
return $pageContents;
}
Get-SPAlternateUrl -Zone Default | foreach-object
{
write-host $.IncomingUrl;
$html = Get-WebPage -url $.IncomingUrl;
}
############## Script 3 #################
SharePoint 2010 \ 2013 Create a SharePoint Site Collection with a custom Template using Powershell
Save the custom site with all custom list\library etc as .wsp. To do so follow below:
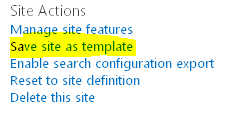
1. Go to Site action > Site settings > Save site as template
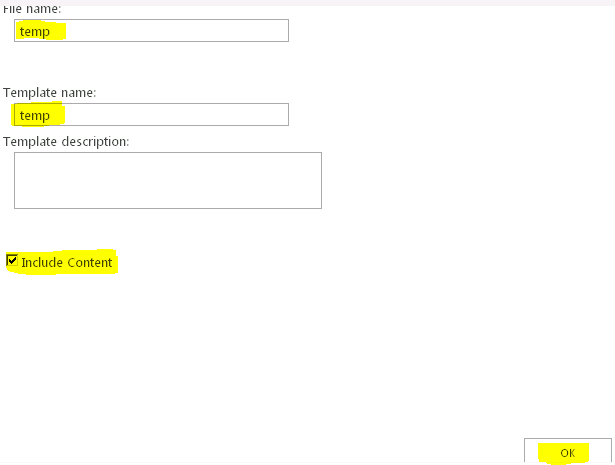
- Mention the name of template and select “Include content” > Click OK

-
Once the site is saved, you will get link for “Solution gallery”. Go to Solution gallery and download the teamplate (temp.wsp) file to something like d:\temp.wsp.
You need to write powershell in 2 parts. One will create site collection and other will apply custom template.
1st Part of Powershell
Start Part 1 Create a SharePoint Site Collection with a custom Template using Powershell
Write-Host “Provide the site collection URL e.g. http://intranet/site/custom”
$Siteurl = read-host
Write-Host “Provide the site collection owner email address”
$owner = read-host
New-SPSite $Siteurl -OwnerAlias $owner -Name “This will have a custom template”
End Part 1 Create a SharePoint Site Collection with a custom Template using Powershell
Now we have to add our WSP to the Solution Gallery in the Site Collection. I have a do While loop to make sure that the solution has been uploaded successfully before activating it.
##### Start Part 2 Create a SharePoint Site Collection with a custom Template using Powershell ##############
Add-SPUserSolution -LiteralPath d:\temp.wsp -Site $Siteurl
$ErrorActionPreference = “silentlycontinue”
do
{
Write-Host “.” -NoNewline -ForeGroundColor White;
Start-Sleep -Seconds 5;
try
{
$testsolution = Get-SPUserSolution -Identity temp.wsp -Site $Siteurl
}
catch
{}
} while(!$testsolution);
$ErrorActionPreference = “stop”
Install-SPUserSolution -Identity temp.wsp -Site $Siteurl
Write-Host “Site collection with custom template is created”
End Part 2 Create a SharePoint Site Collection with a custom Template using Powershell
Note that the Template GUID and Name will never change. So if you want to send the script and the package to someone else, you can hard code this part and it will work no problem.
User Profile Synchronization Service Gets Stuck on Starting SharePoint 2010 \ 2013
For some reason once you provision the User Profile Service Application the User Profile Synchronization Service gets stuck on Starting, and it can’t be stopped in Central Administration. After some research on User Profile Synchronization service I found that when we Start the UPA sync service in “Services on Server” a series of tasks executes which includes Forefront Identity Manager setup. It means setting up windows services, certificates, installing database schemas, registry changes, etc. If it ails at any stage, it will try again nearly 15 times and shows failure after 15 attempt. This is the reason it appears to be “stuck” when in fact its attempting each of the runs. After around 20 to 45 minutes the status will return to Stopped, and you can attempt to start it again.
Observed that some try to reboot the server to get rid of this issue, but it still remain as “Starting” even after reboots. Now this is not a good sign because apparently a very common issue and I have even heard of people re-building SharePoint Servers to fix the issue. Here you might loss data \ settings configuered in UPA if you have to recreate UPA.
Below steps will help you start the UPA service which was stuck on starting which was working fine previously but if its a new setup then I would recemmond you to try create a new UPA service and try below.
Some cause and solutin to this issue
1. Permissions issues:
Incorrect Permissions are most known cause of “Stuck on Starting” behaviour. There is no work around for same. If you don’t set the permissions correctly things won’t work, pretty simple.
We need two accounts to configure UPS Service viz. UPS Service Instance Service Identity which run the FIM services (It is also Farm Account) and Synchronization Connection account, this is the account which actually performs the sync.
You must run the UPS Service Instance as the Farm Account. Just because its possible to change the service identity in Manage Service Accounts, doesn’t mean it will work, and more importantly it is unsupported. So don’t change it.
Next, the Farm Account must be a local administrator of the machine running the UPS Service Instance during provisioning only. When we hit Start in Services in Server a series of tasks are run, which are akin to running the second stage of the Forefront Identity Manager setup. Many of these tasks require local machine administrator rights. You must grant this right before hitting start, and more importantly they must be applied. As the Farm Account is running services on your box (SPTimerV4 and the Central Admin app pool) we must simulate a log off and log on for the change in rights to be applied. You can do this by restarting SPTimerV4, or better yet, rebooting the machine. Once UPS is provisioned you can remove the Farm Account from the local administrators group.
Note: Any event in your farm that requires the UPS service instance to be provisioned will require the Farm Account be a local admin. Such events include the re provisioning of the service instance following the deployment of a SharePoint Cumulative Update and performing a Farm Backup from Central Administration (which stops and starts the UPS service instance). Don’t forget to ensure that the correct rights are assigned (and actually taking effect) when planning and scheduling your farm operational maintenance tasks.
Farm Account must have Log on Locally rights on the machine running the UPS Service Instance. Now be careful, you may think the account has these rights, and it will do if you made it a local administrator. However once you remove the admin rights, you may not have Log On Locally. If you don’t various operations will fail.
Very importantly make sure that Synchronization Connection Account must have Replicating Directory Changes on the Domain you are syncing with. It is the only way sync will work. It’s a hard requirement. Despite the scary name the Replicating Directory Changes permission makes zero changes to AD. It provides a change log capability, which improves the speed of operations such as Sync.
If you are syncing with a Windows Server 2003 functional level domain, the Synchronization Connection Account must be a member of the Pre-Windows 2000 Compatible Access group.
If you wish to do an Export, the Synchronization Connection account must have Create Child Objects and Write permissions on the OUs you are syncing with. Watch out for a common gotcha, that these rights are set on the container level only, you must ensure that This object and all descendants is selected.
2. SQL server 2014:
Environment : If you are using SQL 2014 with SharePoint 2013 or SharePoint 2010
Error : The Open Procedure for service “WmiApRpl” in DLL “C:\Windows\system32\wbem\wmiaprpl.dll” failed. Performance data for this service will not be available. The first four bytes (DWORD) of the Data section contains the error code
Performance counters for the FIMSynchronizationService (Forefront Identity Manager Synchronization Service) service are already in the registry, no need to reinstall. This only happens when you install the same counter twice. The second time install will generate this event.
Unable to open the Server service performance object. The first four bytes (DWORD) of the Data section contains the status code
Solution :
The issue can be resolved by downloading any of the CU updates from April 2014 CU and running PSConfig. Once the CU has been deployed, go through the usual process of starting User Profile Synchronization Service from Central Admin. The issue arises due to the use of SQL 2014
Note: I always recemmond you to install latest updates on all sharepoint servers
3. Environment : SharePoint 2010
Error : Attempting to Manage the UPA, you receive an error, Not Found, Correlation ID: [guid], or Could not load file or assembly ‘Microsoft.ResourceManagement’
SOlution:
Try below updates to resolve the issue
KB2281364 ( Description of the SharePoint Server 2010 hotfix package (wosrv-x-none.msp, pplwfe-x-none.msp, osrv-x-none.msp): July 21, 2010)
KB983497 ( Description of the SharePoint Server 2010 hotfix package (Osrchwfe-x-none.msp;Pplwfe-x-none.msp;Spswfe-x-none.msp): June 29, 2010 )
Note: I always recemmond you to install latest updates on all sharepoint servers
4. If you are not able to resolve the issue and you want to create a new uPA service, Try to stop the User Profile Synchronization Service you need to run a Powershell Command.
a. Open up Powershell on your SharePoint Server and type in the following command
Get-spserviceinstance
b. This will list out all of the services on your SharePoint Server with their associated GUID’s. Copy the GUID for the User Profile Synchronization Service.
c. Then run the following command to stop the User Profile Synchronization Service.
Stop-spserviceinstance <GUID>
d. Now go back into Central Administration > Application Management > Manage Service Applications and delete the User Profile Service Application.
e. Restart your server and set up the User Profile Service Application again.
http://www.harbar.net/articles/sp2010ups2.aspx
http://blogs.technet.com/b/scottstewart/archive/2014/10/30/user-profile-service-stuck-on-starting.aspx
Create \ Extend a SharePoint 2010 \ 2013 site for Internet (extranet)
This works for both SharePoint 2010 and SharePoint 2013
Normally web application on SharePoint server are created for internal (intranet) access only. If you want to extend this web application and access it from internet out side your organisation, you need to follow below.
If you just created Alternate Access Mapping in Central Admin, it will not work for you and you might end up facing issues.
Lets assume that your web application on port 20000 configured with windows or form based authentication.
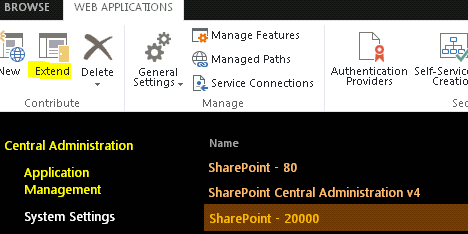
1. Open Central administration -> Manage web application
2. Select your web application with Port 20000 -> Click EXTEND from top ribbon and enter the information for port you want to use.
Note: YOu will have to enter the host header(e.g. internet.domain.com). Port number should be 80
3. For Anonymous choose Yes, one thing here you must enable anonymous access of the web application that you are going to put internet.

4. Select authentication method, which is windows with default values and Enable form based authentication as well.
5. For form based authentication enter the membership and role provider.
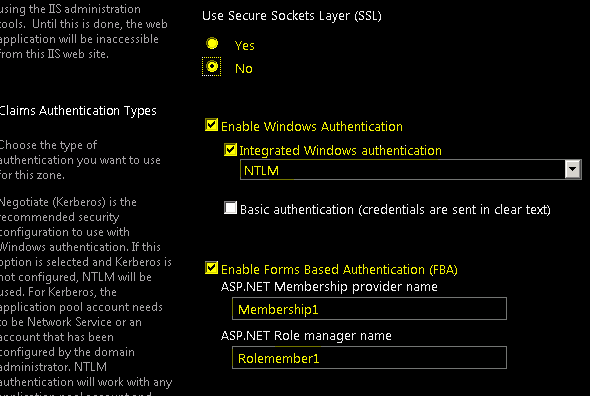
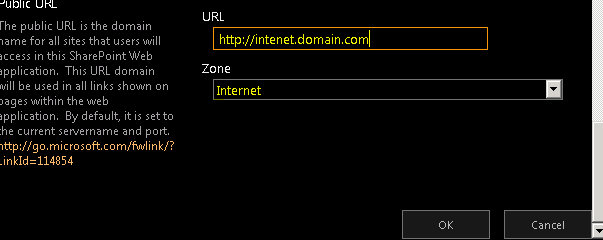
6. Select Internet Zone from Public URL section and click OK.
7. Extend web application – choose zone
8. System will create the IIS website with the host header you entered. If you are on different port rather that 80 don’t forget to add that port to firewall exception.
9. Now you can browse your site from the internet using the url like http://internet.domain.com
Note: You can use form based authentication for the internet facing web application to ensure security.
Bulk create items in SharePoint 2007 2010 2013 list
Hi Guys,
This article has some great link to articles which can help you create Bulk List items.
SharePoint PowerShell How To: Create SharePoint List Items (in Root and in Folders) for Load/Performance Testing
https://camerondwyer.wordpress.com/2014/05/09/sharepoint-powershell-how-to-create-sharepoint-list-items-in-root-and-in-folders-for-loadperformance-testing/
SharePoint 2007/2010 – Powershell script for bulk populating a List
http://saurabhmoss.wordpress.com/2011/03/16/sharepoint-20072010-powershell-script-for-bulk-populating-a-list/
SharePoint – adding list items with Powershell using web services
http://blogs.technet.com/b/lukeb/archive/2011/03/14/sharepoint-adding-list-items-with-powershell.aspx
Batch Update SharePoint List Items using Powershell
http://suryapulipati.blogspot.com/2013/07/batch-update-sharepoint-list-items.html
Hope this will help you all
SharePoint server The search service is not able to connect to the machine that hosts the administration component. Verify that the administration component ‘GUID’ in search application ‘Search Service Application’ is in a good state and try again
Issue:
The search service is not able to connect to the machine that hosts the administration component. Verify that the administration component ‘GUID’ in search application ‘Search Service Application’ is in a good state and try again
In Farm Search Administration page when click on “Modify Topology” get error “An unhandled exception occurred in the user interface.Exception Information: Exception has been thrown by the target of an”
Cause: Search is not able to connect is because of many reasons, In this article I am providing all possible causes and the solutions.
Resolutions:
Solution 1: In the end it turns out to be that the application pool that hosts the search service application somehow doesn’t have the correct access.
You can simply change the application pool to use SharePoint Web Services System for search service applications and check.
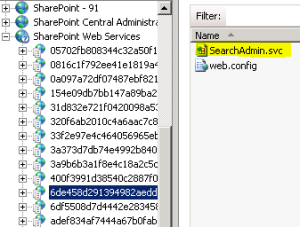
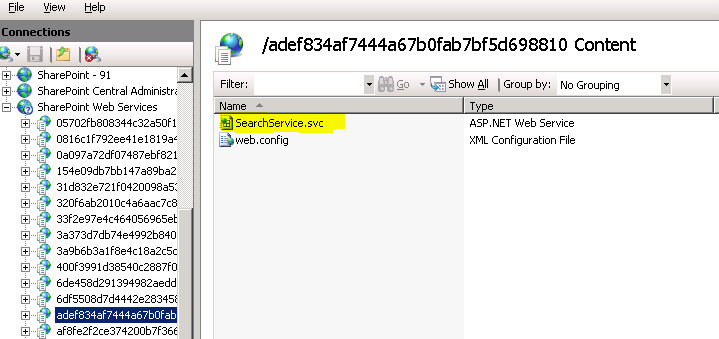
1. Click on Start > Run > Type Inetmgr > Click OK
- In IIS > Expand server > Expand sites > Expand “SharePoint Web Services”
-
Now check all the GUID 1 by 1 in content view unless you find searchadmin.svc and searchservice.svc

-
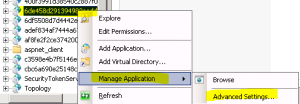
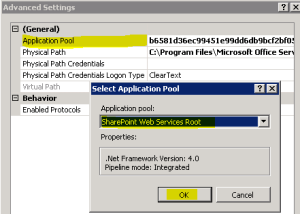
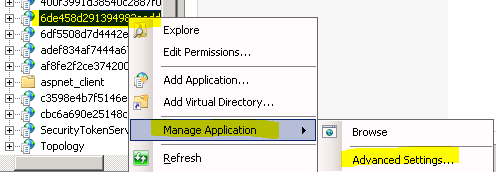
Right click GUID go to advance settings
-
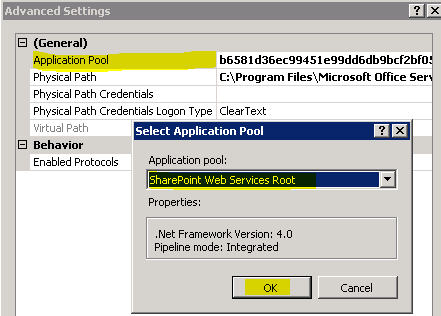
Change the application to “SharePoint Web Services” > Click OK
Solution 2: enable the timer job and do IIS reset
1. Run below PS command to know the status of timer job
Get-SPTimerJob job-application-server-admin-service
Result ==> Is Disabled: True
- Run below PS command to enable the service.
Enable-SPTimerJob job-application-server-admin-service
Result ==> IsDisabled: False -
Do Net Stop sptimerv4
- Do Net start sptimerv4
- DO iisreset
Solution 3:Ensure the account has full control permissions on the Search service application and IIS account used by this service application
Follow below steps
1. Open Central Admin > Select Security > Select “Configure service accounts”
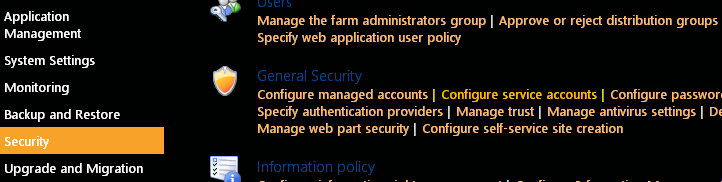
-
Select the search service application
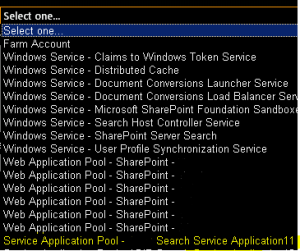
-
For “select account for this component” Select a account which has full permission

Enable Auditing on SharePoint 2010 \ 2013
In this article I have covered steps to enable Auditing on SharePoint 2013 \ 2010 to monitor activity on site.
Steps to Auditing on SharePoint 2013 and SharePoint 2010 are same as shown below:
Click on Site Settings Icon on Right hand top corner of screen and select Site Settings
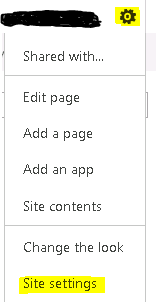
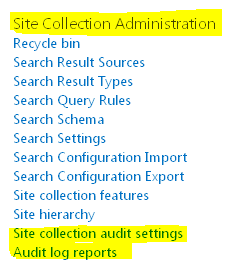
Under Site collection Administration, you should see Site Collection Audit Settings and Audit Log reports. You need to click on site collection audit settings to enable auditing and then select Audit Log reports to view the reports
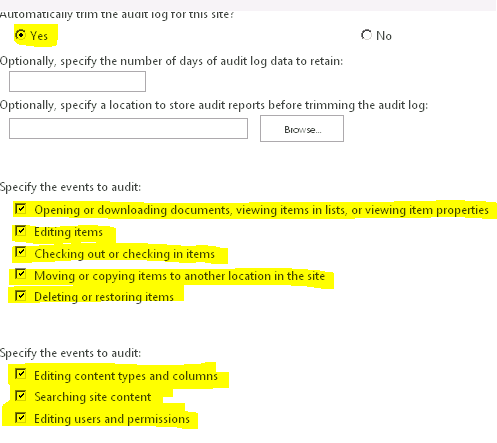
Now select Yes, and select below check boxes to enable logging on specific actions
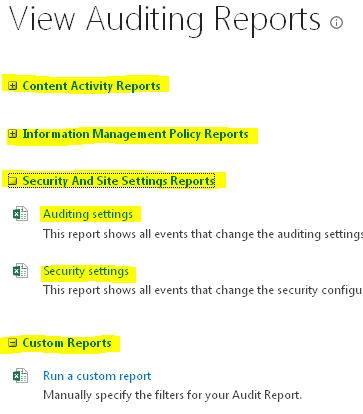
To View Audit logs you need to select Audit Log reports under Site collection Administration.
Note: Auditing some time cause performance issues. Enable it only on required cases or if your system has enough resources to handle it.
SharePoint 2013 \ 2010 ULS logging to troubleshoot issues
In this article I have covered steps to enable ULS logging on SharePoint 2013 \ 2010 to troubleshoot issues.
Steps to enabling logging on SharePoint 2013 and SharePont 2010 are same as shown below:
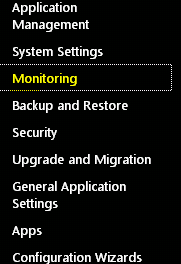
Open Central Admin and Click on Monitoring
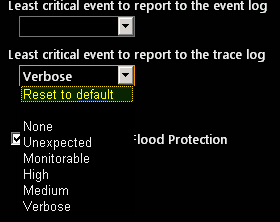
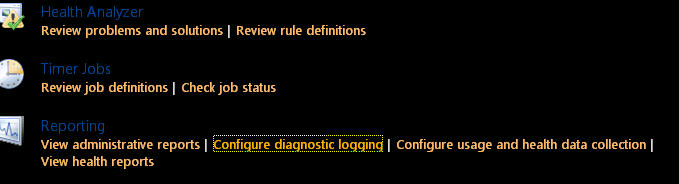
Click on “Configure Diagnostic Logging“
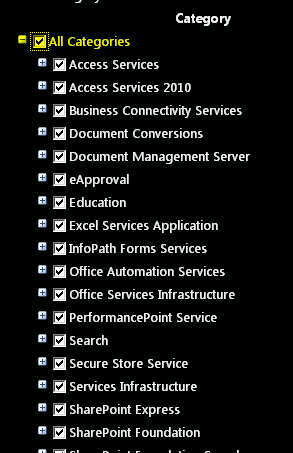
Select “All Categories“
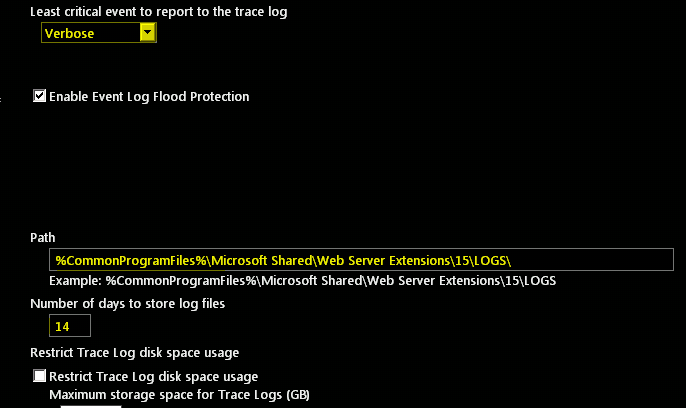
Select Verbose and make sure you remember the path of the logs files. By default it is C:\Program Files\Common Files\Microsoft Shared\Web Server Extensions\15\LOGS
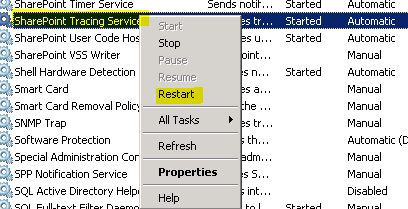
Restart the “SharePoint Tracing services”
 “
“
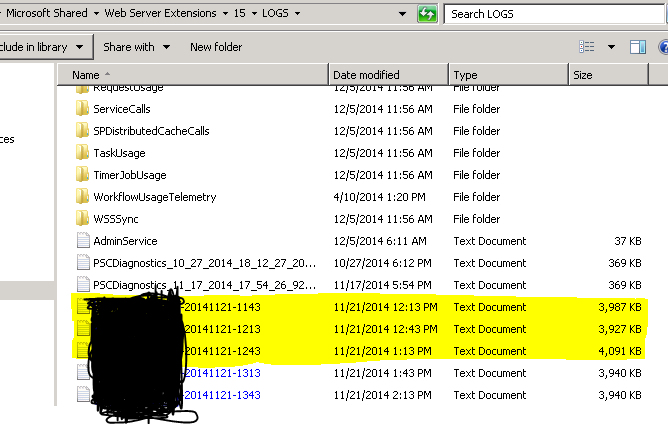
Now you should see all the logs files with Machine name with today’s date\time. a New file is generated every 30 mins.
Note: Verbose logging cause lot of performance issues. If you are done with Verbose logging, set the logging to default to mitigate performance issues.